Deploy Apache Superset™
Important
This feature is currently in preview. The Supplemental Terms of Use for Microsoft Azure Previews include more legal terms that apply to Azure features that are in beta, in preview, or otherwise not yet released into general availability. For information about this specific preview, see Azure HDInsight on AKS preview information. For questions or feature suggestions, please submit a request on AskHDInsight with the details and follow us for more updates on Azure HDInsight Community.
Visualization is essential to effectively explore, present, and share data. Apache Superset allows you to run queries, visualize, and build dashboards over your data in a flexible Web UI.
This article describes how to deploy an Apache Superset UI instance in Azure and connect it to Trino cluster with HDInsight on AKS to query data and create dashboards.
Summary of the steps covered in this article:
Prerequisites
If using Windows, use Ubuntu on WSL2 to run these instructions in a bash shell Linux environment within Windows. Otherwise, you need to modify commands to work in Windows.
Create a Trino cluster and assign a Managed Identity
If you haven't already, create a Trino cluster with HDInsight on AKS.
For Apache Superset to call Trino, it needs to have a managed identity (MSI). Create or pick an existing user assigned managed identity.
Modify your Trino cluster configuration to allow the managed identity created in step 2 to run queries. Learn how to manage access.
Install local tools
Setup Azure CLI.
a. Install Azure CLI.
b. Log in to the Azure CLI:
az login.c. Install Azure CLI preview extension.
# Install the aks-preview extension
az extension add --name aks-preview

# Update the extension to make sure you've the latest version installed
az extension update --name aks-preview
Install Kubernetes.
Install Helm.
Create kubernetes cluster for Apache Superset
This step creates the Azure Kubernetes Service (AKS) cluster where you can install Apache Superset. You need to bind the managed identity you've associated to the cluster to allow the Superset to authenticate with Trino cluster with that identity.
Create the following variables in bash for your Superset installation.
# ----- Parameters ------

# The subscription ID where you want to install Superset
SUBSCRIPTION=
# Superset cluster name (visible only to you)
CLUSTER_NAME=trinosuperset
# Resource group containing the Azure Kubernetes service
RESOURCE_GROUP_NAME=trinosuperset
# The region to deploy Superset (ideally same region as Trino): to list regions: az account list-locations REGION=westus3
# The resource path of your managed identity. To get this resource path:
#   1. Go to the Azure Portal and find your user assigned managed identity
#   2. Select JSON View on the top right
#   3. Copy the Resource ID value.
MANAGED_IDENTITY_RESOURCE=
Select the subscription where you're going to install Superset.
az account set --subscription $SUBSCRIPTIONEnable pod identity feature on your current subscription.
az feature register --name EnablePodIdentityPreview --namespace Microsoft.ContainerService
az provider register -n Microsoft.ContainerService
Create an AKS cluster to deploy Superset.
# Create resource group
az group create --location $REGION --name $RESOURCE_GROUP_NAME

# Create AKS cluster
az \
aks create \
-g $RESOURCE_GROUP_NAME \
-n $CLUSTER_NAME \
--node-vm-size Standard_DS2_v2 \
--node-count 3 \
--enable-managed-identity \
--assign-identity $MANAGED_IDENTITY_RESOURCE \
--assign-kubelet-identity $MANAGED_IDENTITY_RESOURCE

# Set the context of your new Kubernetes cluster
az aks get-credentials --resource-group $RESOURCE_GROUP_NAME --name $CLUSTER_NAME
Deploy Apache Superset
To allow Superset to talk to Trino cluster securely, the easiest way is to set up Superset to use the Azure Managed Identity. This step means that your cluster uses the identity you've assigned it without manual deployment or cycling of secrets.
You need to create a values.yaml file for the Superset Helm deployment. Refer sample code.
Optional: use Microsoft Azure Postgres instead of using the Postgres deployed inside the Kubernetes cluster.
Create an "Azure Database for PostgreSQL" instance to allow easier maintainence, allow for backups, and provide better reliability.
postgresql:
  enabled: false

supersetNode:
  connections:
    db_host: '{{SERVER_NAME}}.postgres.database.azure.com'
    db_port: '5432'
    db_user: '{{POSTGRES_USER}}'
    db_pass: '{{POSTGRES_PASSWORD}}'
    db_name: 'postgres' # default db name for Azure Postgres
Add other sections of the values.yaml if necessary. Superset documentation recommends changing default password.
Deploy Superset using Helm.
# Verify you have the context of the right Kubernetes cluster
kubectl cluster-info
# Add the Superset repository
helm repo add superset https://apache.github.io/superset
# Deploy
helm repo update
helm upgrade --install --values values.yaml superset superset/superset
Connect to Superset and create connection.
Note
You should create separate connections for each Trino catalog you want to use.
Connect to Superset using port forwarding.
kubectl port-forward service/superset 8088:8088 --namespace defaultOpen a web browser and go to http://localhost:8088/. If you didn't change the administrator password, login using username: admin, password: admin.
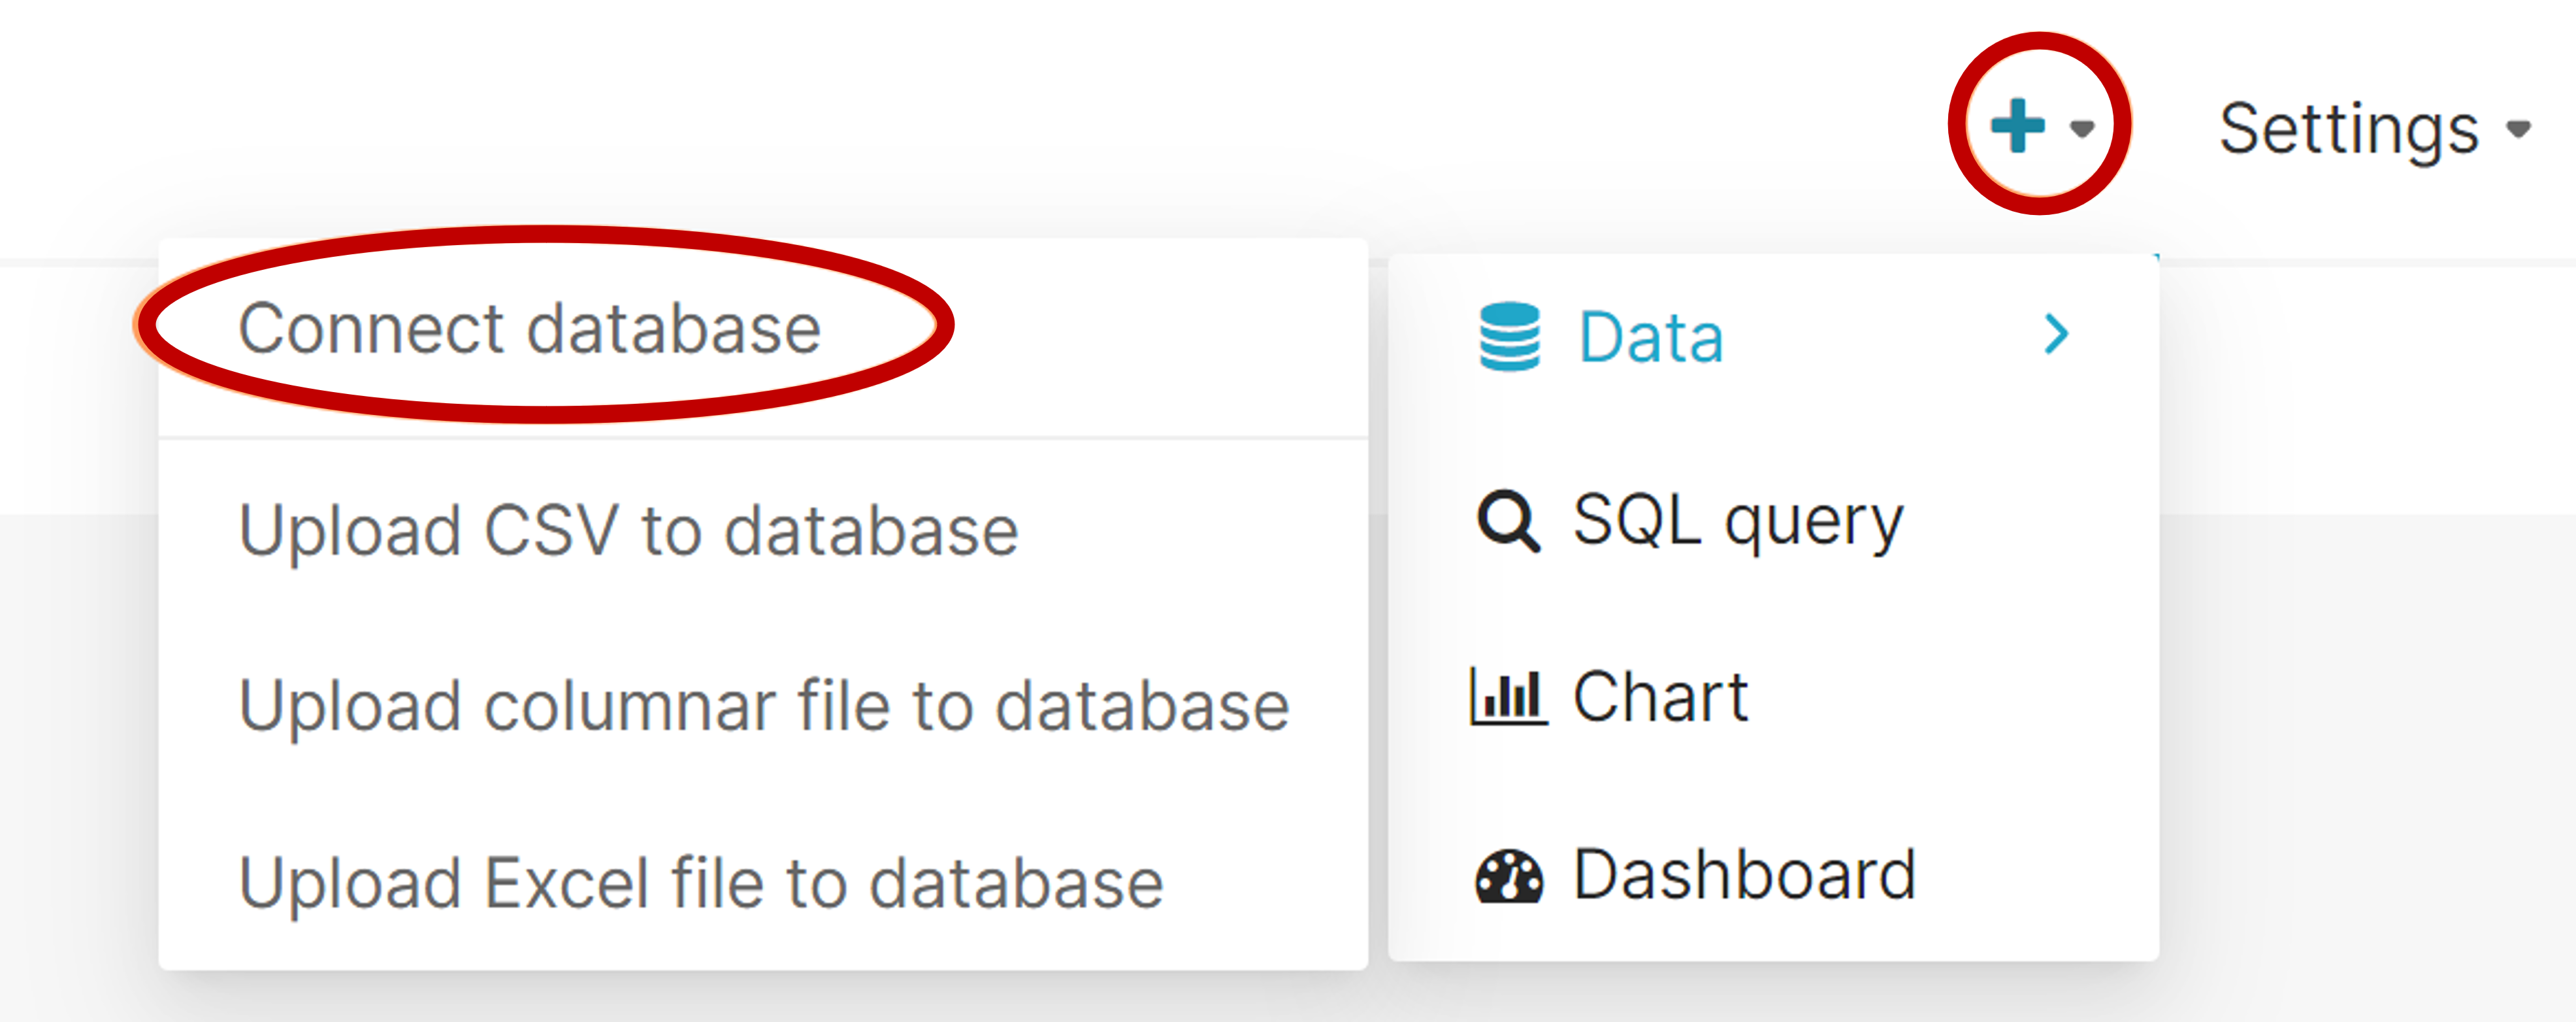
Select "connect database" from the plus '+' menu on the right hand side.
Select Trino.
Enter the SQL Alchemy URI of your Trino cluster.
You need to modify three parts of this connection string:
Property Example Description user trino@ The name before the @ symbol is the username used for connection to Trino. hostname mytrinocluster.00000000000000000000000000
.eastus.hdinsightaks.netThe hostname of your Trino cluster.
You can get this information from "Overview" page of your cluster in the Azure portal.catalog /tpch After the slash, is the default catalog name.
You need to change this catalog to the catalog that has the data you want to visualize.trino://$USER@$TRINO_CLUSTER_HOST_NAME.hdinsightaks.net:443/$DEFAULT_CATALOGExample:
trino://trino@mytrinocluster.00000000000000000000000000.westus3.hdinsightaks.net:443/tpch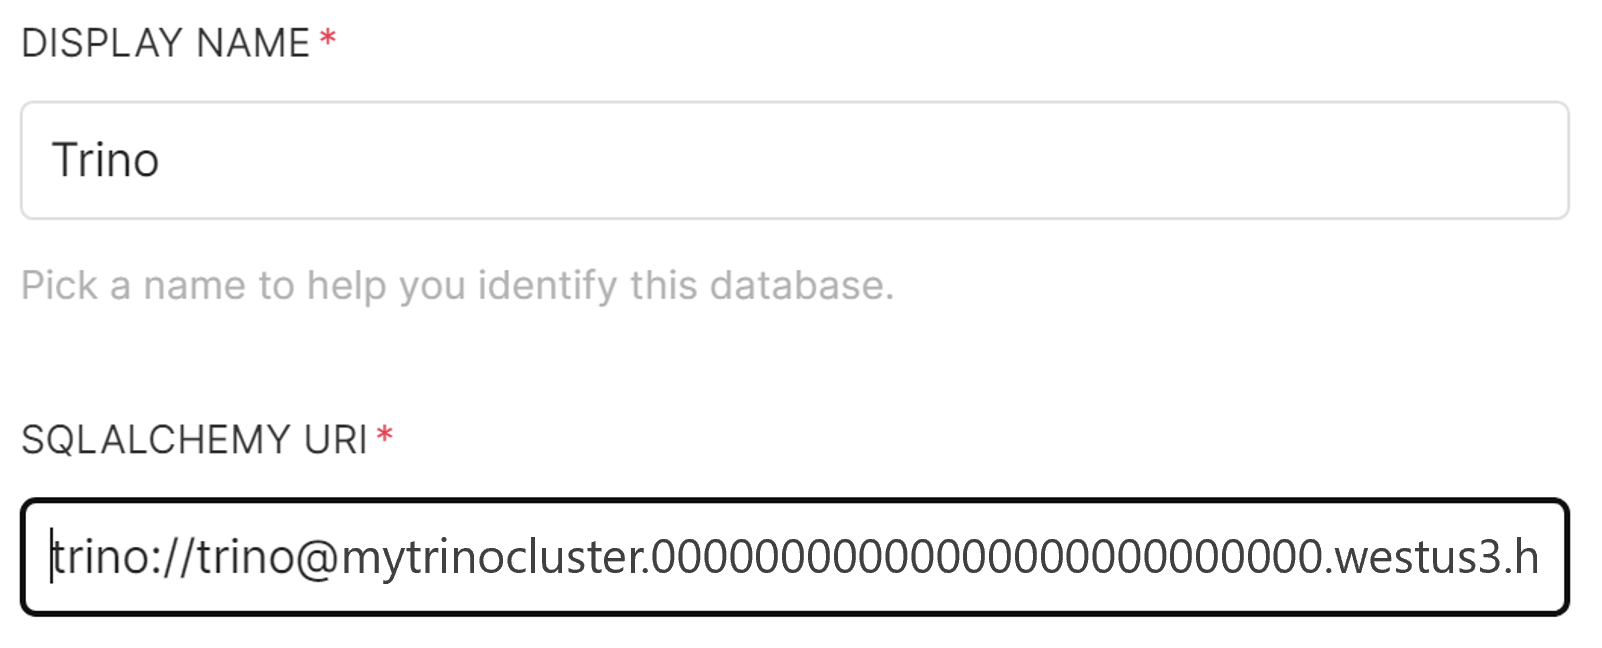
Select the "Advanced" tab and enter the following configuration in "Additional Security." Replace the client_id value with the GUID Client ID for your managed identity (this value can be found in your managed identity resource overview page in the Azure portal).
 {
   "auth_method": "azure_msi",
   "auth_params":
   {
     "scope": "https://clusteraccess.hdinsightaks.net/.default",
     "client_id": "xxxxxxxx-xxxx-xxxx-xxxx-xxxxxxxxxxxx"
   }
 }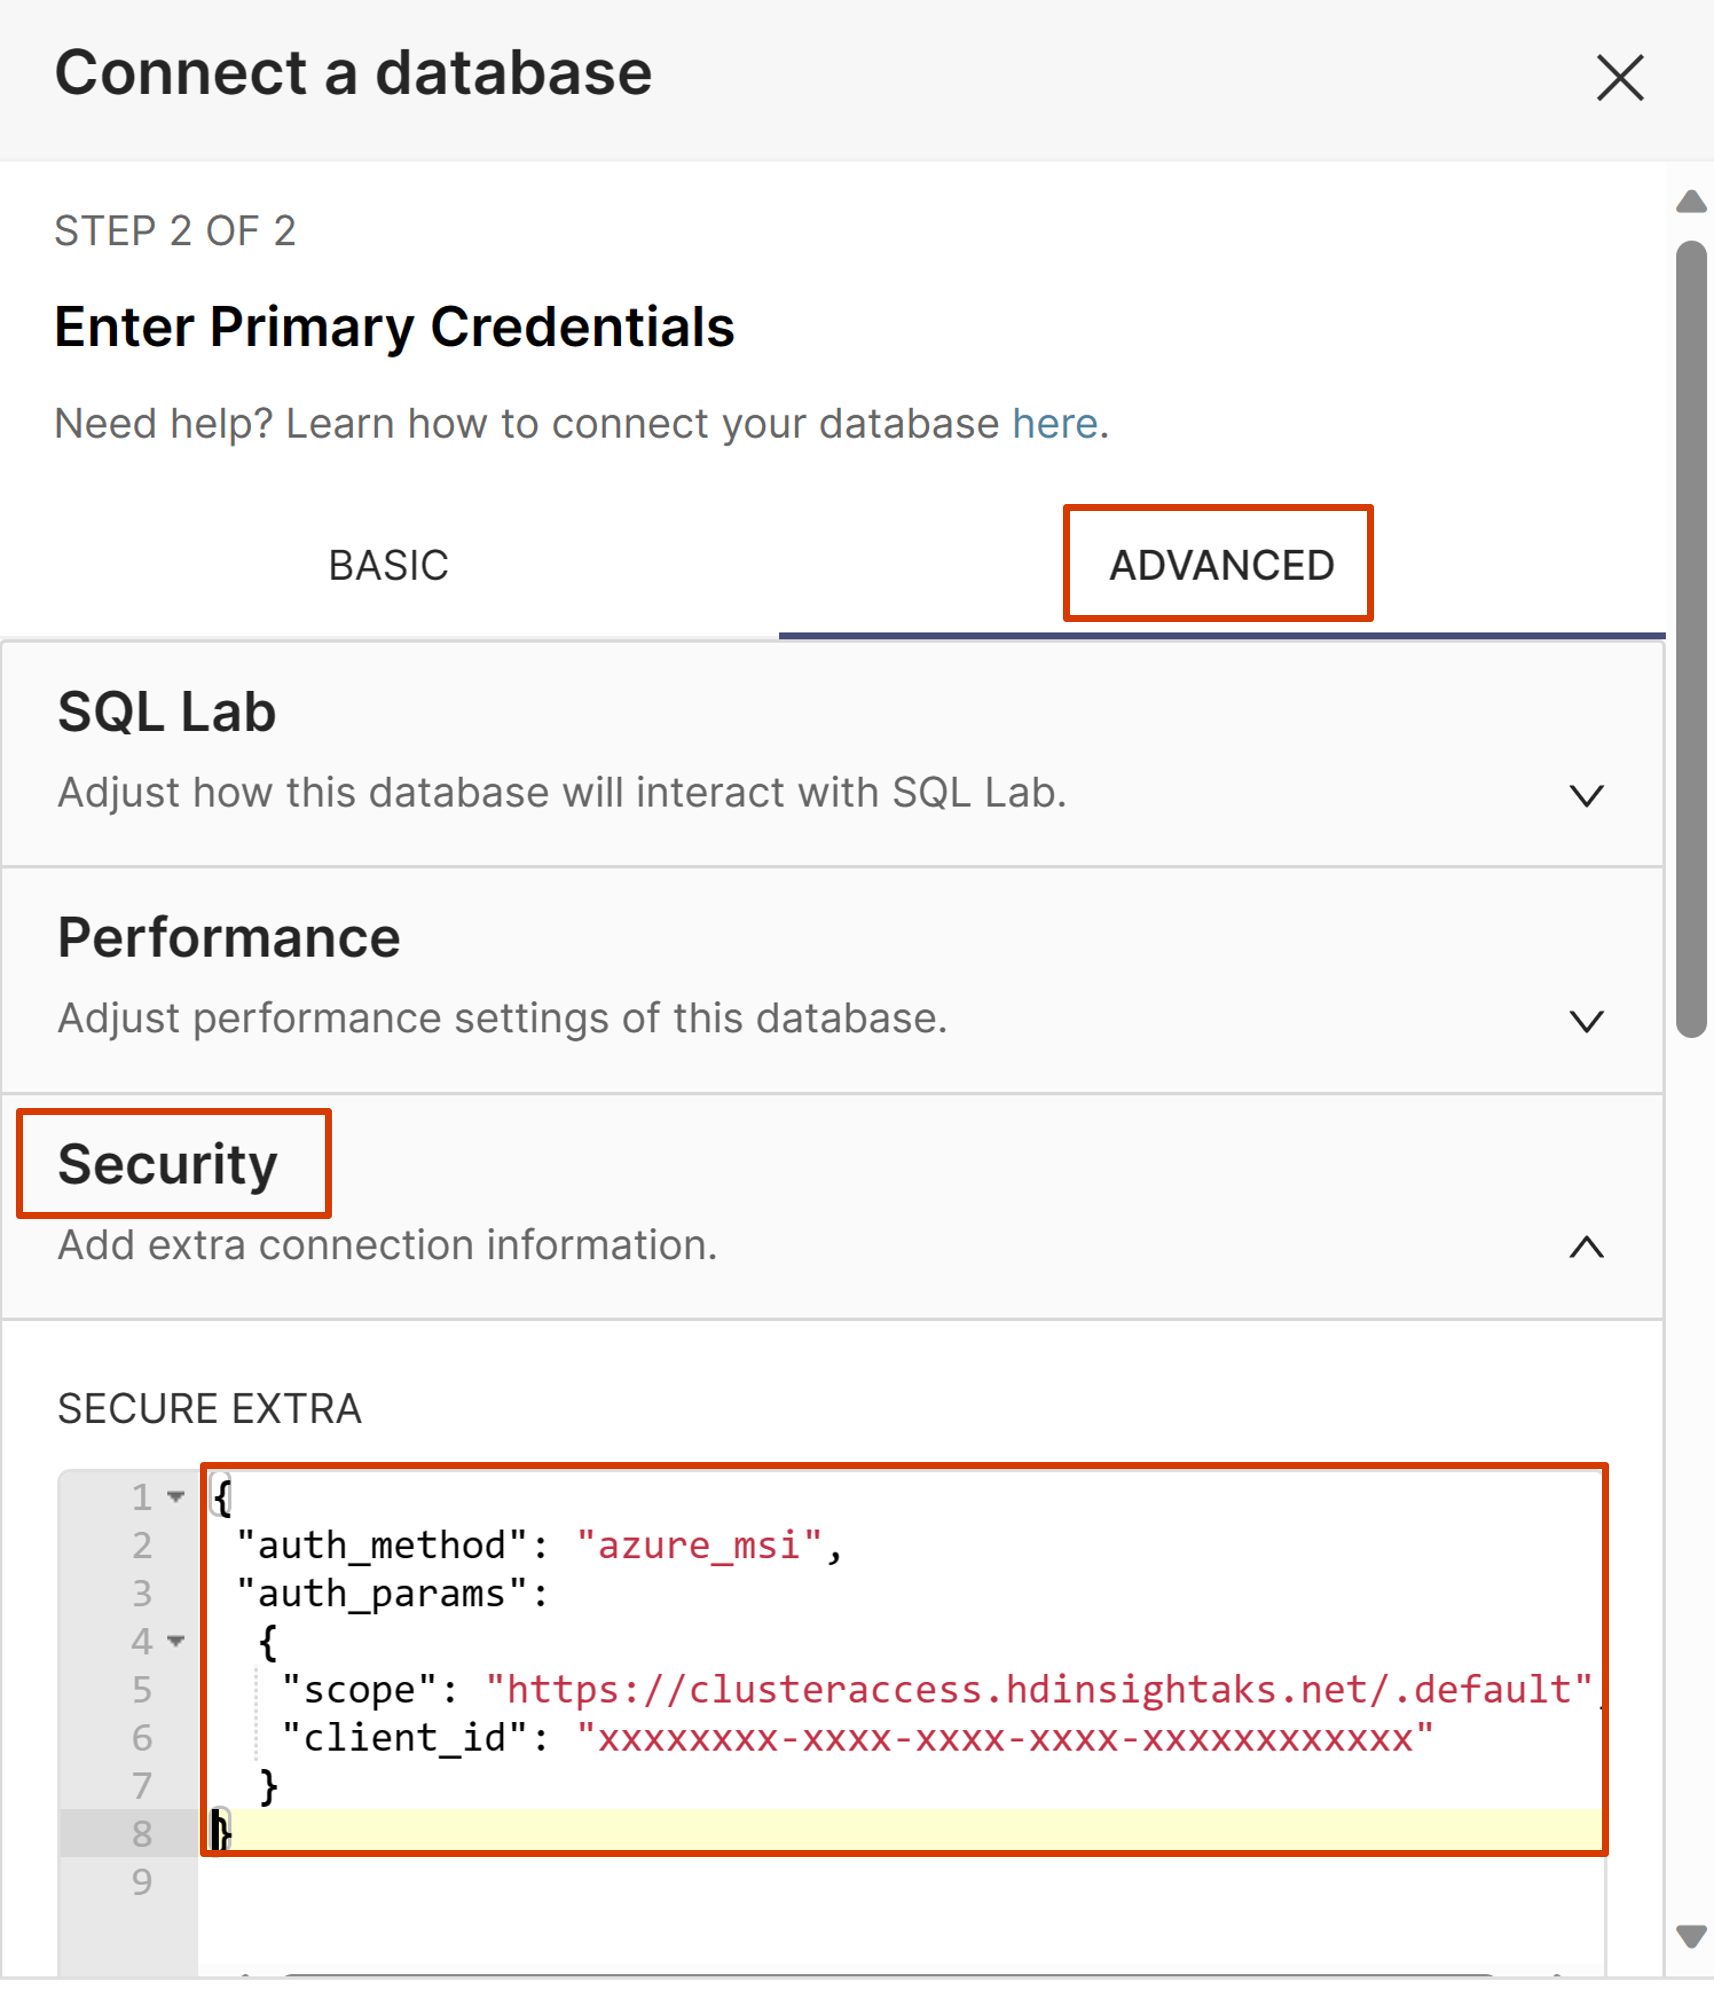
Select "Connect."
Now, you're ready to create datasets and charts.
Troubleshooting
Verify your Trino cluster has been configured to allow the Superset cluster's user assigned managed identity to connect. You can verify this value by looking at the resource JSON of your Trino cluster (authorizationProfile/userIds). Make sure that you're using the identity's object ID, not the client ID.
Make sure there are no mistakes in the connection configuration.
- Make sure the "secure extra" is filled out,
- Your URL is correct.
- Use the
tpchcatalog to test with to verify your connection is working before using your own catalog.
Next Steps
To expose Superset to the internet, allow user login using Microsoft Entra ID you need to accomplish the following general steps. These steps require an intermediate or greater experience with Kubernetes.
Palaute
Tulossa pian: Vuoden 2024 aikana poistamme asteittain GitHub Issuesin käytöstä sisällön palautemekanismina ja korvaamme sen uudella palautejärjestelmällä. Lisätietoja on täällä: https://aka.ms/ContentUserFeedback.
Lähetä ja näytä palaute kohteelle