Enable replication to Azure for VMware VMs
This article describes how to enable replication of on-premises VMware virtual machines (VM) to Azure.
Prerequisites
This article assumes that your system meets the following criteria:
- Set up your on-premises source environment.
- Set up your target environment in Azure.
- Verify requirements and prerequisites before you start. Important things to note include:
- Supported operating systems for replicated machines.
- Storage/disk support.
- Azure requirements with which on-premises machines should comply.
Resolve common issues
- Each disk should be smaller than 4 TB when replicating to unmanaged disks and smaller than 32 TB when replicating to managed disks.
- The operating system disk should be a basic disk, not a dynamic disk.
- For generation 2 UEFI-enabled virtual machines, the operating system family should be Windows, and the boot disk should be smaller than 300 GB.
Before you start
When you replicate VMware virtual machines, keep this information in mind:
- Your Azure user account needs to have certain permissions to enable replication of a new virtual machine to Azure.
- VMware VMs are discovered every 15 minutes. It can take 15 minutes or more for VMs to appear in the Azure portal after discovery. When you add a new vCenter server or vSphere host, discovery can take 15 minutes or more.
- It can take 15 minutes or more for environment changes on the virtual machine to be updated in the portal. For example, the VMware tools installation.
- You can check the last-discovered time for VMware VMs: See the Last Contact At field on the Configuration Servers page for the vCenter server/vSphere host.
- To add virtual machines for replication without waiting for the scheduled discovery, highlight the configuration server (but don't click it), and select Refresh.
- When you enable replication, if the virtual machine is prepared, the process server automatically installs the Azure Site Recovery Mobility service on the VM.
Enable replication
Before you do the steps in this section, review the following information:
- Azure Site Recovery now replicates directly to managed disks for all new replications. The process server writes replication logs to a cache storage account in the target region. These logs are used to create recovery points in replica managed disks that have naming convention of
asrseeddisk. - PowerShell support for replication to managed disks is available beginning with Az.RecoveryServices module version 2.0.0
- At the time of failover, the recovery point that you select is used to create the target-managed disk.
- VMs that were previously configured to replicate to target storage accounts aren't affected.
- Replication to storage accounts for a new virtual machine is only available via a Representational State Transfer (REST) API and PowerShell. Use Azure REST API version 2016-08-10 or 2018-01-10 for replication to storage accounts.
To enable replication, follow these steps:
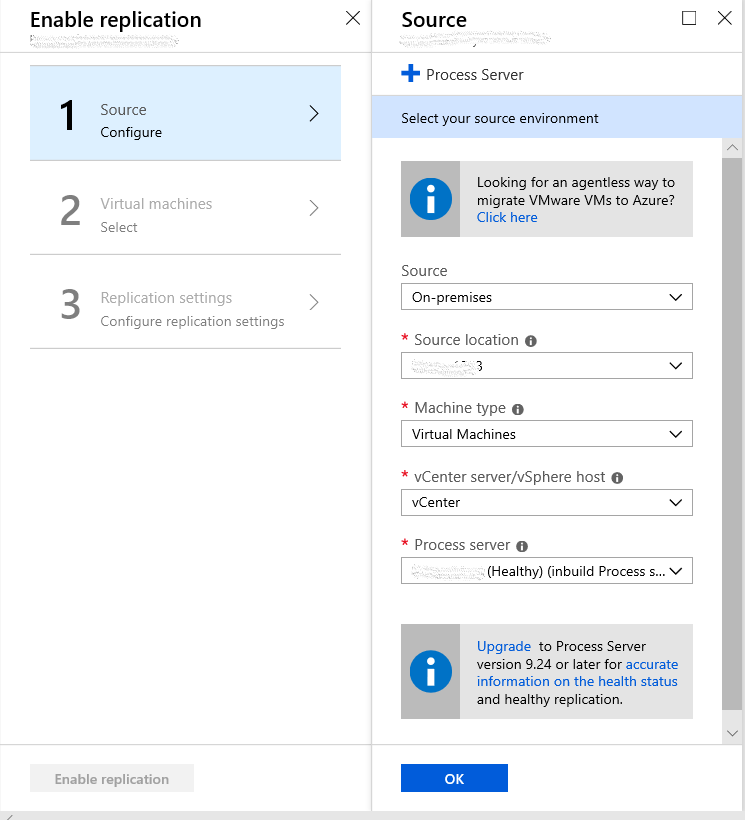
Go to Step 2: Replicate application > Source. After you enable replication for the first time, select +Replicate in the vault to enable replication for additional virtual machines.
In the Source page > Source, select the configuration server.
For Machine type, select Virtual Machines or Physical Machines.
In vCenter/vSphere Hypervisor, select the vCenter server that manages the vSphere host, or select the host. This setting isn't relevant if you're replicating physical computers.
Select the process server. If there are no additional process servers created, the inbuilt process server of configuration server will be available in the dropdown menu. The health status of each process server is indicated as per recommended limits and other parameters. Choose a healthy process server. A critical process server can't be chosen. You can either troubleshoot and resolve the errors or set up a scale-out process server.
Note
Beginning with version 9.24, additional alerts are introduced to enhance the health alerts of process server. Upgrade the Site Recovery components to version 9.24 or above for all alerts to be generated.
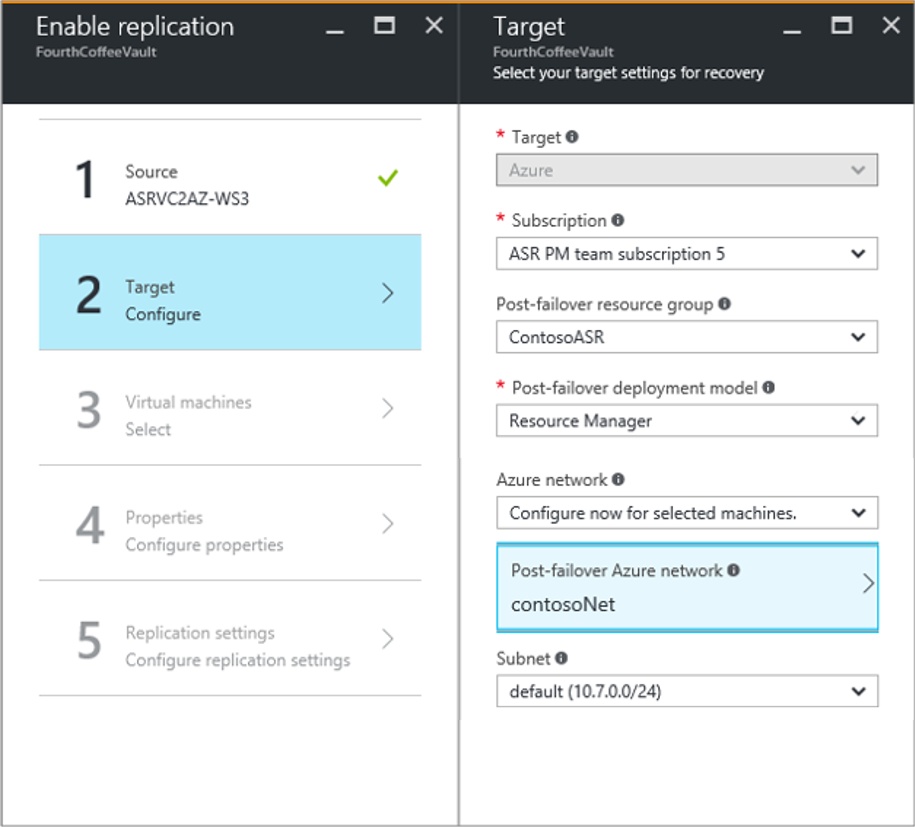
For Target, select the subscription and resource group where you want to create the failed over virtual machines. Choose the deployment model that you want to use in Azure for the failed over VMs.
Select the Azure network and subnet that the Azure VMs will connect to after failover. The network must be in the same region as the Site Recovery service vault.
Select Configure now for selected machines to apply the network setting to all virtual machines that you select for protection. Select Configure later to select the Azure network per virtual machine. If you don't have a network, you need to create one. To create a network by using Azure Resource Manager, select Create new. Select a subnet if applicable, and then select OK.
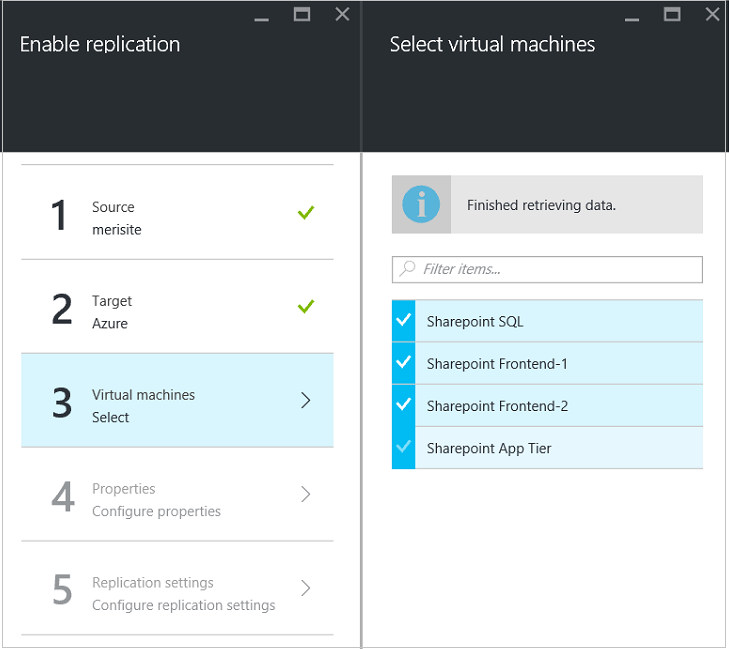
For Virtual machines > Select virtual machines, select each virtual machine that you want to replicate. You can only select virtual machines for which replication can be enabled. Then select OK. If you can't see or select any particular virtual machine, see Source machine isn't listed in the Azure portal to resolve the issue.
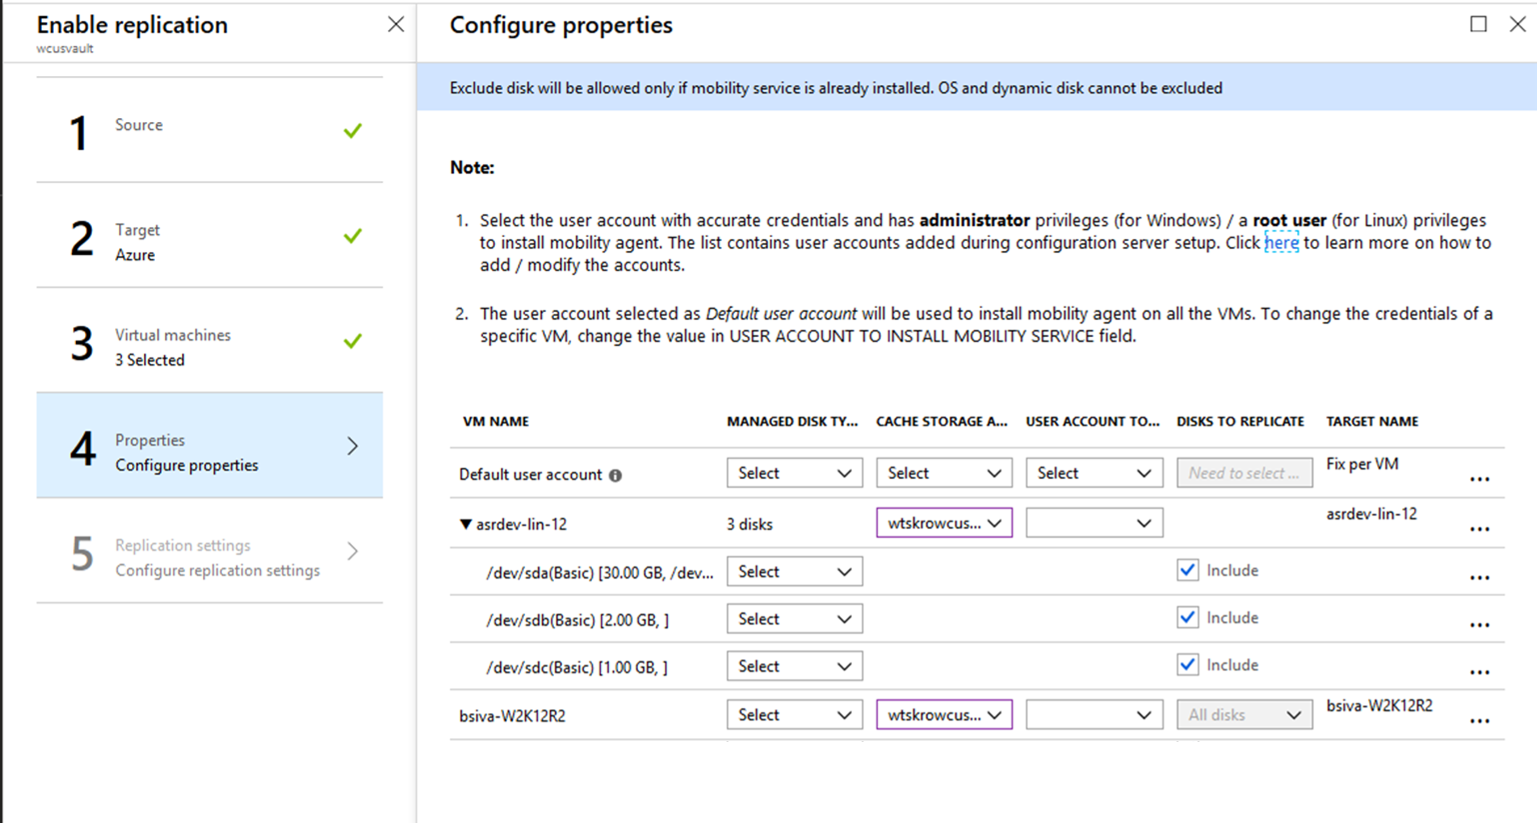
For Properties > Configure properties, select the account that the process server uses to automatically install the Site Recovery Mobility service on the VM. Also, choose the type of target managed disk to use for replication based on your data churn patterns.
By default, all the disks of a source VM are replicated. To exclude disks from replication, clear the Include check box for any disks that you don't want to replicate. Then select OK. You can set additional properties later. Learn more about excluding disks.
From Replication settings > Configure replication settings, verify that the correct replication policy is selected. You can modify replication policy settings at Settings > Replication policies > policy name > Edit Settings. Changes applied to a policy also apply to replicating and new virtual machines.
If you want to gather virtual machines into a replication group, enable Multi-VM consistency. Specify a name for the group, and then select OK.
Note
- Virtual machines in a replication group replicate together and have shared crash-consistent and app-consistent recovery points when they fail over.
- Gather VMs and physical servers together so that they mirror your workloads. Enabling multi-VM consistency can affect workload performance. Do this only if the virtual machines are running the same workload, and you need consistency.
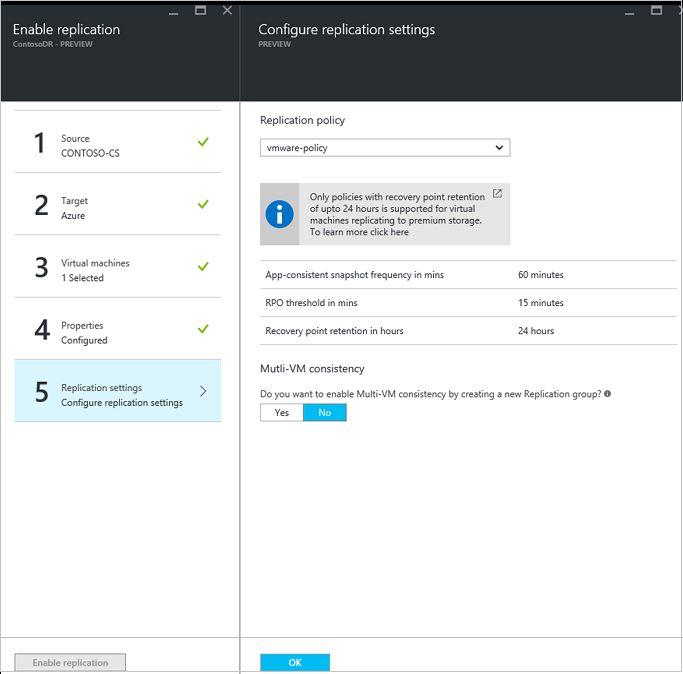
Select Enable Replication. You can track the progress of the Enable Protection job at Settings > Jobs > Site Recovery Jobs. After the Finalize Protection job runs, the virtual machine is ready for failover.
Monitor initial replication
After "Enable replication" of the protected item is complete, Azure Site Recovery initiates replication (synonymous to synchronization) of data from the source machine to target region. During this period, replica of source disks are created. Only after completion of copying original disks, the delta changes are copied to the target region. The time taken to copy the original disks depends on multiple parameters such as:
- size of source machine disks
- bandwidth available to transfer the data to Azure (You can leverage deployment planner to identify the optimal bandwidth required)
- process server resources like memory, free disk space, CPU available to cache & process the data received from protected items (ensure that process server is healthy)
To track the progress of initial replication, navigate to recovery services vault in Azure portal -> replicated items -> monitor "Status" column value of replicated item. The status shows the percentage completion of initial replication. Upon hovering over the Status, the "Total data transferred" would be available. Upon clicking on status, a contextual page opens and displays the following parameters:
Last refreshed at - indicates the latest time at which the replication information of the whole machine has been refreshed by the service.
Completed percentage - indicates the percentage of initial replication completed for the VM
Total data transferred - Amount of data transferred from VM to Azure
Synchronization progress (to track details at a disk level)
- State of replication
- If replication is yet to start, then the status is updated as "In queue". During initial replication, only 3 disks are replicated at a time. This mechanism is followed to avoid throttling at the process server.
- After replication starts, the status is updated as "In progress".
- After completion of initial replication, status is marked as "Complete".
- Site Recovery reads through the original disk, transfers data to Azure and captures progress at a disk level. Note that, Site Recovery skips replication of the unoccupied size of the disk and adds it to the completed data. So, sum of data transferred across all disks might not add up to the "total data transferred" at the VM level.
- Upon clicking on the information balloon against a disk you can obtain details on when the replication (synonymous for synchronization) was triggered for the disk, data transferred to Azure in the last 15 min followed by the last refreshed time stamp. This time stamp indicates latest time at which information was received by Azure service from the source machine

- Health of each disk is displayed
- If replication is slower than expected, then the disk status turns into warning
- If replication is not progressing, then the disk status turns into critical
- State of replication
If the health is in critical/warning state, make sure that Replication Health of the machine and Process Sever are healthy.
As soon as enable replication job is complete, the replication progress would be 0% and total data transferred would be NA. Upon clicking, the data against each identified disk would be as "NA".This indicates that the replication is yet to start and Azure Site Recovery is yet to receive the latest statistics. The progress is refreshed at an interval of 30 min.
Note
Make sure to update Configuration servers, scale-out process servers and mobility agents to versions 9.36 or higher to ensure accurate progress is captured and sent to Site Recovery services.
View and manage VM properties
Next, verify the properties of the source virtual machine. Remember that the Azure VM name needs to conform with Azure virtual machine requirements.
Go to Settings > Replicated items, and then select the virtual machine. The Essentials page shows information about the VM's settings and status.
In Properties, you can view replication and failover information for the VM.
In Compute and Network > Compute properties, you can change multiple VM properties.
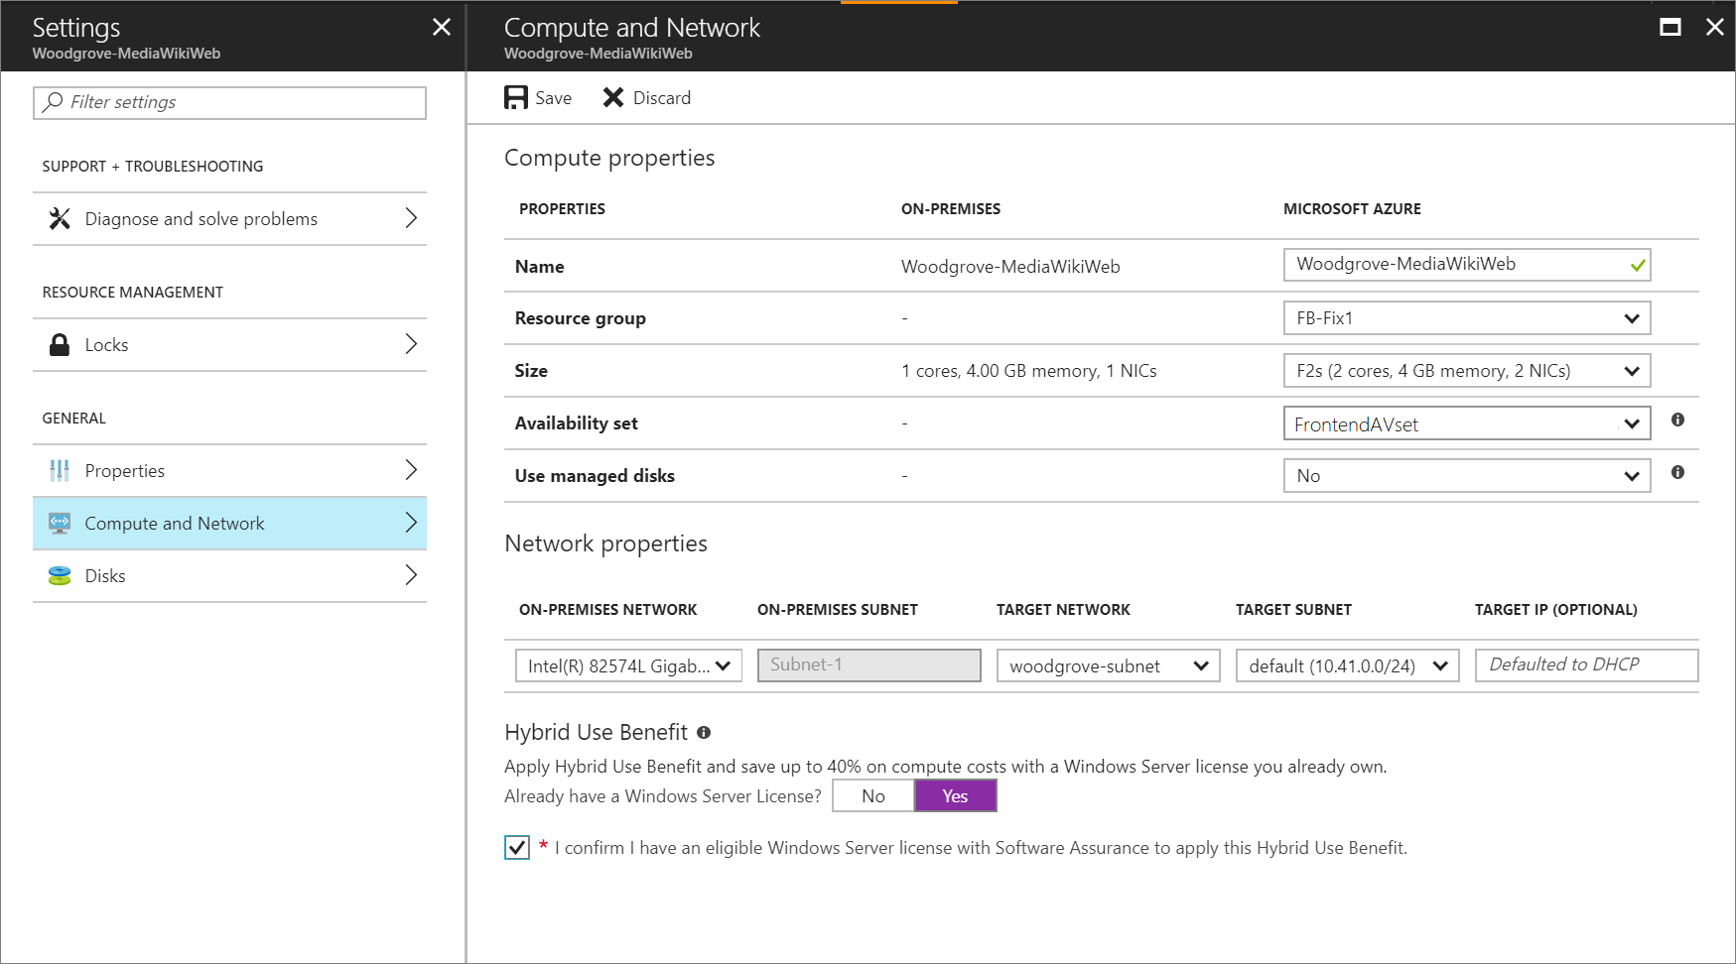
- Azure VM name: Modify the name to meet Azure requirements, if necessary.
- Target VM size or VM type: The default VM size is chosen based on parameters that include disk count, NIC count, CPU core count, memory, and available VM role sizes in the target Azure region. Azure Site Recovery picks the first available VM size that satisfies all the criteria. You can select a different VM size based on your needs at any time before failover. The VM disk size is also based on source disk size, and it can only be changed after failover. Learn more about disk sizes and IOPS rates at Scalability and performance targets for VM disks.
- Resource group: You can select a resource group, from which a virtual machine becomes a part of a post failover. You can change this setting at any time before failover. After failover, if you migrate the virtual machine to a different resource group, the protection settings for that virtual machine break.
- Availability set: You can select an availability set if your virtual machine needs to be a part of a post failover. When you select an availability set, keep the following information in mind:
- Only availability sets that belong to the specified resource group are listed.
- VMs that are on different virtual networks can't be a part of the same availability set.
- Only virtual machines of the same size can be a part of an availability set.
You can also add information about the target network, subnet, and IP address that's assigned to the Azure VM.
In Disks, you can see the operating system and data disks on the VM that will be replicated.
Configure networks and IP addresses
You can set the target IP address:
- If you don't provide an address, the failed over VM uses DHCP.
- If you set an address that isn't available at failover, the failover doesn't work.
- If the address is available in the test failover network, you can use the same target IP address for test failover.
The number of network adapters is dictated by the size that you specify for the target virtual machine, as follows:
- If the number of network adapters on the source virtual machine is less than or equal to the number of adapters that are allowed for the target VM's size, the target has the same number of adapters as the source.
- If the number of adapters for the source virtual machine exceeds the number that's allowed for the target VM's size, the target size maximum is used. For example, if a source virtual machine has two network adapters and the target VM's size supports four, the target virtual machine has two adapters. If the source VM has two adapters but the target size only supports one, the target VM has only one adapter.
- If the virtual machine has multiple network adapters, they all connect to the same network. Also, the first adapter that's shown in the list becomes the default network adapter in the Azure virtual machine.
Azure Hybrid Benefit
Microsoft Software Assurance customers can use Azure Hybrid Benefit to save on licensing costs for Windows Server computers that are migrated to Azure. The benefit also applies to Azure disaster recovery. If you're eligible, you can assign the benefit to the virtual machine that Site Recovery creates if there's a failover.
- Go to the Computer and Network properties of the replicated virtual machine.
- Answer when asked if you have a Windows Server license that makes you eligible for Azure Hybrid Benefit.
- Confirm that you have an eligible Windows Server license with Software Assurance that you can use to apply the benefit to the VM that will be created at failover.
- Save the settings for the replicated virtual machine.
Learn more about Azure Hybrid Benefit.
Next steps
After the virtual machine reaches a protected state, try a failover to check whether your application appears in Azure.
- Learn more about how to clean registration and protection settings to disable replication.
- Learn more about how to automate replication for your virtual machines by using PowerShell.
