Tutorial: Create an NFS Azure file share and mount it on a Linux VM using the Azure portal
Azure Files offers fully managed file shares in the cloud that are accessible via the industry standard Server Message Block (SMB) protocol or Network File System (NFS) protocol. Both NFS and SMB protocols are supported on Azure virtual machines (VMs) running Linux. This tutorial shows you how to create an Azure file share using the NFS protocol and connect it to a Linux VM.
In this tutorial, you will:
- Create a storage account
- Deploy a Linux VM
- Create an NFS file share
- Connect to your VM
- Mount the file share to your VM
Applies to
| File share type | SMB | NFS |
|---|---|---|
| Standard file shares (GPv2), LRS/ZRS | ||
| Standard file shares (GPv2), GRS/GZRS | ||
| Premium file shares (FileStorage), LRS/ZRS |
Getting started
If you don't have an Azure subscription, create a free account before you begin.
Sign in to the Azure portal.
Create a FileStorage storage account
Before you can work with an NFS 4.1 Azure file share, you have to create an Azure storage account with the premium performance tier. Currently, NFS 4.1 shares are only available as premium file shares.
- On the Azure portal menu, select All services. In the list of resources, type Storage Accounts. As you begin typing, the list filters based on your input. Select Storage Accounts.
- On the Storage Accounts window that appears, choose + Create.
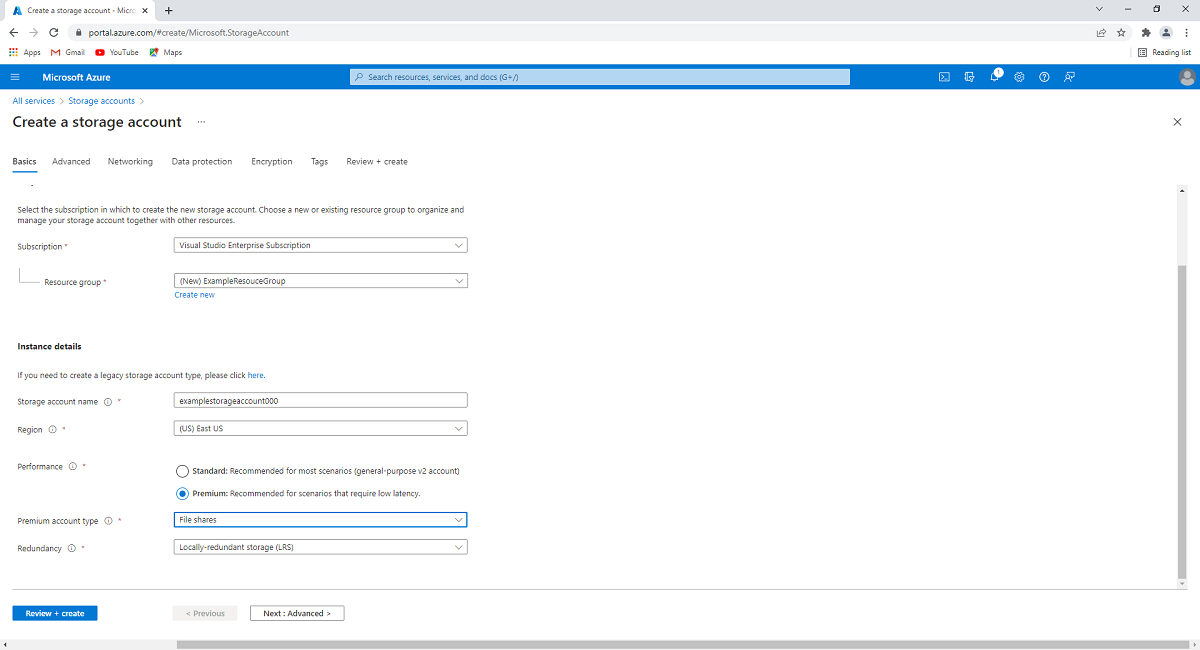
- On the Basics tab, select the subscription in which to create the storage account.
- Under the Resource group field, select Create new to create a new resource group to use for this tutorial.
- Enter a name for your storage account. The name you choose must be unique across Azure. The name also must be between 3 and 24 characters in length, and may include only numbers and lowercase letters.
- Select a region for your storage account, or use the default region. Azure supports NFS file shares in all the same regions that support premium file storage.
- Select the Premium performance tier to store your data on solid-state drives (SSD). Under Premium account type, select File shares.
- Leave replication set to its default value of Locally redundant storage (LRS).
- Select Review + Create to review your storage account settings and create the account.
- When you see the Validation passed notification appear, select Create. You should see a notification that deployment is in progress.
The following image shows the settings on the Basics tab for a new storage account:
Deploy an Azure VM running Linux
Next, create an Azure VM running Linux to represent the on-premises server. When you create the VM, a virtual network will be created for you. The NFS protocol can only be used from a machine inside of a virtual network.
Select Home, and then select Virtual machines under Azure services.
Select + Create and then + Azure virtual machine.
In the Basics tab, under Project details, make sure the correct subscription and resource group are selected. Under Instance details, type myVM for the Virtual machine name, and select the same region as your storage account. Choose your Linux distribution for your Image. Leave the other defaults. The default size and pricing is only shown as an example. Size availability and pricing are dependent on your region and subscription.
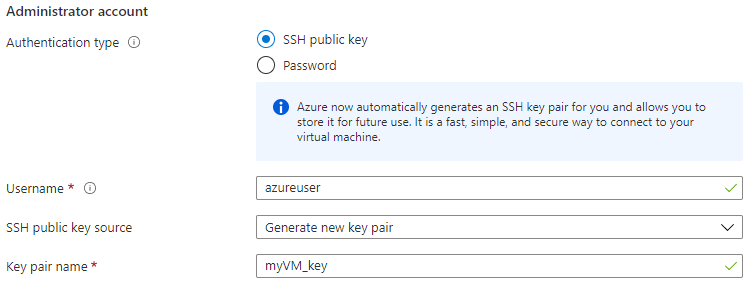
Under Administrator account, select SSH public key. Leave the rest of the defaults.
Under Inbound port rules > Public inbound ports, choose Allow selected ports and then select SSH (22) and HTTP (80) from the drop-down.
Important
Setting SSH port(s) open to the internet is only recommended for testing. If you want to change this setting later, go back to the Basics tab.
Select the Review + create button at the bottom of the page.
On the Create a virtual machine page, you can see the details about the VM you are about to create. Note the name of the virtual network. When you are ready, select Create.
When the Generate new key pair window opens, select Download private key and create resource. Your key file will be download as myVM_key.pem. Make sure you know where the .pem file was downloaded, because you'll need the path to it to connect to your VM.
You'll see a message that deployment is in progress. Wait a few minutes for deployment to complete.
Create an NFS Azure file share
Now you're ready to create an NFS file share and provide network-level security for your NFS traffic.
Add a file share to your storage account
Select Home and then Storage accounts.
Select the storage account you created.
In the service menu, under Data storage, select File shares.
Select + File Share.
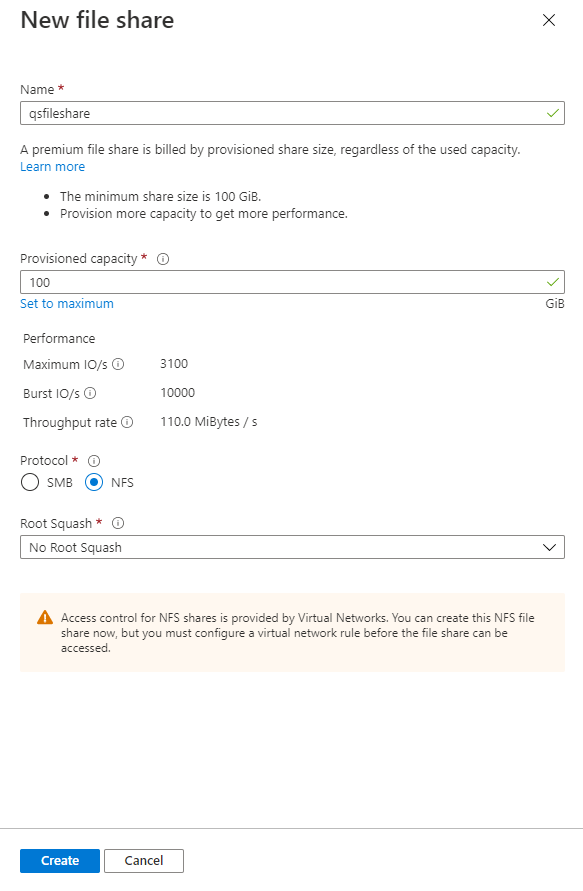
Name the new file share qsfileshare and enter "100" for the minimum Provisioned capacity, or provision more capacity (up to 102,400 GiB) to get more performance. Select NFS protocol, choose a Root Squash setting, and select Create. To learn more about root squash and its security benefits for NFS file shares, see Configure root squash for Azure Files.
Set up a private endpoint or service endpoint
Next, set up a private endpoint for your storage account. This gives your storage account a private IP address from within the address space of your virtual network. Standard data processing rates for private endpoints apply. If you don't require a static IP address, you can use a service endpoint instead. There's no extra charge for using service endpoints.
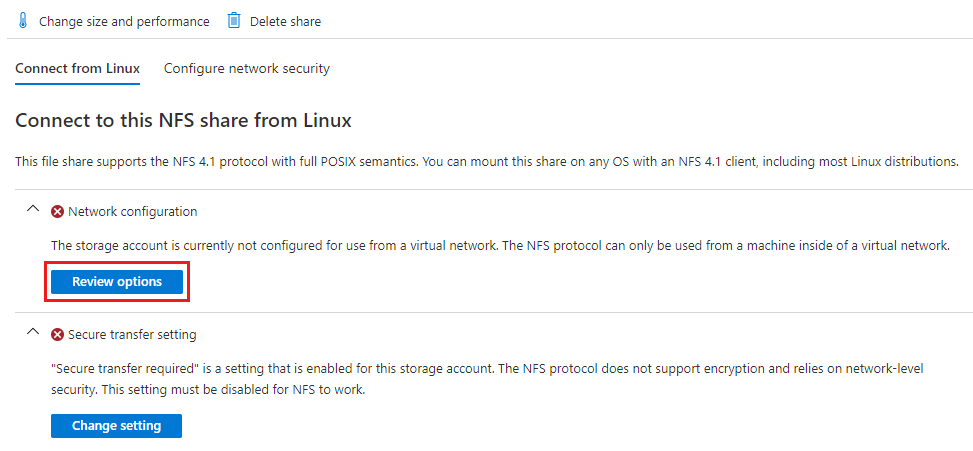
Select the file share qsfileshare. You should see a dialog that says Connect to this NFS share from Linux. Under Network configuration, select Review options
Next, select Setup a private endpoint.
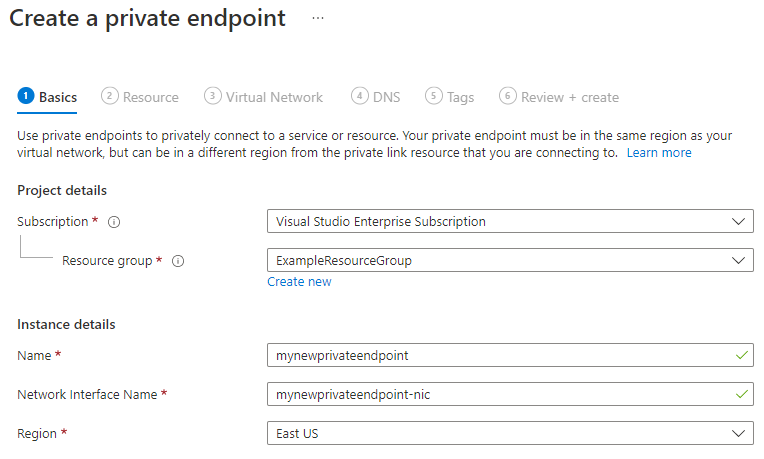
Select + Private endpoint.

Leave Subscription and Resource group the same. Under Instance, provide a name and select a region for the new private endpoint. Your private endpoint must be in the same region as your virtual network, so use the same region as you specified when creating the VM. When all the fields are complete, select Next: Resource.
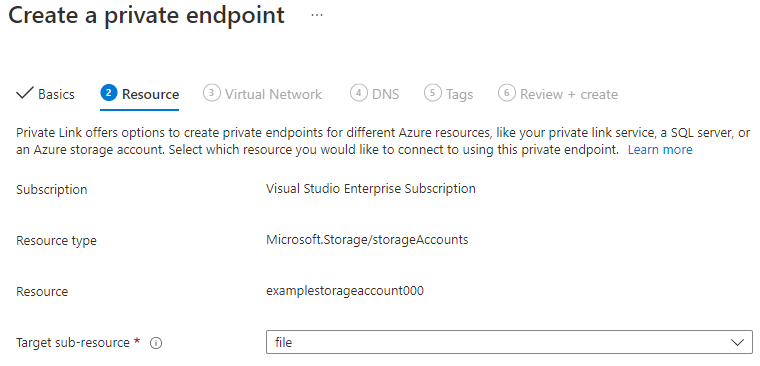
Confirm that the Subscription, Resource type and Resource are correct, and select File from the Target sub-resource drop-down. Then select Next: Virtual Network.
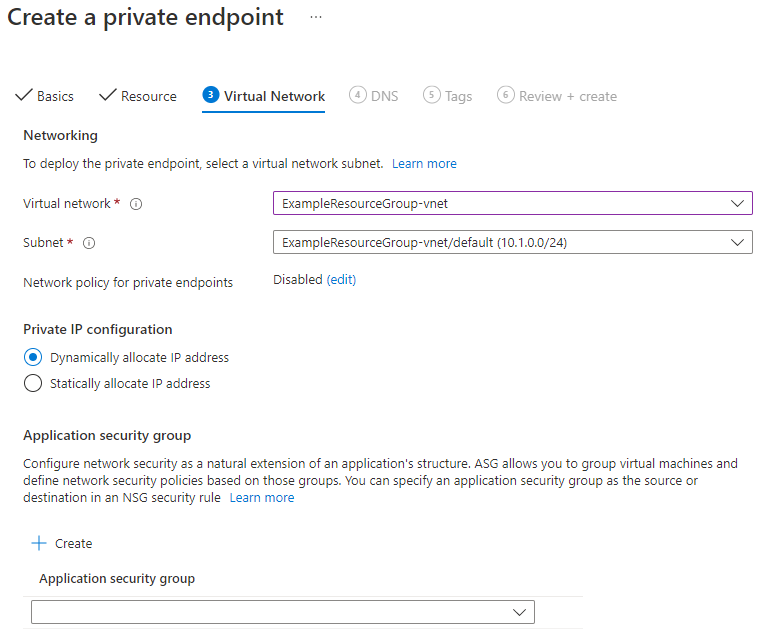
Under Networking, select the virtual network associated with your VM and leave the default subnet. Under Private IP configuration, leave Dynamically allocate IP address selected. Select Next: DNS.
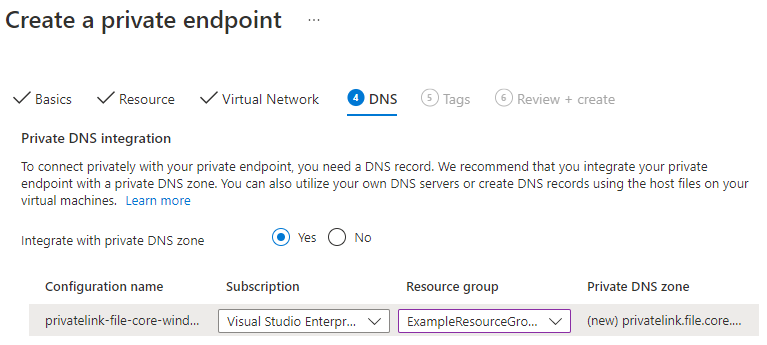
Select Yes for Integrate with private DNS zone. Make sure the correct subscription and resource group are selected, and then select Next: Tags.
You can optionally apply tags to categorize your resources, such as applying the name Environment and the value Test to all testing resources. Enter name/value pairs if desired, and then select Next: Review + create.
Azure will attempt to validate the private endpoint. When validation is complete, select Create. You'll see a notification that deployment is in progress. After a few minutes, you should see a notification that deployment is complete.
Disable secure transfer
Azure Files doesn't currently support encryption-in-transit with the NFS protocol and relies instead on network-level security. Therefore, you'll need to disable secure transfer.
Select Home and then Storage accounts.
Select the storage account you created.
In the service menu, under Data storage, select File shares.
Select the NFS file share that you created. Under Secure transfer setting, select Change setting.
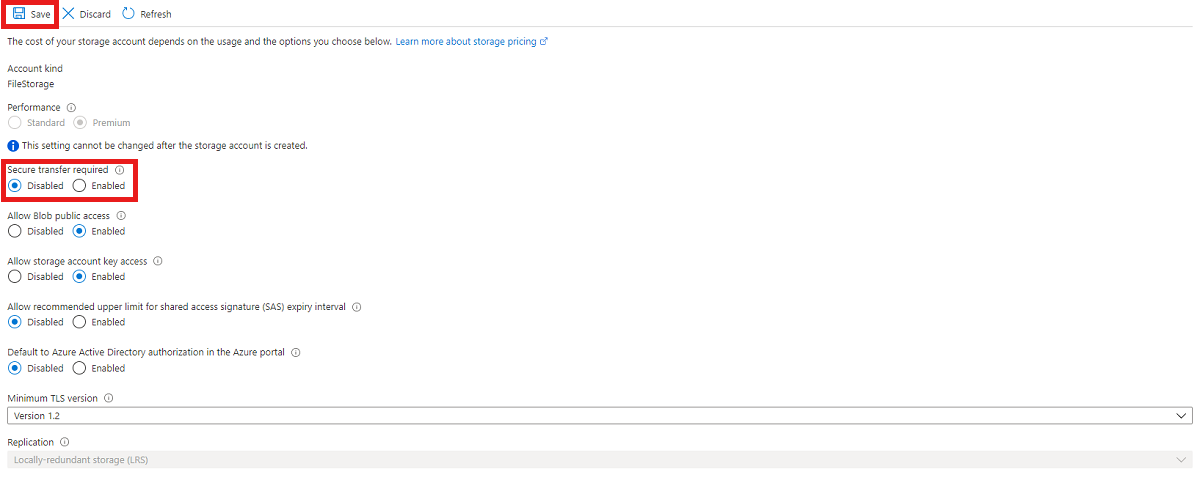
Change the Secure transfer required setting to Disabled, and select Save. The setting change can take up to 30 seconds to take effect.
Connect to your VM
Create an SSH connection with the VM.
Select Home and then Virtual machines.
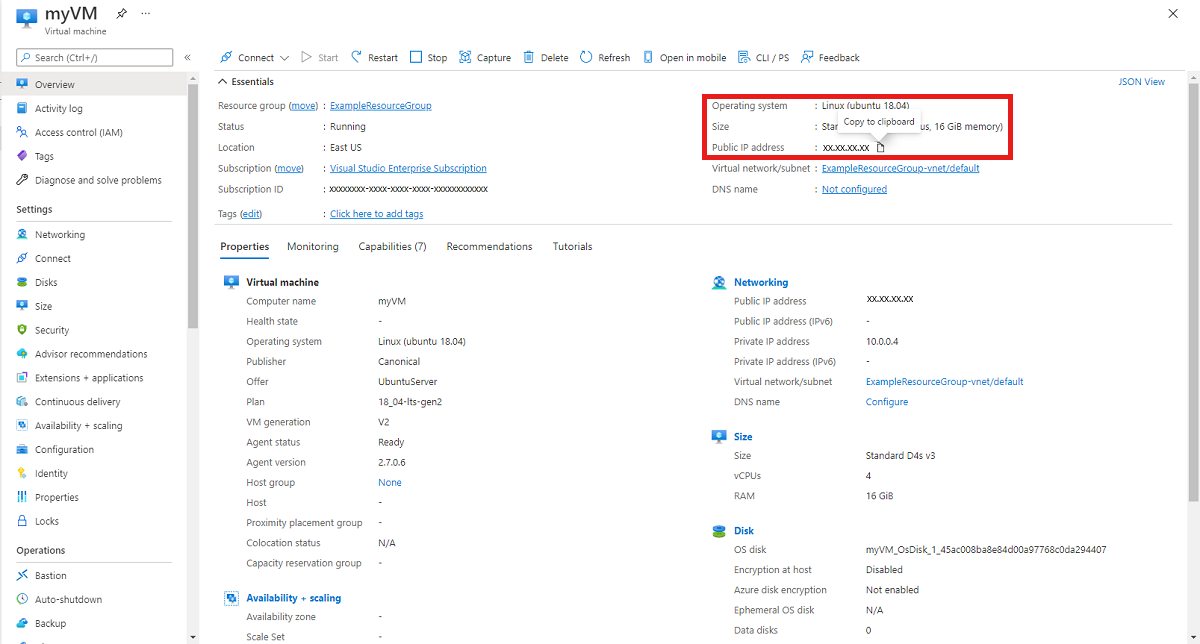
Select the Linux VM you created for this tutorial and ensure that its status is Running. Take note of the VM's public IP address and copy it to your clipboard.
If you are on a Mac or Linux machine, open a Bash prompt. If you are on a Windows machine, open a PowerShell prompt.
At your prompt, open an SSH connection to your VM. Replace
xx.xx.xx.xxwith the IP address of your VM, and replace the path to the.pemwith the path to where the key file was downloaded.
ssh -i .\Downloads\myVM_key.pem azureuser@xx.xx.xx.xx
If you encounter a warning that the authenticity of the host can't be established, type yes to continue connecting to the VM. Leave the ssh connection open for the next step.
Tip
You can use the SSH key you created the next time you create a VM in Azure. Just select the Use a key stored in Azure for SSH public key source the next time you create a VM. You already have the private key on your computer, so you won't need to download anything.
Mount the NFS share
Now that you've created an NFS share, you have to mount it on your Linux client. Using Azure Storage Explorer isn't supported for NFS Azure file shares, either standalone or from within the Azure portal. To view the files in the share, you must mount the share.
Select Home and then Storage accounts.
Select the storage account you created.
In the service menu, under Data storage, select File shares, and then select the NFS file share you created.
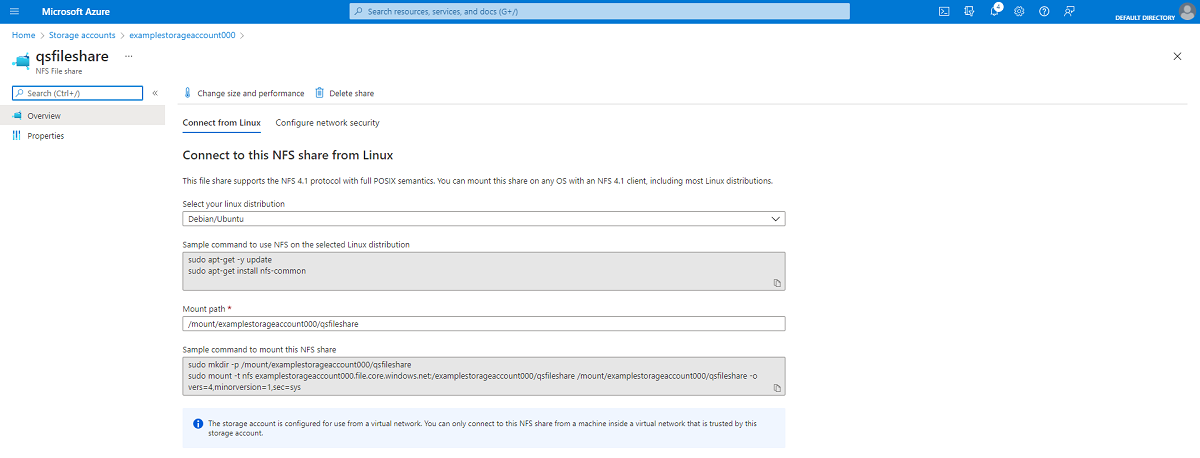
You should see Connect to this NFS share from Linux along with sample commands to use NFS on your Linux distribution and a mounting script that contains the required mount options. For other recommended mount options, see Mount NFS Azure file share on Linux.
Important
The provided mounting script will mount the NFS share only until the Linux machine is rebooted. To automatically mount the share every time the machine reboots, see Mount an NFS share using /etc/fstab.
Select your Linux distribution.
Using the ssh connection you created to your VM, enter the sample commands to use NFS and mount the file share.
You have now mounted your NFS share, and it's ready to store files.
Clean up resources
When you're done, delete the resource group. Deleting the resource group deletes the storage account, the Azure file share, and any other resources that you deployed inside the resource group.
- Select Home and then Resource groups.
- Select the resource group you created for this tutorial.
- Select Delete resource group. A window opens and displays a warning about the resources that will be deleted with the resource group.
- Enter the name of the resource group, and then select Delete.
