Muokkaa

Jaa


How to connect using Remote Desktop and sign on to an Azure virtual machine running Windows

Applies to: ✔️ Windows VMs ✔️ Flexible scale sets

You can create a remote desktop connection to a virtual machine (VM) running Windows in Azure.

To connect to a Windows VM from a Mac, you will need to install an RDP client for Mac such as Microsoft Remote Desktop.
Prerequisites

  • In order to connect to a Windows Virtual Machine via RDP you need TCP connectivity to the machine on the port where Remote Desktop service is listening (3389 by default). You can validate an appropriate port is open for RDP using the troubleshooter or by checking manually in your VM settings. To check if the TCP port is open (assuming default):

    1. On the page for the VM, select Networking from the left menu.
    2. On the Networking page, check to see if there is a rule which allows TCP on port 3389 from the IP address of the computer you are using to connect to the VM. If the rule exists, you can move to the next section.
    3. If there isn't a rule, add one by selecting Add Inbound port rule.
    4. From the Service dropdown select RDP.
    5. Edit Priority and Source if necessary
    6. For Name, type Port_3389
    7. When finished, select Add
    8. You should now have an RDP rule in the table of inbound port rules.
  • Your VM must have a public IP address. To check if your VM has a public IP address, select Overview from the left menu and look at the Networking section. If you see an IP address next to Public IP address, then your VM has a public IP. To learn more about adding a public IP address to an existing VM, see Associate a public IP address to a virtual machine

  • Verify your VM is running. On the Overview tab, in the essentials section, verify the status of the VM is Running. To start the VM, select Start at the top of the page.

Connect to the virtual machine

Follow these steps:

  1. Go to the Azure portal to connect to a VM. Search for and select Virtual machines.

  2. Select the virtual machine from the list.

  3. At the beginning of the virtual machine page, select Connect.

  4. On the Connect to virtual machine page, select RDP, and then select the appropriate IP address and Port number. In most cases, the default IP address and port should be used. Select Download RDP File. If the VM has a just-in-time policy set, you first need to select the Request access button to request access before you can download the RDP file. For more information about the just-in-time policy, see Manage virtual machine access using the just in time policy.

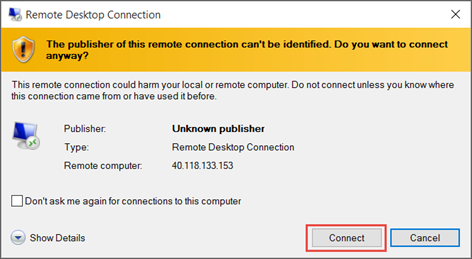
  5. Open the downloaded RDP file and select Connect when prompted. You will get a warning that the .rdp file is from an unknown publisher. This is expected. In the Remote Desktop Connection window, select Connect to continue.

    Screenshot of a warning about an unknown publisher.

  6. In the Windows Security window, select More choices and then Use a different account. Enter the credentials for an account on the virtual machine and then select OK.

    Local account: This is usually the local account user name and password that you specified when you created the virtual machine. In this case, the domain is the name of the virtual machine and it is entered as vmname\username.

    Domain joined VM: If the VM belongs to a domain, enter the user name in the format Domain\Username. The account also needs to either be in the Administrators group or have been granted remote access privileges to the VM.

    Domain controller: If the VM is a domain controller, enter the user name and password of a domain administrator account for that domain.

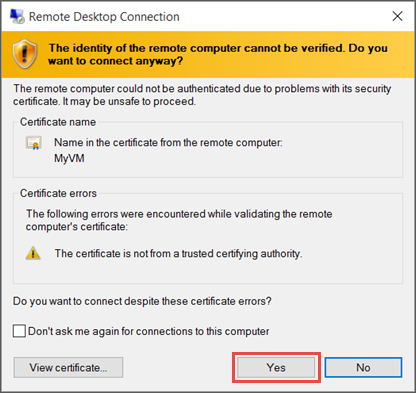
  7. Select Yes to verify the identity of the virtual machine and finish logging on.

    Screenshot showing a message about verifying the identity of the VM.

    Tip

    If the Connect button in the portal is grayed-out and you are not connected to Azure via an Express Route or Site-to-Site VPN connection, you will need to create and assign your VM a public IP address before you can use RDP. For more information, see Public IP addresses in Azure.

Connect to the virtual machine using PowerShell

If you are using PowerShell and have the Azure PowerShell module installed you may also connect using the Get-AzRemoteDesktopFile cmdlet, as shown below.

  1. This example will immediately launch the RDP connection, taking you through similar prompts as above.

    Get-AzRemoteDesktopFile -ResourceGroupName "RgName" -Name "VmName" -Launch
    
  2. You may also save the RDP file for future use.

    Get-AzRemoteDesktopFile -ResourceGroupName "RgName" -Name "VmName" -LocalPath "C:\Path\to\folder"