Muistiinpano
Tämän sivun käyttö edellyttää valtuutusta. Voit yrittää kirjautua sisään tai vaihtaa hakemistoa.
Tämän sivun käyttö edellyttää valtuutusta. Voit yrittää vaihtaa hakemistoa.
This article demonstrates how to install the .NET SDK or the .NET Runtime on Linux by using the install script or by extracting the binaries. For a list of distributions that support the built-in package manager, see Install .NET on Linux.
Install the SDK (which includes the runtime) if you want to develop .NET apps. Or, if you only need to run apps, install the Runtime. If you're installing the Runtime, we suggest you install the ASP.NET Core Runtime as it includes both .NET and ASP.NET Core runtimes.
Use the dotnet --list-sdks and dotnet --list-runtimes commands to see which versions are installed. For more information, see How to check that .NET is already installed.
.NET releases
There are two types of supported releases, Long Term Support (LTS) and Standard Term Support (STS). The quality of all releases is the same. The only difference is the length of support. LTS releases get free support and patches for three years. STS releases get free support and patches for two years. For more information, see .NET Support Policy.
The following table lists the support status of each version of .NET (and .NET Core):
| ✔️ Supported | ❌ Out of support |
|---|---|
| 10 (LTS) | 7 |
| 9 (STS) | 6 |
| 8 (LTS) | 5 |
| 3.1 | |
| 3.0 | |
| 2.2 | |
| 2.1 | |
| 2.0 | |
| 1.1 | |
| 1.0 |
Dependencies
It's possible that when you install .NET, specific dependencies might not be installed, such as when you manually install. The following list details Linux distributions that are supported by Microsoft and have dependencies you might need to install. Check the distribution page for more information:
For generic information about the dependencies, see Self-contained Linux apps.
RPM dependencies
If your distribution wasn't previously listed, and is RPM-based, you might need the following dependencies:
- glibc
- libgcc
- ca-certificates
- openssl-libs
- libstdc++
- libicu
- tzdata
- krb5-libs
DEB dependencies
If your distribution wasn't previously listed, and is debian-based, you might need the following dependencies:
- libc6
- libgcc1
- libgssapi-krb5-2
- libicu70
- libssl3
- libstdc++6
- zlib1g
Scripted install
The dotnet-install scripts are used for automation and non-admin installs of the SDK and Runtime. You can download the script from https://dot.net/v1/dotnet-install.sh. When .NET is installed in this way, you must install the dependencies required by your Linux distribution. Use the links in the Install .NET on Linux article for your specific Linux distribution.
Important
Bash is required to run the script.
You can download the script with wget:
wget https://dot.net/v1/dotnet-install.sh -O dotnet-install.sh
Or, with curl:
curl -L https://dot.net/v1/dotnet-install.sh -o dotnet-install.sh
Before running this script, make sure you grant permission for this script to run as an executable:
chmod +x ./dotnet-install.sh
The script defaults to installing the latest long term support (LTS) SDK version, which is .NET 10. To install the latest release, which might not be an (LTS) version, use the --version latest parameter.
./dotnet-install.sh --version latest
To install .NET Runtime instead of the SDK, use the --runtime parameter.
./dotnet-install.sh --version latest --runtime aspnetcore
You can install a specific major version with the --channel parameter to indicate the specific version. The following command installs .NET 9.0 SDK.
./dotnet-install.sh --channel 9.0
For more information, see dotnet-install scripts reference.
To enable .NET on the command line, see Set environment variables system-wide.
To learn how to use the .NET CLI, see .NET CLI overview.
Manual install
As an alternative to the package managers, you can download and manually install the SDK and runtime. Manual installation is commonly used as part of continuous integration testing or on an unsupported Linux distribution. For a developer or user, it's better to use a package manager.
Download a binary release for either the SDK or the runtime from one of the following sites. The .NET SDK includes the corresponding runtime:
Extract the downloaded file and use the export command to set DOTNET_ROOT to the extracted folder's location and then ensure .NET is in PATH. Exporting DOTNET_ROOT makes the .NET CLI commands available in the terminal. For more information about .NET environment variables, see .NET SDK and CLI environment variables.
Different versions of .NET can be extracted to the same folder, which coexist side-by-side.
Example
The following commands use Bash to set the environment variable DOTNET_ROOT to the current working directory followed by .dotnet. That directory is created if it doesn't exist. The DOTNET_FILE environment variable is the filename of the .NET binary release you want to install. This file is extracted to the DOTNET_ROOT directory. Both the DOTNET_ROOT directory and its tools subdirectory are added to the PATH environment variable.
Important
If you run these commands, remember to change the DOTNET_FILE value to the name of the .NET binary you downloaded.
DOTNET_FILE=dotnet-sdk-9.0.306-linux-x64.tar.gz
export DOTNET_ROOT=$(pwd)/.dotnet

mkdir -p "$DOTNET_ROOT" && tar zxf "$DOTNET_FILE" -C "$DOTNET_ROOT"

export PATH=$PATH:$DOTNET_ROOT:$DOTNET_ROOT/tools
You can install more than one version of .NET in the same folder.
You can also install .NET to the home directory identified by the HOME variable or ~ path:
export DOTNET_ROOT=$HOME/.dotnet
To learn how to use the .NET CLI, see .NET CLI overview.
Verify downloaded binaries
After downloading an installer or binary release, verify it to make sure that the file hasn't been changed or corrupted. You can verify the checksum on your computer and then compare it to what was reported on the download website.
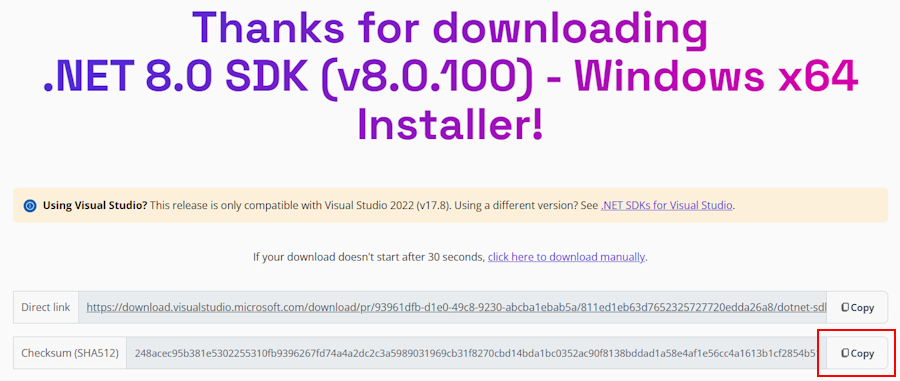
When you download the file from an official download page, the checksum for the file is displayed in a text box. Select the Copy button to copy the checksum value to your clipboard.

Use the sha512sum command to print the checksum of the file you've downloaded. For example, the following command reports the checksum of the dotnet-sdk-9.0.306-linux-x64.tar.gz file:
$ sha512sum dotnet-sdk-9.0.306-linux-x64.tar.gz
bbb6bdc3c8048e7cc189759b406257839e7d4bd6b8b1ba4bcdaeea8f92340e6855231043dd73f902130ca5357af72b810bb51a4da4d1315a2927ff85f831f1d5  dotnet-sdk-9.0.306-linux-x64.tar.gz
Compare the checksum with the value provided by the download site.
Use a checksum file to validate
The .NET release notes contain a link to a checksum file you can use to validate your downloaded file. The following steps describe how to download the checksum file and validate a .NET install binary:
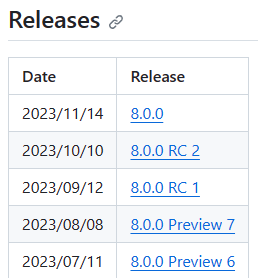
The release notes page for .NET 9 on GitHub at https://github.com/dotnet/core/tree/main/release-notes/9.0#releases contains a section named Releases. The table in that section links to the downloads and checksum files for each .NET 9 release. The following image shows the .NET 8 release table as a reference:

Select the link for the version of .NET that you downloaded.
The previous section used .NET SDK 9.0.306, which is in the .NET 9.0.10 release.
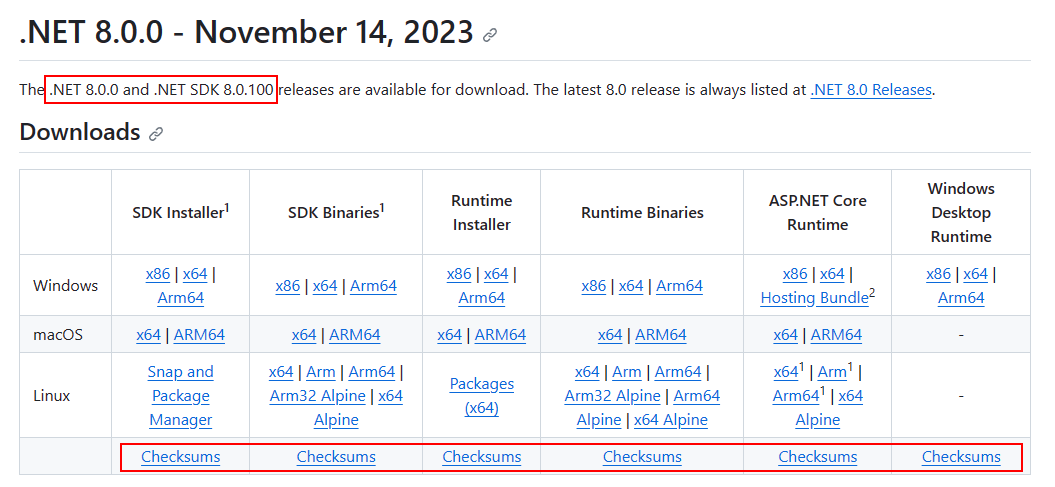
In the release page, you can see the .NET Runtime and .NET SDK version, and a link to the checksum file. The following image shows the .NET 8 release table as a reference:

Right-click on the Checksum link and copy it to your clipboard.
Open a terminal.
Use
curl -O {link}to download the checksum file.Replace the link in the following command with the link you copied.
curl -O https://builds.dotnet.microsoft.com/dotnet/checksums/9.0.10-sha.txtWith both the checksum file and the .NET release file downloaded to the same directory, use the
sha512sum -c {file} --ignore-missingcommand to validate the downloaded file.When validation passes, you see the file printed with the OK status:
$ sha512sum -c 9.0.10-sha.txt --ignore-missing
dotnet-sdk-9.0.306-linux-x64.tar.gz: OK
If you see the file marked as FAILED, the file you downloaded isn't valid and shouldn't be used.
$ sha512sum -c 9.0.10-sha.txt --ignore-missing
dotnet-sdk-9.0.306-linux-x64.tar.gz: FAILED
sha512sum: WARNING: 1 computed checksum did NOT match
sha512sum: 9.0.10-sha.txt: no file was verified
Set environment variables system-wide
If you used the previous install script, the variables set only apply to your current terminal session. Add them to your shell profile. There are many different shells available for Linux and each has a different profile. For example:
- Bash Shell: ~/.bash_profile or ~/.bashrc
- Korn Shell: ~/.kshrc or .profile
- Z Shell: ~/.zshrc or .zprofile
Set the following two environment variables in your shell profile:
DOTNET_ROOTThis variable is set to the folder .NET was installed to, such as
$HOME/.dotnet:export DOTNET_ROOT=$HOME/.dotnetPATHThis variable should include both the
DOTNET_ROOTfolder and theDOTNET_ROOT/toolsfolder:export PATH=$PATH:$DOTNET_ROOT:$DOTNET_ROOT/tools
