Tutorial: Configure secure LDAP for a Microsoft Entra Domain Services managed domain
To communicate with your Microsoft Entra Domain Services managed domain, the Lightweight Directory Access Protocol (LDAP) is used. By default, the LDAP traffic isn't encrypted, which is a security concern for many environments.
With Microsoft Entra Domain Services, you can configure the managed domain to use secure Lightweight Directory Access Protocol (LDAPS). When you use secure LDAP, the traffic is encrypted. Secure LDAP is also known as LDAP over Secure Sockets Layer (SSL) / Transport Layer Security (TLS).
This tutorial shows you how to configure LDAPS for a Domain Services managed domain.
In this tutorial, you learn how to:
- Create a digital certificate for use with Microsoft Entra Domain Services
- Enable secure LDAP for Microsoft Entra Domain Services
- Configure secure LDAP for use over the public internet
- Bind and test secure LDAP for a managed domain
If you don't have an Azure subscription, create an account before you begin.
Prerequisites
To complete this tutorial, you need the following resources and privileges:
- An active Azure subscription.
- If you don't have an Azure subscription, create an account.
- A Microsoft Entra tenant associated with your subscription, either synchronized with an on-premises directory or a cloud-only directory.
- A Microsoft Entra Domain Services managed domain enabled and configured in your Microsoft Entra tenant.
- The LDP.exe tool installed on your computer.
- If needed, install the Remote Server Administration Tools (RSAT) for Active Directory Domain Services and LDAP.
- You need Application Administrator and Groups Administrator Microsoft Entra roles in your tenant to enable secure LDAP.
Sign in to the Microsoft Entra admin center
In this tutorial, you configure secure LDAP for the managed domain using the Microsoft Entra admin center. To get started, first sign in to the Microsoft Entra admin center.
Create a certificate for secure LDAP
To use secure LDAP, a digital certificate is used to encrypt the communication. This digital certificate is applied to your managed domain, and lets tools like LDP.exe use secure encrypted communication when querying data. There are two ways to create a certificate for secure LDAP access to the managed domain:
- A certificate from a public certificate authority (CA) or an enterprise CA.
- If your organization gets certificates from a public CA, get the secure LDAP certificate from that public CA. If you use an enterprise CA in your organization, get the secure LDAP certificate from the enterprise CA.
- A public CA only works when you use a custom DNS name with your managed domain. If the DNS domain name of your managed domain ends in .onmicrosoft.com, you can't create a digital certificate to secure the connection with this default domain. Microsoft owns the .onmicrosoft.com domain, so a public CA won't issue a certificate. In this scenario, create a self-signed certificate and use that to configure secure LDAP.
- A self-signed certificate that you create yourself.
- This approach is good for testing purposes, and is what this tutorial shows.
The certificate you request or create must meet the following requirements. Your managed domain encounters problems if you enable secure LDAP with an invalid certificate:
- Trusted issuer - The certificate must be issued by an authority trusted by computers connecting to the managed domain using secure LDAP. This authority may be a public CA or an Enterprise CA trusted by these computers.
- Lifetime - The certificate must be valid for at least the next 3-6 months. Secure LDAP access to your managed domain is disrupted when the certificate expires.
- Subject name - The subject name on the certificate must be your managed domain. For example, if your domain is named aaddscontoso.com, the certificate's subject name must be *.aaddscontoso.com.
- The DNS name or subject alternate name of the certificate must be a wildcard certificate to ensure the secure LDAP works properly with Domain Services. Domain Controllers use random names and can be removed or added to ensure the service remains available.
- Key usage - The certificate must be configured for digital signatures and key encipherment.
- Certificate purpose - The certificate must be valid for TLS server authentication.
There are several tools available to create self-signed certificate such as OpenSSL, Keytool, MakeCert, New-SelfSignedCertificate cmdlet, and so on.
In this tutorial, let's create a self-signed certificate for secure LDAP using the New-SelfSignedCertificate cmdlet.
Open a PowerShell window as Administrator and run the following commands. Replace the $dnsName variable with the DNS name used by your own managed domain, such as aaddscontoso.com:
# Define your own DNS name used by your managed domain
$dnsName="aaddscontoso.com"

# Get the current date to set a one-year expiration
$lifetime=Get-Date

# Create a self-signed certificate for use with Azure AD DS
New-SelfSignedCertificate -Subject *.$dnsName `
  -NotAfter $lifetime.AddDays(365) -KeyUsage DigitalSignature, KeyEncipherment `
  -Type SSLServerAuthentication -DnsName *.$dnsName, $dnsName
The following example output shows that the certificate was successfully generated and is stored in the local certificate store (LocalMachine\MY):
PS C:\WINDOWS\system32> New-SelfSignedCertificate -Subject *.$dnsName `
>>   -NotAfter $lifetime.AddDays(365) -KeyUsage DigitalSignature, KeyEncipherment `
>>   -Type SSLServerAuthentication -DnsName *.$dnsName, $dnsName.com

   PSParentPath: Microsoft.PowerShell.Security\Certificate::LocalMachine\MY

Thumbprint                                Subject
----------                                -------
959BD1531A1E674EB09E13BD8534B2C76A45B3E6  CN=aaddscontoso.com
Understand and export required certificates
To use secure LDAP, the network traffic is encrypted using public key infrastructure (PKI).
- A private key is applied to the managed domain.
- This private key is used to decrypt the secure LDAP traffic. The private key should only be applied to the managed domain and not widely distributed to client computers.
- A certificate that includes the private key uses the .PFX file format.
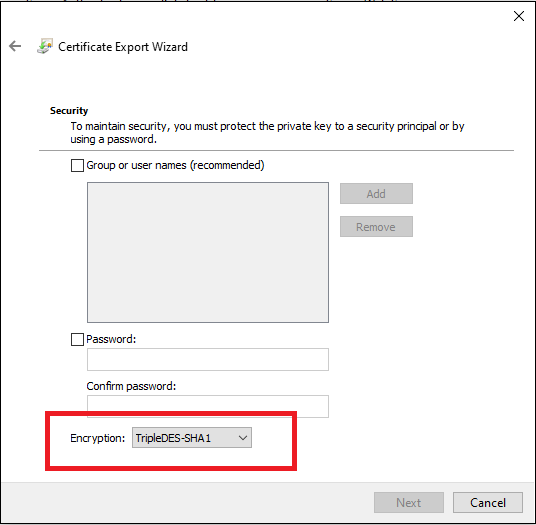
- When exporting the certificate, you must specify the TripleDES-SHA1 encryption algorithm. This is applicable to the .pfx file only and does not impact the algorithm used by the certificate itself. Note that the TripleDES-SHA1 option is available only beginning with Windows Server 2016.
- A public key is applied to the client computers.
- This public key is used to encrypt the secure LDAP traffic. The public key can be distributed to client computers.
- Certificates without the private key use the .CER file format.
These two keys, the private and public keys, make sure that only the appropriate computers can successfully communicate with each other. If you use a public CA or enterprise CA, you are issued with a certificate that includes the private key and can be applied to a managed domain. The public key should already be known and trusted by client computers.
In this tutorial, you created a self-signed certificate with the private key, so you need to export the appropriate private and public components.
Export a certificate for Microsoft Entra Domain Services
Before you can use the digital certificate created in the previous step with your managed domain, export the certificate to a .PFX certificate file that includes the private key.
To open the Run dialog, select the Windows + R keys.
Open the Microsoft Management Console (MMC) by entering mmc in the Run dialog, then select OK.
On the User Account Control prompt, then select Yes to launch MMC as administrator.
From the File menu, select Add/Remove Snap-in...
In the Certificates snap-in wizard, choose Computer account, then select Next.
On the Select Computer page, choose Local computer: (the computer this console is running on), then select Finish.
In the Add or Remove Snap-ins dialog, select OK to add the certificates snap-in to MMC.
In the MMC window, expand Console Root. Select Certificates (Local Computer), then expand the Personal node, followed by the Certificates node.

The self-signed certificate created in the previous step is shown, such as aaddscontoso.com. Right-select this certificate, then choose All Tasks > Export...
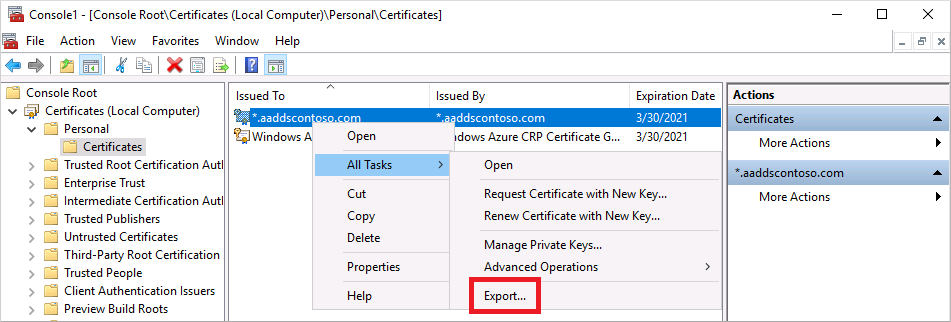
In the Certificate Export Wizard, select Next.
The private key for the certificate must be exported. If the private key is not included in the exported certificate, the action to enable secure LDAP for your managed domain fails.
On the Export Private Key page, choose Yes, export the private key, then select Next.
Managed domains only support the .PFX certificate file format that includes the private key. Don't export the certificate as .CER certificate file format without the private key.
On the Export File Format page, select Personal Information Exchange - PKCS #12 (.PFX) as the file format for the exported certificate. Check the box for Include all certificates in the certification path if possible:
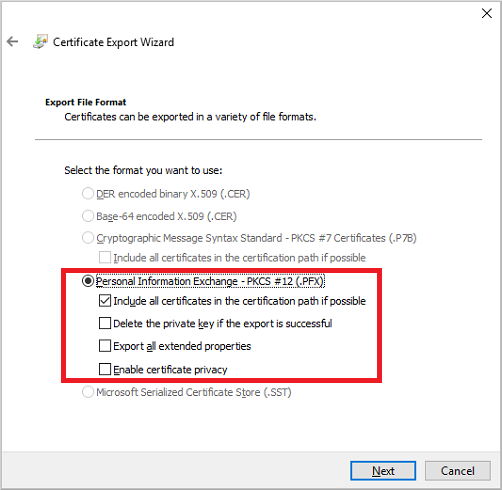
As this certificate is used to decrypt data, you should carefully control access. A password can be used to protect the use of the certificate. Without the correct password, the certificate can't be applied to a service.
On the Security page, choose the option for Password to protect the .PFX certificate file. The encryption algorithm must be TripleDES-SHA1. Enter and confirm a password, then select Next. This password is used in the next section to enable secure LDAP for your managed domain.
If you export using the PowerShell export-pfxcertificate cmdlet, you need to pass the -CryptoAlgorithmOption flag using TripleDES_SHA1.
On the File to Export page, specify the file name and location where you'd like to export the certificate, such as
C:\Users\<account-name>\azure-ad-ds.pfx. Keep a note of the password and location of the .PFX file as this information would be required in next steps.On the review page, select Finish to export the certificate to a .PFX certificate file. A confirmation dialog is displayed when the certificate has been successfully exported.
Leave the MMC open for use in the following section.
Export a certificate for client computers
Client computers must trust the issuer of the secure LDAP certificate to be able to connect successfully to the managed domain using LDAPS. The client computers need a certificate to successfully encrypt data that is decrypted by Domain Services. If you use a public CA, the computer should automatically trust these certificate issuers and have a corresponding certificate.
In this tutorial you use a self-signed certificate, and generated a certificate that includes the private key in the previous step. Now let's export and then install the self-signed certificate into the trusted certificate store on the client computer:
Go back to the MMC for Certificates (Local Computer) > Personal > Certificates store. The self-signed certificate created in a previous step is shown, such as aaddscontoso.com. Right-select this certificate, then choose All Tasks > Export...
In the Certificate Export Wizard, select Next.
As you don't need the private key for clients, on the Export Private Key page choose No, do not export the private key, then select Next.
On the Export File Format page, select Base-64 encoded X.509 (.CER) as the file format for the exported certificate:
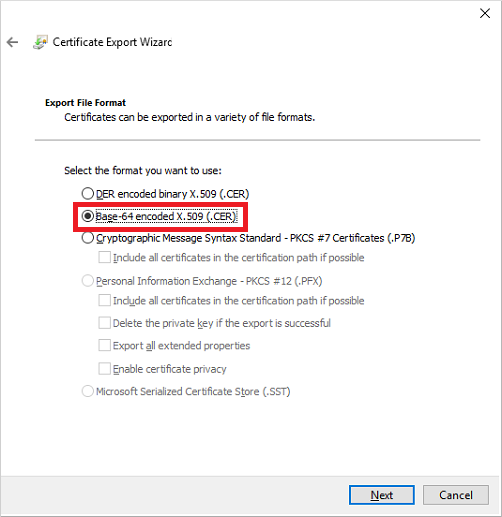
On the File to Export page, specify the file name and location where you'd like to export the certificate, such as
C:\Users\<account-name>\azure-ad-ds-client.cer.On the review page, select Finish to export the certificate to a .CER certificate file. A confirmation dialog is displayed when the certificate has been successfully exported.
The .CER certificate file can now be distributed to client computers that need to trust the secure LDAP connection to the managed domain. Let's install the certificate on the local computer.
Open File Explorer and browse to the location where you saved the .CER certificate file, such as
C:\Users\<account-name>\azure-ad-ds-client.cer.Right-select the .CER certificate file, then choose Install Certificate.
In the Certificate Import Wizard, choose to store the certificate in the Local machine, then select Next:
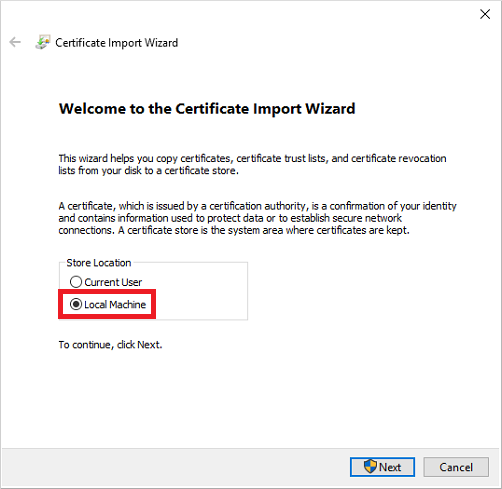
When prompted, choose Yes to allow the computer to make changes.
Choose to Automatically select the certificate store based on the type of certificate, then select Next.
On the review page, select Finish to import the .CER certificate. file A confirmation dialog is displayed when the certificate has been successfully imported.
Enable secure LDAP for Microsoft Entra Domain Services
With a digital certificate created and exported that includes the private key, and the client computer set to trust the connection, now enable secure LDAP on your managed domain. To enable secure LDAP on a managed domain, perform the following configuration steps:
In the Microsoft Entra admin center, enter domain services in the Search resources box. Select Microsoft Entra Domain Services from the search result.
Choose your managed domain, such as aaddscontoso.com.
On the left-hand side of the Microsoft Entra Domain Services window, choose Secure LDAP.
By default, secure LDAP access to your managed domain is disabled. Toggle Secure LDAP to Enable.
Secure LDAP access to your managed domain over the internet is disabled by default. When you enable public secure LDAP access, your domain is susceptible to password brute force attacks over the internet. In the next step, a network security group is configured to lock down access to only the required source IP address ranges.
Toggle Allow secure LDAP access over the internet to Enable.
Select the folder icon next to .PFX file with secure LDAP certificate. Browse to the path of the .PFX file, then select the certificate created in a previous step that includes the private key.
Important
As noted in the previous section on certificate requirements, you can't use a certificate from a public CA with the default .onmicrosoft.com domain. Microsoft owns the .onmicrosoft.com domain, so a public CA won't issue a certificate.
Make sure your certificate is in the appropriate format. If it's not, the Azure platform generates certificate validation errors when you enable secure LDAP.
Enter the Password to decrypt .PFX file set in a previous step when the certificate was exported to a .PFX file.
Select Save to enable secure LDAP.
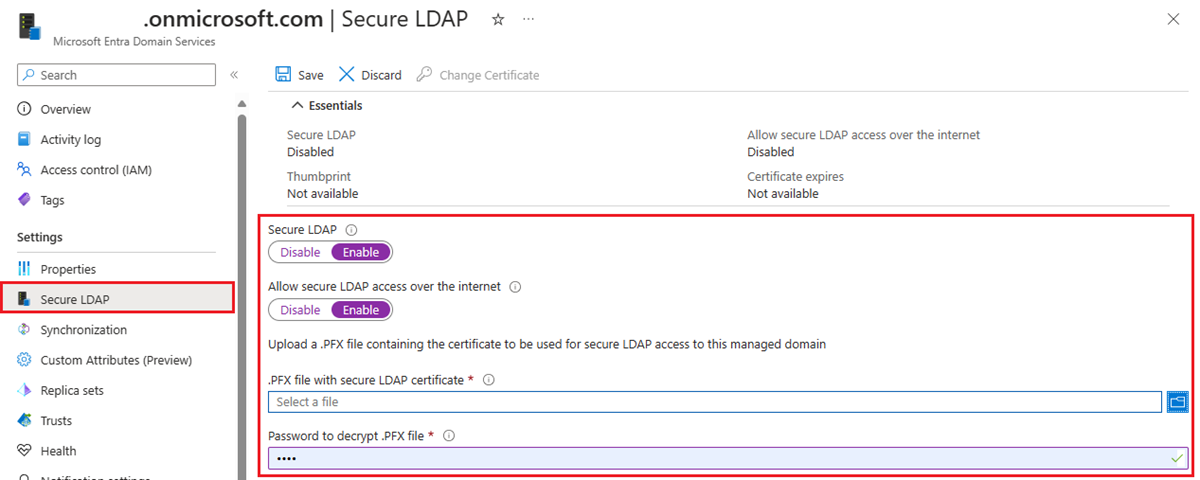
A notification is displayed that secure LDAP is being configured for the managed domain. You can't modify other settings for the managed domain until this operation is complete.
It takes a few minutes to enable secure LDAP for your managed domain. If the secure LDAP certificate you provide doesn't match the required criteria, the action to enable secure LDAP for the managed domain fails.
Some common reasons for failure are if the domain name is incorrect, the encryption algorithm for the certificate isn't TripleDES-SHA1, or the certificate expires soon or has already expired. You can re-create the certificate with valid parameters, then enable secure LDAP using this updated certificate.
Change an expiring certificate
- Create a replacement secure LDAP certificate by following the steps to create a certificate for secure LDAP.
- To apply the replacement certificate to Domain Services, in the left menu for Microsoft Entra Domain Services in the Microsoft Entra admin center, select Secure LDAP, and then select Change Certificate.
- Distribute the certificate to any clients that connect by using secure LDAP.
Lock down secure LDAP access over the internet
When you enable secure LDAP access over the internet to your managed domain, it creates a security threat. The managed domain is reachable from the internet on TCP port 636. It's recommended to restrict access to the managed domain to specific known IP addresses for your environment. An Azure network security group rule can be used to limit access to secure LDAP.
Let's create a rule to allow inbound secure LDAP access over TCP port 636 from a specified set of IP addresses. A default DenyAll rule with a lower priority applies to all other inbound traffic from the internet, so only the specified addresses can reach your managed domain using secure LDAP.
In the Microsoft Entra admin center, search for and select Resource groups.
Choose your resource group, such as myResourceGroup, then select your network security group, such as aaads-nsg.
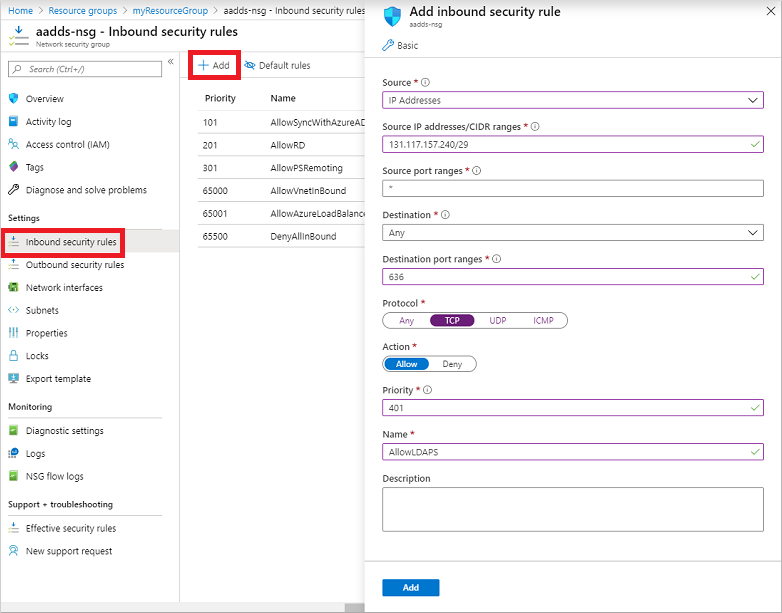
The list of existing inbound and outbound security rules are displayed. On the left-hand side of the network security group window, choose Settings > Inbound security rules.
Select Add, then create a rule to allow TCP port 636. For improved security, choose the source as IP Addresses and then specify your own valid IP address or range for your organization.
Setting Value Source IP Addresses Source IP addresses / CIDR ranges A valid IP address or range for your environment Source port ranges * Destination Any Destination port ranges 636 Protocol TCP Action Allow Priority 401 Name AllowLDAPS When ready, select Add to save and apply the rule.
Configure DNS zone for external access
With secure LDAP access enabled over the internet, update the DNS zone so that client computers can find this managed domain. The Secure LDAP external IP address is listed on the Properties tab for your managed domain:
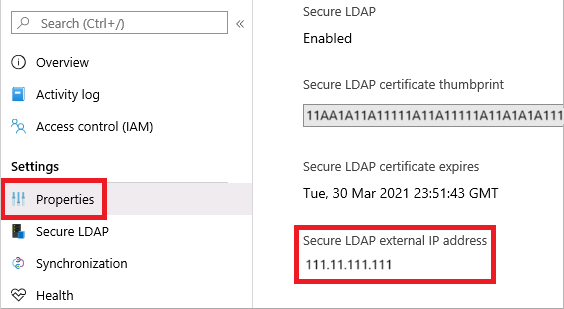
Configure your external DNS provider to create a host record, such as ldaps, to resolve to this external IP address. To test locally on your machine first, you can create an entry in the Windows hosts file. To successfully edit the hosts file on your local machine, open Notepad as an administrator, then open the file C:\Windows\System32\drivers\etc\hosts.
The following example DNS entry, either with your external DNS provider or in the local hosts file, resolves traffic for ldaps.aaddscontoso.com to the external IP address of 168.62.205.103:
168.62.205.103 ldaps.aaddscontoso.com
Test queries to the managed domain
To connect and bind to your managed domain and search over LDAP, you use the LDP.exe tool. This tool is included in the Remote Server Administration Tools (RSAT) package. For more information, see install Remote Server Administration Tools.
- Open LDP.exe and connect to the managed domain. Select Connection, then choose Connect....
- Enter the secure LDAP DNS domain name of your managed domain created in the previous step, such as ldaps.aaddscontoso.com. To use secure LDAP, set Port to 636, then check the box for SSL.
- Select OK to connect to the managed domain.
Next, bind to your managed domain. Users (and service accounts) can't perform LDAP simple binds if you have disabled NTLM password hash synchronization on your managed domain. For more information on disabling NTLM password hash synchronization, see Secure your managed domain.
- Select the Connection menu option, then choose Bind....
- Provide the credentials of a user account that belongs to the managed domain. Enter the user account's password, then enter your domain, such as aaddscontoso.com.
- For Bind type, choose the option for Bind with credentials.
- Select OK to bind to your managed domain.
To see of the objects stored in your managed domain:
Select the View menu option, and then choose Tree.
Leave the BaseDN field blank, then select OK.
Choose a container, such as AADDC Users, then right-select the container and choose Search.
Leave the pre-populated fields set, then select Run. The results of the query are displayed in the right-hand window, as shown in the following example output:
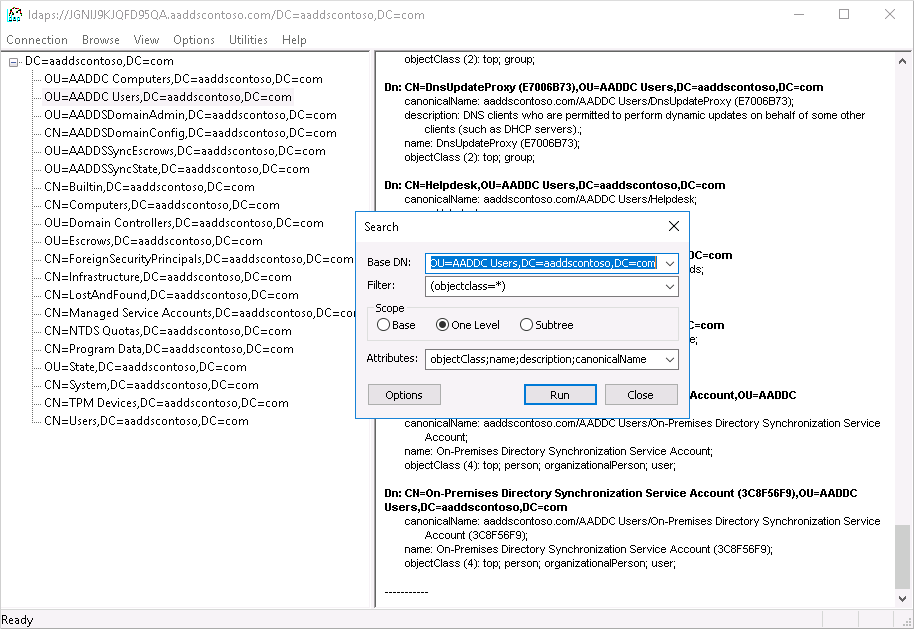
To directly query a specific container, from the View > Tree menu, you can specify a BaseDN such as OU=AADDC Users,DC=AADDSCONTOSO,DC=COM or OU=AADDC Computers,DC=AADDSCONTOSO,DC=COM. For more information on how to format and create queries, see LDAP query basics.
Note
If a Self signed certificate is used, make sure Self signed certificate added on the Trusted Root Certification Authorities for LDAPS to work with LDP.exe
Clean up resources
If you added a DNS entry to the local hosts file of your computer to test connectivity for this tutorial, remove this entry and add a formal record in your DNS zone. To remove the entry from the local hosts file, complete the following steps:
- On your local machine, open Notepad as an administrator
- Browse to and open the file
C:\Windows\System32\drivers\etc\hosts. - Delete the line for the record you added, such as
168.62.205.103 ldaps.aaddscontoso.com
Troubleshooting
If you see an error stating that LDAP.exe cannot connect, try working through the different aspects of getting the connection:
- Configuring the domain controller
- Configuring the client
- Networking
- Establishing the TLS session
For the certificate subject name match, the DC will use the Domain Services domain name (not the Microsoft Entra domain name) to search its certificate store for the certificate. Spelling mistakes, for example, prevent the DC from selecting the right certificate.
The client attempts to establish the TLS connection using the name you provided. The traffic needs to get all the way through. The DC sends the public key of the server auth cert. The cert needs to have the right usage in the certificate, the name signed in the subject name must be compatible for the client to trust that the server is the DNS name which you’re connecting to (that is, a wildcard will work, with no spelling mistakes), and the client must trust the issuer. You can check for any problems in that chain in the System log in Event Viewer, and filter the events where source equals Schannel. Once those pieces are in place, they form a session key.
For more information, see TLS Handshake.
Next steps
In this tutorial, you learned how to:
- Create a digital certificate for use with Microsoft Entra Domain Services
- Enable secure LDAP for Microsoft Entra Domain Services
- Configure secure LDAP for use over the public internet
- Bind and test secure LDAP for a managed domain