How to create collections in Configuration Manager
Applies to: Configuration Manager (current branch)
Collections are groupings of users or devices. Use collections for tasks like managing applications, deploying compliance settings, or installing software updates. You can also use collections to manage groups of client settings or use them with role-based administration to specify the resources that an administrative user can access. Configuration Manager contains several built-in collections. For more information, see Introduction to collections.
Note
A collection can contain users or devices, but not both.
The information in this article can help you create collections in Configuration Manager. You can also import collections that were created at the current Configuration Manager site or at another one. For more information about how to export and import collections, see How to manage collections.
Collection rules
There are different types of rules that you can use to configure the members of a collection in Configuration Manager.
Direct rule
Use direct rules to choose the users or computers that you want to add to a collection. The membership doesn't change unless you remove a resource from Configuration Manager. Before you can add the resources to a direct rule collection, Configuration Manager must have discovered them or you must have imported them. Direct rule collections have more administrative overhead than query rule collections because they require manual changes.
Query rule
Dynamically update the membership of a collection based on a query that Configuration Manager runs on a schedule. For example, you can create a collection of users that are a member of the Human Resources organizational unit in Active Directory Domain Services. This collection is automatically updated when new users are added to or removed from the Human Resources organizational unit.
For example queries that you can use to build collections, see How to create queries.
Include collection rule
Include the members of another collection in a Configuration Manager collection. If the included collection changes, Configuration Manager updates the membership of the current collection on a schedule.
You can add multiple include collection rules to a collection.
Exclude collection rule
Exclude collection rules let you exclude the members of one collection from another Configuration Manager collection. If the excluded collection changes, Configuration Manager updates the membership of the current collection on a schedule.
You can add multiple exclude collection rules to a collection. If a collection includes both include collection and exclude collection rules and there's a conflict, the exclude collection rule takes priority.
Example of an exclude collection rule
You create a collection that has one include collection rule and one exclude collection rule. The include collection rule is for a collection of Dell desktops. The exclude collection is for a collection of computers that have less than 4 GB of RAM. The new collection contains Dell desktops that have at least 4 GB of RAM.
Create a collection
In the Configuration Manager console, go to the Assets and Compliance workspace.
To create a device collection, select the Device Collections node. Then, on the Home tab of the ribbon, in the Create group, select Create Device Collection.
To create a user collection, select the User Collections node. Then, on the Home tab of the ribbon, in the Create group, select Create User Collection.
On the General page of the wizard, provide a Name and a Comment. In the Limiting collection section, select Browse, and then select a limiting collection. The collection you're creating will contain only members from the limiting collection.
On the Membership Rules page, in the Add Rule list, select the type of membership rule that you want to use for the collection. You can configure multiple rules for each collection. The configuration for each rule varies. For more information on configuring each rule, see the following sections of this article:
Also on the Membership Rules page, review the following settings.
Use incremental updates for this collection: Select this option to periodically scan for and update only new or changed resources from the previous collection evaluation. This process is independent of a full collection evaluation. By default, incremental updates occur at 5-minute intervals.
Important
Collections with query rules that use the following classes don't support incremental updates:
- SMS_G_System_CollectedFile
- SMS_G_System_LastSoftwareScan
- SMS_G_System_AppClientState
- SMS_G_System_DCMDeploymentState
- SMS_G_System_DCMDeploymentErrorAssetDetails
- SMS_G_System_DCMDeploymentCompliantAssetDetails
- SMS_G_System_DCMDeploymentNonCompliantAssetDetails
- SMS_G_User_DCMDeploymentCompliantAssetDetails (for collections of users only)
- SMS_G_User_DCMDeploymentNonCompliantAssetDetails (for collections of users only)
- SMS_G_System_SoftwareUsageData
- SMS_G_System_CI_ComplianceState
- SMS_G_System_EndpointProtectionStatus
- SMS_GH_System_*
- SMS_GEH_System_*
Schedule a full update on this collection: Schedule a regular full evaluation of the collection membership.
When you disable this setting, the site clears the schedule. This change from previous behavior makes sure that the site doesn't continue to evaluate the query. To stop the site evaluating a collection on a schedule, disable this option.
You can't disable the evaluation of built-in collections like All Systems, but you can configure the schedule. This behavior allows you to customize this action at a time that meets your requirements.
Tip
On built-in collections, only change the Time of the custom schedule. Don't change the Recurrence pattern. Future versions of Configuration Manager might enforce a specific recurrence pattern.
Complete the wizard to create the new collection. The new collection is displayed in the Device Collections node of the Assets and Compliance workspace.
Note
To see new collection members, refresh or reload the Configuration Manager console. They don't appear in the collection until after the first scheduled update. You can also manually select Update Membership for the collection. It might take a few minutes for a collection update to complete.
Configure a direct rule for a collection
On the Search for Resources page of the Create Direct Membership Rule Wizard, specify the following information:
Resource class: Select the type of resource you want to search for and add to the collection. For example:
- System Resource: Search for inventory data returned from client computers.
- Unknown Computer: Select from values returned by unknown computers.
- User Resource: Search for user information collected by Configuration Manager.
- User Group Resource: Search for user group information collected by Configuration Manager.
Attribute name: Select the attribute associated with the selected resource class that you want to search for. For example:
If you want to select computers by their NetBIOS name, select System Resource in the Resource class list and NetBIOS name in the Attribute name list.
If you want to select users by their organizational unit (OU) name, select User Resource in the Resource class list and User OU Name in the Attribute name list.
Exclude resources marked as obsolete: If a client computer is marked as obsolete, don't include this value in the search results.
Exclude resources that do not have the Configuration Manager client installed: These resources won't be displayed in the search results.
Value: Enter a value to search the selected attribute name. Use the percent character (
%) as a wildcard. For example:To search for computers that have a NetBIOS name beginning with M, enter
M%in this field.To search for users in the Contoso OU, enter
Contosoin this field.
On the Select Resources page, select the resources that you want to add to the collection in the Resources list, and then select Next.
Configure a query rule for a collection
In the Query Rule Properties dialog box, specify the following information.
Name: Specify a unique name for the query.
Import Query Statement: Opens the Browse Query dialog box. Select a Configuration Manager query to use as the query rule for the collection.
Resource class: Select the type of resource you want to search for and add to the collection. Select a value from System Resource to search for inventory data returned from client computers or from Unknown Computer to select from values returned by unknown computers.
Edit Query Statement: Opens the Query Statement Properties dialog box, where you can write a query to use as the rule for the collection. On the General tab, if you select the option to Omit duplicate rows (select distinct), it may result in fewer rows returned but potentially quicker results. For more information about queries, see Introduction to queries.
- Starting in Configuration Manager 2010, you can preview the results when you're creating or editing a query for collection membership. For more information, see the Preview collection queries section.
Configure an include collection rule
In the Select Collections dialog box, select the collections you want to include in the new collection, and then select OK.
Configure an exclude collection rule
In the Select Collections dialog box, select the collections you want to exclude from the new collection, and then select OK.
Preview collection queries
(Introduced in 2010)
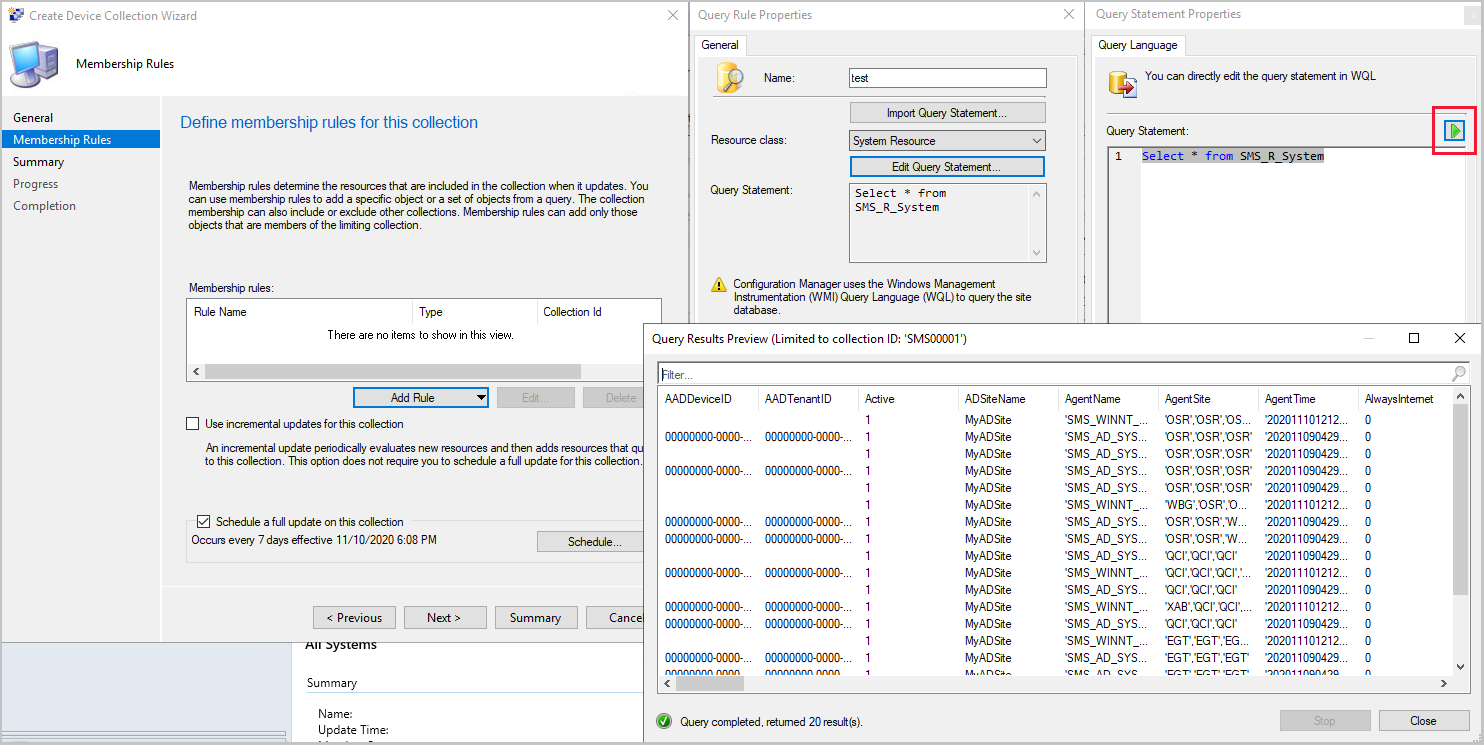
Starting in Configuration Manager 2010, you can preview the results when you're creating or editing a query for collection membership. In the Query Statement Properties, select the green triangle to show the Query Results Preview window. Select Stop if you want to stop a long running query.

Improvements to query preview
(Introduced in 2103)
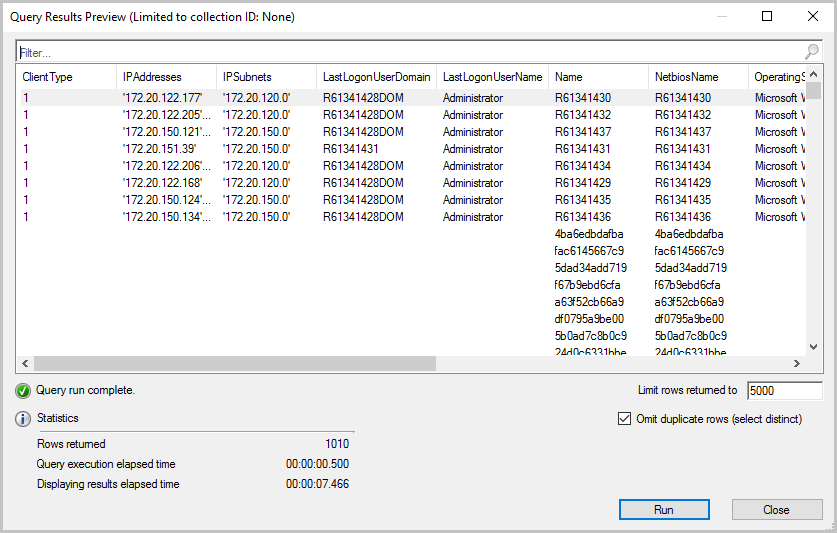
Starting in Configuration Manager version 2103, you have more options when using the collection query preview. The following improvements have been made to previewing collection queries:
- Limit the number of rows returned
- Your limit can be between 1 to 10,000 rows. The default is 5000 rows.
- Omit duplicate rows from the result set
- If the Omit duplicate rows option isn't selected, the original query statement will be executed as is, even if the query contains the word distinct.
- When the Omit duplicate rows option is selected, if the query already contains the word distinct, then the query runs as it is. When the query doesn't contain the word distinct, it's added to the query for the preview (mean override).
- Review statistics for the query preview such as number of rows returned and elapsed time.
Note
- Elapsed times shown for the query preview may not be the same as actual execution of the target query.
- Query execution elapsed time and Displaying results elapsed time shouldn't be added for a total elapsed time since these processes run in parallel.
Import a collection
When you export a collection from a site, Configuration Manager saves it as a Managed Object Format (MOF) file. Use this procedure to import that file into your site database. To complete this procedure, you need Create permissions on the collections class.
Important
Make sure the MOF file contains only collection data, is from a trusted source, and hasn't been tampered with.
Also make sure to export the file from a site that's the same version of Configuration Manager as the import site.
For more information about exporting collections, see How to manage collections.
In the Configuration Manager console, go to the Assets and Compliance workspace. Select either the User Collections or the Device Collections node.
On the Home tab of the ribbon, in the Create group, select Import Collections.
On the General page of the Import Collections Wizard, select Next.
On the MOF File Name page, select Browse. Browse to the MOF file that contains the collection information you want to import.
Complete the wizard to import the collection. The new collection is displayed in the User Collections or Device Collections node of the Assets and Compliance workspace. Refresh or reload the Configuration Manager console to see the collection members for the newly imported collection.
Use PowerShell
You can use PowerShell to create and import collections. For more information, see the following cmdlet articles:
Synchronize members to Microsoft Entra groups
Synchronize collection members to Microsoft Entra groups
