Note
Ang pag-access sa pahinang ito ay nangangailangan ng pahintulot. Maaari mong subukang mag-sign in o magpalit ng mga direktoryo.
Ang pag-access sa pahinang ito ay nangangailangan ng pahintulot. Maaari mong subukang baguhin ang mga direktoryo.
A child agent is a lightweight agent that exists within the context of your main agent. Child agents let you logically group tools, instructions, and knowledge into clearly defined subagents within a larger agent. They're ideal for single use cases that respond to a single intent or complete a single task. This article explains how to create and manage a child agent.
Create a child agent
Go to the Agents page for your main agent and select Add an agent.
Select New child agent.
Enter a distinctive name for your new child agent.
Determine when your agent should be used. By default, agents respond to users or triggers, based on their description.
- If you want to use the default behavior (The agent chooses - Based on description), enter a brief description of your agent's purpose.
- Otherwise, expand the list under When will this be used? and select the desired behavior. For more information on the supported behaviors, see Determine when to use your agent.
Enter clear instructions that you want your agent to follow when invoked. To reference tools, variables, or add Power Fx formulas in your instructions, enter a slash (/) and select the desired option from the menu that appears.
Important
When referencing existing tools in your subagent instructions, decide if the tool should be accessible directly by your main agent or only when explicitly called within the subagent instructions. Limiting a tool's usage to explicit instruction references helps prevent orchestrator confusion when similar tools or agents exist. For example, if you have a "Check account balance" agent and a similar "Get account balance" tool, restrict the tool to be called only by the agent to avoid overlap. To restrict a tool to only be available when referenced from another agent, clear the Allow agent to decide dynamically when to use this tool property in the Additional details section on the tool's detail page.
Optionally, add knowledge and tools that only this child agent can use:
- In the Knowledge section, select Add and proceed in the same fashion as when you add knowledge to your main agent.
- In the Tools section, select Add and proceed in the same fashion as when you add tools to your main agent.
If you don't want this agent to be active yet, turn off Enabled. You can make your child agent active later.
Select Save.
Manage inputs and outputs
By default, a child agent receives a natural language task to accomplish from the main agent when the agent calls it. When it completes its task, it returns a natural language summary of what happened during its execution. In some cases, you might want to specify more explicit input and output values for the agent.
Configure inputs and input collection
From your parent agent Agents page, select your child agent.
Scroll to the Inputs section.
To add an input, select Add Input. Define a Display name and Description, which help the agent understand the purpose of the input so that it can fill the input with a relevant value when calling this agent.
Select a Data type.
Optionally, select Make this input required to require the input has a value before the agent can be called.
Select Save.
Advanced input configurations
Select Advanced to expand the section and see the other settings you can configure for the input.
Advanced settings include the following settings related to how the agent fills the input value when calling the child agent:
- Should prompt user: If this setting is turned on, the agent explicitly prompts the end user for a value for the input if the agent can't find the value from available context. This is useful when you want to ensure the agent gets a value for this input, even if the calling agent doesn't provide one or doesn't have relevant context to fill it. When this setting is enabled, the child agent generates a prompt to ask the user for the required information, which can help improve the accuracy of the agent's response.
- Prompt - Customize: Select to customize a specific prompt wording for collection for more deterministic control.
- How many reprompts: Specify how many times the agent should reprompt the user for a value for this input if the provided value isn't valid. This is useful to ensure the agent gets a valid value for this input. You can select up to two reprompts.
- Retry prompt - Customize: Select to customize specific prompt wording for reprompts when the provided value doesn't satisfy the specified conditions, for more deterministic control.
- Condition: Specify conditions the provided input has to satisfy to be considered valid.
- Condition not met prompt: Customize a specific prompt wording to ask the user for a different value when the provided value doesn't satisfy the specified conditions.
- Action if no entity found: Specify the action the agent should take if the agent can't find a value for this input from the available context, or from prompting. Select whether to escalate, set the variable to a specific value, or leave the value empty.
- No entity found message: If you select to have the agent escalate when no value is found for this input, customize the message the agent sends to the user.
Configure child agent outputs and completion behavior
Under Outputs, you can configure the output values your child agent returns to the parent agent when it finishes. You can also configure the behavior of the parent agent after the child agent finishes.
Configure parent agent behavior after child agent completion
You can specify the behavior of the parent agent after the child agent finishes running under After running in the Outputs section:
- Don't respond: By default, the parent agent continues with the next step in its orchestration plan after the child agent finishes and returns any outputs to the parent agent. You can also select to have the parent agent send a message to the user immediately after the child agent finishes, before continuing with the next step in its orchestration plan by selecting one of the other options.
- Write the response with generative AI: The parent agent sends a message to the user with a generative AI response immediately after the child agent finishes, using the child agent's outputs as context for the response.
- Send specific response: The parent agent sends a specific message to the user immediately after the child agent finishes, regardless of the child agent's outputs. When you select this option, you can customize the message content.
- Send an adaptive card: The parent agent sends an adaptive card to the user immediately after the child agent finishes. When you select this option, you can customize the adaptive card content.
Configure outputs
Go to the child agent details.
Scroll to the Outputs section.
To see the current list of outputs, expand the Advanced section within the Outputs section.
To add an output, select Add Output. Define a Display name and Description, which help the agent understand the purpose of the output so that it can fill it with a relevant value when returning values to the calling agent.
Select a Data type.
Select Save.
Within the Outputs section, you can also choose to have a message sent to the user immediately after your child agent finishes. To send the message, change the After running selection.
Determine when to use your agent
By default, child agents respond to a user query based on their description. You can also configure child agents to intercept other events and respond to them under When will this be used?.
| Event | Description |
|---|---|
| A message is received | Called when a message activity—the most common type of activity—is received. Received when a user types or says something to the agent. By default, the agent responds to any messages. To limit the agent response to a specific type of message, use the Activity type list under Additional details. |
| A custom client event occurs | Called when an event activity is received. By default, the agent responds to any event. To limit the agent response to a specific event, use the Event name property under Additional details. |
| An activity occurs | Called when an activity of any type is received. To limit the agent response to a specific type of activity, use the Activity type list under Additional details. |
| The conversation changes | Called when a conversation update activity is received. For example, Teams sends an activity of this type when a user joins a conversation. |
| It's invoked | Called when an invoke activity is received. Most commonly received from the Teams channel—for example, when the user interacts with a message or search extension in Teams. |
| It's redirected to | Called when the agent is called explicitly from within a topic. |
| The user is inactive for a while | Called when the user hasn't interacted with the main agent after a configured period of time. Select the desired inactivity threshold from the Inactivity duration list under Additional details. |
| A plan completes | Called when the main agent finishes executing all planned steps to respond to a user query or autonomous trigger. |
| An AI-generated response is about to be sent | Called when the main agent generates a response for a user after calling one or more topics, tools, or knowledge sources. Use the Response.FormattedText system variable to see the generated response. Set the ContinueResponse variable to false if you want to prevent the orchestration response being sent (that is, if you modify the message and send your own using a Message node). |
Other details
Depending on your selection for When will this be used?, more properties might be available. The following properties are always available.
Condition
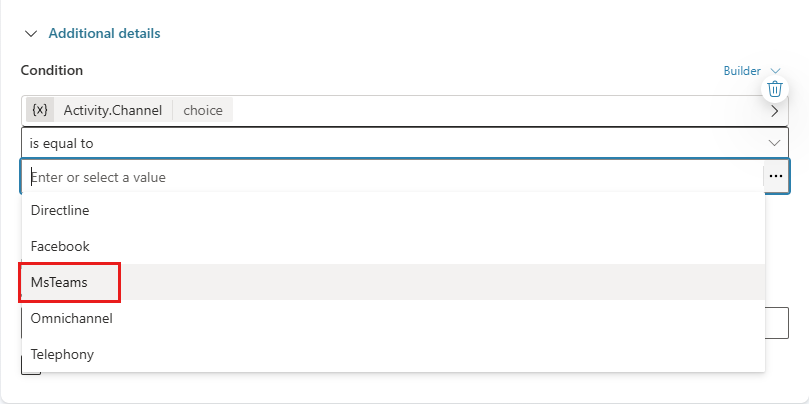
Specify conditions that must be met in order for the agent to be called. For example, you might want the agent to be called only if the channel used by an employee is Microsoft Teams.
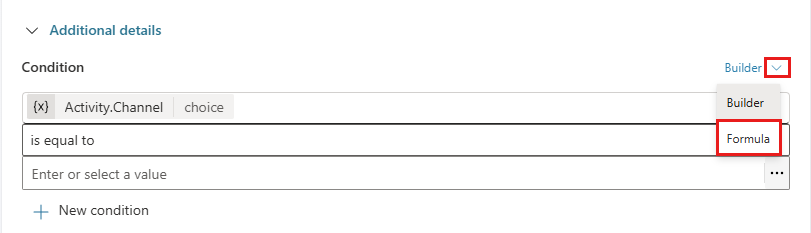
If you need more complex conditions, you can switch to the Power Fx formula editor: select Builder then select Formula.
Priority
More than one agent can fire for a single incoming activity, such as a message. By default, the option you select for When will this be used? determines the order the agents fire.
Child agents and topics share the same set of triggers or events that they can respond to. If an agent and a topic are configured to respond to the same event, such as user inactivity, use the priority property to determine which one goes first.
Order of execution:
- An activity occurs
- A message is received / A custom client event occurs / The conversation changes / It's invoked
- The agent chooses
If multiple agents or topics must be called based on the same type of event, they're called in the order of creation (oldest first).
You can set the Priority property explicitly. A lower number indicates a higher priority.
Child agents and tools use
Copilot Studio agents using generative orchestration have limitations in the maximum and recommended numbers of tools they can use. For more information, see Limitations on tools in agents.
When a child agent is called, it uses its own tools and knowledge to respond to the user or event. Because child agents have their own orchestration, they have their own limits for the number of tools, separate from the limits of the parent agent.
The separate limit is one of the benefits of using child agents: you can logically group tools and knowledge into smaller agents that focus on specific tasks, without impacting the overall limits of the main agent. There's a tradeoff, however, in the latency added by the added layer of orchestration.