Note
Ang pag-access sa pahinang ito ay nangangailangan ng pahintulot. Maaari mong subukang mag-sign in o magpalit ng mga direktoryo.
Ang pag-access sa pahinang ito ay nangangailangan ng pahintulot. Maaari mong subukang baguhin ang mga direktoryo.
Use the Update a row action to make changes to a row in Microsoft Dataverse.
For example, you can create a flow that updates an Account in Dataverse when you receive an email, as shown in the following image.
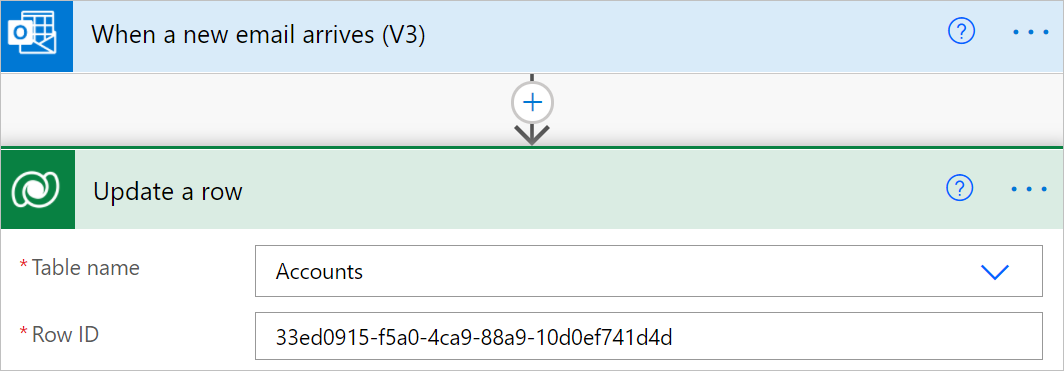
Update a row
After you select a table, the action card displays a list of inputs for the row ID that's related to the columns in the table to update. An asterisk (*) marks the mandatory columns. The Row ID column is the unique ID for the row that's being updated. If you provide a row ID that doesn't exist or generate one with the guid() expression, the action performs an update or insert (upsert) operation, creating a new row with the ID you provide.
If you don't see a column, select Show advanced options at the bottom of the card. The update skips columns you leave blank, unless a null value is provided explicitly.
Set complex fields
Most Dataverse fields contain simple data types where you can set the values intuitively. Two types of fields that are frequently challenging are lookup and multiselect fields.
Set lookup fields
Lookup fields require the following syntax: <entity set name>(<item id>).
For example, if you set the value of the account table primary contact field to a contact record with ID value of aaaaaaaa-0000-1111-2222-bbbbbbbbbbbb, set the lookup by using this value: contacts(aaaaaaaa-0000-1111-2222-bbbbbbbbbbbb).
The tricky part is determining the entity set name. It's usually the same as the plural name of the table, but not always. Use the following procedure to get the correct entity set name for a table by using Power Apps.
Sign in to Power Apps.
To learn more about using the Power Apps interface, see Get started with Power Apps.
On the left navigation pane, select Tables.
Set the filter to All.
Search for the table you want and select it.
In the Table properties area, expand the Tools menu.
Select the Copy set name command.
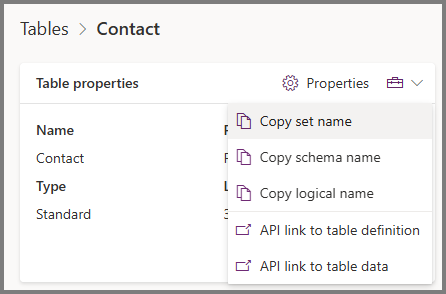
By using this method, you can always get the correct entity set name.
View all entity set names
Another way to quickly check entity set names is to use your browser to navigate to [Organization URI]/api/data/v9.2/, where [Organization URI] represents the URL for your environment. You can find this Web API endpoint URL in Developer resources in Power Apps. This URL returns a list of all the entity set names. In the results, use Ctrl+F to search for the name you expect to confirm it exists.
{
  "@odata.context": "[Organization URI]/api/data/v9.2/$metadata",
  "value": [
    {
      "name": "aadusers",
      "kind": "EntitySet",
      "url": "aadusers"
    },
    {
      "name": "accountleadscollection",
      "kind": "EntitySet",
      "url": "accountleadscollection"
    },
    {
      "name": "accounts",
      "kind": "EntitySet",
      "url": "accounts"
    },

 [Truncated for brevity]
Learn more about this and other Web API resources
Set multiselect fields
The user interface accepts only one option. To select multiple options, switch the input method to Enter custom value, and then enter a unique name for each option, separating each name with a comma.
Learn more about multiselect 'choices' columns:
Advanced options
Return Full Metadata
This setting controls whether to load all columns from the table or just the essential ones for better performance. If you don't set it, the flow automatically returns full metadata if it uses dynamic content or expressions that need it.