Note
L’accès à cette page nécessite une autorisation. Vous pouvez essayer de vous connecter ou de modifier des répertoires.
L’accès à cette page nécessite une autorisation. Vous pouvez essayer de modifier des répertoires.
LinearLayout est unViewGroup qui affiche l’enfantView éléments dans une direction linéaire, verticalement ou horizontalement.
Vous devez faire attention à l’utilisation excessive de .LinearLayout
Si vous commencez à imbriquer plusieurs LinearLayouts, vous pouvez envisager d’utiliser unRelativeLayout Place.
Démarrez un nouveau projet nommé HelloLinearLayout.
Ouvrez Resources/Layout/Main.axml et insérez les éléments suivants :
<?xml version="1.0" encoding="utf-8"?>
<LinearLayout xmlns:android="http://schemas.android.com/apk/res/android"
    android:orientation=    "vertical"
    android:layout_width=    "match_parent"
    android:layout_height=    "match_parent"    >

  <LinearLayout
      android:orientation=    "horizontal"
      android:layout_width=    "match_parent"
      android:layout_height=    "match_parent"
      android:layout_weight=    "1"    >
      <TextView
          android:text=    "red"
          android:gravity=    "center_horizontal"
          android:background=    "#aa0000"
          android:layout_width=    "wrap_content"
          android:layout_height=    "match_parent"
          android:layout_weight=    "1"    />
      <TextView
          android:text=    "green"
          android:gravity=    "center_horizontal"
          android:background=    "#00aa00"
          android:layout_width=    "wrap_content"
          android:layout_height=    "match_parent"
          android:layout_weight=    "1"    />
      <TextView
          android:text=    "blue"
          android:gravity=    "center_horizontal"
          android:background=    "#0000aa"
          android:layout_width=    "wrap_content"
          android:layout_height=    "match_parent"
          android:layout_weight=    "1"    />
      <TextView
          android:text=    "yellow"
          android:gravity=    "center_horizontal"
          android:background=    "#aaaa00"
          android:layout_width=    "wrap_content"
          android:layout_height=    "match_parent"
          android:layout_weight=    "1"    />
  </LinearLayout>

  <LinearLayout
    android:orientation=    "vertical"
    android:layout_width=    "match_parent"
    android:layout_height=    "match_parent"
    android:layout_weight=    "1"    >
    <TextView
        android:text=    "row one"
        android:textSize=    "15pt"
        android:layout_width=    "match_parent"
        android:layout_height=    "wrap_content"
        android:layout_weight=    "1"    />
    <TextView
        android:text=    "row two"
        android:textSize=    "15pt"
        android:layout_width=    "match_parent"
        android:layout_height=    "wrap_content"
        android:layout_weight=    "1"    />
    <TextView
        android:text=    "row three"
        android:textSize=    "15pt"
        android:layout_width=    "match_parent"
        android:layout_height=    "wrap_content"
        android:layout_weight=    "1"    />
    <TextView
        android:text=    "row four"
        android:textSize=    "15pt"
        android:layout_width=    "match_parent"
        android:layout_height=    "wrap_content"
       android:layout_weight=    "1"    />
  </LinearLayout>

</LinearLayout>
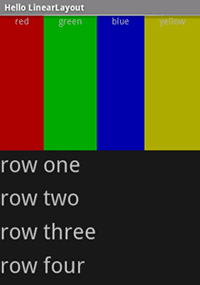
Examinez attentivement ce code XML. Il existe une racineLinearLayout qui définit son orientation verticale : tous les enfants View(dont il a deux) seront empilés verticalement. Le premier enfant est un autreLinearLayout qui utilise une orientation horizontale et le deuxième enfant est unLinearLayout qui utilise une orientation verticale. Chacun de ces s imbriqués LinearLayoutcontient plusieursTextView éléments, qui sont orientés les uns avec les autres de la manière définie par leur parent LinearLayout.
Maintenant, ouvrez HelloLinearLayout.cs et assurez-vous qu’il charge la disposition Resources/Layout/Main.axml dans leMéthode OnCreate() :
protected override void OnCreate (Bundle savedInstanceState)
{
    base.OnCreate (savedInstanceState);
    SetContentView (Resource.Layout.Main);
}
La SetContentView(int)méthode ) charge le fichier de disposition pour , Activityspécifié par l’ID de ressource – Resources.Layout.Main fait référence au fichier de disposition Resources/Layout/Main.axml .
Exécutez l’application. Les éléments suivants doivent s’afficher :
Notez comment les attributs XML définissent le comportement de chaque vue. Essayez d’expérimenter différentes valeurs pour android:layout_weight voir comment l’immobilier de l’écran est distribué en fonction du poids de chaque élément. Consultez le document Common Layout Objects pour plus d’informations sur la façon dontLinearLayout gère l’attribut android:layout_weight .
Références
Les parties de cette page sont des modifications basées sur le travail créé et partagé par le projet Open Source Android et utilisés selon les termes décrits dans la licence d’attribution Creative Commons 2.5.
