Inscription de l’utilisateur actif aux notifications Push à l’aide d’ASP.NET
Vue d’ensemble
Cette rubrique montre comment demander une inscription aux notifications Push avec Azure Notification Hubs lorsque l’inscription est réalisée par l’API Web ASP.NET. Cette rubrique s'inscrit dans le prolongement du didacticiel Notification des utilisateurs via Notification Hubs. Vous devez avoir suivi les étapes de ce didacticiel permettant de créer le service mobile authentifié. Pour plus d'informations sur les scénarios de notification des utilisateurs, consultez la rubrique Notification des utilisateurs via Notification Hubs.
Mise à jour de votre application
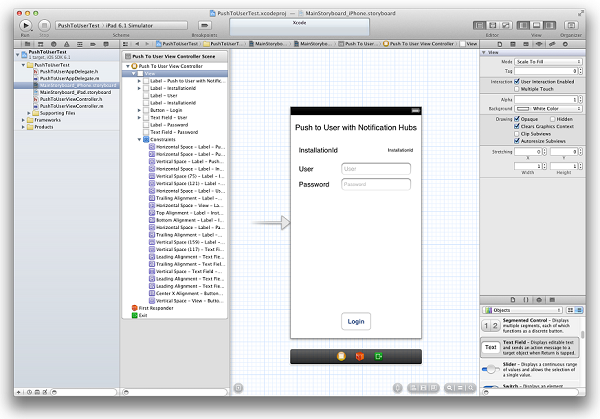
Dans MainStoryboard_iPhone.storyboard, ajoutez les composants suivants de la bibliothèque d'objets :
Étiquette : « Envoi d’une notification Push à l’utilisateur avec Notification Hubs »
Étiquette : « InstallationId »
Étiquette : « Utilisateur »
Champ texte : « Utilisateur »
Étiquette : « Mot de passe »
Champ texte : « Mot de passe »
Bouton : « Connexion »
À ce stade, votre storyboard a normalement l’aspect suivant :
Dans l’éditeur de l’Assistant, créez des outlets pour tous les contrôles commutés et appelez-les, connectez les champs texte au View Controller (délegué), puis créez une Action pour le bouton login.
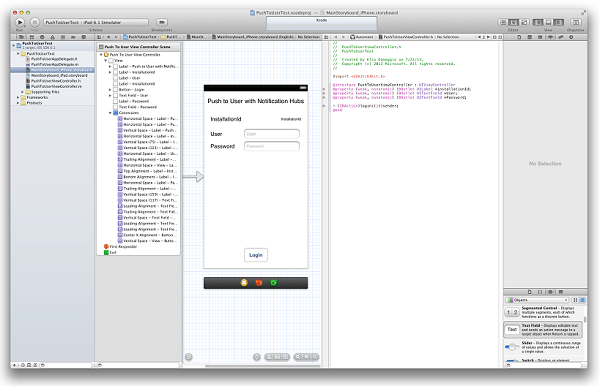
Le fichier BreakingNewsViewController.h doit désormais contenir le code suivant :
@property (weak, nonatomic) IBOutlet UILabel *installationId;
@property (weak, nonatomic) IBOutlet UITextField *User;
@property (weak, nonatomic) IBOutlet UITextField *Password;

- (IBAction)login:(id)sender;
Créez une classe nommée
DeviceInfo, puis copiez le code suivant dans la section de l’interface du fichier DeviceInfo.h :@property (readonly, nonatomic) NSString* installationId; @property (nonatomic) NSData* deviceToken;Copiez le code suivant dans la section d'implémentation du fichier DeviceInfo.m :
@synthesize installationId = _installationId;

- (id)init {
    if (!(self = [super init]))
        return nil;

    NSUserDefaults *defaults = [NSUserDefaults standardUserDefaults];
    _installationId = [defaults stringForKey:@"PushToUserInstallationId"];
    if(!_installationId) {
        CFUUIDRef newUUID = CFUUIDCreate(kCFAllocatorDefault);
        _installationId = (__bridge_transfer NSString *)CFUUIDCreateString(kCFAllocatorDefault, newUUID);
        CFRelease(newUUID);

        //store the install ID so we don't generate a new one next time
        [defaults setObject:_installationId forKey:@"PushToUserInstallationId"];
        [defaults synchronize];
    }

    return self;
}

- (NSString*)getDeviceTokenInHex {
    const unsigned *tokenBytes = [[self deviceToken] bytes];
    NSString *hexToken = [NSString stringWithFormat:@"%08X%08X%08X%08X%08X%08X%08X%08X",
                            ntohl(tokenBytes[0]), ntohl(tokenBytes[1]), ntohl(tokenBytes[2]),
                            ntohl(tokenBytes[3]), ntohl(tokenBytes[4]), ntohl(tokenBytes[5]),
                            ntohl(tokenBytes[6]), ntohl(tokenBytes[7])];
    return hexToken;
}
Dans PushToUserAppDelegate.h, ajoutez le singleton de propriété suivant :
@property (strong, nonatomic) DeviceInfo* deviceInfo;Dans la méthode
didFinishLaunchingWithOptionsdu fichier PushToUserAppDelegate.m, ajoutez le code suivant :self.deviceInfo = [[DeviceInfo alloc] init]; [[UIApplication sharedApplication] registerForRemoteNotificationTypes: UIRemoteNotificationTypeAlert | UIRemoteNotificationTypeBadge | UIRemoteNotificationTypeSound];La première ligne initialise le singleton
DeviceInfo. La seconde ligne lance l’inscription aux notifications Push, déjà présente si vous avez préalablement suivi le tutoriel Prise en main de Notification Hubs.Dans PushToUserAppDelegate.m, implémentez la méthode
didRegisterForRemoteNotificationsWithDeviceTokendans AppDelegate et ajoutez le code suivant :self.deviceInfo.deviceToken = deviceToken;Cela définit le jeton d’appareil de la requête.
Notes
À ce stade, il ne doit pas y avoir d’autre code dans cette méthode. S’il existe déjà un appel à la méthode
registerNativeWithDeviceTokenque vous avez ajoutée quand vous avez suivi le tutoriel Envoyer des notifications Push aux applications iOS avec Azure Notification Hubs, vous devez placer l’appel en commentaire ou le supprimer.Dans le fichier
PushToUserAppDelegate.m, ajoutez la méthode de gestionnaire suivante :* (void) application:(UIApplication *) application didReceiveRemoteNotification:(NSDictionary *)userInfo { NSLog(@"%@", userInfo); UIAlertView *alert = [[UIAlertView alloc] initWithTitle:@"Notification" message: [userInfo objectForKey:@"inAppMessage"] delegate:nil cancelButtonTitle: @"OK" otherButtonTitles:nil, nil]; [alert show]; }Cette méthode affiche une alerte dans l'interface utilisateur lorsque votre application reçoit des notifications alors qu'elle est en cours d'exécution.
Ouvrez le fichier
PushToUserViewController.met revenez au clavier dans l’implémentation suivante :- (BOOL)textFieldShouldReturn:(UITextField *)theTextField { if (theTextField == self.User || theTextField == self.Password) { [theTextField resignFirstResponder]; } return YES; }Dans la méthode
viewDidLoaddu fichierPushToUserViewController.m, initialisez l’étiquetteinstallationIdcomme suit :DeviceInfo* deviceInfo = [(PushToUserAppDelegate*)[[UIApplication sharedApplication]delegate] deviceInfo]; Self.installationId.text = deviceInfo.installationId;Ajoutez les propriétés suivantes à l’interface du fichier
PushToUserViewController.m:@property (readonly) NSOperationQueue* downloadQueue; - (NSString*)base64forData:(NSData*)theData;Ajoutez ensuite l'implémentation suivante :
- (NSOperationQueue *)downloadQueue {
    if (!_downloadQueue) {
        _downloadQueue = [[NSOperationQueue alloc] init];
        _downloadQueue.name = @"Download Queue";
        _downloadQueue.maxConcurrentOperationCount = 1;
    }
    return _downloadQueue;
}

// base64 encoding
- (NSString*)base64forData:(NSData*)theData
{
    const uint8_t* input = (const uint8_t*)[theData bytes];
    NSInteger length = [theData length];

    static char table[] = "ABCDEFGHIJKLMNOPQRSTUVWXYZabcdefghijklmnopqrstuvwxyz0123456789+/=";

    NSMutableData* data = [NSMutableData dataWithLength:((length + 2) / 3) * 4];
    uint8_t* output = (uint8_t*)data.mutableBytes;

    NSInteger i;
    for (i=0; i < length; i += 3) {
        NSInteger value = 0;
        NSInteger j;
        for (j = i; j < (i + 3); j++) {
            value <<= 8;

            if (j < length) {
                value |= (0xFF & input[j]);
            }
        }

        NSInteger theIndex = (i / 3) * 4;
        output[theIndex + 0] =                    table[(value >> 18) & 0x3F];
        output[theIndex + 1] =                    table[(value >> 12) & 0x3F];
        output[theIndex + 2] = (i + 1) < length ? table[(value >> 6)  & 0x3F] : '=';
        output[theIndex + 3] = (i + 2) < length ? table[(value >> 0)  & 0x3F] : '=';
    }

    return [[NSString alloc] initWithData:data encoding:NSASCIIStringEncoding];
}
Copiez le code suivant dans la méthode de gestionnaire
logincréée par XCode :DeviceInfo* deviceInfo = [(PushToUserAppDelegate*)[[UIApplication sharedApplication]delegate] deviceInfo]; // build JSON NSString* json = [NSString stringWithFormat:@"{\"platform\":\"ios\", \"instId\":\"%@\", \"deviceToken\":\"%@\"}", deviceInfo.installationId, [deviceInfo getDeviceTokenInHex]]; // build auth string NSString* authString = [NSString stringWithFormat:@"%@:%@", self.User.text, self.Password.text]; NSMutableURLRequest* request = [NSMutableURLRequest requestWithURL:[NSURL URLWithString:@"http://nhnotifyuser.azurewebsites.net/api/register"]]; [request setHTTPMethod:@"POST"]; [request setHTTPBody:[json dataUsingEncoding:NSUTF8StringEncoding]]; [request addValue:[@([json lengthOfBytesUsingEncoding:NSUTF8StringEncoding]) description] forHTTPHeaderField:@"Content-Length"]; [request addValue:@"application/json" forHTTPHeaderField:@"Content-Type"]; [request addValue:[NSString stringWithFormat:@"Basic %@",[self base64forData:[authString dataUsingEncoding:NSUTF8StringEncoding]]] forHTTPHeaderField:@"Authorization"]; // connect with POST [NSURLConnection sendAsynchronousRequest:request queue:[self downloadQueue] completionHandler:^(NSURLResponse* response, NSData* data, NSError* error) { // add UIAlert depending on response. if (error != nil) { NSHTTPURLResponse* httpResponse = (NSHTTPURLResponse*)response; if ([httpResponse statusCode] == 200) { UIAlertView *alert = [[UIAlertView alloc] initWithTitle:@"Back-end registration" message:@"Registration successful" delegate:nil cancelButtonTitle: @"OK" otherButtonTitles:nil, nil]; [alert show]; } else { NSLog(@"status: %ld", (long)[httpResponse statusCode]); } } else { NSLog(@"error: %@", error); } }];Cette méthode obtient à la fois un ID d'installation et un canal pour les notifications Push et les envoie avec le type d'appareil à la méthode d'API Web authentifiée qui crée une inscription dans Notification Hubs. Cette API Web a été définie dans le cadre du didacticiel Notification des utilisateurs via Notification Hubs.
Maintenant que l'application cliente est à jour, retournez au didacticiel Notification des utilisateurs via Notification Hubs et mettez le service mobile à jour pour qu'il envoie des notifications à l'aide de Notification Hubs.