View DLP policy results
The Microsoft Purview compliance portal enables organizations to monitor and audit the compliance status and activities of their data sources. This information is divided into four categories: Policy, Classification, Activity, and Audit. Each category has several reports and queries that provide different insights and perspectives on your data compliance. You can use the filters and parameters to customize the reports and queries according to your needs. You can also export the reports and queries as CSV files for further analysis.
The following list includes a brief description of each category and the insights that it provides:
- Policy. This category shows the policies and rules that your organization defined and applies to its data sources. You can see the policy name, description, status, scope, and actions for each policy. You can also see the number of data sources, assets, and classifications that are affected by each policy.
- Classification. This category shows the classifications and labels that your organization created and assigns to its data sources and assets. You can see the classification name, description, category, and sensitivity for each classification. You can also see the number of data sources, assets, and policies that are associated with each classification.
- Activity. This category shows the activities and events that occurred on your data sources and assets. You can see the activity type, date, time, source, destination, user, and policy for each activity. You can also see the number of activities, data sources, assets, and classifications that are involved in each activity.
- Audit. This category shows the audit logs and records that Microsoft Purview DLP generated for your organization. You can see the audit type, date, time, user, operation, and details for each audit. You can also see the number of audits, data sources, assets, and policies that are related to each audit.
Microsoft Purview DLP submits a vast amount of information into Microsoft Purview from monitoring, policy matches and actions, and user activities. Organizations should consume and act on that information to tune their policies and triage actions taken on sensitive items. The customer data goes into the Microsoft Purview compliance portal Audit Logs first. Microsoft Purview processes it and then it finally makes its way to different reporting tools. Each reporting tool has a different purpose. This unit introduces you to the several of the key DLP policy reporting tools.
DLP Alerts Dashboard
When DLP takes an action on a sensitive item, it can notify you of that action through a configurable alert. Rather than having these alerts pile up in a mailbox for administrators to sift through, the Microsoft Purview compliance portal makes them available in the DLP Alerts Management Dashboard. Organizations can use the DLP Alerts dashboard to:
- Configure DLP alerts
- Review them
- Triage them
- Track their resolution
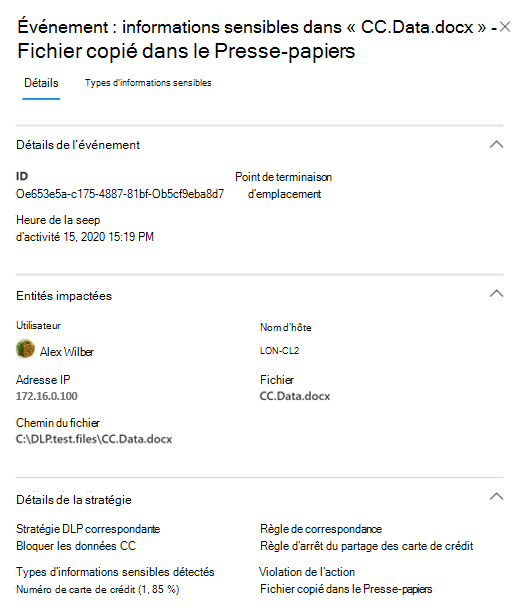
The following screenshot from a Windows 10 device is an example of an alert generated by a policy match and an activity.
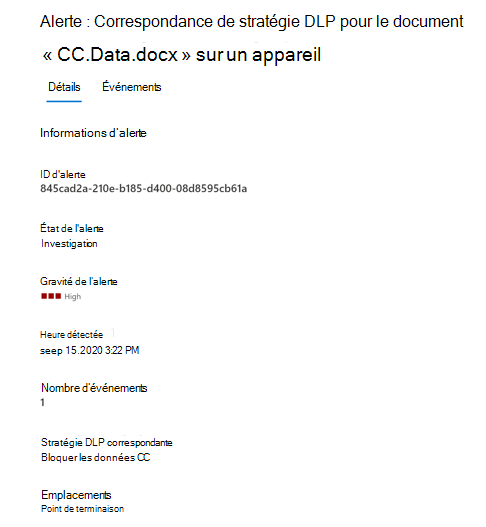
You can also view details of the associated event with rich metadata in the same dashboard.
DLP Activity explorer
The Activity explorer tab on the Data loss prevention page has the Activity filter preset to DLPRuleMatch. This tool enables organizations to review activities related to content that contains sensitive information or has labels applied. It displays what labels changed, files that users modified, and a matched rule.

A later training module examines the Activity explorer in greater detail.
DLP Overview
In the Microsoft Purview compliance portal, select Data Loss Prevention > Overview to display a summary of DLP insights for your organization. This page displays various DLP metrics, while also enabling you to turn on other DLP functionality.
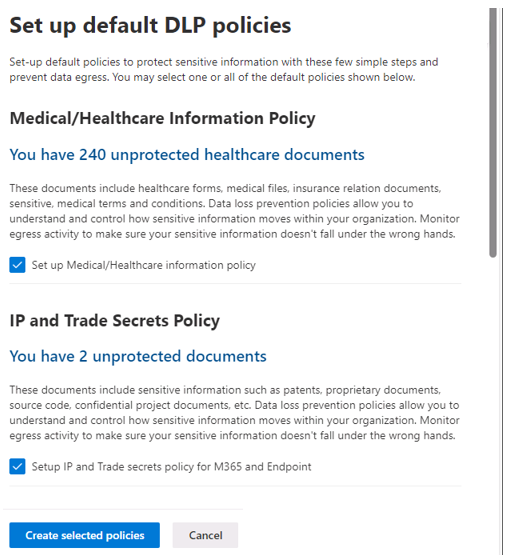
The Protect sensitive info section displays information on the number of unprotected documents in SharePoint and OneDrive that contain sensitive financial, healthcare, HR, IP and trade secrets, or customer account information.

The Protect sensitive info section also includes options to Get started and View detected documents. Selecting the Get started button displays the Set up default DLP policies pane, which provides a list of steps that you can take to prevent data egress.
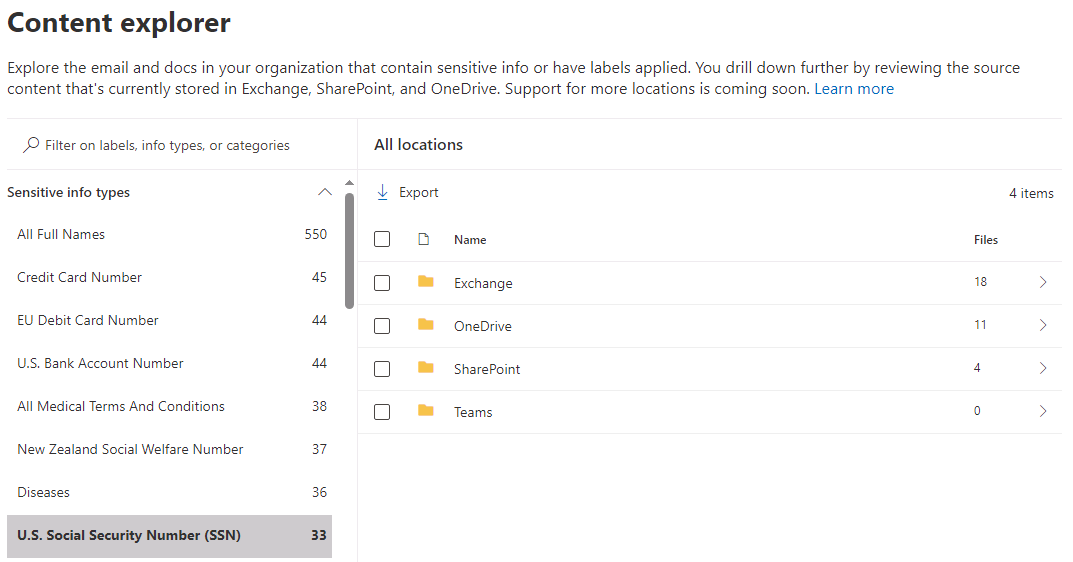
Selecting the View detected documents button displays a summary of the number of unprotected documents that were detected in each category for both SharePoint and OneDrive. You can then select a category to open Content explorer, which in turn enables you to see the documents in that category.
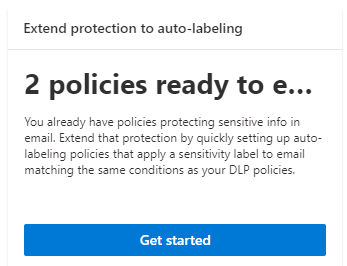
The Overview page in Microsoft Purview Data Loss Protection also includes an Extend protection to auto-labeling section. This section enables organizations to extend their email protection with auto-labeling. If you already have policies that protect sensitive information in email, you can select the Get started button to extend that protection by setting up auto-labeling policies.
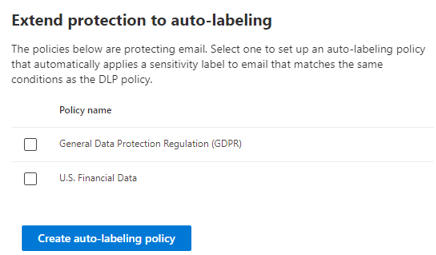
Selecting the Get started button displays the Extend protection to auto-labeling pane, which displays an organization's existing DLP policies that protect email. You can select one of the policies to set up an auto-labeling policy that automatically applies a sensitivity label to email that matches the same conditions as the selected policy.
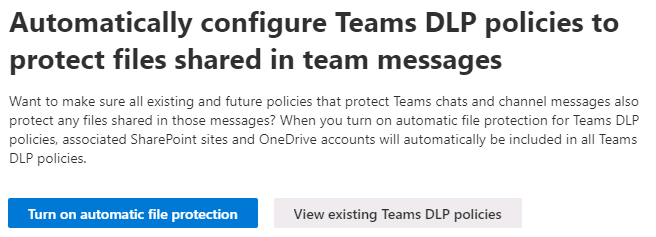
The Overview page also includes an option to automatically configure Teams DLP policies to protect files shared in team messages. When you select the Turn on automatic file protection button, this section displays any new incidents found in the last six months.