Perform bulk user maintenance in Microsoft Entra ID
Microsoft Entra ID enables organizations to bulk create new users, bulk delete existing users, and bulk restore deleted users. Bulk user operations require that you fill out a comma-separated values (CSV) template to download the selected users from the Microsoft Entra admin center.
Note
To perform any of the bulk operations in the Microsoft Entra admin center, you must sign-in as a Global Administrator or User Administrator.
Create users in bulk
Bulk user operations require the use of a bulk user CSV template. The CSV template for bulk user creations is slightly different from the template used to bulk delete users, which is slightly different from the template used to bulk restore deleted users. Organizations should download and fill in the CSV template for the corresponding bulk operation.
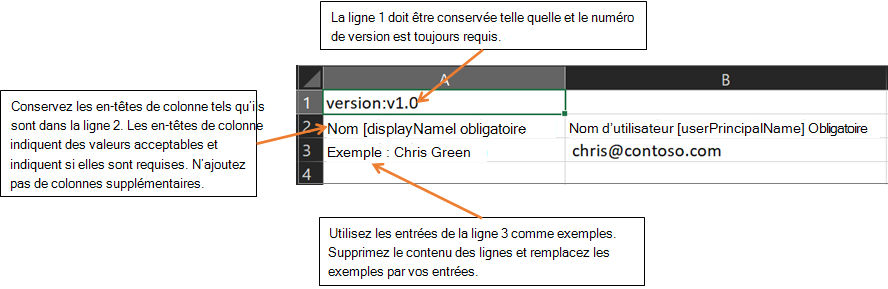
The CSV template used to bulk create users should look like this example (older versions can vary):
Warning
If you're adding only one entry using the CSV template, you must preserve row 3 and add your new entry to row 4. Ensure that you add the ".csv" file extension and remove any leading spaces before userPrincipalName, passwordProfile, and accountEnabled.
The rows in the downloaded CSV template to bulk create new users are as follows:
- Version number. The upload CSV file must contain the version number in the first row.
- Column headings. The format of the column headings is <Item name> [PropertyName] <Required or blank>. For example,
Name [displayName] Required. Some older versions of the template can have slight variations. - Examples row. The template includes a row of examples of acceptable values for each column. You must remove the examples row and replace it with your own entries.
Organizations should keep in mind the following issues related to the bulk create CSV template:
- You can't remove or modify the first two rows of the upload template, or the upload process fails.
- It lists the required columns first.
- Microsoft doesn't recommend that you add new columns to the template. The upload process ignores any other columns that you add.
- Microsoft recommends that you download the latest version of the CSV template as often as possible.
- Verify there's no unintended whitespace before or after any field. For User principal name, having such whitespace would cause import failure.
- Verify that values in the Initial password comply with the currently active password policy.
Organizations should complete the following steps to bulk create users in Microsoft Entra ID:
In the Microsoft 365 admin center, under Admin centers in the navigation pane, select Identity.
In the Microsoft Entra admin center, select Users, and then select All users.
On the Users page, select Bulk operations on the menu bar. In the drop-down menu that appears, select Bulk create.
In the Bulk create users pane that appears, select Download to receive a comma-separated values (CSV) file of user properties. Use this file as a template and add users you want to create.
Open the CSV template file and add a line for each user you want to create. The only required values are Name, User principal name, Initial password, and Block sign in (Yes/No). Then save the file.

On the Bulk create users pane, under Upload your CSV file, browse to the file. When you select the file and then select Submit, validation of the CSV file starts.
After the system validates the file contents, a File uploaded successfully message appears. If there are errors, you must fix them before you can submit the job.
When your file passes validation, select Submit to start the bulk operation that imports the new users.
When the import operation completes, the system displays a notification indicating the bulk operation job status.
If there are errors, you can download and view the results file on the Bulk operation results page. The file contains the reason for each error. The file submission must match the provided template and include the exact column names.
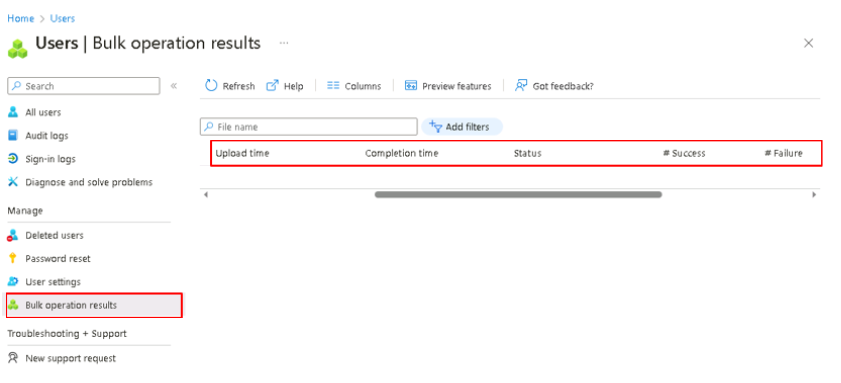
Check status of your bulk operations
An organization can check the status of all its pending bulk requests in the Microsoft Entra admin center. On the Users page, under the Manage section in the middle navigation pane, select Bulk operation results.
Warning
Each bulk activity to create users can run for up to one hour. This process enables bulk creation of at least 50,000 users.
Verify the users were created
An organization can then verify whether the users it created exist in the Microsoft Entra organization. It can do so either in the Microsoft Entra admin center or by using PowerShell.
Verify users in the Microsoft Entra admin center
Perform the following steps to verify the users that you created are visible in the Microsoft Entra admin center:
- In the Microsoft 365 admin center, under Admin centers in the navigation pane, select Identity.
- In the Microsoft Entra admin center, select Users, and then select All users.
- On the Users page, verify the users you submitted to be bulk created are displayed in the list.
Verify users with PowerShell
Some Microsoft 365 Administrators prefer to use Windows PowerShell rather than the Microsoft 365 admin center to complete user administrative functions. You must begin by installing Microsoft Graph PowerShell, importing the Microsoft.Graph.Identity.DirectoryManagement module, and connecting to MgGraph with the proper permissions. The following example provides the "Read only" permission needed to retrieve a user account.
Install-Module Microsoft.Graph -Scope CurrentUser
Import-Module Microsoft.Graph.Identity.DirectoryManagement
Connect-MgGraph -Scopes 'User.Read.All'
To verify the system bulk created the users that you submitted, run the following command using Microsoft Graph PowerShell:
Get-MgUser -Filter "UserType eq 'Member'"
Delete users in bulk
Just as you added users in bulk to Microsoft Entra ID, so too can you delete users in bulk. Both processes use a CSV file to identify the users you want to add and delete.
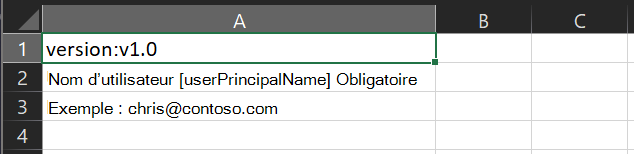
The template used for bulk deletion is slightly different from the template used for bulk creation. Instead of having two columns, the template only requires one column, as shown in the following image.
The rows in the downloaded CSV template to bulk deleted existing users are as follows:
- Version number. The upload CSV file must contain the version number in the first row.
- Column headings.
User name [userPrincipalName] Required. Older versions of the template can vary. - Examples row. The template includes an example of an acceptable value. Example:
chris@contoso.com. You must remove the example row and replace it with your own entries.
Organizations should keep in mind the following issues related to the bulk delete CSV template:
- You can't modify or remove the first two rows of the template, or the delete process fails.
- The template lists the required columns first.
- Microsoft recommends that you don't add new columns to the template. The system ignores any other columns that you add.
- Microsoft recommends that you download the latest version of the CSV template as often as possible.
Organizations should complete the following steps to bulk delete users in Microsoft Entra ID:
- In the Microsoft 365 admin center, under Admin centers in the navigation pane, select Identity.
- In the Microsoft Entra admin center, select Users, and then select All users.
- On the Users page, select Bulk operations on the menu bar. In the drop-down menu that appears, select Bulk delete.
- On the Bulk delete users pane, select Download to receive a comma-separated values (CSV) file of user properties. Use this file as a template and add users you want to delete.
- Open the CSV file and add a line for each user you want to delete. The only required value is User principal name. Save the file.
- On the Bulk delete users pane, under Upload your csv file, browse to the file. When you select the file and select Submit, validation of the CSV file starts.
- After the system validates the file contents, a File uploaded successfully message appears. If there are errors, you must fix them before you can submit the job.
- When your file passes validation, select Submit to start the bulk operation that deletes the users.
- When the deletion operation completes, the system displays a notification indicating the bulk operation succeeded.
If there are errors, you can download and view the results file on the Bulk operation results page. The file contains the reason for each error.
You can see the status of all of your pending bulk requests in the Bulk operation results page.
Restore users in bulk
Just as you deleted users in bulk from Microsoft Entra ID, so too can you restore deleted users in bulk. Both processes use a CSV file to identify the users you want to delete and restore.
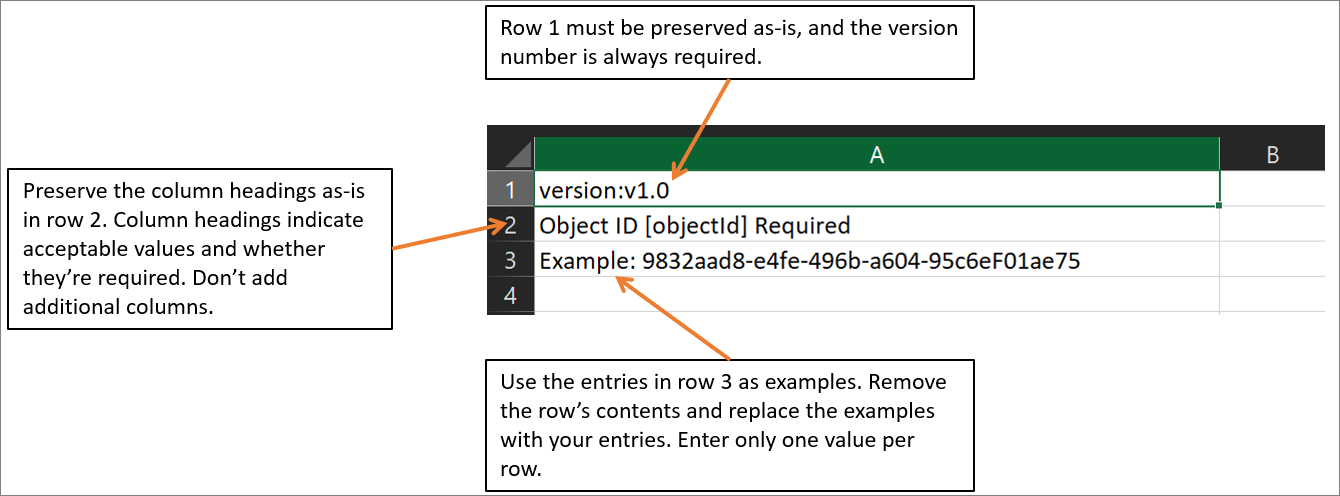
The template used for bulk restore is slightly different from the template used for bulk deletion. Rather than specifying each user's UPN, you instead specify the user's object ID.
The rows in the downloaded CSV template to bulk restore deleted users are as follows:
- Version number. The upload CSV file must contain the version number in the first row.
- Column headings. The format of the column headings is <Item name> [PropertyName] <Required or blank>. For example,
Object ID [objectId] Required. Some older versions of the template can have slight variations. - Examples row. The template includes an example of an acceptable value. You must remove the example row and replace it with your own entries.
Organizations should keep in mind the following issues related to the bulk delete CSV template:
- You can't modify or remove the first two rows of the upload template, or the upload process fails.
- The template lists the required columns first.
- Microsoft doesn't recommend that you add new columns to the template. The system ignores any other columns that you add.
- Microsoft recommends that you download the latest version of the CSV template as often as possible.
Organizations should complete the following steps to bulk restore users in Microsoft Entra ID:
- In the Microsoft 365 admin center, under Admin centers in the navigation pane, select Identity.
- In the Microsoft Entra admin center, select Users, and then select Deleted users.
- On the Deleted user page, select the Bulk restore option on the menu bar to download the latest version of the CSV template.
- On the Bulk restore users pane, select Download to receive a comma-separated values (CSV) file of user properties. Use this file as a template and add the deleted users you want to restore.
- Open the CSV file and add a line for each user you want to restore. The only required value is ObjectID. Save the file.
- On the Bulk restore users pane, under Upload your csv file, browse to the file. When you select the file and select Submit, validation of the CSV file starts.
- After the system validates the file contents, a File uploaded successfully message appears. If there are errors, you must fix them before you can submit the job.
- When your file passes validation, select Submit to start the bulk operation that restores the deleted users.
- When the restore operation completes, the system displays a notification indicating the bulk operation succeeded.
If there are errors, you can download and view the results file on the Bulk operation results page. The file contains the reason for each error.
You can see the status of all of your pending bulk requests in the Bulk operation results page.
Create users in bulk using PowerShell
Some Microsoft 365 Administrators prefer to use Windows PowerShell rather than the Microsoft 365 admin center to complete user administrative functions. You must begin by installing Microsoft Graph PowerShell, importing the Microsoft.Graph.Identity.DirectoryManagement module, and connecting to MgGraph with the proper permissions. The following example provides the Read/Write permissions needed to add a new user.
Install-Module Microsoft.Graph -Scope CurrentUser
Import-Module Microsoft.Graph.Identity.DirectoryManagement
Connect-MgGraph -Scopes 'User.ReadWrite.All'
At this point, you're ready to use the New-MgUser cmdlet to create a user account in Microsoft 365. When creating a new user account with the Microsoft Graph PowerShell module, you must specify, at a minimum, the required properties for the user, which includes the user password. The password must satisfy minimum requirements as specified by the user’s PasswordPolicies property. By default, the system requires a strong password. You can optionally specify any other writable properties.
You must begin by creating a comma-separated value (CSV) file that contains the required user account information. For example:
UserPrincipalName,FirstName,LastName,DisplayName,UsageLocation,AccountSkuId,Password
ClaudeL@contoso.onmicrosoft.com,Claude,Loiselle,Claude Loiselle,US,contoso:ENTERPRISEPACK,User.pw1
LynneB@contoso.onmicrosoft.com,Lynne,Baxter,Lynne Baxter,US,contoso:ENTERPRISEPACK,User.pw2
ShawnM@contoso.onmicrosoft.com,Shawn,Melendez,Shawn Melendez,US,contoso:ENTERPRISEPACK,User.pw3
Note
The column names and their order in the first row of the CSV file are arbitrary. But make sure the order of the data in the rest of the file matches the order of the column names. The system uses the column names for the parameter values in the PowerShell command.
Run the Import-Csv command using the following syntax:
Import-Csv -Path <Input CSV File Path and Name> | foreach {New-MgUser -DisplayName $_.DisplayName -GivenName $_.FirstName -Surname $_.LastName -UserPrincipalName $_.UserPrincipalName -UsageLocation $_.UsageLocation -LicenseAssignmentStates $_.AccountSkuId -PasswordProfile $_.Password} | Export-Csv -Path <Output CSV File Path and Name>
The following example creates user accounts from the file C:\My Documents\NewAccounts.csv and logs the results in a file named C:\My Documents\NewAccountResults.csv.
Import-Csv -Path "C:\My Documents\NewAccounts.csv" | foreach {New-MgUser -DisplayName $_.DisplayName -GivenName $_.FirstName -Surname $_.LastName -UserPrincipalName $_.UserPrincipalName -UsageLocation $_.UsageLocation -LicenseAssignmentStates $_.AccountSkuId -PasswordProfile $_.Password} | Export-Csv -Path "C:\My Documents\NewAccountResults.csv"
Review the output file to see the results.