Create and manage guest users using B2B collaboration
Microsoft 365 enables people from outside the Microsoft 365 organization to collaborate with users within the organization. It does so through B2B collaboration, which is a feature within Microsoft Entra External ID. With B2B collaboration, you can securely share your company's applications and services with external users, while maintaining control over your own corporate data. With B2B collaboration, you can work safely and securely with external partners, large or small, even if they don't have Microsoft Entra ID or an IT department.
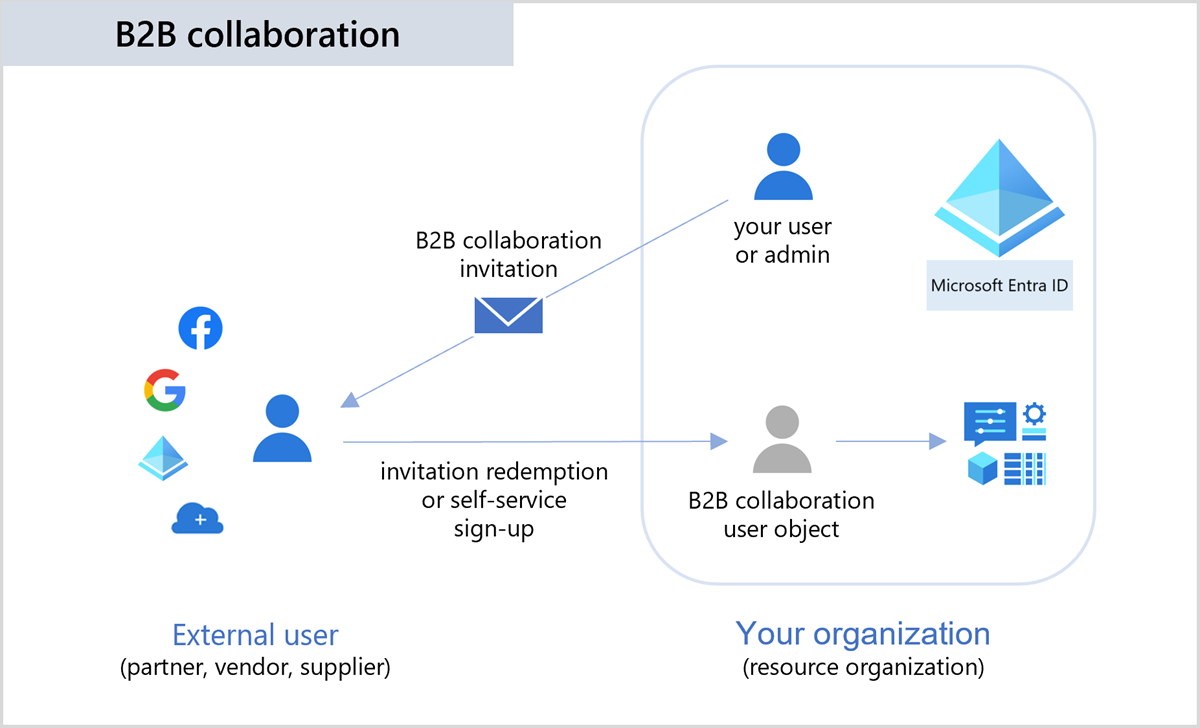
With B2B collaboration, an external user is invited to sign in to your Microsoft Entra organization using their own credentials. This B2B collaboration user can then access the apps and resources you want to share with them. A user object is created for the B2B collaboration user in the same directory as your employees. B2B collaboration user objects have limited privileges in your directory by default, and they can be managed like employees, added to groups, and so on.
A simple invitation and redemption process lets partners use their own credentials to access your company's resources. You can also enable self-service sign-up user flows to let external users sign up for apps or resources themselves. Once the external user redeems their invitation or completes sign-up, they're represented in your directory as a user object. The user type for these B2B collaboration users is typically set to "guest" and their user principal name contains the #EXT# identifier.
The following list describes B2B collaboration users based on how they authenticate (internally or externally) and their relationship to your organization (guest or member):
- External guest. Most users who are commonly considered external users or guests fall into this category. This B2B collaboration user has an account in an external Microsoft Entra organization or an external identity provider (such as a social identity), They also have guest-level permissions in the resource organization. The user object created in the resource Microsoft Entra directory has a UserType of Guest.
- External member. This B2B collaboration user has an account in an external Microsoft Entra organization or an external identity provider (such as a social identity) and member-level access to resources in your organization. This scenario is common in organizations consisting of multiple tenants, where users are considered part of the larger organization and need member-level access to resources in the organization's other tenants. The user object created in the resource Microsoft Entra directory has a UserType of Member.
- Internal guest. Before Microsoft Entra B2B collaboration was available, it was common to collaborate with distributors, suppliers, vendors, and others by setting up internal credentials for them and designating them as guests by setting the user object UserType to Guest. If you have internal guest users like these, you can invite them to use B2B collaboration instead so they can use their own credentials, allowing their external identity provider to manage authentication and their account lifecycle.
- Internal member. These users are generally considered employees of your organization. The user authenticates internally through Microsoft Entra ID, and the user object created in the resource Microsoft Entra directory has a UserType of Member.
Understanding guest accounts in Microsoft 365
Being able to easily share files and documents with the right people while preventing oversharing requires planning. The following resources provide more background to help you create a secure guest sharing environment in Microsoft 365.
- Plan external collaboration.
- Create a secure guest sharing environment.
- Set up secure file and document sharing and collaboration with Teams in Microsoft 365.
- Guest access in Microsoft Teams.
In addition to Microsoft Teams and SharePoint, Microsoft 365 also supports guest access in other applications. The following Microsoft 365 products support guest access.
- Power Apps. For more information, see Share a canvas app with guest users.
- Lists. For more information, see External or guest sharing in OneDrive, SharePoint, and Lists.
- OneDrive. For more information, see External or guest sharing in OneDrive, SharePoint, and Lists.
- Planner. Applies to Web and mobile platforms. For more information, see Guest access in Microsoft Planner.
- Microsoft 365 groups. For more information, see Manage guest access in Microsoft 365 groups.
- Yammer. For more information, see Work with external groups in Yammer networks not aligned to native mode.
Microsoft Office applications like Microsoft Word and Excel control guest access by the location of the output file, such as Microsoft SharePoint, Teams, or OneDrive.
External collaboration settings
As a Microsoft 365 administrator, you must ensure the configuration of your organization's external collaboration settings enable guest user access. If you want to add a guest user, an administrator must first assign you a role that allows you to create users in your tenant directory. Examples of such roles include a Global Administrator role or a limited administrator directory role, such as a Guest Inviter or User Administrator.
Note
Organizations can configure their external collaboration policies to prevent certain types of users or administrators from inviting guests. To find out how to view and set these policies, see Enable B2B external collaboration and manage who can invite guests.
Administrators can invite guest users to their organization's Microsoft Entra ID, to a group, or to an application. After they invite a person through any of these methods, the system adds the invited user's account to the organization's Microsoft Entra ID with a user type of Guest*.* The guest user must then redeem their invitation before they can begin collaborating with organizational users.
After an administrator adds a guest user to the organization's Microsoft Entra ID, the guest user can select either:
- A direct link to a shared application.
- The redemption URL in the invitation email they receive.
When an organization adds a guest user to its Microsoft Teams, SharePoint, or Microsoft Entra ID, the system automatically adds the user to the Guest users list in the Microsoft 365 admin center. Once a user shows up in the Guest users list, you can remove their access there as well. After you add a guest user in Microsoft Entra ID, you can assign them to a group, or give them access to an app in your organization.
By default, Microsoft 365 turns on guest access for an organization's Microsoft 365 groups. The Microsoft 365 Administrator controls whether to allow guest access to groups for the whole organization or for individual groups.
To view guest users in the Microsoft 365 admin center, expand Users in the left-hand navigation pane and then select Guest users.
The user profile for a Microsoft Entra B2B collaboration user includes the following key properties:
User Principal Name (UPN). The UPN for a B2B collaboration user object contains a #EXT# identifier.
User type. The UserType property indicates the relationship of the user to the host tenancy. This property can have two values:
- Member. This value indicates an employee of the host organization and a user in the organization's payroll. For example, this user expects to have access to internal-only sites. This user isn't considered an external collaborator.
- Guest. This value indicates a user who isn't considered internal to the company, such as an external collaborator, partner, or customer. Such a user isn't expected to receive a chief executive officer (CEO)'s internal memo or receive company benefits, for example.
Note
The UserType property has no relation to how the user signs in, the directory role of the user, and so on. This property simply indicates the user's relationship with the host organization and allows the organization to enforce policies that depend on this property.
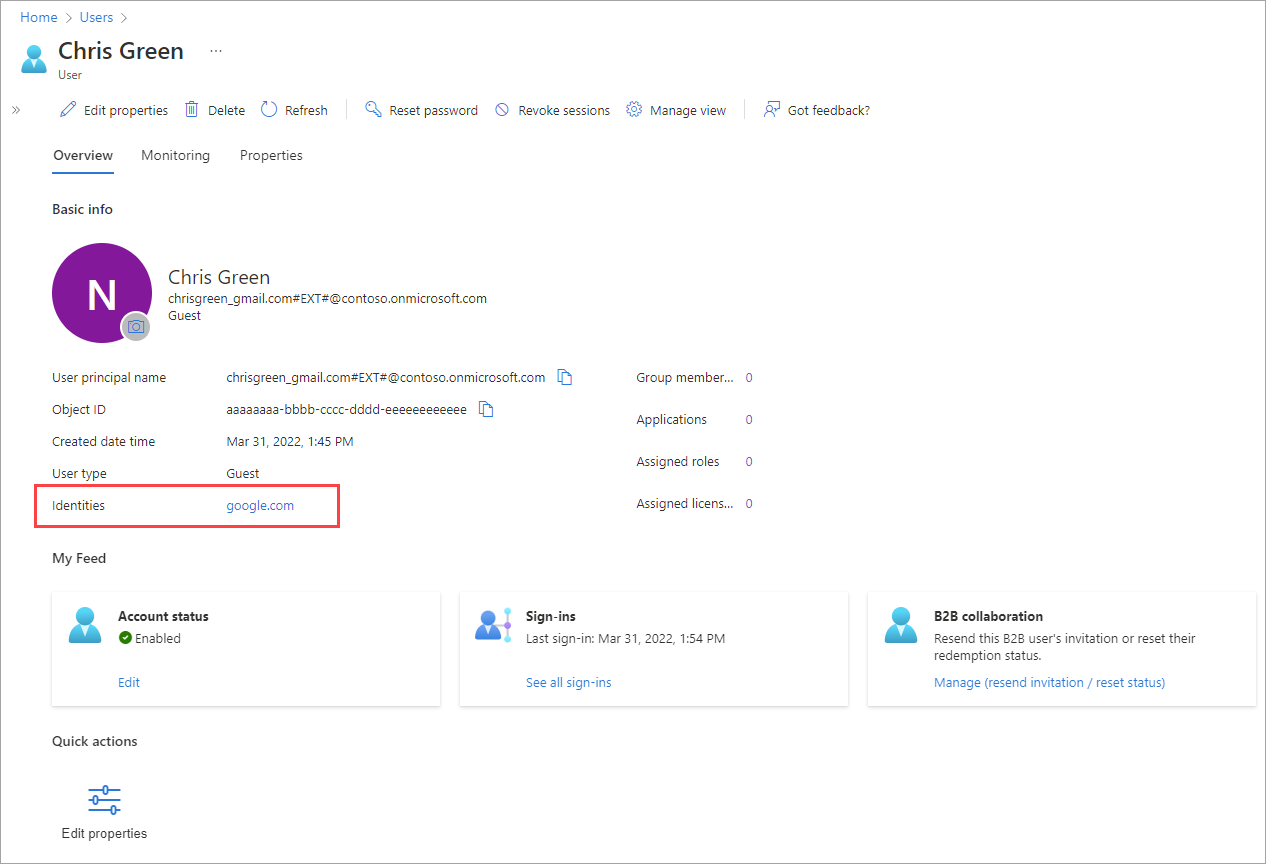
Identities. This property indicates the user's primary identity provider. A user can have several identity providers, which can be viewed by selecting the link next to Identities in the user's profile or by querying the Identities property through the Microsoft Graph API. Identities and UserType are independent properties.
Identities property value Sign-in state ExternalAzureAD This user is homed in an external organization and authenticates by using a Microsoft Entra account that belongs to the other organization. Microsoft account This user is homed in a Microsoft account and authenticates by using a Microsoft account. {host's domain} This user authenticates by using a Microsoft Entra account that belongs to this organization. google.com This user has a Gmail account and signed up by using self-service to the other organization. facebook.com This user has a Facebook account and signed up by using self-service to the other organization. mail This user signed up by using Microsoft Entra External ID email one-time passcode (OTP). {issuer URI} This user is homed in an external organization that doesn't use Microsoft Entra ID as their identity provider, but instead uses a Security Assertion Markup Language (SAML)/WS-Fed-based identity provider. The issuer URI is shown when the Identities field is clicked. Note
A value in Identities doesn't imply a particular value for UserType.
Restrict guest access permissions in Microsoft Entra ID
Microsoft Entra ID enables organizations to restrict what data guest users can see. Microsoft Entra ID sets guest users to a limited permission level by default, while the default for member users is the full set of user permissions. There's another guest user permission level in your organization's Microsoft Entra external collaboration settings for even more restricted access. The guest access levels include:
| Permission level | Access level |
|---|---|
| Same as member users | Guests have the same access to Microsoft Entra resources as member users. |
| Limited access (default) | Guests can see membership of all nonhidden groups. |
| Restricted access | Guests can't see membership of any group. |
When a guest user's permission level is set to Restricted access, they can view only their own user profile. They don't have permission to view other users, even if the guest searches by User Principal Name or objectId. Restricted access also restricts guest users from seeing the membership of groups they're in.
Note
There are no licensing requirements to restrict guest access.
External collaboration settings let an organization specify what roles it can invite guest users for B2B collaboration. These settings also include options for allowing or blocking specific domains, and options for restricting what guest users can see in your Microsoft Entra admin center. The following options are available:
- Determine guest user access. Microsoft Entra ID allows you to restrict what guest users can see in your Microsoft Entra directory. For example, you can limit guest users' view of group memberships, or allow guests to view only their own profile information.
- Specify who can invite guests. By default, all users in your organization, including B2B collaboration guest users, can invite guest users to B2B collaboration. If you want to limit the ability to send invitations, you can turn invitations on or off for everyone, or limit invitations to certain roles.
- Enable guest self-service sign-up via user flows. For applications you build, you can create user flows that allow a user to sign up for an app and create a new guest account. You can enable the feature in your external collaboration settings, and then add a self-service sign-up user flow to your app.
- Allow or block domains. You can use collaboration restrictions to allow or deny invitations to the domains you specify. For details, see Allow or block domains.
For B2B collaboration with other Microsoft Entra organizations, you should also review your cross-tenant access settings. Doing so ensures your inbound and outbound B2B collaboration. It also scopes access to specific users, groups, and applications.
To update guest access permissions in Microsoft Entra ID, perform the following steps:
- Sign into Microsoft 365 as a Global Administrator or a user with a limited administrator directory role or the Guest Inviter role.
- On the Microsoft 365 admin center, select Show All in the navigation pane.
- Under the Admin centers group in the navigation pane, select Identity.
- In the Microsoft Entra admin center, in the left-hand navigation pane, select Users, and then select User settings.
- On the User | User settings page, under the External users section towards the bottom of the page, select the Manage external collaboration settings link.
- On the External collaboration settings page, update each of the available settings to meet your organization's requirements.
- Select Save. The changes can take up to 15 minutes to take effect for guest users.
Invitation redemption
B2B collaboration user accounts are the result of inviting guest users to collaborate by using the guest users' own credentials. When the invitation is initially sent to the guest user, an account is created in your tenant. This account doesn't have any credentials associated with it because authentication is performed by the guest user's identity provider. The Identities property for the guest user account in your directory is set to the host's organization domain until the guest redeems their invitation. The user sending the invitation is added as a default value for the Sponsor (preview) attribute on the guest user account. In the admin center, the invited user's profile shows an External user state of PendingAcceptance.
Note
Guest user invitations don't expire. For more information about the redemption process, see B2B collaboration invitation redemption.
After the B2B collaboration user accepts the invitation, the Identities property in the user's profile is updated based on the user's identity provider.
- If the B2B collaboration user is using a Microsoft account or credentials from another external identity provider, the Identities field reflects the identity provider. For example, Microsoft Account, google.com, or facebook.com.
- If the B2B collaboration user is using credentials from another Microsoft Entra organization, the value of the Identities field is ExternalAzureAD.
- For external users who are using internal credentials, the Identities property is set to the host's organization domain. The Directory synced property is Yes if the account is homed in the organization's on-premises Active Directory and synced with Microsoft Entra ID. Or the property is set to No if the account is a cloud-only Microsoft Entra account.
Note
The directory sync information is also available through the onPremisesSyncEnabled property in Microsoft Graph.
Add guests in Microsoft Entra ID
To add guest users to your organization's Microsoft Entra ID, perform the following steps:
Sign into Microsoft 365 as a Global Administrator or a user with a limited administrator directory role or the Guest Inviter role.
On the Microsoft 365 admin center, select Show All in the navigation pane.
Under the Admin centers group in the navigation pane, select Identity.
In the Microsoft Entra admin center, in the left-hand navigation pane, select Users, and then select All users.
On the Users window, select +New user on the menu bar. In the drop-down menu that appears, select Invite external user.
On the Invite external user page, under the Basics tab, enter the guest user's Email address and Display name. You can optionally send an invitation message, which you can also enter here, along with the email address of a recipient you wish to CC.
You can optionally select the Properties tab to enter the external user's full name and job information.
You can also select the Assignments tab to assign the external user to existing groups, or to add security roles to the user account.
Note
The system doesn't support Group email addresses. Instead, enter the email address for an individual. Also, some email providers allow users to add a plus symbol (+) and other text to their email addresses to help with things like inbox filtering. However, Microsoft Entra ID doesn’t currently support plus symbols in email addresses. To avoid delivery issues, omit the plus symbol and any characters following it up to the @ symbol.
When you're ready to send the invitation, select the Review + Invite button. Doing so displays the Review + invite tab, which shows you whether any required information is missing. When everything looks OK, select Invite to automatically send the invitation to the guest user.
After you send the invitation, the system automatically adds the user account to the directory as a guest. It adds the guest user account with a user principal name (UPN) in the format emailaddress#EXT#@domain. For example, john_contoso.com#EXT#@fabrikam.onmicrosoft.com, where fabrikam.onmicrosoft.com is the organization from which you sent the invitation.
Add guest users to a group
To manually add a guest user to a group, perform the following steps:
- Sign into Microsoft 365 as a Global Administrator or a user with a limited administrator directory role or the Guest Inviter role.
- On the Microsoft 365 admin center, select Show All in the navigation pane.
- Under the Admin centers group in the navigation pane, select Identity.
- In the Microsoft Entra admin center, in the left-hand navigation pane, select Groups, and then select All groups.
- Select a group (or select New group in the menu bar to create a new one). It's a good idea to include in the group description that the group contains B2B guest users.
- In the group window that appears, under the Manage section in the middle pane, select Members.
- Select +Add members.
- Perform one of the following steps:
- If the guest user is already in Microsoft Entra ID*:*
- On the Add members page, start typing the name or email address of the guest user.
- In the search results, choose the user, and then choose Select.
- If the guest user isn't currently in Microsoft Entra ID*:*
- On the Add members page, type the user's full email address in the search box, type a Personal message (optional), and then choose Invite to send an invitation.
- Choose Select.
- Now add the user to the group. On the Members page, choose Add members. Type the user's name or email address in the search box, choose the user in the results, and then choose Select.
- If the guest user is already in Microsoft Entra ID*:*
You can also use dynamic groups with Microsoft Entra B2B collaboration. For more information, see Dynamic groups and Microsoft Entra B2B collaboration.
Add guest users to an application
To add guest users to an application, perform the following steps:
- Sign into Microsoft 365 as a Global Administrator or a user with a limited administrator directory role or the Guest Inviter role.
- On the Microsoft 365 admin center, select Show All in the navigation pane.
- Under the Admin centers group in the navigation pane, select Identity.
- In the Microsoft Entra admin center, in the left-hand navigation pane, select Applications, and then select Enterprise applications.
- On the Enterprise applications | All applications page, select the application to which you want to add guest users.
- On the {application} | Overview page, under the Manage section in the middle pane, select Users and groups.
- Select Add user/group.
- On the Add Assignment page, select the link under Users.
- Perform one of the following steps:
- If the guest user is already in Microsoft Entra ID:
- On the Users page, start typing the name or email address of the guest user.
- In the search results, choose the user, and then choose Select.
- On the Add Assignment page, choose Assign to add the user to the app.
- If the guest user isn't currently in Microsoft Entra ID:
- On the Users page, type the user's full email address in the search box, type a Personal message (optional), and then choose Invite.
- Choose Select.
- Now add the invited user to the application: On the Add Assignment page, choose the link under Users. Type the invited user's name or email address in the search box, choose the user in the results, and then choose Select.
- On the Add Assignment page, choose Assign.
- If the guest user is already in Microsoft Entra ID:
- The guest user appears in the application's Users and groups list with the assigned role of Default Access. If the application provides different roles and you want to change the user's role, perform the following steps:
- Select the check box next to the guest user, and then select the Edit button.
- On the Edit Assignment page, choose the link under Select a role, and select the role you want to assign to the user.
- Choose Select.
- Select Assign.