Notes
L’accès à cette page nécessite une autorisation. Vous pouvez essayer de vous connecter ou de modifier des répertoires.
L’accès à cette page nécessite une autorisation. Vous pouvez essayer de modifier des répertoires.
Dans cette rubrique, nous allons apprendre à créer une application de base C# .NET avec des fonctionnalités d’interopérabilité WinUI 3 et Win32 à l’aide de Platform Invocation Services (PInvoke).
Conditions préalables
Application C#/.NET managée de base
Pour cet exemple, nous allons spécifier l’emplacement et la taille de la fenêtre d’application, la convertir et la mettre à l’échelle pour le PPP approprié, désactiver les boutons de réduction et d'agrandissement de la fenêtre, puis interroger le processus actuel pour afficher la liste des modules chargés.
Nous allons générer notre exemple d’application à partir de l’application modèle initiale (voir Prérequis). Voir également Modèles WinUI 3 dans Visual Studio.
Fichier MainWindow.xaml
Avec WinUI 3, vous pouvez créer des instances de la classe Window dans le balisage XAML.
La classe XAML Window a été étendue pour prendre en charge les fenêtres de bureau, ce qui en fait une abstraction de chacune des implémentations de fenêtre de bas niveau utilisées par les modèles d’application de bureau et UWP. Plus précisément, CoreWindow pour UWP et les handles de fenêtre (ou HWND) pour Win32.
Le code suivant montre le fichier MainWindow.xaml de l’application modèle initiale, qui utilise la classe Window comme élément racine de l’application.
<Window
    x:Class="WinUI_3_basic_win32_interop.MainWindow"
    xmlns="http://schemas.microsoft.com/winfx/2006/xaml/presentation"
    xmlns:x="http://schemas.microsoft.com/winfx/2006/xaml"
    xmlns:local="using:WinUI_3_basic_win32_interop"
    xmlns:d="http://schemas.microsoft.com/expression/blend/2008"
    xmlns:mc="http://schemas.openxmlformats.org/markup-compatibility/2006"
    mc:Ignorable="d">

    <StackPanel Orientation="Horizontal" HorizontalAlignment="Center" VerticalAlignment="Center">
        <Button x:Name="myButton" Click="myButton_Click">Click Me</Button>
    </StackPanel>
</Window>
Paramétrage
Pour appeler des API Win32 exportées à partir de
User32.dll, vous pouvez utiliser l'C#/Win32 P/Invoke Source Generator dans votre projet Visual Studio. Cliquez sur Tools>Gestionnaire de package NuGet>Gérer les packages NuGet pour la solution...et (sous l’onglet Parcourir ) recherchez Microsoft.Windows.CsWin32. Pour plus d’informations, consultez Appel de fonctions natives à partir de code managé.Vous pouvez éventuellement confirmer que l’installation a réussi en confirmant que microsoft.Windows.CsWin32 est répertorié sous le nœud Dépendances>Packages dans l’Explorateur de solutions.
Vous pouvez également double-cliquer sur le fichier projet d’application (ou cliquer avec le bouton droit et sélectionner Modifier le fichier projet) pour ouvrir le fichier dans un éditeur de texte, et confirmer que le fichier projet inclut désormais un
PackageReferenceNuGet pour « Microsoft.Windows.CsWin32 ».<Project Sdk="Microsoft.NET.Sdk"> <PropertyGroup> <OutputType>WinExe</OutputType> <TargetFramework>net8.0-windows10.0.19041.0</TargetFramework> <TargetPlatformMinVersion>10.0.17763.0</TargetPlatformMinVersion> <RootNamespace>WinUI_3_basic_win32_interop</RootNamespace> <ApplicationManifest>app.manifest</ApplicationManifest> <Platforms>x86;x64;ARM64</Platforms> <RuntimeIdentifiers>win-x86;win-x64;win-arm64</RuntimeIdentifiers> <PublishProfile>win-$(Platform).pubxml</PublishProfile> <UseWinUI>true</UseWinUI> <EnableMsixTooling>true</EnableMsixTooling> <Nullable>enable</Nullable> </PropertyGroup> <ItemGroup> <Content Include="Assets\SplashScreen.scale-200.png" /> <Content Include="Assets\LockScreenLogo.scale-200.png" /> <Content Include="Assets\Square150x150Logo.scale-200.png" /> <Content Include="Assets\Square44x44Logo.scale-200.png" /> <Content Include="Assets\Square44x44Logo.targetsize-24_altform-unplated.png" /> <Content Include="Assets\StoreLogo.png" /> <Content Include="Assets\Wide310x150Logo.scale-200.png" /> </ItemGroup> <ItemGroup> <Manifest Include="$(ApplicationManifest)" /> </ItemGroup> <!-- Defining the "Msix" ProjectCapability here allows the Single-project MSIX Packaging Tools extension to be activated for this project even if the Windows App SDK Nuget package has not yet been restored. --> <ItemGroup Condition="'$(DisableMsixProjectCapabilityAddedByProject)'!='true' and '$(EnableMsixTooling)'=='true'"> <ProjectCapability Include="Msix" /> </ItemGroup> <ItemGroup> <PackageReference Include="Microsoft.Windows.CsWin32" Version="0.3.183"> <PrivateAssets>all</PrivateAssets> <IncludeAssets>runtime; build; native; contentfiles; analyzers; buildtransitive</IncludeAssets> </PackageReference> <PackageReference Include="Microsoft.Windows.SDK.BuildTools" Version="10.0.26100.1742" /> <PackageReference Include="Microsoft.WindowsAppSDK" Version="1.6.250205002" /> </ItemGroup> <!-- Defining the "HasPackageAndPublishMenuAddedByProject" property here allows the Solution Explorer "Package and Publish" context menu entry to be enabled for this project even if the Windows App SDK Nuget package has not yet been restored. --> <PropertyGroup Condition="'$(DisableHasPackageAndPublishMenuAddedByProject)'!='true' and '$(EnableMsixTooling)'=='true'"> <HasPackageAndPublishMenu>true</HasPackageAndPublishMenu> </PropertyGroup> <!-- Publish Properties --> <PropertyGroup> <PublishReadyToRun Condition="'$(Configuration)' == 'Debug'">False</PublishReadyToRun> <PublishReadyToRun Condition="'$(Configuration)' != 'Debug'">True</PublishReadyToRun> <PublishTrimmed Condition="'$(Configuration)' == 'Debug'">False</PublishTrimmed> <PublishTrimmed Condition="'$(Configuration)' != 'Debug'">True</PublishTrimmed> </PropertyGroup> </Project>Ajoutez un fichier texte à votre projet et nommez-le
NativeMethods.txt. Le contenu de ce fichier informe le générateur de source C#/Win32 P/Invoke des fonctions et types pour lesquels vous souhaitez générer le code source P/Invoke. En d’autres termes, quelles fonctions et types vous allez appeler et utiliser dans votre code C#.GetDpiForWindow GetWindowLong SetWindowPos SetWindowLong HWND_TOP WINDOW_STYLE
Code
Dans le fichier code-behind
App.xaml.cs, nous obtenons un handle vers Window en utilisant la méthode d’interopérabilité COM WinRT WindowNative.GetWindowHandle (voir Récupérer un handle de fenêtre (HWND)).Cette méthode est appelée à partir du gestionnaire OnLaunched de l’application, comme illustré ici :
/// <summary>
/// Invoked when the application is launched.
/// </summary>
/// <param name="args">Details about the launch request and process.</param>
protected override void OnLaunched(Microsoft.UI.Xaml.LaunchActivatedEventArgs args)
{
    m_window = new MainWindow();

    var hwnd = WinRT.Interop.WindowNative.GetWindowHandle(m_window);

    SetWindowDetails(hwnd, 800, 600);

    m_window.Activate();
}
Nous appelons ensuite une méthode
SetWindowDetails, en fournissant la poignée de fenêtre et les dimensions préférées.Dans cette méthode :
- Nous appelons GetDpiForWindow pour obtenir la valeur des points par pouce (ppp) pour la fenêtre (Win32 utilise des pixels physiques, tandis que WinUI 3 utilise des pixels effectifs). Cette valeur en ppp sert à calculer le facteur d’échelle, et à l’appliquer à la largeur et à la hauteur spécifiées pour la fenêtre.
- Nous appelons ensuite SetWindowPos pour spécifier l’emplacement souhaité de la fenêtre.
- Enfin, nous appelons SetWindowLong pour désactiver les boutons Réduire et Agrandir.
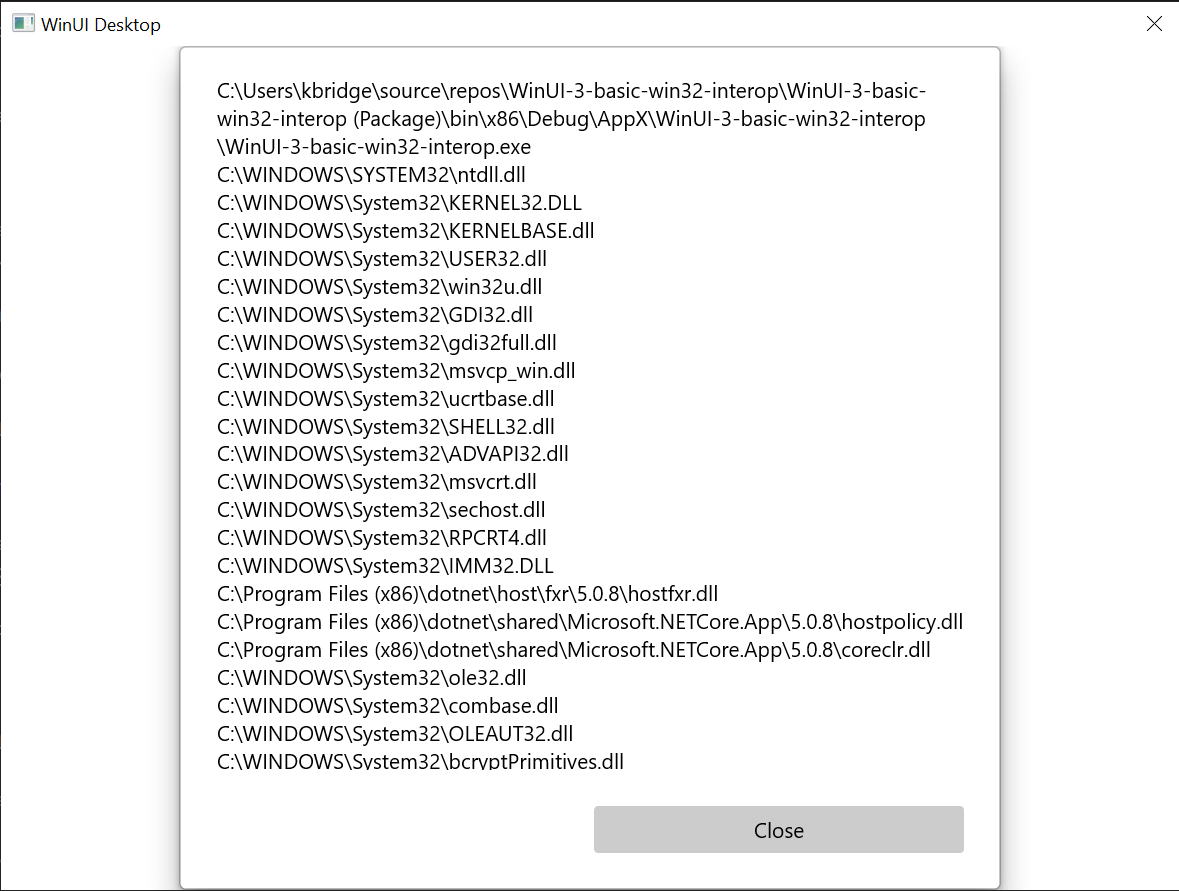
private static void SetWindowDetails(IntPtr hwnd, int width, int height)
{
    var dpi = Windows.Win32.PInvoke.GetDpiForWindow((Windows.Win32.Foundation.HWND)hwnd);
    float scalingFactor = (float)dpi / 96;
    width = (int)(width * scalingFactor);
    height = (int)(height * scalingFactor);

    _ = Windows.Win32.PInvoke.SetWindowPos((Windows.Win32.Foundation.HWND)hwnd,
                                Windows.Win32.Foundation.HWND.HWND_TOP,
                                0, 0, width, height,
                                Windows.Win32.UI.WindowsAndMessaging.SET_WINDOW_POS_FLAGS.SWP_NOMOVE);

    var nIndex = Windows.Win32.PInvoke.GetWindowLong((Windows.Win32.Foundation.HWND)hwnd,
              Windows.Win32.UI.WindowsAndMessaging.WINDOW_LONG_PTR_INDEX.GWL_STYLE) &
              ~(int)Windows.Win32.UI.WindowsAndMessaging.WINDOW_STYLE.WS_MINIMIZEBOX &
              ~(int)Windows.Win32.UI.WindowsAndMessaging.WINDOW_STYLE.WS_MAXIMIZEBOX;

    _ = Windows.Win32.PInvoke.SetWindowLong((Windows.Win32.Foundation.HWND)hwnd,
           Windows.Win32.UI.WindowsAndMessaging.WINDOW_LONG_PTR_INDEX.GWL_STYLE,
           nIndex);
}
Dans le fichier MainWindow.xaml, nous utilisons un ContentDialog avec un ScrollViewer pour afficher la liste de tous les modules chargés pour le processus actuel.
<StackPanel Orientation="Horizontal" HorizontalAlignment="Center" VerticalAlignment="Center">
    <Button x:Name="myButton" Click="myButton_Click">Display loaded modules</Button>

    <ContentDialog x:Name="contentDialog" CloseButtonText="Close">
        <ScrollViewer>
            <TextBlock x:Name="cdTextBlock" TextWrapping="Wrap" />
        </ScrollViewer>
    </ContentDialog>

</StackPanel>
Nous remplaçons ensuite le gestionnaire d’événements
MyButton_Clickpar le code suivant.Ici, nous obtenons une référence au processus actuel en appelant GetCurrentProcess. Nous allons ensuite itérer au sein de la collection de Modules et ajouter le nom de fichier de chaque ProcessModule à notre chaîne d’affichage.
private async void myButton_Click(object sender, RoutedEventArgs e)
{
    myButton.Content = "Clicked";

    var description = new System.Text.StringBuilder();
    var process = System.Diagnostics.Process.GetCurrentProcess();
    foreach (System.Diagnostics.ProcessModule module in process.Modules)
    {
        description.AppendLine(module.FileName);
    }

    cdTextBlock.Text = description.ToString();
    await contentDialog.ShowAsync();
}
Compilez et exécutez l’application.
Une fois la fenêtre affichée, sélectionnez le bouton « Afficher les modules chargés ».
l’application d’interopérabilité Win32 de base décrite dans cette rubrique.
Résumé
Dans cette rubrique, nous avons abordé l’accès à l’implémentation de fenêtre sous-jacente (dans ce cas Win32 et HWND) et l’utilisation des API Win32, ainsi que les API WinRT. Cela montre comment utiliser le code d’application de bureau existant lors de la création d’applications de bureau WinUI 3.
Pour obtenir un exemple plus complet, consultez l’exemple de galerie AppWindow dans le dépôt GitHub des exemples de Windows App SDK .
Exemple de personnalisation de la barre de titre de la fenêtre
Dans ce deuxième exemple, nous montrons comment personnaliser la barre de titre de la fenêtre et son contenu. Avant de suivre cette procédure, passez en revue les rubriques suivantes :
Créer un projet
- Dans Visual Studio, créez un projet C# ou C++/WinRT à partir du modèle de projet Application vide, Empaquetée (WinUI 3 dans Desktop).
Paramétrage
Là encore, référencez le Microsoft.Windows.CsWin32 package NuGet comme nous l’avons fait dans le premier exemple.
Ajoutez un fichier texte
NativeMethods.txtà votre projet.LoadImage SendMessage SetWindowText WM_SETICON
MainWindow.xaml
Remarque
Si vous avez besoin d’un fichier d’icône à utiliser avec cette procédure pas à pas, vous pouvez télécharger le fichier computer.ico à partir de l’exemple d’application WirelessHostednetwork. Placez ce fichier dans votre dossier Assets et ajoutez le fichier à votre projet en tant que contenu. Vous pourrez ensuite faire référence au fichier à l’aide de l’URL Assets/computer.ico.
Sinon, n’hésitez pas à utiliser un fichier d’icône que vous avez déjà, et modifiez les deux références à celle-ci dans les listes de code ci-dessous.
- Dans la liste de codes ci-dessous, vous verrez que dans
MainWindow.xamlnous avons ajouté deux boutons et spécifié des gestionnaires Click pour chacun d'eux. Dans le gestionnaire Click du premier bouton (basicButton_Click), nous définissons l'icône et le texte de la barre de titre. Dans le deuxième (customButton_Click), nous montrons une personnalisation plus importante en remplaçant la barre de titre par le contenu de StackPanel nommé customTitleBarPanel.
<?xml version="1.0" encoding="utf-8"?>
<Window
    x:Class="window_titlebar.MainWindow"
    xmlns="http://schemas.microsoft.com/winfx/2006/xaml/presentation"
    xmlns:x="http://schemas.microsoft.com/winfx/2006/xaml"
    xmlns:local="using:window_titlebar"
    xmlns:d="http://schemas.microsoft.com/expression/blend/2008"
    xmlns:mc="http://schemas.openxmlformats.org/markup-compatibility/2006"
    mc:Ignorable="d"
    Title="Basic WinUI 3 Window title bar sample">

    <Grid x:Name="rootElement" RowDefinitions="100, *, 100, *">

        <StackPanel x:Name="customTitleBarPanel" Grid.Row="0" Orientation="Horizontal" HorizontalAlignment="Stretch" VerticalAlignment="Top" Visibility="Collapsed">
            <Image Source="Images/windowIcon.gif" />
            <TextBlock VerticalAlignment="Center" Text="Full customization of title bar"/>
        </StackPanel>

        <StackPanel x:Name="buttonPanel"  Grid.Row="2" Orientation="Horizontal" HorizontalAlignment="Center">
            <Button x:Name="basicButton" Click="basicButton_Click" Margin="25">Set the Window title and icon</Button>
            <Button x:Name="customButton" Click="customButton_Click" Margin="25">Customize the window title bar</Button>
        </StackPanel>

    </Grid>
</Window>
MainWindow.xaml.cs/cpp
- Dans la liste de codes ci-dessous pour le gestionnaire de basicButton_Click, afin de conserver la barre de titre personnalisée masquée, nous effondrons le customTitleBarPanelStackPanel, et nous définissons la propriété ExtendsContentIntoTitleBar sur
false. - Nous appelons ensuite IWindowNative ::get_WindowHandle (pour C#, à l’aide de la méthode d’assistance interop GetWindowHandle) pour récupérer le handle de fenêtre (HWND) de la fenêtre principale.
- Ensuite, nous définissons l’icône d’application (pour C#, à l’aide du package PInvoke.User32 NuGet) en appelant les fonctions LoadImage et SendMessage.
- Enfin, nous appelons SetWindowText pour mettre à jour la chaîne de la barre de titre.
private void basicButton_Click(object sender, RoutedEventArgs e)
{
    // Ensure the custom title bar content is not displayed.
    customTitleBarPanel.Visibility = Visibility.Collapsed;

    // Disable custom title bar content.
    ExtendsContentIntoTitleBar = false;

    //Get the Window's HWND
    var hwnd = WinRT.Interop.WindowNative.GetWindowHandle(this);

    var hIcon = Windows.Win32.PInvoke.LoadImage(
        null,
        "Images/windowIcon.ico",
        Windows.Win32.UI.WindowsAndMessaging.GDI_IMAGE_TYPE.IMAGE_ICON,
        20, 20,
        Windows.Win32.UI.WindowsAndMessaging.IMAGE_FLAGS.LR_LOADFROMFILE);

    Windows.Win32.PInvoke.SendMessage(
        (Windows.Win32.Foundation.HWND)hwnd,
        Windows.Win32.PInvoke.WM_SETICON,
        (Windows.Win32.Foundation.WPARAM)0,
        (Windows.Win32.Foundation.LPARAM)hIcon.DangerousGetHandle());

    Windows.Win32.PInvoke.SetWindowText((Windows.Win32.Foundation.HWND)hwnd, "Basic customization of title bar");
}
// pch.h
...
#include <microsoft.ui.xaml.window.h>
...

// MainWindow.xaml.h
...
void basicButton_Click(Windows::Foundation::IInspectable const& sender, Microsoft::UI::Xaml::RoutedEventArgs const& args);
...

// MainWindow.xaml.cpp
void MainWindow::basicButton_Click(IInspectable const&, RoutedEventArgs const&)
{
    // Ensure the that custom title bar content is not displayed.
    customTitleBarPanel().Visibility(Visibility::Collapsed);

    // Disable custom title bar content.
    ExtendsContentIntoTitleBar(false);

    // Get the window's HWND
    auto windowNative{ this->m_inner.as<::IWindowNative>() };
    HWND hWnd{ 0 };
    windowNative->get_WindowHandle(&hWnd);

    HICON icon{ reinterpret_cast<HICON>(::LoadImage(nullptr, L"Assets/computer.ico", IMAGE_ICON, 0, 0, LR_DEFAULTSIZE | LR_LOADFROMFILE)) };
    ::SendMessage(hWnd, WM_SETICON, 0, (LPARAM)icon);

    this->Title(L"Basic customization of title bar");
}
- Dans le gestionnaire customButton_Click, nous définissons la visibilité du customTitleBarPanelStackPanel sur Visible.
- Nous définissons ensuite la propriété ExtendsContentIntoTitleBar sur
true, puis appelons SetTitleBar pour afficher la customTitleBarPanelStackPanel en tant que barre de titre personnalisée.
private void customButton_Click(object sender, RoutedEventArgs e)
{
    customTitleBarPanel.Visibility = Visibility.Visible;

    // Enable custom title bar content.
    ExtendsContentIntoTitleBar = true;
    // Set the content of the custom title bar.
    SetTitleBar(customTitleBarPanel);
}
// MainWindow.xaml.h
...
void customButton_Click(Windows::Foundation::IInspectable const& sender, Microsoft::UI::Xaml::RoutedEventArgs const& args);
...

// MainWindow.xaml.cpp
void MainWindow::customButton_Click(IInspectable const&, RoutedEventArgs const&)
{
    customTitleBarPanel().Visibility(Visibility::Visible);

    // Enable custom title bar content.
    ExtendsContentIntoTitleBar(true);

    // Set the content of the custom title bar.
    SetTitleBar(customTitleBarPanel());
}
App.xaml
- Dans le fichier
App.xaml, immédiatement après le commentaire<!-- Other app resources here -->, nous avons ajouté des pinceaux de couleur personnalisée pour la barre de titre, comme indiqué ci-dessous.
<?xml version="1.0" encoding="utf-8"?>
<Application
    x:Class="window_titlebar.App"
    xmlns="http://schemas.microsoft.com/winfx/2006/xaml/presentation"
    xmlns:x="http://schemas.microsoft.com/winfx/2006/xaml"
    xmlns:local="using:window_titlebar">
    <Application.Resources>
        <ResourceDictionary>
            <ResourceDictionary.MergedDictionaries>
                <XamlControlsResources xmlns="using:Microsoft.UI.Xaml.Controls" />
                <!-- Other merged dictionaries here -->
            </ResourceDictionary.MergedDictionaries>
            <!-- Other app resources here -->
            <SolidColorBrush x:Key="WindowCaptionBackground">Green</SolidColorBrush>
            <SolidColorBrush x:Key="WindowCaptionBackgroundDisabled">LightGreen</SolidColorBrush>
            <SolidColorBrush x:Key="WindowCaptionForeground">Red</SolidColorBrush>
            <SolidColorBrush x:Key="WindowCaptionForegroundDisabled">Pink</SolidColorBrush>
        </ResourceDictionary>
    </Application.Resources>
</Application>
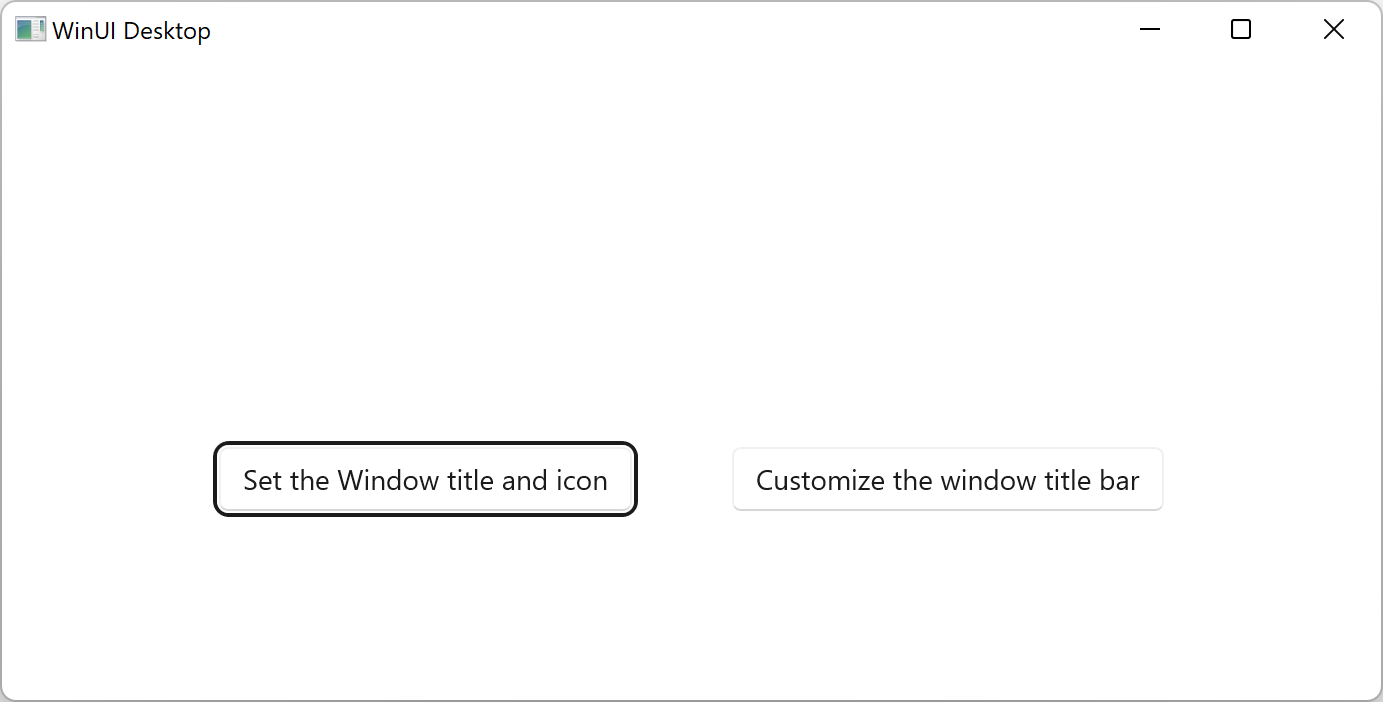
Si vous avez suivi ces étapes dans votre propre application, vous pouvez générer votre projet maintenant et exécuter l’application. Vous verrez une fenêtre d’application similaire à ce qui suit (avec l’icône d’application personnalisée) :
app template
Voici la barre de titre personnalisée de base :
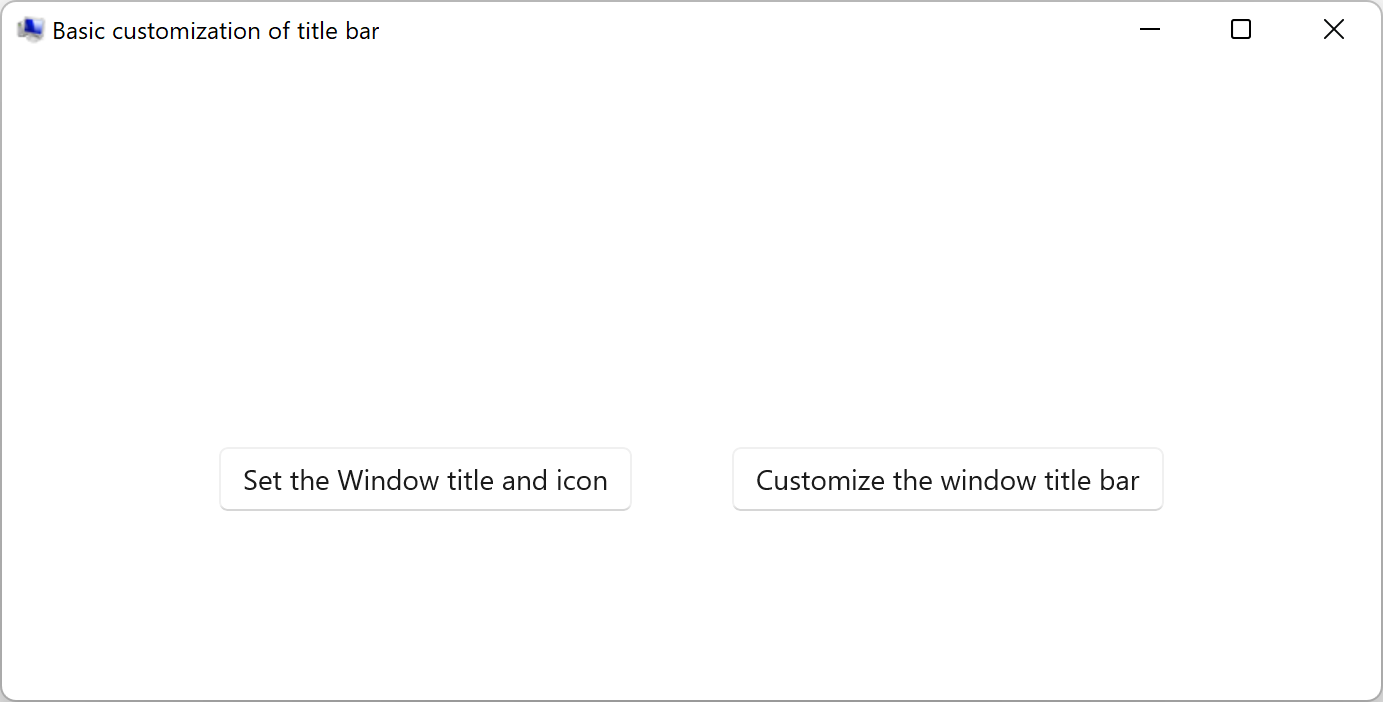
Modèle d'application avec icône personnalisée.Voici la barre de titre entièrement personnalisée :
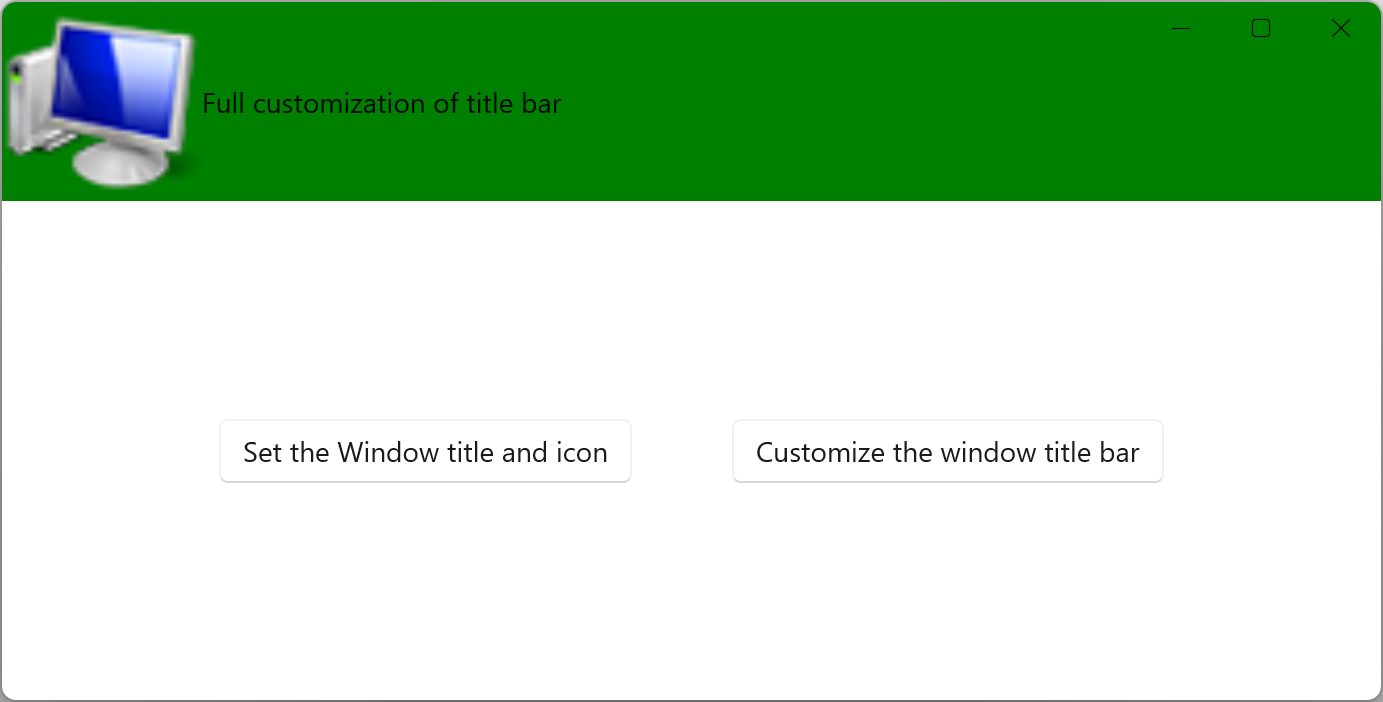
application modèle avec barre de titre personnalisée.
Voir aussi
Collaborer avec nous sur GitHub
La source de ce contenu se trouve sur GitHub, où vous pouvez également créer et examiner les problèmes et les demandes de tirage. Pour plus d’informations, consultez notre guide du contributeur.

Windows developer