Nóta
Teastaíonn údarú chun rochtain a fháil ar an leathanach seo. Is féidir leat triail a bhaint as shíniú isteach nó eolairí a athrú.
Teastaíonn údarú chun rochtain a fháil ar an leathanach seo. Is féidir leat triail a bhaint as eolairí a athrú.
This tutorial shows you how to install IBM WebSphere Application Server (WAS) Network Deployment (ND) traditional and configure a WAS cluster on Azure Virtual Machines (VMs) on GNU/Linux.
In this tutorial, you learn how to:
- Create a custom virtual network and create the VMs within the network.
- Manually install WebSphere Application Server Network Deployment traditional (V9 or V8.5) on the VMs by using the graphical interface.
- Configure a WAS cluster by using the Profile Management Tool.
- Deploy and run a Java Platform Enterprise Edition (Java EE) application in the cluster.
- Expose the application to the public internet via Azure Application Gateway.
- Validate the successful configuration.
If you prefer a fully automated solution that does all of these steps on your behalf on GNU/Linux VMs, directly from the Azure portal, see Quickstart: Deploy WebSphere Application Server Network Deployment Cluster on Azure Virtual Machines. A less automated, but still accelerated, option is to skip the steps of installing Java Development Kit (JDK) and WebSphere on the operating system by using a pre-configured Red Hat Linux base image. You can find these offers in Azure Marketplace by using a query for WebSphere Application Server image 9.0.5.x.
If you're interested in working closely on your migration scenario with the engineering team developing WebSphere on Azure solutions, fill out this short survey on WebSphere migration and include your contact information. The team of program managers, architects, and engineers will promptly get in touch with you to initiate close collaboration.
Prerequisites
- An Azure subscription. If you don't have an Azure subscription, create a free account before you begin.
- Install Azure CLI version 2.46.0 or later to run Azure CLI commands.
- This article provides instructions for invoking Azure CLI commands on Windows PowerShell or UNIX Bash. Either way, you must install the Azure CLI.
- When you're prompted, install Azure CLI extensions on first use. For more information about extensions, see Use and manage extensions with the Azure CLI.
- Run az version to find the version and dependent libraries that are installed. To upgrade to the latest version, run az upgrade.
- You must have an IBMid. If you don't have one, create an IBM account at Log in to IBM and select Create an IBMid. Make note of your IBMid password and email.
- If you plan to use version 8.5.5 of IBM WebSphere Application Server Network Deployment, this IBMid must be entitled to use that version of the software. To learn about entitlements, ask the primary or secondary contacts for your IBM Passport Advantage site to grant you access, or follow the steps at IBM eCustomer Care.
Prepare the environment
In this section, you set up the infrastructure within which you install IBM Installation Manager and WebSphere Application Server Network Deployment traditional.
Assumptions
This tutorial configures a WAS cluster with a deployment manager and two managed servers on a total of three VMs. To configure the cluster, you must create the following three Azure VMs within the same availability set:
- The admin VM (VM name
adminVM) has the deployment manager running. - The managed VMs (VM names
mspVM1andmspVM2) have two managed servers running.
Sign in to Azure
If you haven't done so already, sign in to your Azure subscription by using the az login command and follow the on-screen directions.
az login
Note
If multiple Azure tenants are associated with your Azure credentials, you must specify which tenant you want to sign in to. You can do this by using the --tenant option. For example: az login --tenant contoso.onmicrosoft.com.
Create a resource group
Create a resource group by using az group create. Resource group names must be globally unique within a subscription. For this reason, consider prepending a unique identifier to any names you create that must be unique. A useful technique is to use your initials, followed by today's date in mmdd format. This example creates a resource group named abc1110rg in the eastus location:
export RESOURCE_GROUP_NAME=abc1110rg
az group create --name $RESOURCE_GROUP_NAME --location eastus
Create a virtual network
Note
By default, the Azure CLI commands in this section follow the Bash style unless otherwise specified.
If you run these commands in PowerShell, be sure to declare environment parameters as indicated in the earlier commands.
To break a command line into multiple lines in PowerShell, you can use the backtick character (`) at the end of each line.
The resources that compose your WebSphere Application Server cluster must communicate with each other, and with the public internet, by using a virtual network. For a complete guide to planning your virtual network, see the Cloud Adoption Framework for Azure guide Plan virtual networks. For more information, see Azure Virtual Network frequently asked questions.
Use the following steps to create the virtual network. The example in this section creates a virtual network with address space 192.168.0.0/16 and creates a subnet for VMs.
Create a virtual network by using az network vnet create. The following example creates a network named
myVNet:az network vnet create \ --resource-group $RESOURCE_GROUP_NAME \ --name myVNet \ --address-prefixes 192.168.0.0/24Create a subnet for the WAS cluster by using az network vnet subnet create. The following example creates a subnet named
mySubnet:az network vnet subnet create \ --resource-group $RESOURCE_GROUP_NAME \ --name mySubnet \ --vnet-name myVNet \ --address-prefixes 192.168.0.0/25Create a subnet for Application Gateway by using az network vnet subnet create. The following example creates a subnet named
wasGateway:az network vnet subnet create \ --resource-group $RESOURCE_GROUP_NAME \ --name wasGateway \ --vnet-name myVNet \ --address-prefixes 192.168.0.128/25
Create an availability set
Create an availability set by using az vm availability-set create, as shown in the following example. Creating an availability set is optional, but we recommend it. For more information, see Example Azure infrastructure walkthrough for Windows VMs.
az vm availability-set create \
    --resource-group $RESOURCE_GROUP_NAME \
    --name myAvailabilitySet \
    --platform-fault-domain-count 2 \
    --platform-update-domain-count 2
Get or install WAS on GNU/Linux
The following sections describe the steps for getting or installing WAS on GNU/Linux. You can choose the operating system and WAS version according to your requirements, but you should verify that they're available in the IBM WebSphere Application Server Network Deployment documentation.
If you want to use WAS V9, the instructions use an Azure VM image that contains the latest supported version of the software. IBM and Microsoft maintain the image. For the full list of WAS base images that IBM and Microsoft maintain, see Azure Marketplace.
IBM and Microsoft maintain a VM base image that has WAS V9 preinstalled on the recommended version of Red Hat Enterprise Linux. For more information about this image, see the Azure portal. If you take this approach, the Azure Marketplace image that you use to create the VMs is ibm-usa-ny-armonk-hq-6275750-ibmcloud-aiops:2021-04-27-twas-cluster-base-image:2021-04-27-twas-cluster-base-image:latest. Use the following command to save the image name in an environment variable:
export VM_URN="ibm-usa-ny-armonk-hq-6275750-ibmcloud-aiops:2023-03-27-twas-cluster-base-image:2023-03-27-twas-cluster-base-image:latest"
$Env:VM_URN="ibm-usa-ny-armonk-hq-6275750-ibmcloud-aiops:2023-03-27-twas-cluster-base-image:2023-03-27-twas-cluster-base-image:latest"
Create a Red Hat Enterprise Linux machine
Use the following steps to create a basic VM, ensure the installation of required tools, take a snapshot of its disk, and create replicas based on that snapshot:
Create a VM by using az vm create. You run the deployment manager on this VM.
The following example creates a Red Hat Enterprise Linux machine by using a username/password pair for the authentication. You can choose to use TLS/SSL authentication instead, which is more secure.
az vm create \ --resource-group $RESOURCE_GROUP_NAME \ --name adminVM \ --availability-set myAvailabilitySet \ --image $VM_URN \ --size Standard_DS1_v2 \ --admin-username azureuser \ --admin-password Secret123456 \ --public-ip-address "" \ --nsg ""Create and attach a new disk for WAS files by using the following command:
This step is already performed for you when you use the VM base image.
Create a Windows VM and set up an X server
This tutorial uses the graphical interface of WAS to complete the installation and configuration. You use a Windows VM as a jump box and run an X Window System server to view the graphical installers on the three VMs of the WAS cluster.
Use the following steps to provision a Windows 10 machine and install an X server. If you already have a Windows machine within the same network as the Red Hat Enterprise Linux machine, you don't need to provision a new one from Azure. You can go directly to the section that installs the X server.
Use the following steps to create a Windows 10 VM from the Azure portal:
- Open the resource group you created before in the Azure portal.
- Select Create to create the resource.
- Select Compute, search for windows 10, and then select Microsoft Windows 10.
- Select the plan that you want, and then select Create.
- Use the following values to configure the VM:
- Virtual machine name: myWindowsVM
- Image: Windows 10 Pro
- Username: azureuser
- Password: Secret123456
- Select the checkbox under Licensing.
- Select Review + create, and then select Create.
It takes a few minutes to create the VM and supporting resources.
After the deployment finishes, install the X server and use it to configure the application server on the Linux machines by using a graphical interface.
Use the following steps to install and launch the X server:
- Use Remote Desktop to connect to
myWindowsVM. For a detailed guide, see How to connect using Remote Desktop and sign on to an Azure virtual machine running Windows. You must execute the remaining steps in this section onmyWindowsVM. - Download and install VcXsrv Windows X Server.
- Disable the firewall. To allow communication from the Linux VMs, use the following steps to turn off Windows Defender Firewall:
- Search for and open Windows Defender Firewall.
- Find Turn Windows Defender Firewall on or off, and then select Turn off in Private network settings. You can leave Public network settings alone.
- Select OK.
- Close the Windows Defender Firewall settings panel.
- Select X-launch from the desktop.
- For display settings, set the display number to -1 to use multiple windows, and then select Next.
- For Select how to start clients, select Start no client, and then select Next.
- For extra settings, select Clipboard and Primary Selection, Native opengl, and Disable access control.
- Select Next to finish.
A Windows Security Alert dialog might appear with this message: "Allow VcXsrv windows X-server to communicate on these networks." Select Allow access.
- Use Remote Desktop to connect to
You're now ready to connect to the Red Hat Enterprise Linux machine and install the required tools by using the graphical interface. The following sections guide you to install IBM Installation Manager and WebSphere Application Server Network Deployment traditional. You use myWindowsVM for the installation and configuration.
Install dependencies
Use the following steps to install the required dependencies to allow the connection from the X server and enable graphical installation:
Use the following steps to get the private IP address of
adminVM:- In the Azure portal, select the resource group you created before.
- In the list of resources, select
adminVM. - On the overview pane, select Properties.
- In the Networking section, copy the value of Private IP address. In this example, the value is
192.168.0.4.
Open a command prompt from
myWindowsVM, and then connect toadminVMby usingssh, as shown in the following example:set ADMINVM_IP="192.168.0.4" ssh azureuser@%ADMINVM_IP%Enter the password Secret123456.
Use the following command to switch to the
rootuser. This tutorial installs all the tools with therootuser.sudo su -Use the following commands to install dependencies:
# dependencies for X server access
yum install -y libXtst libSM libXrender

# dependencies for GUI installation
yum install -y gtk2 libXtst xorg-x11-fonts-Type1 mesa-libGL
Later, you continue to mount the data disk on adminVM, so keep this terminal open.
Mount the data disk
This step is already performed for you when you use the VM base image.


Install WebSphere Application Server Network Deployment traditional
When you use the base image, WebSphere Application Server Network Deployment is already installed in the directory /datadrive/IBM/WebSphere/ND/V9.


Create machines for managed servers
You installed WebSphere Application Server Network Deployment on adminVM, which runs the deployment manager. You still need to prepare machines to run the two managed servers. Next, you create a snapshot from disks of adminVM and prepare machines for managed severs mspVM1 and mspVM2.
This section introduces an approach to prepare machines with the snapshot of adminVM. Return to your terminal where you're signed in to the Azure CLI, and then use the following steps. This terminal isn't the Windows jump box.
Use the following command to stop
adminVM:# export RESOURCE_GROUP_NAME=abc1110rg az vm stop --resource-group $RESOURCE_GROUP_NAME --name adminVMUse az snapshot create to take a snapshot of the
adminVMOS disk:export ADMIN_OS_DISK_ID=$(az vm show \ --resource-group $RESOURCE_GROUP_NAME \ --name adminVM \ --query storageProfile.osDisk.managedDisk.id \ --output tsv) az snapshot create \ --resource-group $RESOURCE_GROUP_NAME \ --name myAdminOSDiskSnapshot \ --source $ADMIN_OS_DISK_IDUse az snapshot create to take a snapshot of the
adminVMdata disk:export ADMIN_DATA_DISK_ID=$(az vm show \ --resource-group $RESOURCE_GROUP_NAME \ --name adminVM \ --query 'storageProfile.dataDisks[0].managedDisk.id' \ --output tsv) az snapshot create \ --resource-group $RESOURCE_GROUP_NAME \ --name myAdminDataDiskSnapshot \ --source $ADMIN_DATA_DISK_IDUse the following commands to query for the snapshot IDs that you use later:
# Get the snapshot ID.
export OS_SNAPSHOT_ID=$(az snapshot show \
    --resource-group $RESOURCE_GROUP_NAME \
    --name myAdminOSDiskSnapshot \
    --query '[id]' \
    --output tsv)
export DATA_SNAPSHOT_ID=$(az snapshot show \
    --resource-group $RESOURCE_GROUP_NAME \
    --name myAdminDataDiskSnapshot \
    --query '[id]' \
    --output tsv)
Next, create mspVM1 and mspVM2.
Create mspVM1
Use the following steps to create mspVM1:
Create an OS disk for
mspVM1by using az disk create:# Create a new managed disk by using the OS snapshot ID. # Note that the managed disk is created in the same location as the snapshot. az disk create \ --resource-group $RESOURCE_GROUP_NAME \ --name mspVM1_OsDisk_1 \ --source $OS_SNAPSHOT_IDUse the following commands to create the
mspVM1VM by attaching OS diskmspVM1_OsDisk_1:# Get the resource ID of the managed disk. export MSPVM1_OS_DISK_ID=$(az disk show \ --resource-group $RESOURCE_GROUP_NAME \ --name mspVM1_OsDisk_1 \ --query '[id]' \ --output tsv)# Create the VM by attaching the existing managed disk as an OS. az vm create \ --resource-group $RESOURCE_GROUP_NAME \ --name mspVM1 \ --attach-os-disk $MSPVM1_OS_DISK_ID \ --plan-publisher ibm-usa-ny-armonk-hq-6275750-ibmcloud-aiops \ --plan-product 2023-03-27-twas-cluster-base-image \ --plan-name 2023-03-27-twas-cluster-base-image \ --os-type linux \ --availability-set myAvailabilitySet \ --public-ip-address "" \ --nsg ""# Create the VM by attaching the existing managed disk as an OS. # For `public-ip-address` and `nsg`, be sure to wrap the value "" in '' in PowerShell. az vm create ` --resource-group $Env:RESOURCE_GROUP_NAME ` --name mspVM1 ` --attach-os-disk $Env:MSPVM1_OS_DISK_ID ` --plan-publisher ibm-usa-ny-armonk-hq-6275750-ibmcloud-aiops ` --plan-product 2023-03-27-twas-cluster-base-image ` --plan-name 2023-03-27-twas-cluster-base-image ` --os-type linux ` --availability-set myAvailabilitySet ` --public-ip-address '""' ` --nsg '""'Create a managed disk from the data disk snapshot and attach it to
mspVM1:az disk create \ --resource-group $RESOURCE_GROUP_NAME \ --name mspVM1_Data_Disk_1 \ --source $DATA_SNAPSHOT_ID export MSPVM1_DATA_DISK_ID=$(az disk show \ --resource-group $RESOURCE_GROUP_NAME \ --name mspVM1_Data_Disk_1 \ --query '[id]' \ --output tsv) az vm disk attach \ --resource-group $RESOURCE_GROUP_NAME \ --vm-name mspVM1 \ --name $MSPVM1_DATA_DISK_IDYou created
mspVM1with WAS installed. Because you created the VM from a snapshot of theadminVMdisks, the two VMs have the same host name. Use az vm run-command invoke to change the host name to the valuemspVM1:az vm run-command invoke \ --resource-group $RESOURCE_GROUP_NAME \ --name mspVM1 \ --command-id RunShellScript \ --scripts "sudo hostnamectl set-hostname mspVM1"When the command finishes successfully, you get output similar to the following example:
{
    "value": [
        {
        "code": "ProvisioningState/succeeded",
        "displayStatus": "Provisioning succeeded",
        "level": "Info",
        "message": "Enable succeeded: \n[stdout]\n\n[stderr]\n",
        "time": null
        }
    ]
}
Create mspVM2
Use the following steps to create mspVM2:
Create an OS disk for
mspVM2by using az disk create:# Create a new managed disk by using the OS snapshot ID. # Note that the managed disk is created in the same location as the snapshot. az disk create \ --resource-group $RESOURCE_GROUP_NAME \ --name mspVM2_OsDisk_1 \ --source $OS_SNAPSHOT_IDUse the following commands to create the
mspVM2VM by attaching OS diskmspVM2_OsDisk_1:# Get the resource ID of the managed disk. export MSPVM2_OS_DISK_ID=$(az disk show \ --resource-group $RESOURCE_GROUP_NAME \ --name mspVM2_OsDisk_1 \ --query '[id]' \ --output tsv)# Create the VM by attaching the existing managed disk as an OS. az vm create \ --resource-group $RESOURCE_GROUP_NAME \ --name mspVM2 \ --attach-os-disk $MSPVM2_OS_DISK_ID \ --plan-publisher ibm-usa-ny-armonk-hq-6275750-ibmcloud-aiops \ --plan-product 2023-03-27-twas-cluster-base-image \ --plan-name 2023-03-27-twas-cluster-base-image \ --os-type linux \ --availability-set myAvailabilitySet \ --public-ip-address "" \ --nsg ""# Create the VM by attaching the existing managed disk as an OS. # For `public-ip-address` and `nsg`, be sure to wrap the value "" in '' in PowerShell. az vm create ` --resource-group $Env:RESOURCE_GROUP_NAME ` --name mspVM2 ` --attach-os-disk $Env:MSPVM2_OS_DISK_ID ` --plan-publisher ibm-usa-ny-armonk-hq-6275750-ibmcloud-aiops ` --plan-product 2023-03-27-twas-cluster-base-image ` --plan-name 2023-03-27-twas-cluster-base-image ` --os-type linux ` --availability-set myAvailabilitySet ` --public-ip-address '""' ` --nsg '""'Create a managed disk from the data snapshot and attach it to
mspVM2:az disk create \ --resource-group $RESOURCE_GROUP_NAME \ --name mspVM2_Data_Disk_1 \ --source $DATA_SNAPSHOT_ID export MSPVM2_DATA_DISK_ID=$(az disk show \ --resource-group $RESOURCE_GROUP_NAME \ --name mspVM2_Data_Disk_1 \ --query '[id]' \ --output tsv) az vm disk attach \ --resource-group $RESOURCE_GROUP_NAME \ --vm-name mspVM2 \ --name $MSPVM2_DATA_DISK_IDYou created
mspVM2with WAS installed. Because you created the VM from a snapshot of theadminVMdisks, the two VMs have the same host name. Use az vm run-command invoke to change the host name to the valuemspVM2:az vm run-command invoke \ --resource-group $RESOURCE_GROUP_NAME \ --name mspVM2 \ --command-id RunShellScript \ --scripts "sudo hostnamectl set-hostname mspVM2"When the command finishes successfully, you get output similar to the following example:
{
    "value": [
        {
        "code": "ProvisioningState/succeeded",
        "displayStatus": "Provisioning succeeded",
        "level": "Info",
        "message": "Enable succeeded: \n[stdout]\n\n[stderr]\n",
        "time": null
        }
    ]
}
Make sure that you completed the previous steps for both mspVM1 and mspVM2. Then, use the following steps to finish preparing the machines:
Use the az vm start command to start
adminVM, as shown in the following example:az vm start --resource-group $RESOURCE_GROUP_NAME --name adminVMUse the following commands to get and show the private IP addresses, which you use in later sections:
export ADMINVM_NIC_ID=$(az vm show \
    --resource-group $RESOURCE_GROUP_NAME \
    --name adminVM \
    --query networkProfile.networkInterfaces'[0]'.id \
    --output tsv)
export ADMINVM_IP=$(az network nic show \
    --ids $ADMINVM_NIC_ID \
    --query ipConfigurations'[0]'.privateIPAddress \
    --output tsv)
export MSPVM1_NIC_ID=$(az vm show \
    --resource-group $RESOURCE_GROUP_NAME \
    --name mspVM1 \
    --query networkProfile.networkInterfaces'[0]'.id \
    --output tsv)
export MSPVM1_IP=$(az network nic show \
    --ids $MSPVM1_NIC_ID \
    --query ipConfigurations'[0]'.privateIPAddress \
    --output tsv)
export MSPVM2_NIC_ID=$(az vm show \
    --resource-group $RESOURCE_GROUP_NAME \
    --name mspVM2 \
    --query networkProfile.networkInterfaces'[0]'.id \
    --output tsv)
export MSPVM2_IP=$(az network nic show \
    --ids $MSPVM2_NIC_ID \
    --query ipConfigurations'[0]'.privateIPAddress \
    --output tsv)
echo "Private IP of adminVM: $ADMINVM_IP"
echo "Private IP of mspVM1: $MSPVM1_IP"
echo "Private IP of mspVM2: $MSPVM2_IP"
Now, all three machines are ready. Next, you configure a WAS cluster.
Create WAS profiles and a cluster
This section shows you how to create and configure a WAS cluster. In terms of creating WAS profiles and a cluster, there's no significant difference between the 9.x series and the 8.5.x series. All the screenshots in this section show V9 as the basis.
Configure a deployment manager profile
In this section, you use the X server on myWindowsVM to create a management profile for the deployment manager to administer servers within the deployment manager cell by using the Profile Management Tool. For more information about profiles, see Profile concepts. For more information about creating the deployment manager profile, see Creating management profiles with deployment managers.
Use the following steps to create and configure the management profile:
Make sure you're still on your Windows machine. If you aren't, use the following commands to remotely connect to
myWindowsVM, and then connect toadminVMfrom a command prompt:set ADMINVM_IP="192.168.0.4" ssh azureuser@%ADMINVM_IP%Use the following commands to become the
rootuser and set theDISPLAYvariable:sudo su - export DISPLAY=<my-windows-vm-private-ip>:0.0 # export DISPLAY=192.168.0.5:0.0Use the following commands to start the Profile Management Tool:
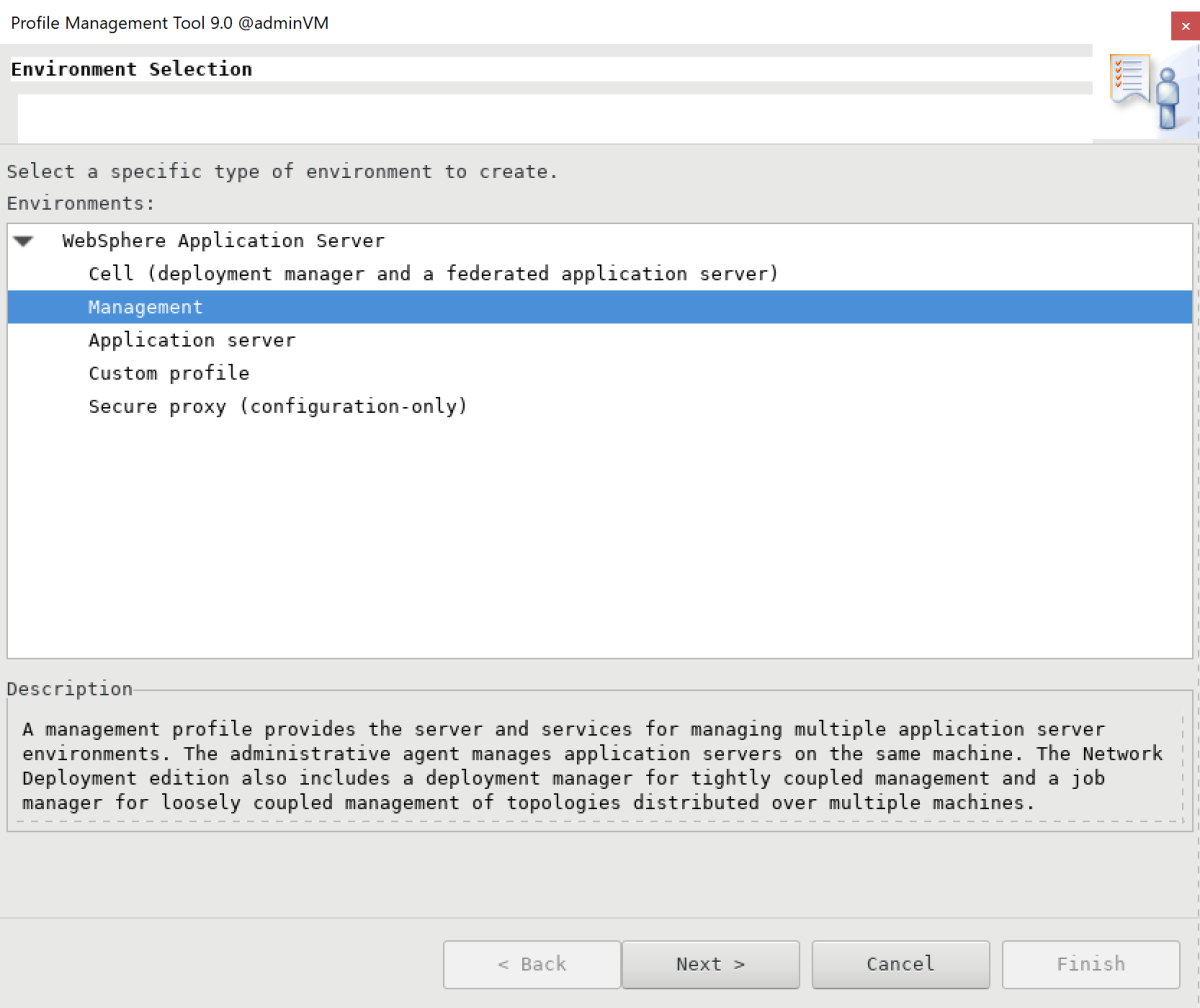
cd /datadrive/IBM/WebSphere/ND/V9/bin/ProfileManagement ./pmt.shAfter a while, the Profile Management Tool appears. If you don't see the user interface, check behind the command prompt. Select Create.

On the Environment Selection pane, select Management, and then select Next.
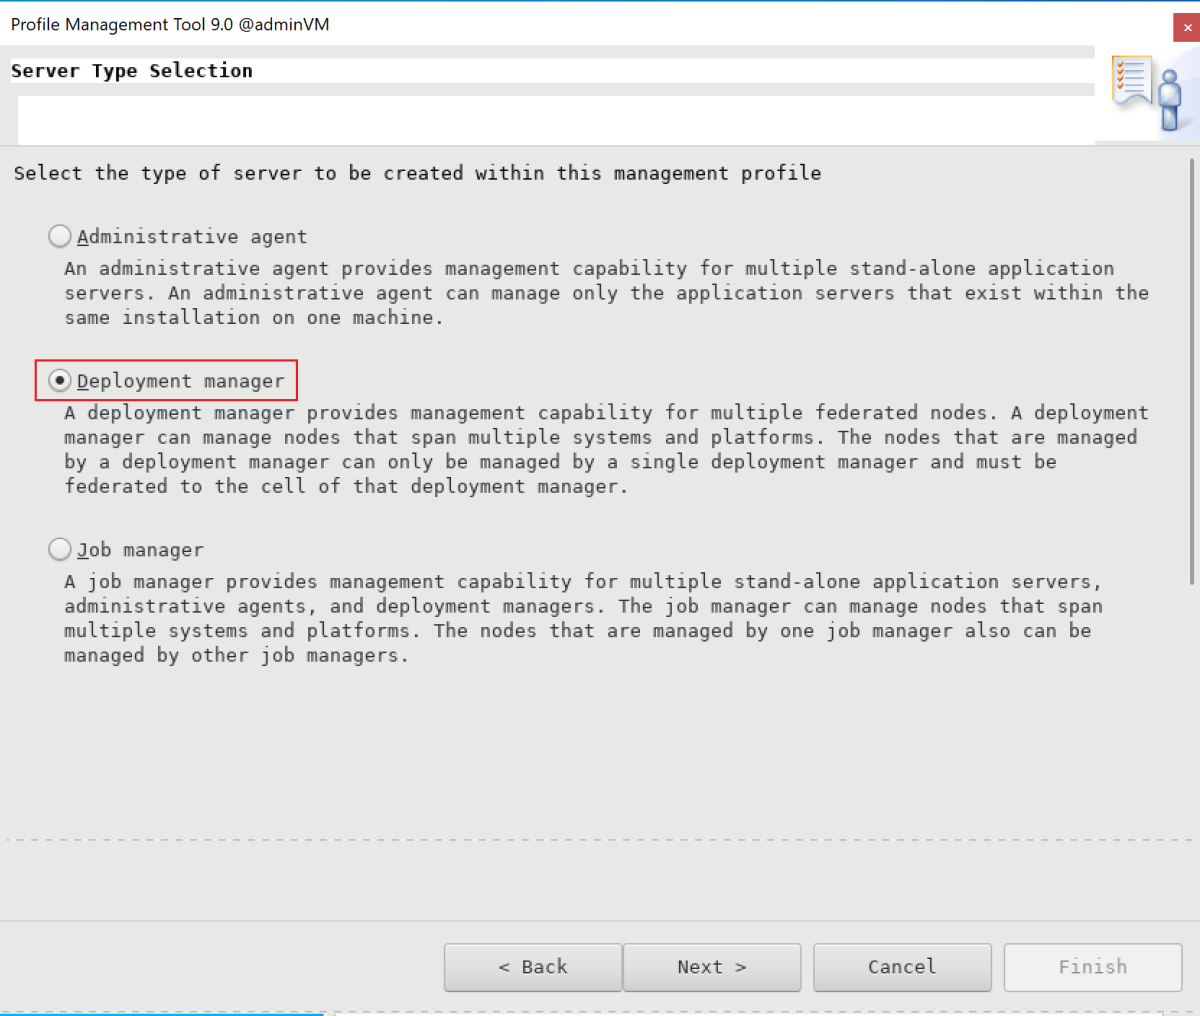
On the Server Type Selection pane, select Deployment manager, and then select Next.
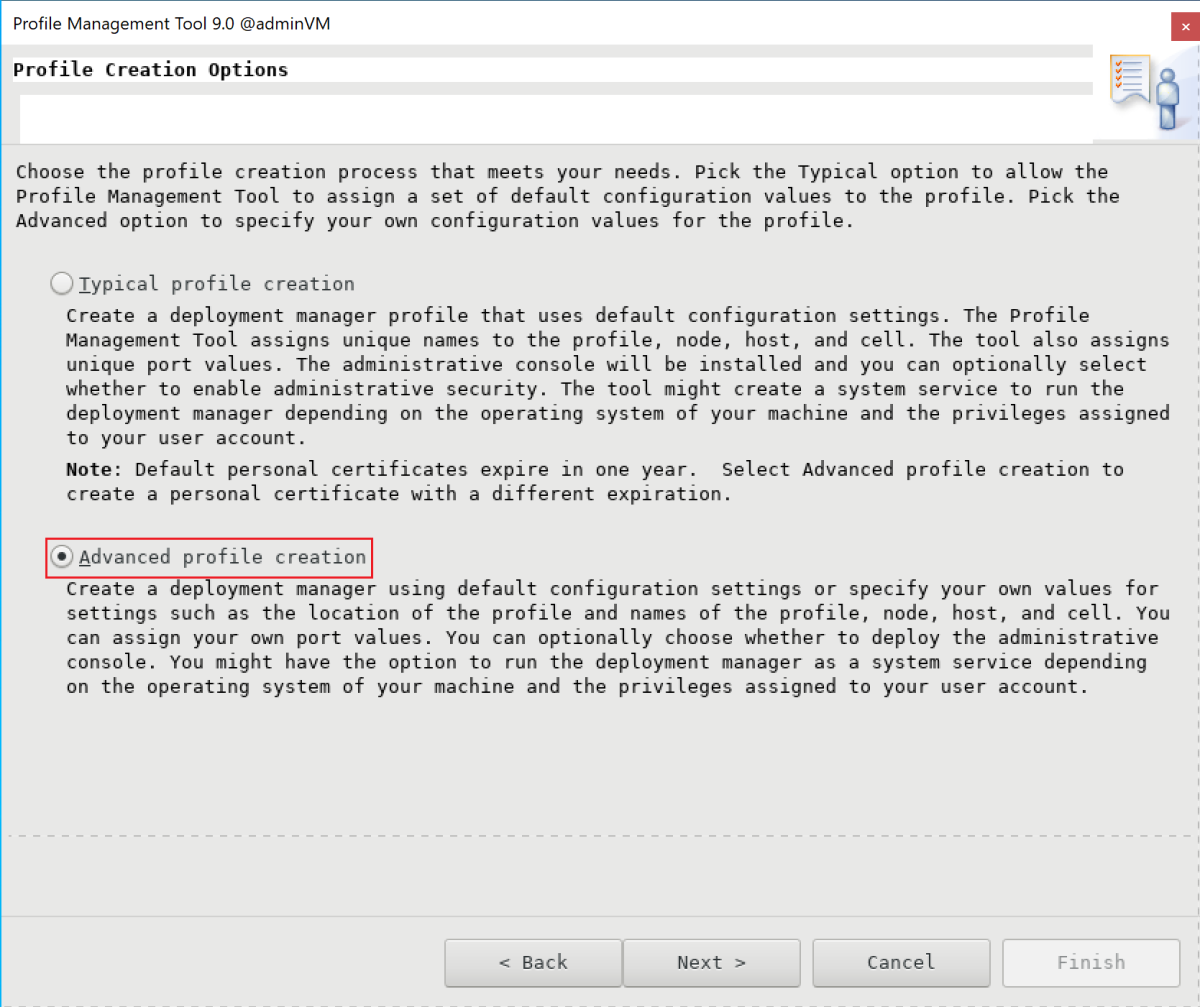
On the Profile Creation Options pane, select Advanced profile creation, and then select Next.
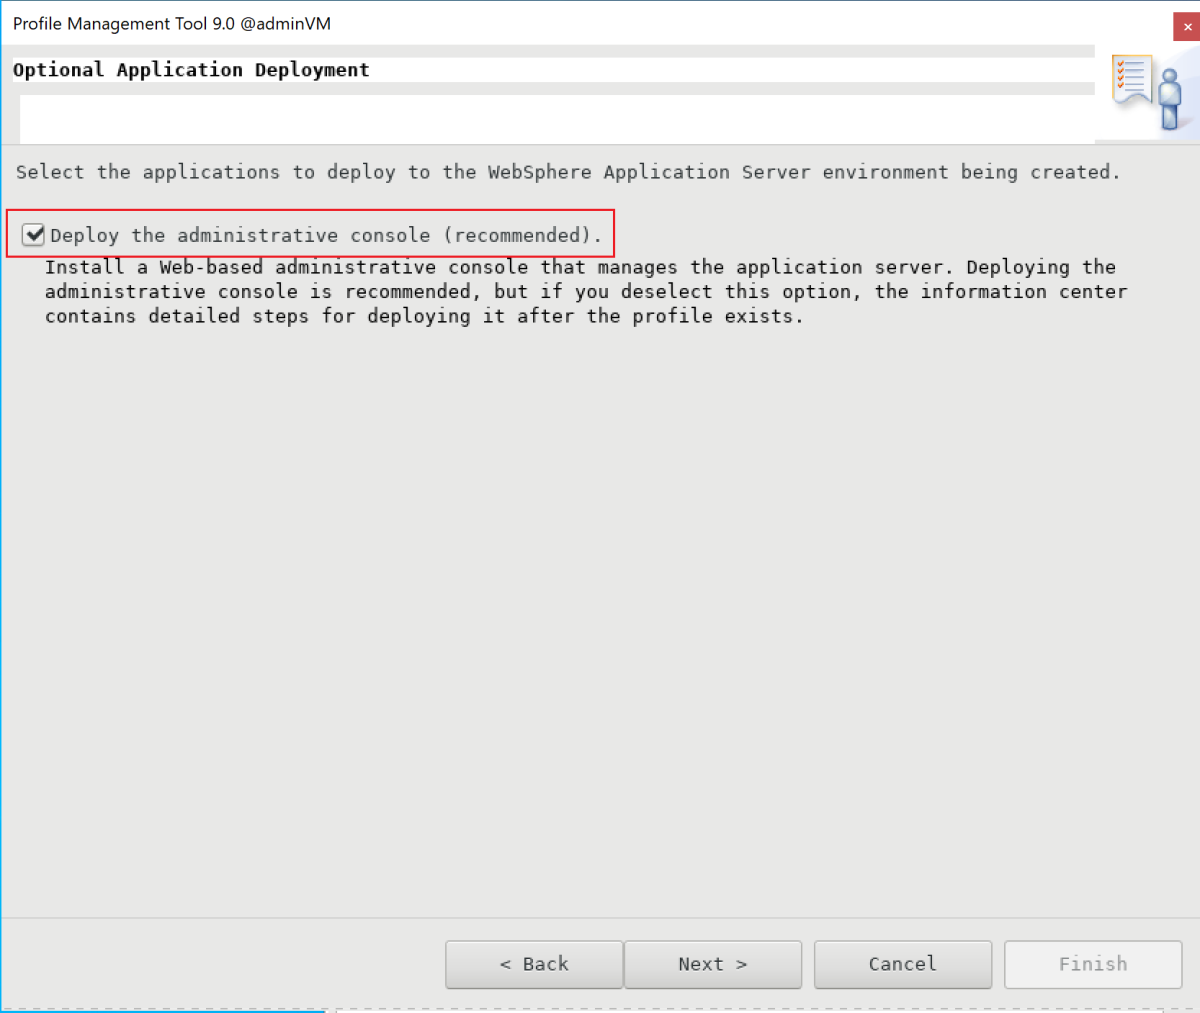
On the Optional Application Deployment pane, ensure that Deploy the administrative console (recommended) is selected, and then select Next.
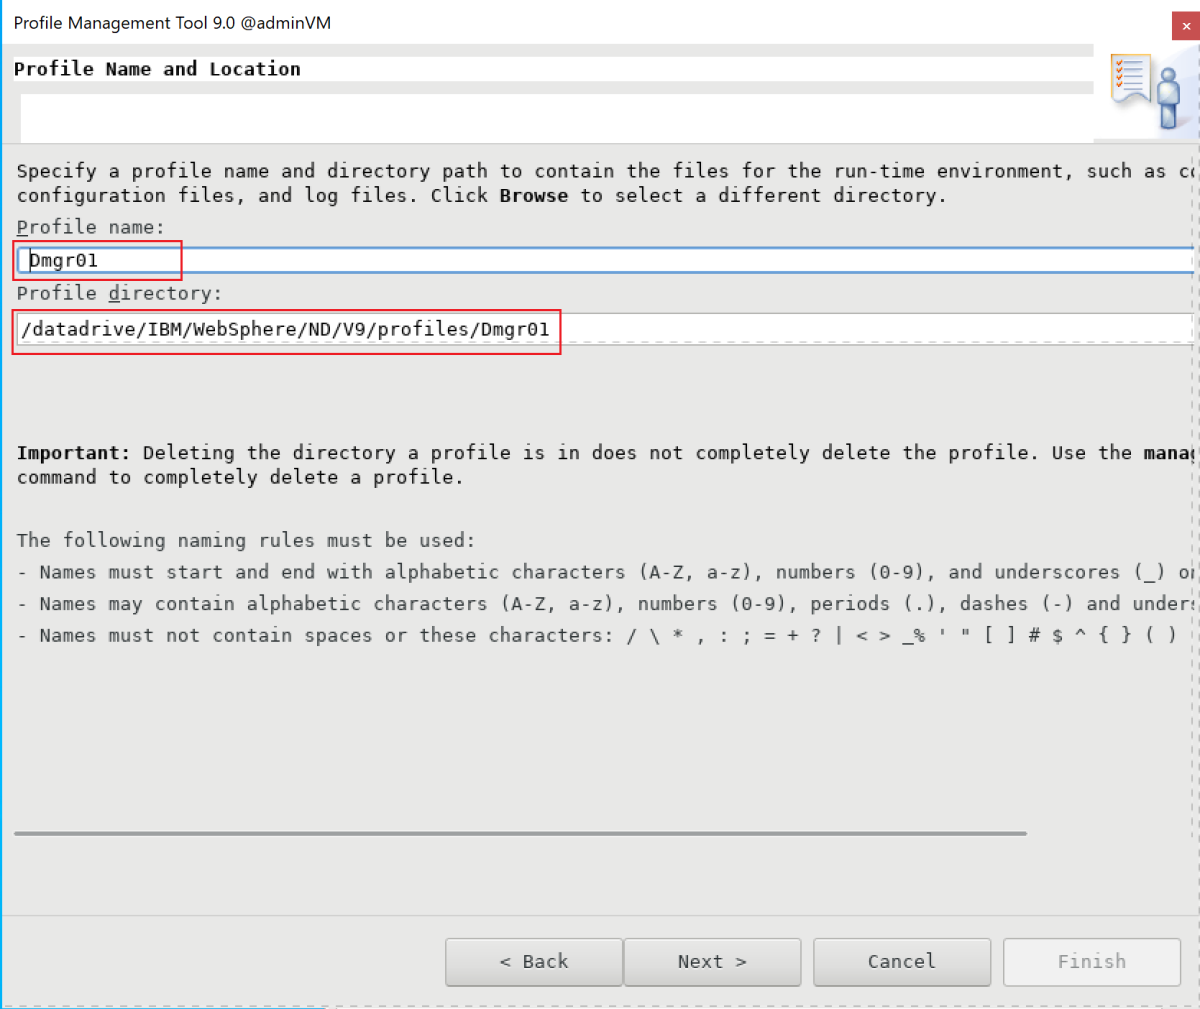
On the Profile Name and Location pane, enter your profile name and location. In this example, the profile name is
Dmgr01. The location depends on your WAS version:- In WAS V9, the location is /datadrive/IBM/WebSphere/ND/V9/profiles/Dmgr01.
- In WAS V8.5, the location is /datadrive/IBM/WebSphere/ND/V85/profiles/Dmgr01.
When you finish, select Next.
On the Node, Host, and Cell Names pane, enter your node name, host name, and cell name. The host is the private IP address of
adminVM. In this example, the node name isadminvmCellManager01, the host value is192.168.0.4, and the cell name isadminvmCell01. When you finish, select Next.
On the Administrative Security pane, enter your admin username and password. In this example, the username is
websphere, and the password isSecret123456. Note down the username and password so you can use them to sign in to the IBM console. When you finish, select Next.
For the security certificate (part 1), enter your certificate if you have one. This example uses the default self-signed certificate. Then select Next.
For the security certificate (part 2), enter your certificate if you have one. This example uses the default self-signed certificate. Then select Next.
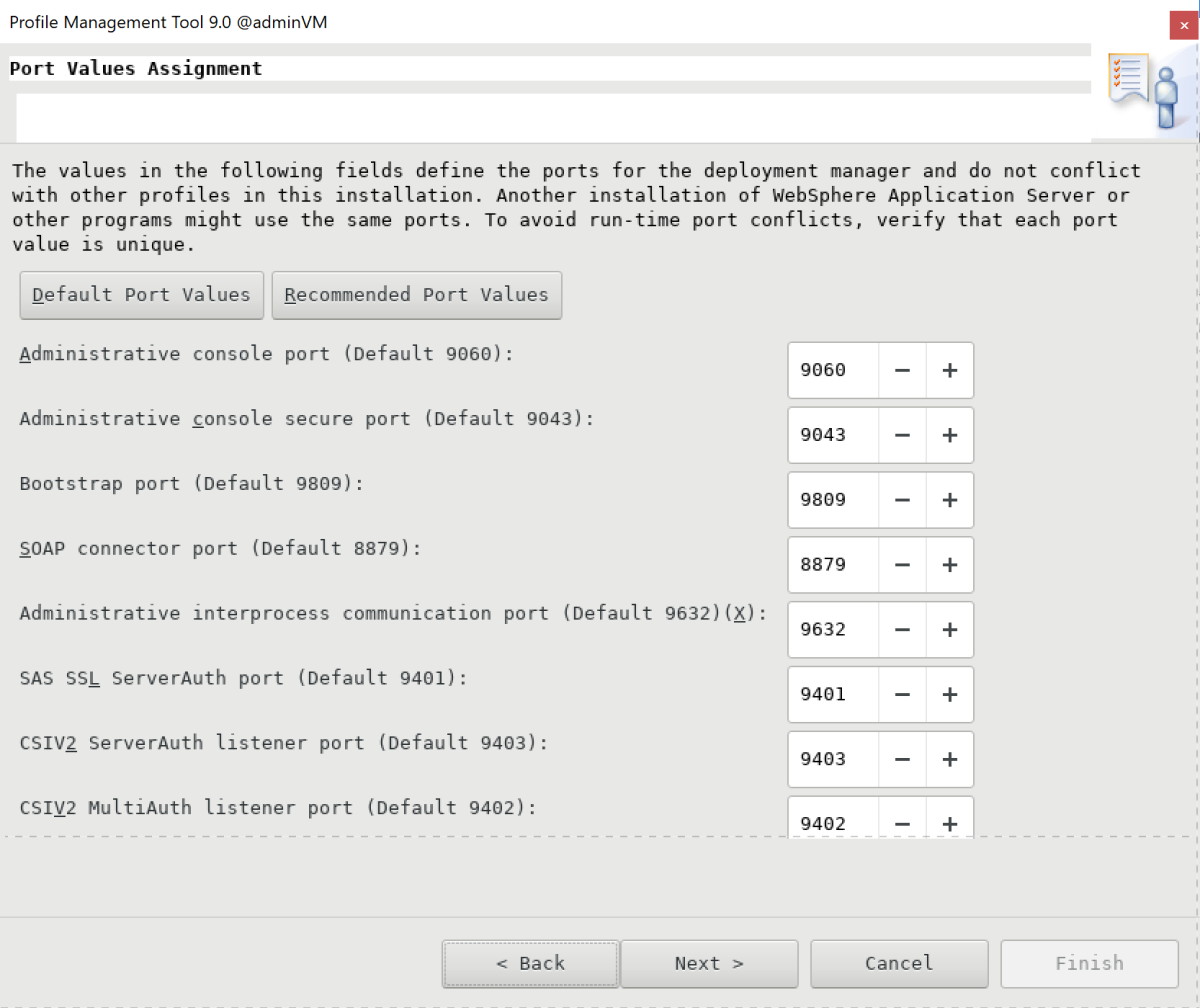
On the Port Values Assignment pane, keep the default ports and select Next.
On the Linux Service Definition pane, don't select Run the deployment manager process as a Linux service. Later, you create the Linux service. Select Next.
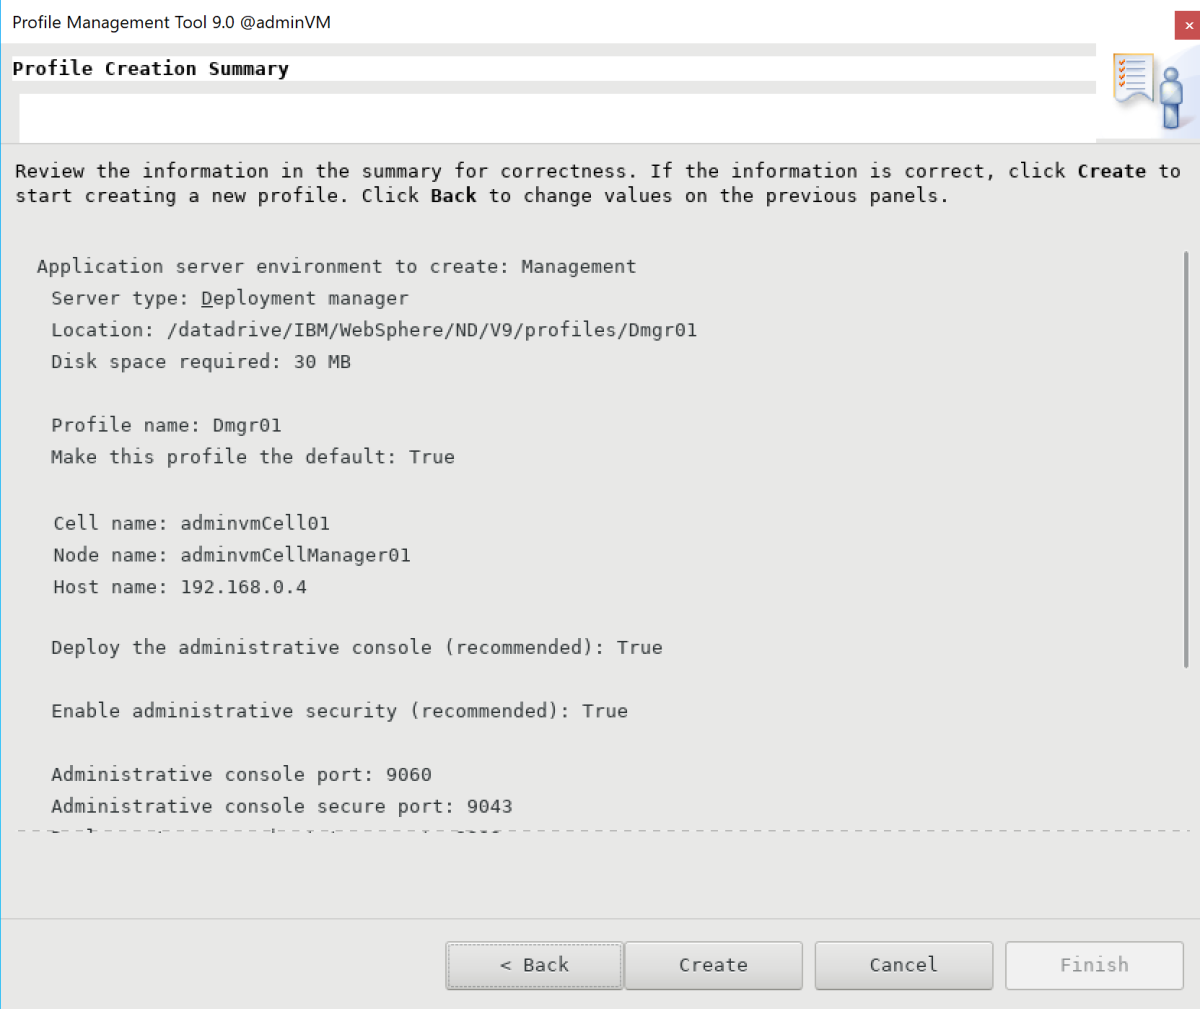
On the Profile Creation Summary pane, make sure that the information is correct, and then select Create.
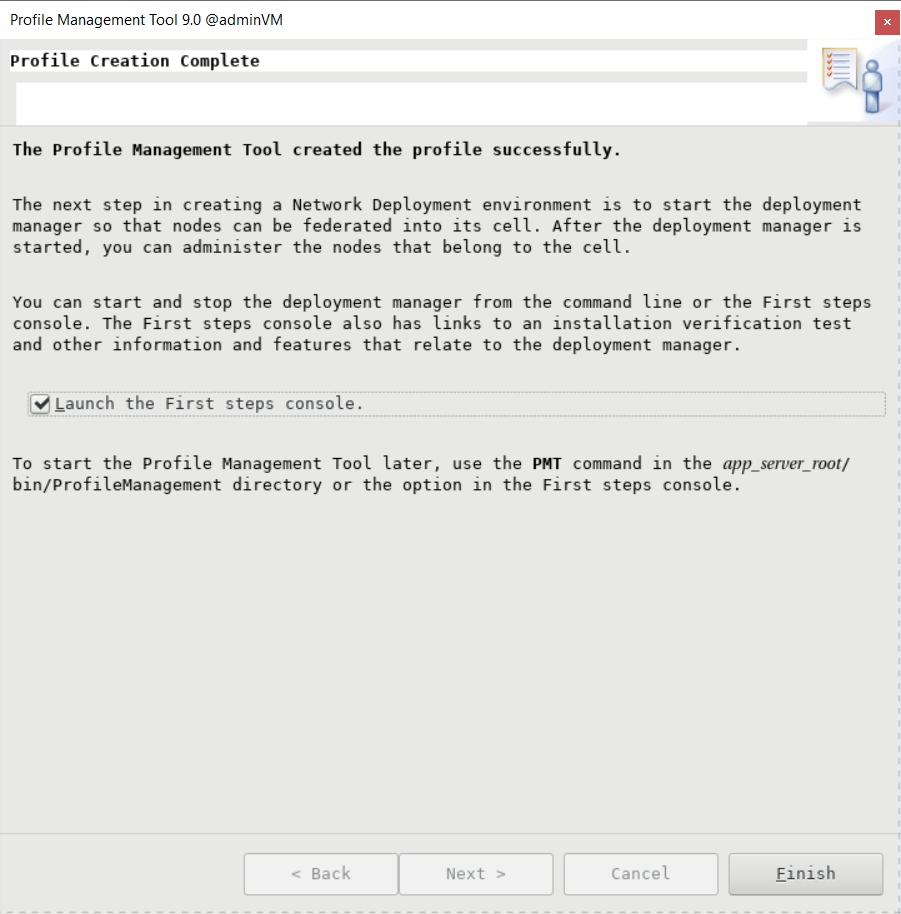
It takes a while to finish the profile creation. When the Profile Creation Complete pane appears, select Launch the First steps console. Then select Finish.
The First steps console appears. Select Installation verification.
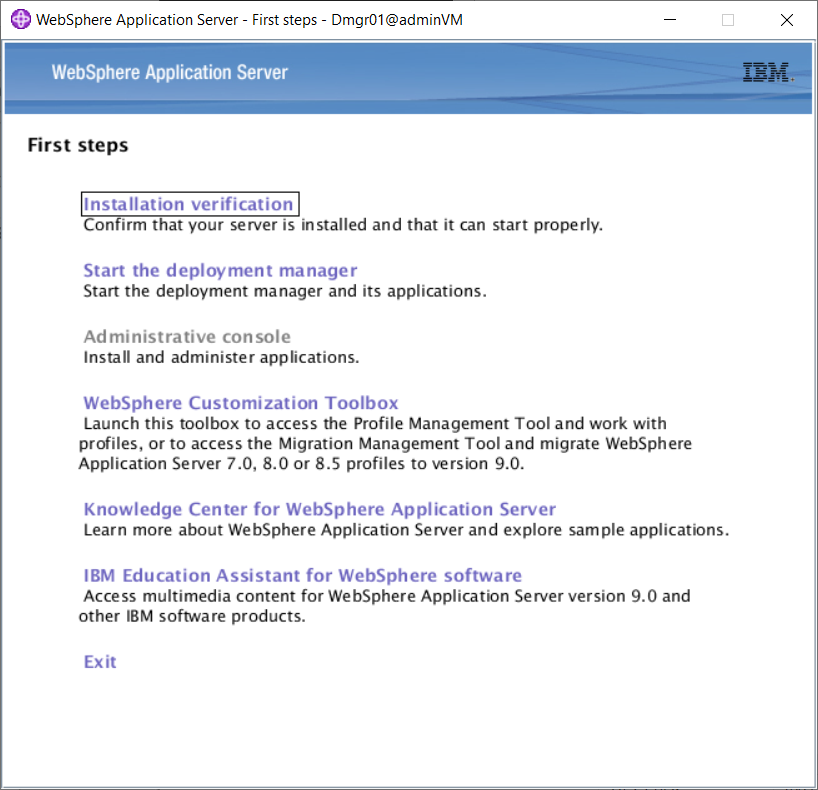
The verification process starts, and output similar to the following example appears. If there are errors, you must resolve them before moving on.
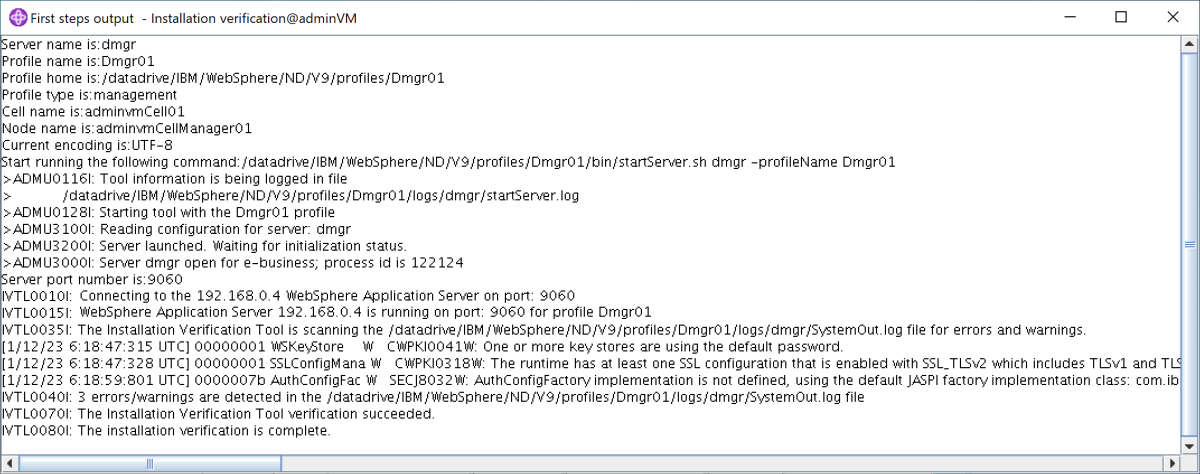
The deployment manager process starts. You can close the First steps console by closing the output pane and selecting Exit in the console.
You finished the profile creation. You can close the WebSphere Customization Toolbox.
To access the IBM console, open the firewall ports by using the following commands:
firewall-cmd --zone=public --add-port=9060/tcp --permanent
firewall-cmd --zone=public --add-port=9043/tcp --permanent
firewall-cmd --zone=public --add-port=9809/tcp --permanent
firewall-cmd --zone=public --add-port=7277/tcp --permanent
firewall-cmd --zone=public --add-port=9402/tcp --permanent
firewall-cmd --zone=public --add-port=9403/tcp --permanent
firewall-cmd --zone=public --add-port=9352/tcp --permanent
firewall-cmd --zone=public --add-port=9632/tcp --permanent
firewall-cmd --zone=public --add-port=9100/tcp --permanent
firewall-cmd --zone=public --add-port=9401/tcp --permanent
firewall-cmd --zone=public --add-port=8879/tcp --permanent
firewall-cmd --zone=public --add-port=5555/tcp --permanent
firewall-cmd --zone=public --add-port=7060/tcp --permanent
firewall-cmd --zone=public --add-port=11005/udp --permanent
firewall-cmd --zone=public --add-port=11006/tcp --permanent
firewall-cmd --zone=public --add-port=9420/tcp --permanent

firewall-cmd --reload
To start the deployment manager automatically at startup, create a Linux service for the process. Run the following commands to create a Linux service:
export PROFILE_PATH=/datadrive/IBM/WebSphere/ND/V9/profiles/Dmgr01 # Configure SELinux so systemctl has access on server start/stop script files. semanage fcontext -a -t bin_t "${PROFILE_PATH}/bin(/.*)?" restorecon -r -v ${PROFILE_PATH}/bin # Add service. ${PROFILE_PATH}/bin/wasservice.sh -add adminvmCellManager01 -servername dmgr -profilePath ${PROFILE_PATH}Confirm that the following output appears:
CWSFU0013I: Service [adminvmCellManager01] added successfully.If the output doesn't appear, troubleshoot and resolve the problem before continuing.


The deployment manager is running on adminVM. From the jump box Windows VM, you can access the IBM console at the URL http://<admin-vm-private-ip>:9060/ibm/console/.
Configure custom profiles
In this section, you use the X server on myWindowsVM to create custom profiles for the managed servers mspVM1 and mspVM2.
Make sure you're still on your Windows machine. If you're not, remotely connect to myWindowsVM.
Configure the custom profile for mspVM1
Use the following steps to configure a custom profile for mspVM1:
Use the following commands to connect to
mspVM1from a command prompt:set MSPVM1VM_IP="192.168.0.6" ssh azureuser@%MSPVM1VM_IP%Use the following commands to become the
rootuser and set theDISPLAYvariable:sudo su - export DISPLAY=<my-windows-vm-private-ip>:0.0 # export DISPLAY=192.168.0.5:0.0To access the deployment manager on
adminVM, open firewall ports by using the following commands:firewall-cmd --zone=public --add-port=9080/tcp --permanent firewall-cmd --zone=public --add-port=9443/tcp --permanent firewall-cmd --zone=public --add-port=2809/tcp --permanent firewall-cmd --zone=public --add-port=9405/tcp --permanent firewall-cmd --zone=public --add-port=9406/tcp --permanent firewall-cmd --zone=public --add-port=9353/tcp --permanent firewall-cmd --zone=public --add-port=9633/tcp --permanent firewall-cmd --zone=public --add-port=5558/tcp --permanent firewall-cmd --zone=public --add-port=5578/tcp --permanent firewall-cmd --zone=public --add-port=9100/tcp --permanent firewall-cmd --zone=public --add-port=9404/tcp --permanent firewall-cmd --zone=public --add-port=7276/tcp --permanent firewall-cmd --zone=public --add-port=7286/tcp --permanent firewall-cmd --zone=public --add-port=5060/tcp --permanent firewall-cmd --zone=public --add-port=5061/tcp --permanent firewall-cmd --zone=public --add-port=8880/tcp --permanent firewall-cmd --zone=public --add-port=11003/udp --permanent firewall-cmd --zone=public --add-port=11004/tcp --permanent firewall-cmd --zone=public --add-port=2810/tcp --permanent firewall-cmd --zone=public --add-port=9201/tcp --permanent firewall-cmd --zone=public --add-port=9202/tcp --permanent firewall-cmd --zone=public --add-port=9354/tcp --permanent firewall-cmd --zone=public --add-port=9626/tcp --permanent firewall-cmd --zone=public --add-port=9629/tcp --permanent firewall-cmd --zone=public --add-port=7272/tcp --permanent firewall-cmd --zone=public --add-port=5001/tcp --permanent firewall-cmd --zone=public --add-port=5000/tcp --permanent firewall-cmd --zone=public --add-port=9900/tcp --permanent firewall-cmd --zone=public --add-port=9901/tcp --permanent firewall-cmd --zone=public --add-port=8878/tcp --permanent firewall-cmd --zone=public --add-port=7061/tcp --permanent firewall-cmd --zone=public --add-port=7062/tcp --permanent firewall-cmd --zone=public --add-port=11001/udp --permanent firewall-cmd --zone=public --add-port=11002/tcp --permanent firewall-cmd --zone=public --add-port=9809/tcp --permanent firewall-cmd --zone=public --add-port=9402/tcp --permanent firewall-cmd --zone=public --add-port=9403/tcp --permanent firewall-cmd --zone=public --add-port=9352/tcp --permanent firewall-cmd --zone=public --add-port=9632/tcp --permanent firewall-cmd --zone=public --add-port=9401/tcp --permanent firewall-cmd --zone=public --add-port=11005/udp --permanent firewall-cmd --zone=public --add-port=11006/tcp --permanent firewall-cmd --zone=public --add-port=8879/tcp --permanent firewall-cmd --zone=public --add-port=9060/tcp --permanent firewall-cmd --zone=public --add-port=9043/tcp --permanent firewall-cmd --reloadUse the following commands to start the Profile Management Tool:
cd /datadrive/IBM/WebSphere/ND/V9/bin/ProfileManagement ./pmt.shAfter a while, the Profile Management Tool appears. If you don't see the user interface, troubleshoot and resolve the problem before continuing. Select Create.
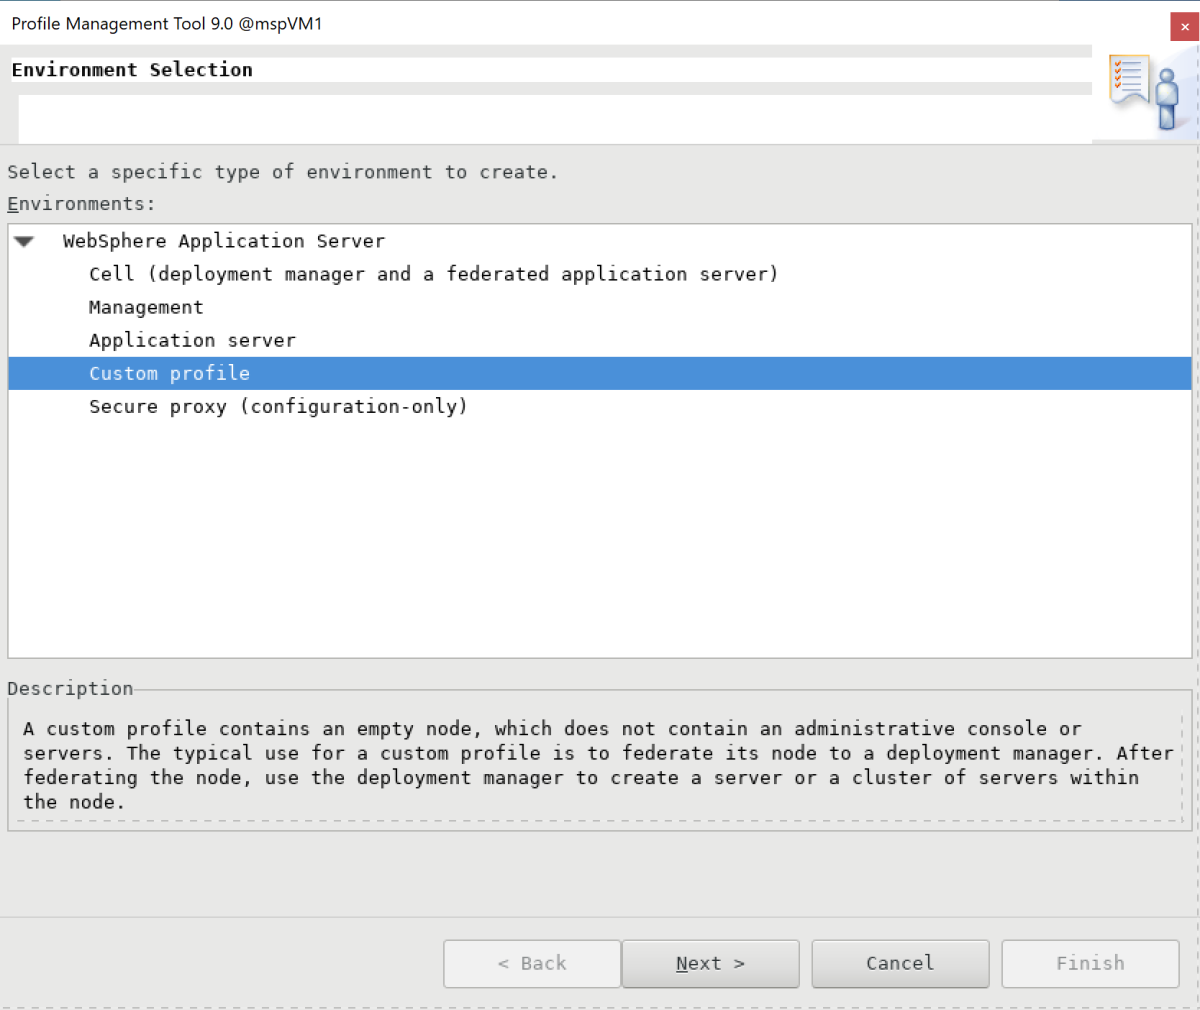
On the Environment Selection pane, select Custom profile, and then select Next.
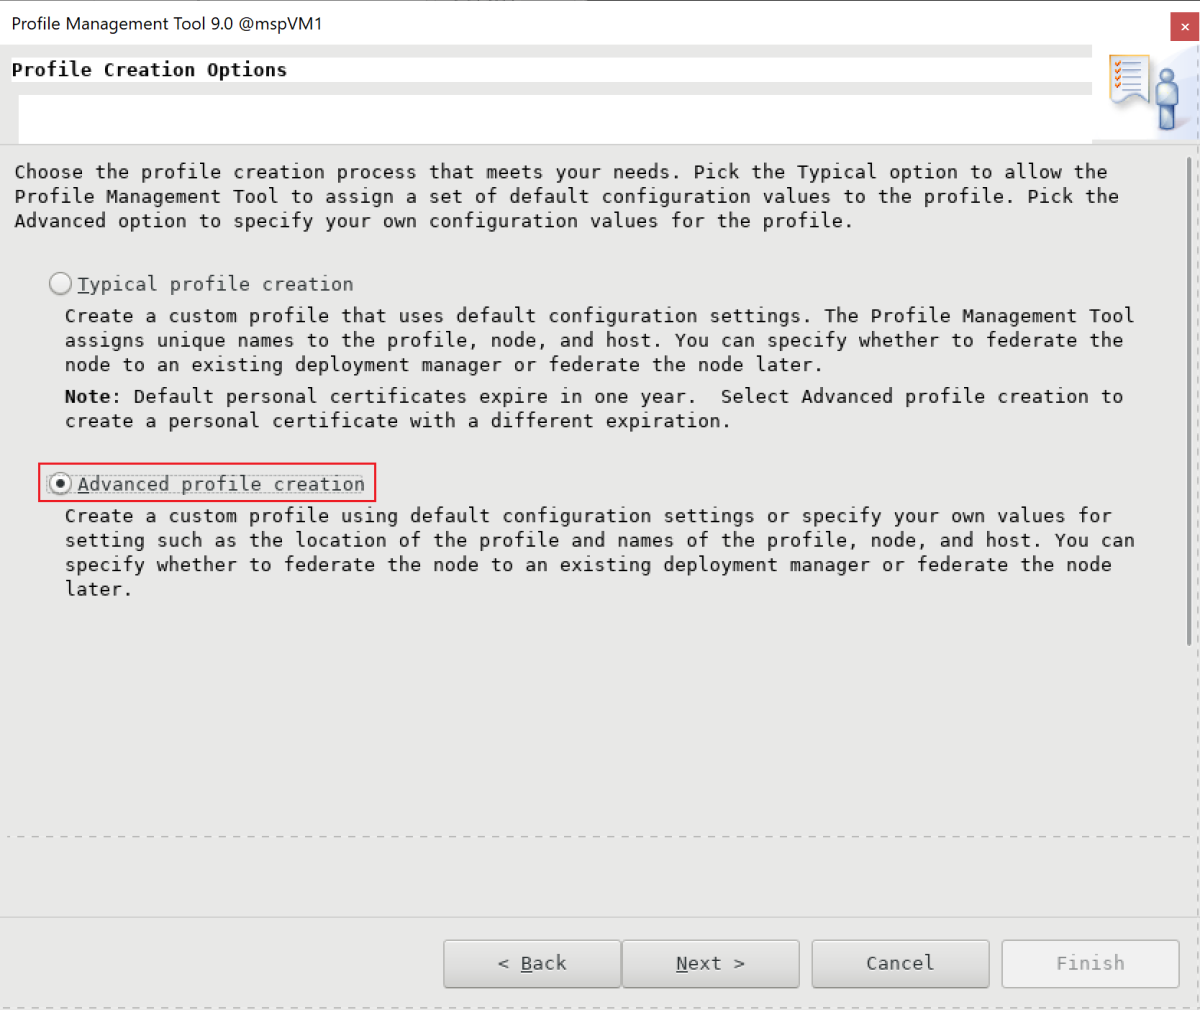
On the Profile Creation Options pane, select Advanced profile creation, and then select Next.
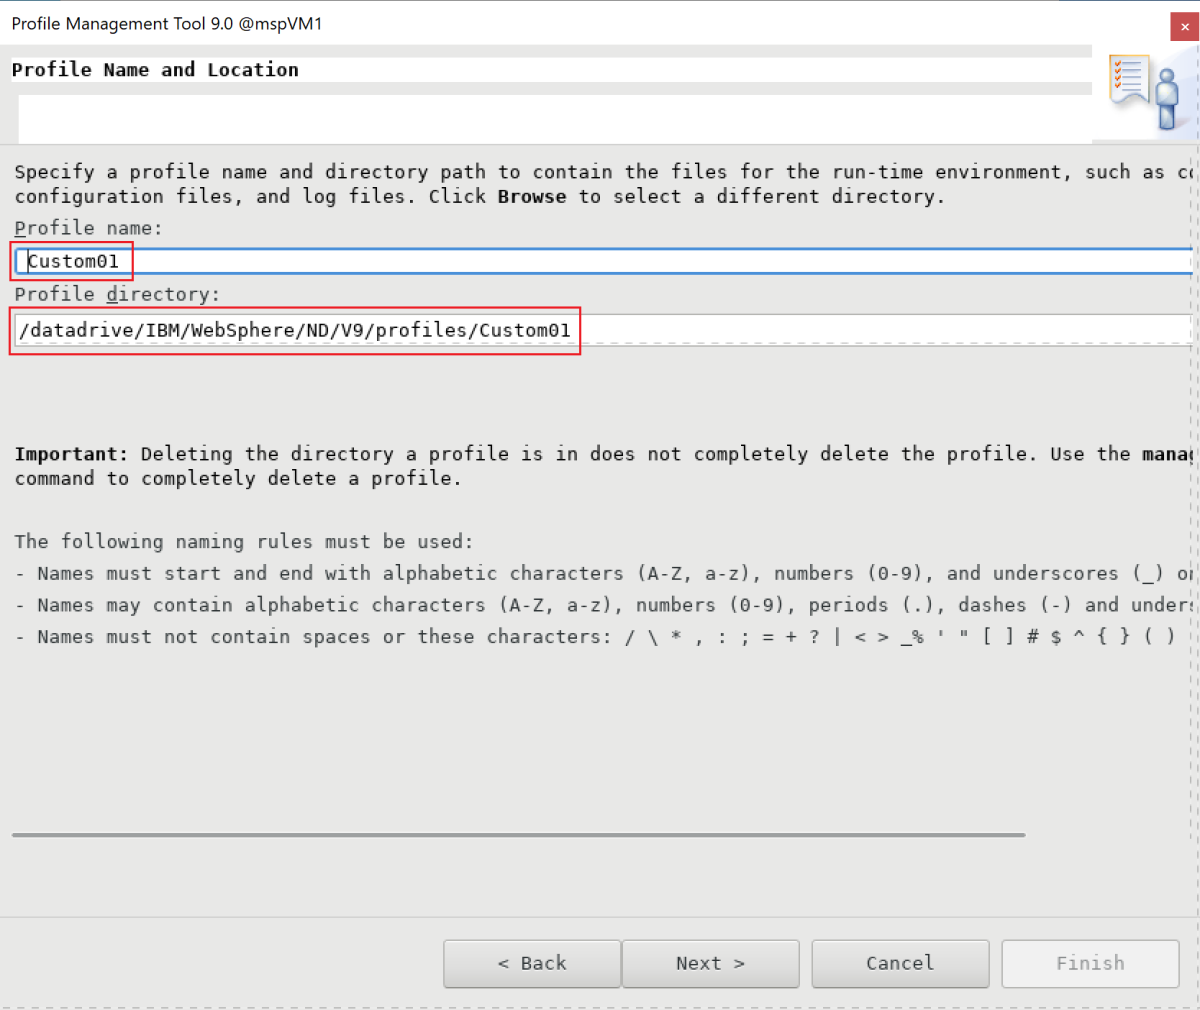
On the Profile Name and Location pane, enter your profile name and location. In this example, the profile name is
Custom01. The location depends on your WAS version:- In WAS V9, the location is /datadrive/IBM/WebSphere/ND/V9/profiles/Custom01.
- In WAS V8.5, the location is /datadrive/IBM/WebSphere/ND/V85/profiles/Custom01.
When you finish, select Next.
On the Node and Host Names pane, enter your node name and host. The value of host is the private IP address of
mspVM1. In this example, the host is192.168.0.6and the node name ismspvm1Node01. When you finish, select Next.
On the Federation pane, enter the deployment manager's host name and authentication. For Deployment manager host name or IP address, the value is the private IP address of
adminVM, which is192.168.0.4here. For Deployment manager authentication, in this example, the username iswebsphereand the password isSecret123456. When you finish, select Next.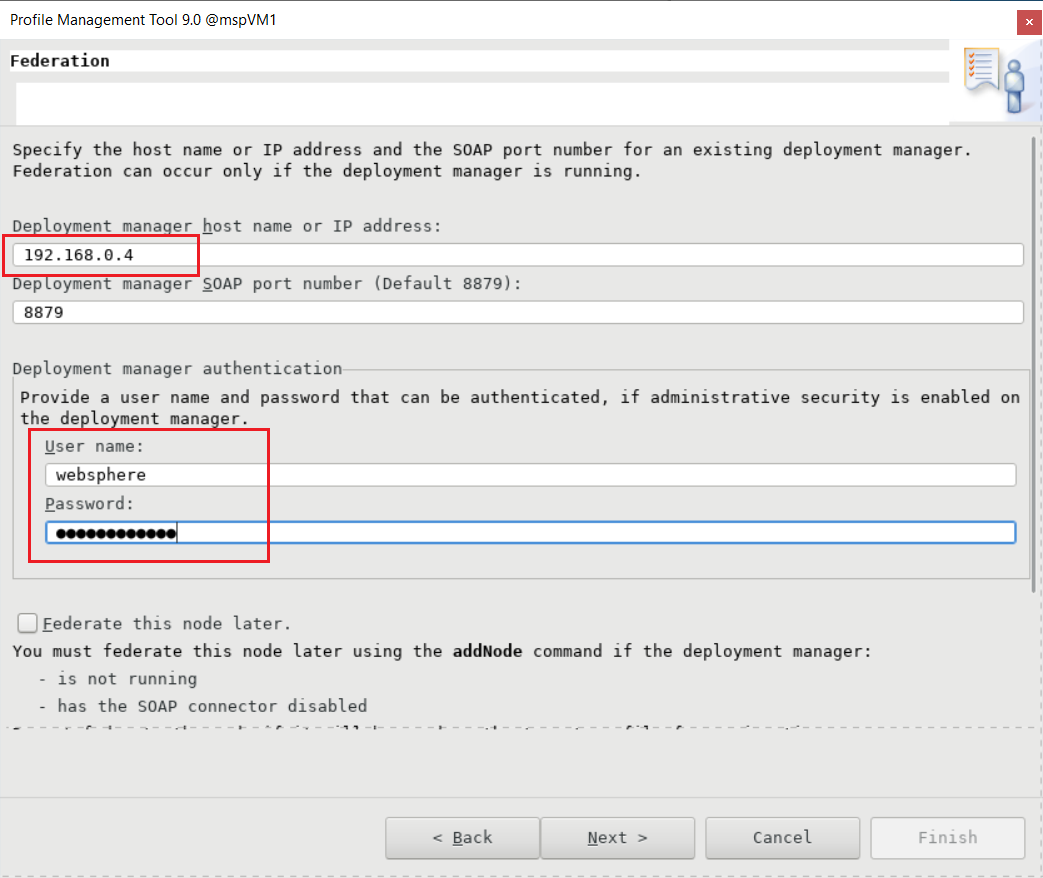
For the security certificate (part 1), enter your certificate if you have one. This example uses the default self-signed certificate. Then select Next.
For the security certificate (part 2), enter your certificate if you have one. This example uses the default self-signed certificate. Then select Next.
On the Port Values Assignment pane, keep the default ports and select Next.

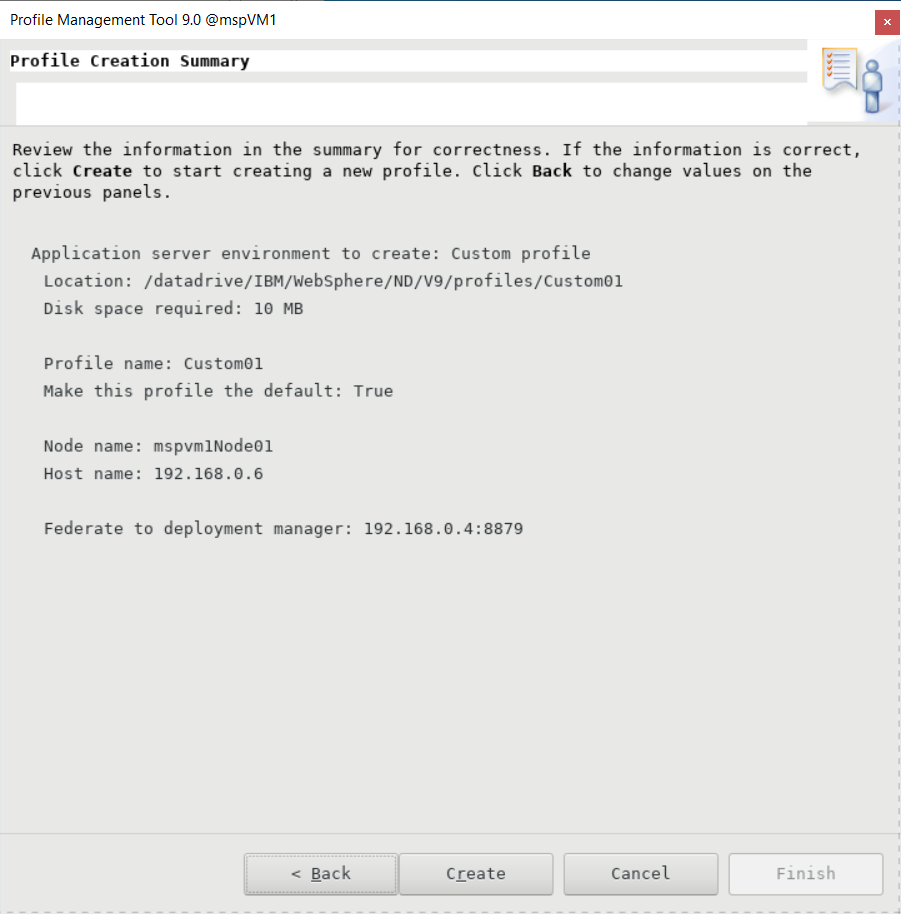
On the Profile Creation Summary pane, make sure that the information is correct, and then select Create.
It takes a while to create the custom profile. On the Profile Creation Complete pane, clear the Launch the First steps console checkbox. Then select Finish to complete profile creation and close the Profile Management Tool.

To start the server automatically at startup, create a Linux service for the process. The following commands create a Linux service to start
nodeagent:export PROFILE_PATH=/datadrive/IBM/WebSphere/ND/V9/profiles/Custom01 # Configure SELinux so systemctl has access on server start/stop script files. semanage fcontext -a -t bin_t "${PROFILE_PATH}/bin(/.*)?" restorecon -r -v ${PROFILE_PATH}/bin # Add service to start nodeagent. ${PROFILE_PATH}/bin/wasservice.sh -add mspvm1Node01 -servername nodeagent -profilePath ${PROFILE_PATH}Confirm that the following output appears:
CWSFU0013I: Service [mspvm1Node01] added successfully.If the output doesn't appear, troubleshoot and resolve the problem before continuing.


You created a custom profile and nodeagent running on mspVM1. Stop being the root user, and close the SSH connection to mspVM1.
Configure the custom profile for mspVM2
Go back to the beginning of the Configure the custom profile for mspVM1 section and do the same steps for mspVM2. That is, wherever you used mspVM1 or similar, do the same for mspVM2.
On the Node and Host Names pane, enter mspvm2Node01 for Node name and 192.168.0.7 for Host name.
You prepared the custom profile for two managed servers: mspVM1 and mspVM2. Continue ahead to create a WAS cluster.
Create a cluster and start servers
In this section, you use the IBM console to create a WAS cluster and start managed servers by using the browser on myWindowsVM. Make sure you're still on your Windows machine. If you aren't, remotely connect to myWindowsVM. Then, use the following steps:
Open the Microsoft Edge browser and go to
http://<adminvm-private-ip>:9060/ibm/console/. In this example, the IBM console URL ishttp://192.168.0.4:9060/ibm/console/. Find the sign-in pane. Sign in to the IBM console using your administrative username and password (websphere/Secret123456). You can now administer clusters and servers.
On the navigation pane, select Servers > Clusters > WebSphere application server clusters. Then select New to create a new cluster.
In the Create a new cluster dialog, for Step 1: Enter basic cluster information, enter your cluster name. In this example, the cluster name is
cluster1. When you finish, select Next.
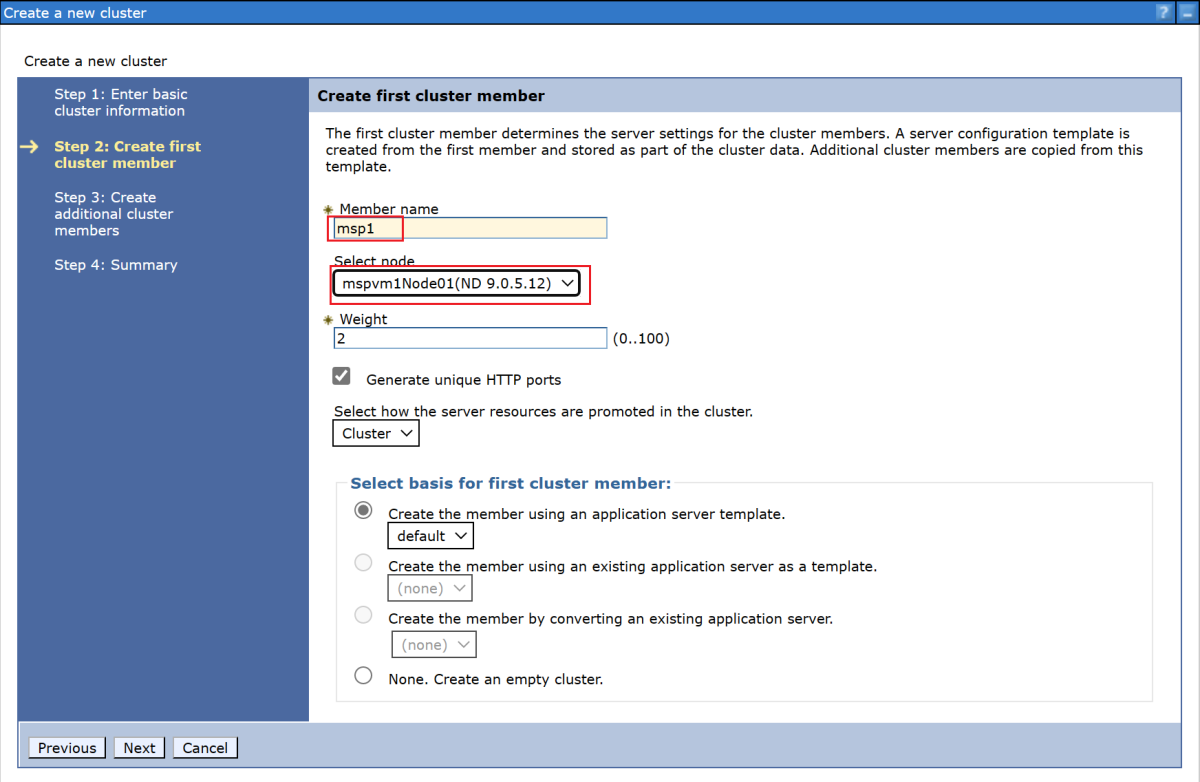
For Step 2: Create first cluster member, enter your member name, and select the node
mspvm1Node01. In this example, the member name ismsp1. The node depends on your WAS version:- In WAS V9, the node is
mspvm1Node01 (ND 9.0.5.12). - In WAS V8.5, the node is
mspvm1Node01 (ND 8.5.5.24).
When you finish, select Next.
- In WAS V9, the node is
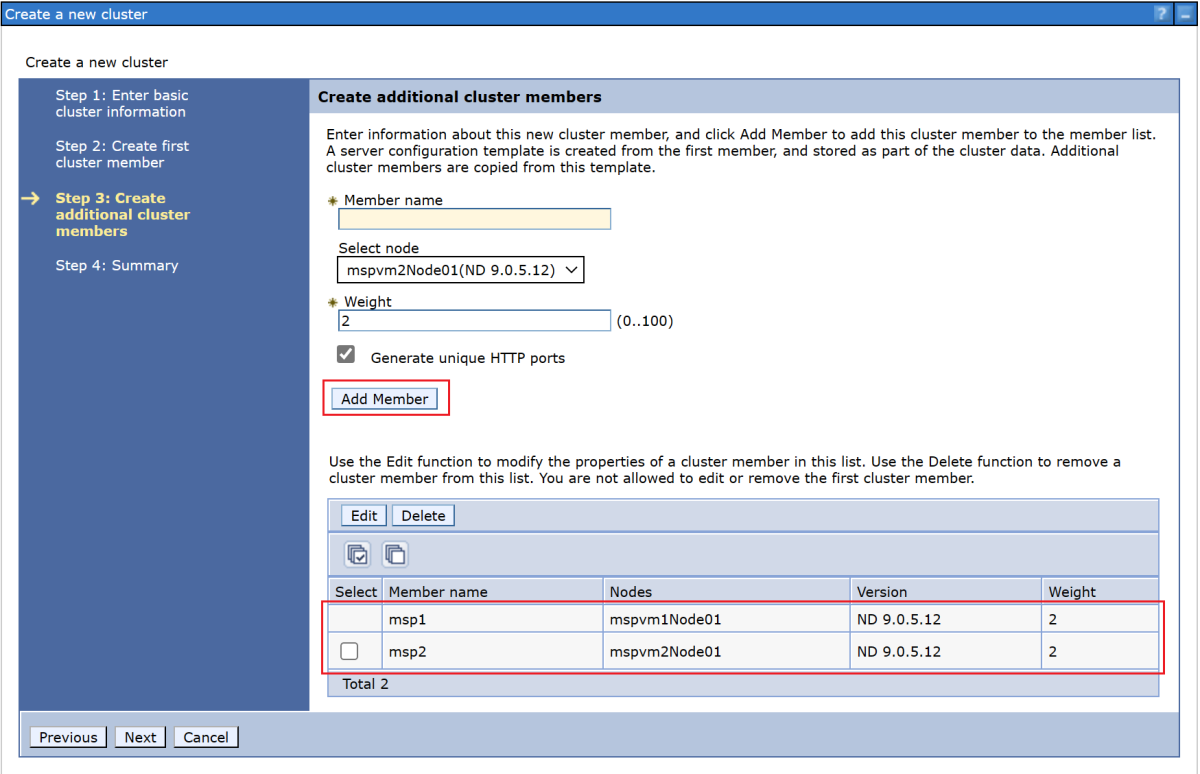
For Step 3: Create additional cluster members, enter your second member name, and select node
mspvm2Node01. In this example, the member name ismsp2. The node depends on your WAS version:- In WAS V9, the node is
mspvm2Node01 (ND 9.0.5.12). - In WAS V8.5, the node is
mspvm2Node01 (ND 8.5.5.24).
- In WAS V9, the node is
Select Add Member to add the second node. The table lists two members. When you finish, select Next.
For Step 4: Summary, select Finish.

It takes a while to create the cluster. After the cluster is created,
cluster1appears in the table.Select cluster1, and then select Review to review the information.
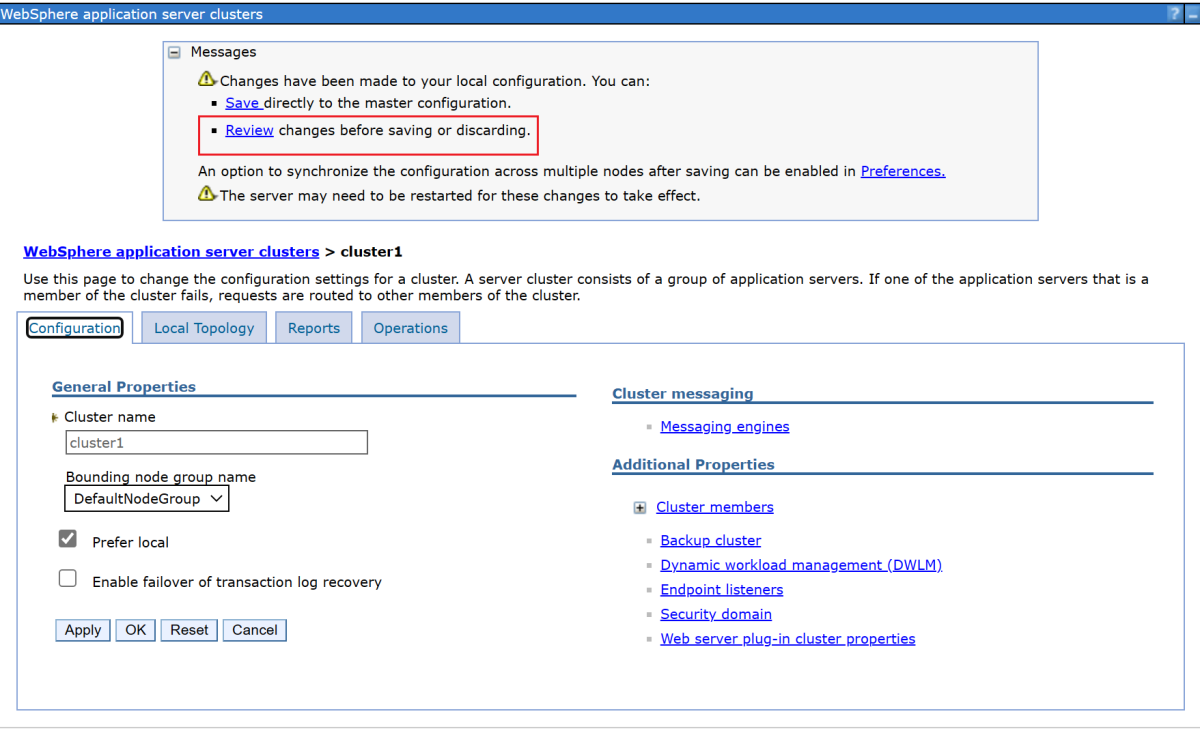
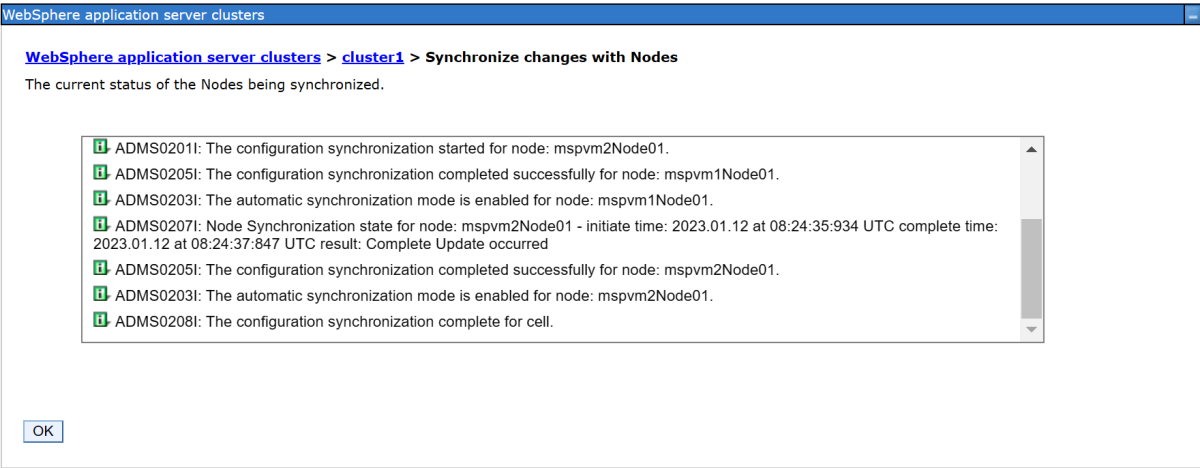
Select Synchronize changes with Nodes, and then select Save.

The creation should finish without error. Select OK to continue.
Select cluster1 in the table, and then select the Start button to start the cluster.
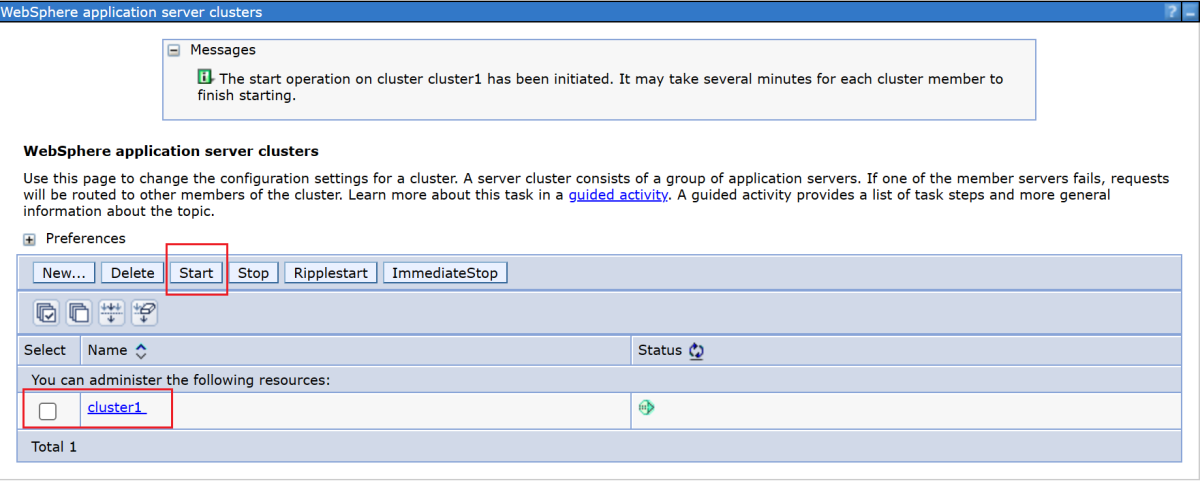
It takes a while to start the two managed servers. In the Status column, select the refresh icon (two arrows pointing to each other) to refresh the status.
Hover over the refresh icon. When the tooltip shows Started, you can trust that the cluster is formed. Continue to periodically refresh and check until the tooltip shows Started.
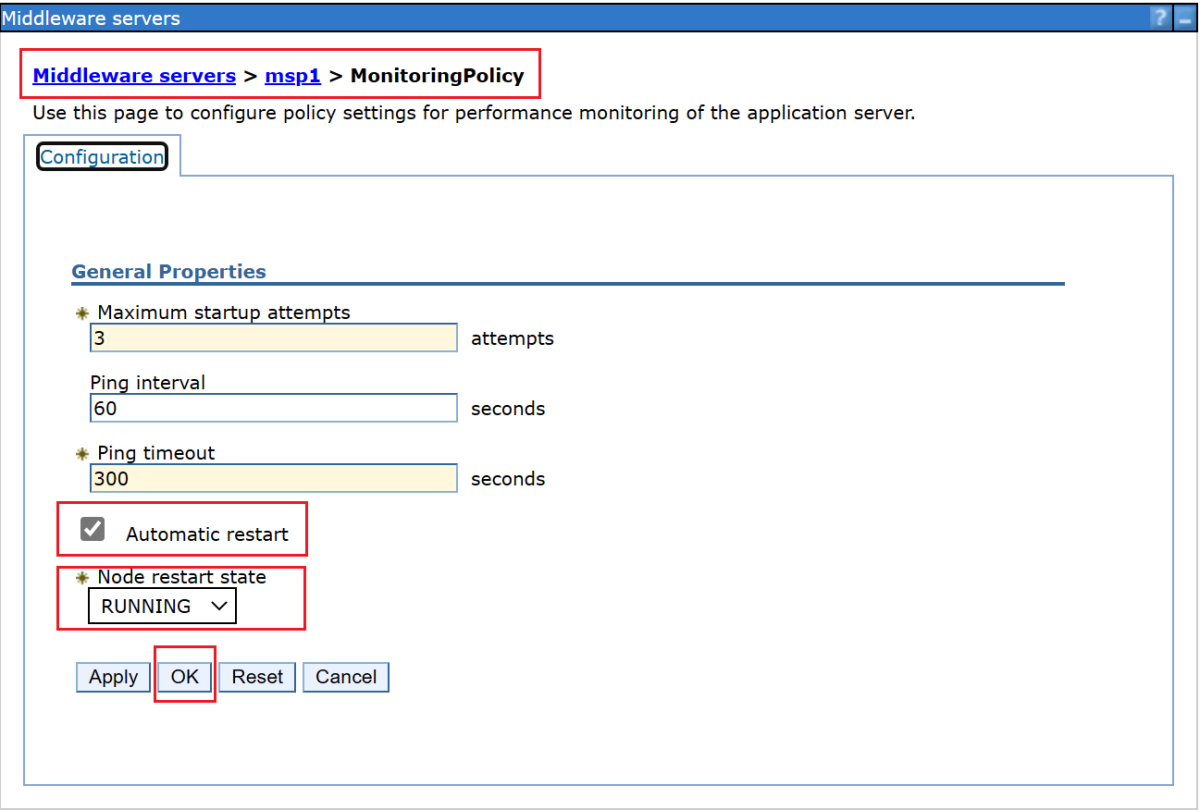
Use the following steps to configure the Application Server Monitoring Policy settings to automatically start the managed server after the Node Agent starts.
Use the following steps to configure
msp1:On the navigation pane, select Servers, select Server Types, and then select WebSphere application servers.
Select the hyperlink for application server
msp1.In the Server Infrastructure section, select Java and process management.
Select Monitoring policy.
Ensure that Automatic restart is selected, and then select RUNNING as the node restart state. Select OK.
Go back to the Middleware services pane. On the Messages panel, select the Review link, and then select Synchronize changes with Nodes. Select Save to save and synchronize changes.
The following message appears:
The configuration synchronization complete for cell.Select OK to exit the configuration.
Use the following steps to configure
msp2:- On the navigation pane, select Servers, select Server Types, and then select WebSphere application servers.
- Select the hyperlink for application server
msp2. - In the Server Infrastructure section, select Java and process management.
- Select Monitoring policy.
- Ensure that Automatic restart is selected, and then select RUNNING as the node restart state. Select OK.
- Go back to the Middleware services pane. On the Messages panel, select the Review link, and then select Synchronize changes with Nodes. Select Save to save and synchronize changes.
- The following message appears:
The configuration synchronization complete for cell.Select OK to exit the configuration.


You configured cluster1 with two managed servers, msp1 and msp2. The cluster is up and running.
Deploy an application
Use the following steps to deploy the application:
In the administrative console where you signed in earlier, select Applications > New Application, and then select New Enterprise Application.
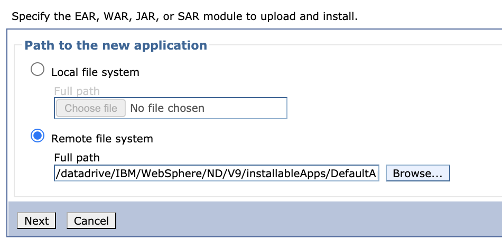
On the next panel, select Remote file system, and then select Browse to browse through the file systems of your installed servers.
Select the system that begins with adminvm. The VM's file system appears. From there, select V9 (or V85), and then select installableApps.
In the list of applications that are available to install, select DefaultApplication.ear. Then select OK.
You're back on the panel for selecting the application. Select Next.
Select Next for all the remaining steps in the Install New Application workflow. Then select Finish.
The following message should appear:
Application DefaultApplication.ear installed successfully.If this message doesn't appear, troubleshoot and resolve the problem before continuing.Select the Save directly to the master configuration link.
You need to start the application. Go to Applications > All Applications. Select the DefaultApplication.ear checkbox, ensure that Action is set to Start, and then select Submit Action.
In the All Applications table, in the Status column, select the refresh icon. After a few times refreshing the table in this way, a green arrow should appear in the Status column for DefaultApplication.ear.
The application is now installed in your WAS cluster.
Expose WAS by using Azure Application Gateway
Now that you finished creating the WAS cluster on GNU/Linux virtual machines, this section walks you through the process of exposing WAS to the internet by using Azure Application Gateway.
Create the application gateway
Use the following steps to create the application gateway:
To expose WAS to the internet, you need a public IP address. In the shell with the Azure CLI installed, create the IP address by using az network public-ip create, as shown in the following example:
az network public-ip create \ --resource-group $RESOURCE_GROUP_NAME \ --name myAGPublicIPAddress \ --allocation-method Static \ --sku Standard export APPGATEWAY_IP=$(az network public-ip show \ --resource-group $RESOURCE_GROUP_NAME \ --name myAGPublicIPAddress \ --query '[ipAddress]' \ --output tsv)Create the application gateway to associate with the IP address. The following example creates an application gateway with the WebSphere managed servers in the default back-end pool:
az network application-gateway create \ --resource-group $RESOURCE_GROUP_NAME \ --name myAppGateway \ --public-ip-address myAGPublicIPAddress \ --location eastus \ --capacity 2 \ --http-settings-port 80 \ --http-settings-protocol Http \ --frontend-port 80 \ --sku Standard_V2 \ --subnet wasGateway \ --vnet-name myVNet \ --priority 1001 \ --servers ${MSPVM1_IP} ${MSPVM2_IP}The managed servers expose their workloads with port
9080. Use the following commands to updateappGatewayBackendHttpSettingsby specifying back-end port9080and creating a probe for it:az network application-gateway probe create \ --resource-group $RESOURCE_GROUP_NAME \ --gateway-name myAppGateway \ --name clusterProbe \ --protocol http \ --host-name-from-http-settings true \ --match-status-codes 404 \ --path "/" az network application-gateway http-settings update \ --resource-group $RESOURCE_GROUP_NAME \ --gateway-name myAppGateway \ --name appGatewayBackendHttpSettings \ --host-name-from-backend-pool true \ --port 9080 \ --probe clusterProbeUse the following commands to provision a rewrite rule for redirections:
# Create a rewrite rule set.
az network application-gateway rewrite-rule set create \
    --resource-group $RESOURCE_GROUP_NAME \
    --gateway-name myAppGateway \
    --name myRewriteRuleSet

# Associated routing rules.
az network application-gateway rule update \
    --resource-group $RESOURCE_GROUP_NAME \
    --gateway-name myAppGateway \
    --name rule1 \
    --rewrite-rule-set myRewriteRuleSet

# Create a rewrite rule 1.
az network application-gateway rewrite-rule create \
    --resource-group $RESOURCE_GROUP_NAME \
    --gateway-name myAppGateway \
    --rule-set-name myRewriteRuleSet \
    --name myRewriteRule01 \
    --sequence 100 \
    --response-headers Location=http://${APPGATEWAY_IP}{http_resp_Location_2}

# Create a rewrite rule condition.
az network application-gateway rewrite-rule condition create \
    --resource-group $RESOURCE_GROUP_NAME \
    --gateway-name myAppGateway \
    --rule-name myRewriteRule01 \
    --rule-set-name myRewriteRuleSet \
    --variable "http_resp_Location" \
    --ignore-case true \
    --negate false \
    --pattern "(https?):\/\/192.168.0.6:9080(.*)$"

# Create a rewrite rule 2.
az network application-gateway rewrite-rule create \
    --resource-group $RESOURCE_GROUP_NAME \
    --gateway-name myAppGateway \
    --rule-set-name myRewriteRuleSet \
    --name myRewriteRule02 \
    --sequence 100 \
    --response-headers Location=http://${APPGATEWAY_IP}{http_resp_Location_2}

# Create a rewrite rule condition.
az network application-gateway rewrite-rule condition create \
    --resource-group $RESOURCE_GROUP_NAME \
    --gateway-name myAppGateway \
    --rule-name myRewriteRule02 \
    --rule-set-name myRewriteRuleSet \
    --variable "http_resp_Location" \
    --ignore-case true \
    --negate false \
    --pattern "(https?):\/\/192.168.0.7:9080(.*)$"
You can now access the application by using the URL that the following command produces:
echo "http://${APPGATEWAY_IP}/snoop/"
Note
This example sets up simple access to the WAS servers with HTTP. If you want secure access, configure TLS/SSL termination by following the instructions in End-to-end TLS with Application Gateway.
This example doesn't expose the IBM console via Application Gateway. To access the IBM console, you can use the Windows machine myWindowsVM or assign a public IP address to adminVM.
If you don't want to use the jump box myWindowsVM to access the IBM console, but you want to expose it to a public network, use the following commands to assign a public IP address to adminVM:
# Create a public IP address.
az network public-ip create \
    --resource-group $RESOURCE_GROUP_NAME \
    --name myAdminVMPublicIPAddress \
    --allocation-method Static \
    --sku Standard

# Create a network security group.
az network nsg create \
    --resource-group $RESOURCE_GROUP_NAME \
    --name adminnsg

# Create an inbound rule for the network security group.
az network nsg rule create \
    --resource-group $RESOURCE_GROUP_NAME \
    --nsg-name adminnsg \
    --name ALLOW_IBM_CONSOLE \
    --access Allow \
    --direction Inbound \
    --source-address-prefixes '["*"]' \
    --destination-port-ranges 9043 \
    --protocol Tcp \
    --priority 500

# Update the network adapter with the network security group.
az network nic update \
    --resource-group $RESOURCE_GROUP_NAME \
    --name adminVMVMNic \
    --network-security-group adminnsg

# Update the network adapter with the public IP address.
az network nic ip-config update \
    --resource-group $RESOURCE_GROUP_NAME \
    --name ipconfigadminVM \
    --nic-name adminVMVMNic \
    --public-ip-address myAdminVMPublicIPAddress

export ADMIN_PUBLIC_IP=$(az network public-ip show \
    --resource-group $RESOURCE_GROUP_NAME \
    --name myAdminVMPublicIPAddress \
    --query '[ipAddress]' \
    --output tsv)

echo "IBM Console public URL: https://${ADMIN_PUBLIC_IP}:9043/ibm/console/"
Test the WAS cluster configuration
You finished configuring the WAS cluster and deploying the Java EE application to it. Use the following steps to access the application to validate all the settings:
- Open a web browser.
- Go to the application by using the URL
http://<gateway-public-ip-address>/snoop/. - When you continually refresh the browser, the app cycles through the server instances. Look at the value of the Host request header and note that it changes after reloading several times.
Clean up resources
You completed the WAS cluster configuration. The following sections describe how to remove the resources that you created.
Clean up the Windows machine
You can remove the Windows machine myWindowsVM by using the following commands. Alternatively, you could shut down the Windows machine and continue to use it as a jump box for ongoing cluster maintenance tasks.
export WINDOWSVM_NIC_ID=$(az vm show \
    --resource-group ${RESOURCE_GROUP_NAME} \
    --name myWindowsVM \
    --query networkProfile.networkInterfaces[0].id \
    --output tsv)
export WINDOWSVM_NSG_ID=$(az network nic show \
    --ids ${WINDOWSVM_NIC_ID} \
    --query networkSecurityGroup.id \
    --output tsv)
export WINDOWSVM_DISK_ID=$(az vm show \
    --resource-group ${RESOURCE_GROUP_NAME} \
    --name myWindowsVM \
    --query storageProfile.osDisk.managedDisk.id \
    --output tsv)
export WINDOWSVM_PUBLIC_IP=$(az network public-ip list \
    -g ${RESOURCE_GROUP_NAME} --query [0].id \
    --output tsv)

echo "deleting myWindowsVM"
az vm delete --resource-group ${RESOURCE_GROUP_NAME} --name myWindowsVM --yes
echo "deleting nic ${WINDOWSVM_NIC_ID}"
az network nic delete --ids ${WINDOWSVM_NIC_ID}
echo "deleting public-ip ${WINDOWSVM_PUBLIC_IP}"
az network public-ip delete --ids ${WINDOWSVM_PUBLIC_IP}
echo "deleting disk ${WINDOWSVM_DISK_ID}"
az disk delete --yes --ids ${WINDOWSVM_DISK_ID}
echo "deleting nsg ${WINDOWSVM_NSG_ID}"
az network nsg delete --ids ${WINDOWSVM_NSG_ID}
Clean up all the resources
Delete abc1110rg by using the following command:
az group delete --name $RESOURCE_GROUP_NAME --yes --no-wait
Next steps
To explore options to run WebSphere products on Azure, see What are solutions to run the WebSphere family of products on Azure?