Note
Access to this page requires authorization. You can try signing in or changing directories.
Access to this page requires authorization. You can try changing directories.
Caution
The Microsoft Graph Toolkit is deprecated. The retirement period begins September 1, 2025, with full retirement planned for August 28, 2026. Developers should migrate to using the Microsoft Graph SDKs or other supported Microsoft Graph tools for building web experiences. For more information, see the deprecation announcement.
Microsoft Graph Toolkit is a set of web components that simplify connecting to Microsoft Graph and allow you to focus on your application instead. Microsoft Graph Toolkit is available as a generic set of web components distributed through the @microsoft/mgt-components npm package.
If you're building apps with React, you can use the @microsoft/mgt-react package, which wraps Microsoft Graph Toolkit web components in React components and makes it easier to pass complex data.
If you're building apps with React, you can use the @microsoft/mgt-react package, which wraps Microsoft Graph Toolkit web components in React components and makes it easier to pass complex data. To use the mgt-chat and mgt-new-chat components, install the separate @microsoft/mgt-chat package.
This article describes the step-by-step process of using the Microsoft Graph Toolkit to create a React app and connect it to Microsoft 365. After completing the steps, you'll have a React app that shows the upcoming appointments of the currently signed in user from Microsoft 365.
Tip
You can also follow this tutorial as an interactive code tour. For details, see the GitHub repo with the starter project.
Tip
You can also download a starter template to kickstart your journey. This template will ensure the right set of dependencies, etc. To continue, download the GitHub starter project for mgt-react. Follow the README instructions and then continue with Load data from Microsoft 365
Tip
You can also download a starter template to kickstart your journey. This template will ensure the right set of dependencies, etc. To continue, download the GitHub starter project for mgt-react and mgt-chat. Follow the README instructions and then continue with Load data from Microsoft 365
Prerequisites
To follow the steps in this article, you need a Microsoft 365 development environment and a few tools. For details, see getting started.
Create a React app
Create a new React app by running the following command. This command creates a new React app using TypeScript, which helps writing more robust code and avoiding runtime errors. If asked to install the create-react-app package, select y to confirm.
npx create-react-app my-m365-app --template typescript --use-npm
Change the working directory to the newly created app.
cd my-m365-app
Next, install the mgt-react, mgt-element and mgt-msal2-provider npm packages, which contain the Microsoft Graph Toolkit React components, the core Toolkit capabilities and the MSAL2 authentication provider.
npm i @microsoft/mgt-react @microsoft/mgt-element @microsoft/mgt-msal2-provider
Next, install the mgt-react, mgt-chat mgt-element and mgt-msal2-provider npm packages, which contain the Microsoft Graph Toolkit React components, the core Toolkit capabilities and the MSAL2 authentication provider.
npm i @microsoft/mgt-react@next.mgt-chat @microsoft/mgt-chat@next.mgt-chat @microsoft/mgt-element@next.mgt-chat @microsoft/mgt-msal2-provider@next.mgt-chat
Confirm that you can run the app.
npm start
You should be able to open your app in the browser via http://localhost:3000.
Create a Microsoft Entra app
Microsoft Graph, the API that you use to connect to Microsoft 365, is secured with OAuth 2.0. In order to connect your app to Microsoft 365, you'll need to create an app in Microsoft Entra ID and grant this app permission to access specific resources on behalf of the person using your app.
Follow the steps in the Create a Microsoft Entra app article to create a new Microsoft Entra app.
Connect React app to Microsoft 365
Now that your application is registered with Microsoft Entra ID, you can connect the React app to Microsoft 365. First, allow users to sign in to the app using their Microsoft account.
Copy the Microsoft Entra application registration ID
- In the Microsoft Entra admin center, go to your application registration.
- Verify that you are on the Overview page.
- From the Essentials section, copy the value of the Application (client) ID property
Configure the Microsoft Graph Toolkit authentication provider
Next, configure the authentication provider that the Microsoft Graph Toolkit should use. In this case, we use MSAL2, which is a good default for building standalone applications. If you use any of the extensibility points in Microsoft 365, like Teams or SharePoint, use other providers.
In the code editor, open the src/index.tsx file, and to the list of imports, add:
import { Providers } from "@microsoft/mgt-element";
import { Msal2Provider } from "@microsoft/mgt-msal2-provider";
After the last
importstatement, initialize the Microsoft Graph Toolkit with MSAL provider.Providers.globalProvider = new Msal2Provider({ clientId: 'REPLACE_WITH_CLIENTID' });
Replace the value of the clientId property with the value of the Application (client) ID property you copied previously in the Microsoft Entra admin center app registration overview.
With these changes, the src/index.tsx file looks like the following.
import React from 'react';
import ReactDOM from 'react-dom/client';
import './index.css';
import App from './App';
import reportWebVitals from './reportWebVitals';

import { Providers } from "@microsoft/mgt-element";
import { Msal2Provider } from "@microsoft/mgt-msal2-provider";

Providers.globalProvider = new Msal2Provider({
  clientId: "REPLACE_WITH_CLIENTID",
});

const root = ReactDOM.createRoot(
  document.getElementById('root') as HTMLElement
);
root.render(
  <React.StrictMode>
    <App />
  </React.StrictMode>
);

// If you want to start measuring performance in your app, pass a function
// to log results (for example: reportWebVitals(console.log))
// or send to an analytics endpoint. Learn more: https://bit.ly/CRA-vitals
reportWebVitals();
Add the sign-in button
Add the Login Microsoft Graph Toolkit React component to allow users to sign in with their Microsoft account to your app.
In the code editor, open the src/App.tsx file, and to the list of imports add:
import { Login } from '@microsoft/mgt-react';In the
Appfunction, replace the contents of thereturnclause with the basic structure including the Microsoft Graph Toolkit<Login />component:<div className="app"> <header> <Login /> </header> </div>
With these changes, the src/App.tsx file looks like the following.
import React from 'react';
import logo from './logo.svg';
import './App.css';
import { Login } from '@microsoft/mgt-react';
function App() {
return (
<div className="app">
  <header>
    <Login />
  </header>
</div>
);
}
export default App;
Test signing in to your application
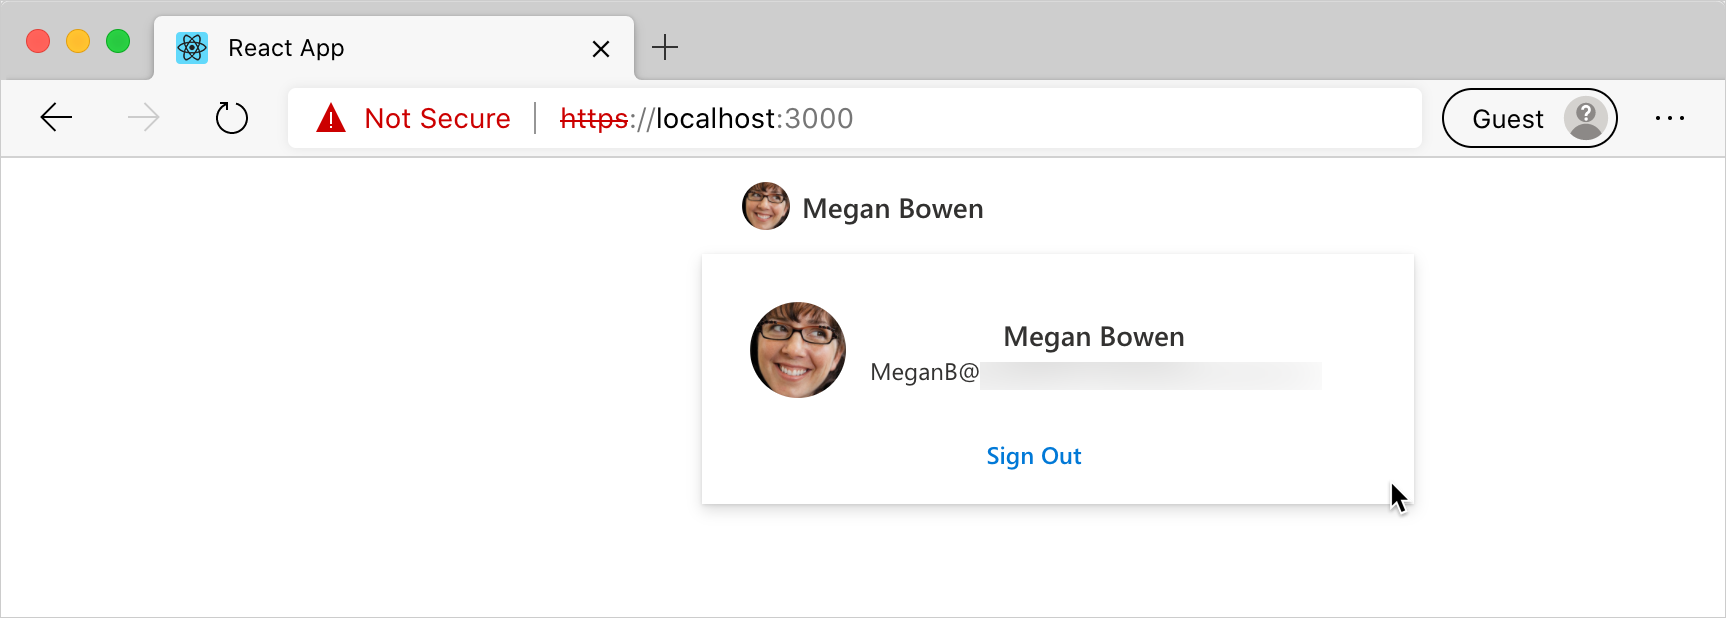
You should now be able to sign in to your application with your Microsoft account.
- Go back to the browser where your React app is running. You should now see a Sign In button.
- When you select the Sign In button, you're prompted to sign in with your Microsoft account (you can use the same account as the one you accessed the Azure portal with).
- The first time you're using this Microsoft Entra application, you need to consent its use in your organization.
- After signing in, you'll be redirected to your React app. Notice that the Sign In button changed to show your user's name
Load data from Microsoft 365
Microsoft Graph Toolkit not only simplifies authentication to Microsoft 365, but also loading its data. In this example, the signed in person's calendar is displayed.
Specify permissions needed for your application
Before you can load data from Microsoft 365, you need to specify the list of permission scopes your application must be granted to access user's data. These scopes differ depending on what kind of information you want to show. In this case, you need access to people's calendar and basic access to information about people that is also displayed in the calendar. You can find the scopes required by each API in the Microsoft Graph API documentation.
In the code editor, open the src/index.tsx file, and update the provider initialization code.
Providers.globalProvider = new Msal2Provider({
  clientId: 'REPLACE_WITH_CLIENTID',
  scopes: ['calendars.read', 'user.read', 'openid', 'profile', 'people.read', 'user.readbasic.all']
});
Show user's calendar data after signing in
Next, extend the application to show data from the user's calendar. You can access this information only after the user is signed in. You need to track the user's sign-in state and show the calendar data after the user is logged in with their Microsoft account.
Track user's sign-in state
You need to track the user's signed-in state in order to use the useIsSignedIn hook provided by mgt-react.
Import the
useIsSignedInhook frommgt-react, by adding it to themgt-reactimports.import { Login, useIsSignedIn } from '@microsoft/mgt-react';Use the hook
useIsSignedInto enable tracking the user's sign-in state in your application by adding it in the App function:const [ isSignedIn ] = useIsSignedIn();
This code defines a Boolean isSignedIn constant, which you can use to determine whether the user is currently signed in to your application.
Load user's calendar if user is signed in
Now that you track the user's sign-in state in your application, you can show their calendar after they signed in.
In the code editor, open the src/App.tsx file, and extend the component
importstatement with the<Agenda />component.import { useIsSignedIn, Agenda, Login } from '@microsoft/mgt-react';Extend the contents of the
returnclause with an extradivand the Microsoft Graph Toolkit<Agenda />component that only renders if the user is signed in.<div className="row"> <div className="column"> {isSignedIn && <Agenda />} </div> </div>In the code editor, open the src/App.css file, and change the entire content of the file with the following code.
.row { display: flex; flex-flow: wrap; } .column { flex: 0 0 50%; }
With these changes, the src/App.tsx file should look like the following.
import { useIsSignedIn, Agenda, Login } from '@microsoft/mgt-react';
import React, { useState, useEffect } from 'react';
import './App.css';
function App() {
const [isSignedIn] = useIsSignedIn();
return (
<div className="app">
<header>
<Login />
</header>
<div className="row">
  <div className="column">
    {isSignedIn &&
      <Agenda />}
  </div>
</div>
</div>
);
}
export default App;
Show a user's chat conversation
Next, extend the application to show a conversation from the user's 1:1 and group conversations. You can access this information only after the user is signed in.
Update the required permissions for your application
By adding the chat components to your application, you need to update the list of requested scopes to include the permissions required to access chat data. You can find the scopes required by each API in the Microsoft Graph API documentation.
In the code editor, open the src/index.tsx file, and update the provider initialization code.
import { allChatScopes } from '@microsoft/mgt-chat';

Providers.globalProvider = new Msal2Provider({
  clientId: 'REPLACE_WITH_CLIENTID',
  scopes: ['calendars.read', 'user.read', 'openid', 'profile', 'people.read', 'user.readbasic.all', ...allChatScopes]
});
Load a user's chat conversation if the user is signed in
In the code editor, open the src/App.tsx file, and extend the component
importstatement with the Chat component and types.import { Chat, NewChat } from '@microsoft/mgt-chat'; import { Chat as GraphChat } from '@microsoft/microsoft-graph-types'; import React, { useState, useEffect, useCallback } from 'react';Next, inside the App function, add the necessary code to handle the user's interactions with the chat components.
const [chatId, setChatId] = useState<string>(); const [showNewChat, setShowNewChat] = useState<boolean>(false); const onChatCreated = useCallback((chat: GraphChat) => { setChatId(chat.id); setShowNewChat(false); }, []);Then, extend the contents of the
returnclause with an extradivand the Microsoft Graph Toolkit<Chat />and<NewChat />components.<div className="column"> {isSignedIn && ( <> <button onClick={() => setShowNewChat(true)}>New Chat</button> {showNewChat && ( <NewChat onChatCreated={onChatCreated} onCancelClicked={() => setShowNewChat(false)} mode="auto" /> )} {chatId && <Chat chatId={chatId} />} </> )} </div>
With these changes, the src/App.tsx file should look like the following.
import { useIsSignedIn, Agenda, Login } from '@microsoft/mgt-react';
import { Chat, NewChat } from '@microsoft/mgt-chat';
import { Chat as GraphChat } from '@microsoft/microsoft-graph-types';
import React, { useState, useEffect, useCallback } from 'react';
import './App.css';
function App() {
const [isSignedIn] = useIsSignedIn();
const [chatId, setChatId] = useState<string>();

const [showNewChat, setShowNewChat] = useState<boolean>(false);
const onChatCreated = useCallback((chat: GraphChat) => {
  setChatId(chat.id);
  setShowNewChat(false);
}, []);
return (
<div className="App">
<header>
<Login />
</header>
<div className="row">
<div className="column">
{isSignedIn &&
<Agenda />}
</div>
<div className="column">
  {isSignedIn && (
    <>
      <button onClick={() => setShowNewChat(true)}>New Chat</button>
      {showNewChat && (
        <NewChat
          onChatCreated={onChatCreated}
          onCancelClicked={() => setShowNewChat(false)}
          mode="auto"
        />
      )}

      {chatId && <Chat chatId={chatId} />}
    </>
  )}
</div>
</div>
</div>
);
}
export default App;
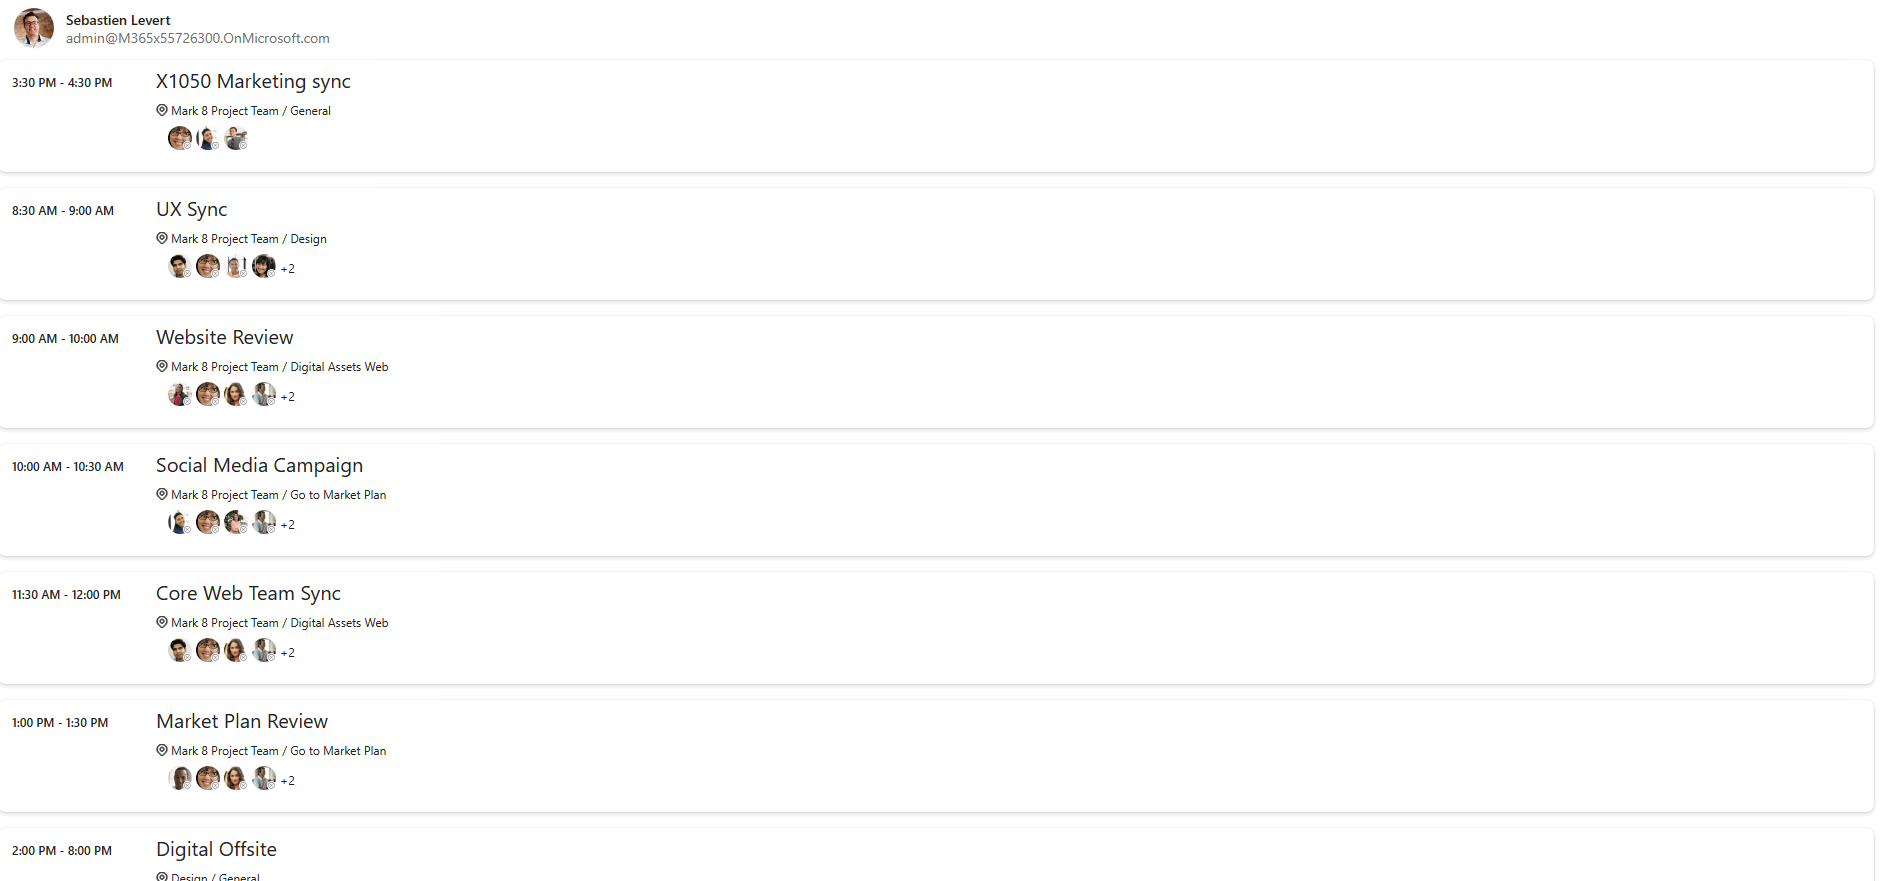
Test showing a user's calendar and chats after they signed in
With these changes, after signing in to your application with your Microsoft account, you should see your calendar.
- To see the changes, refresh your browser at
http://localhost:3000. - Choose the Sign In button and sign in using your Microsoft account.
- After consenting to the use of the application, you should see information about the current user and their calendar.
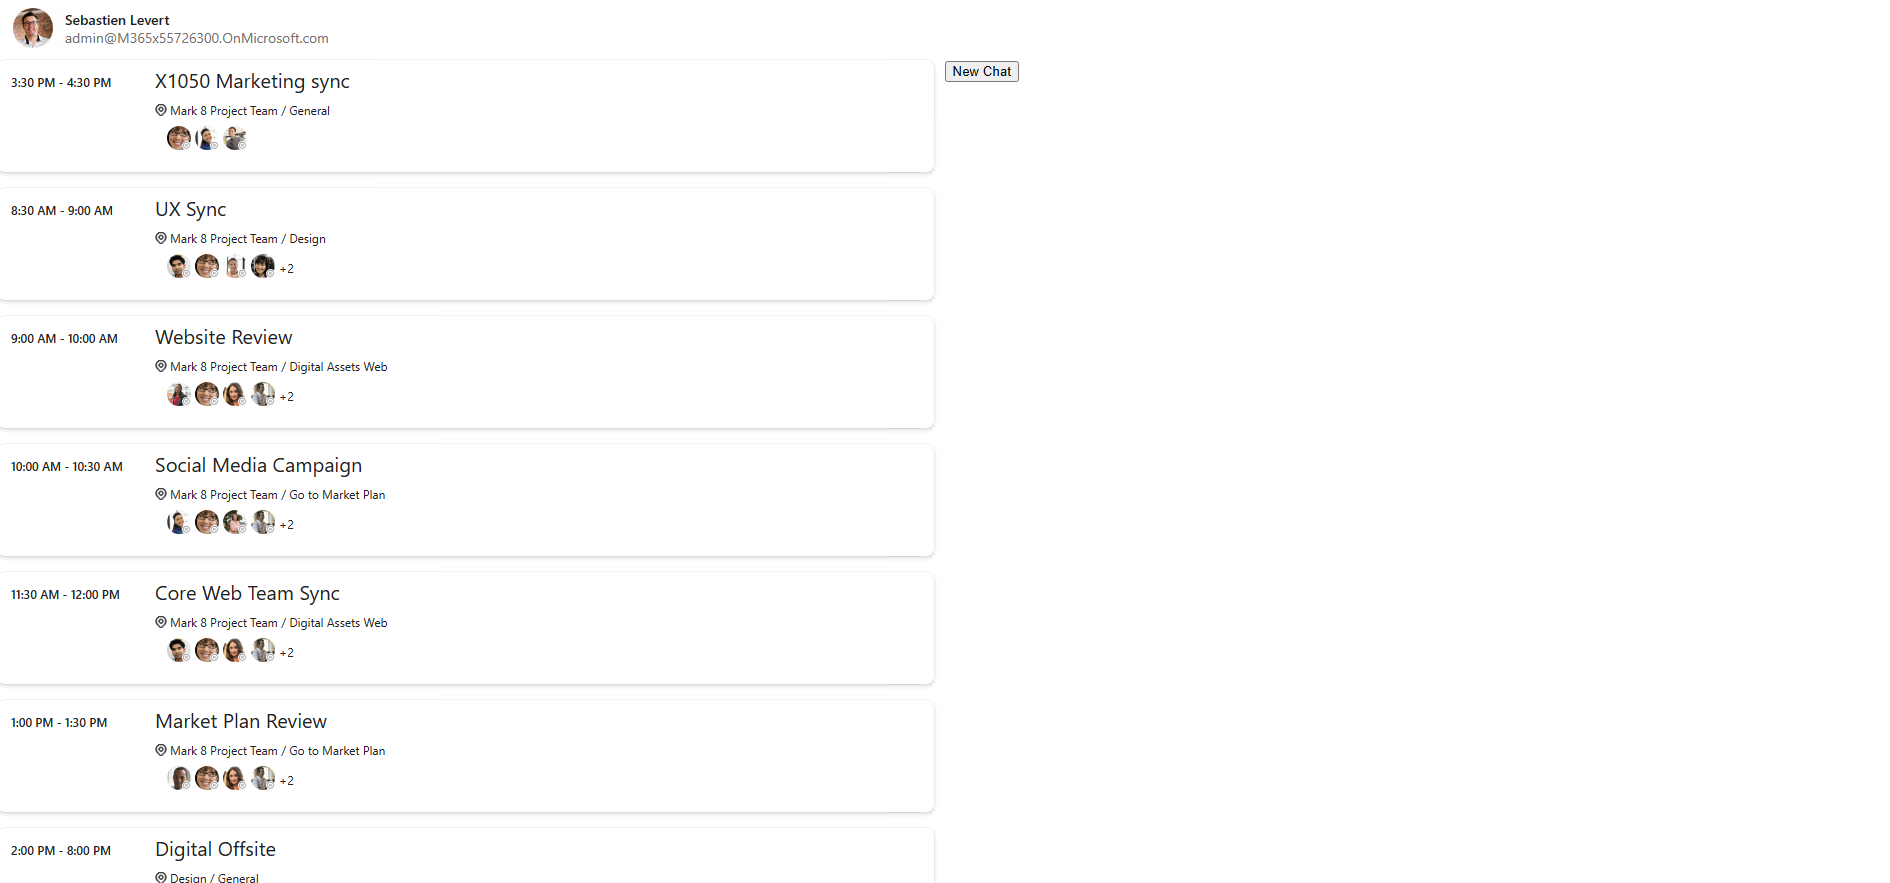
- To see the changes, refresh your browser at
http://localhost:3000. - Choose the Sign In button and sign in using your Microsoft account.
- After consenting to the use of the application, you should see information about the current user. You also see their calendar and the ability to create a new chat and start interacting with this user.
Next steps
- See what's in the Microsoft Graph Toolkit.
- Try out the components in the playground.
- Ask a question on Stack Overflow.
- Report bugs or leave a feature request on GitHub.