התקנת ATA - שלב 7
חל על: Advanced Threat Analytics גירסה 1.9
שלב 7: שילוב VPN
Microsoft Advanced Threat Analytics (ATA) גירסה 1.8 ואילך יכול לאסוף מידע חשבונאות מפתרונות VPN. לאחר קביעת התצורה, דף הפרופיל של המשתמש כולל מידע מחיבורי ה- VPN, כגון כתובות ה- IP והמיקומים שבהם נוצרו החיבורים. פעולה זו משלימה את תהליך החקירה על-ידי מתן מידע נוסף על פעילות משתמשים. השיחה לפתרון כתובת IP חיצונית למיקום היא אנונימית. לא נשלח מזהה אישי בשיחה זו.
ATA משתלב עם פתרון ה- VPN שלך על-ידי האזנה לאירועי חשבונאות של RADIUS המועברים לשערי ATA. מנגנון זה מבוסס על רדיוס חשבונאות רגיל (RFC 2866), וספקי ה- VPN הבאים נתמכים:
- Microsoft
- F5
- Cisco ASA
חשוב
נכון לספטמבר 2019, שירות ה- VPN הגיאוגרפי Advanced Threat Analytics האחראי על זיהוי מיקומי VPN תומך כעת באופן בלעדי ב- TLS 1.2. ודא שתצורת מרכז ה- ATA שלך נקבעה לתמיכה ב- TLS 1.2, כי גירסאות 1.1 ו- 1.0 אינן נתמכות עוד.
דרישות מוקדמות
כדי להפוך שילוב VPN לזמין, הקפד להגדיר את הפרמטרים הבאים:
פתח את יציאה UDP 1813 בשערי ATA ובשערי ATA Lightweight Gateway.
למרכז ATA חייבת להיות אפשרות לגשת ti.ata.azure.com HTTPS (יציאה 443) כך שהוא יוכל לבצע שאילתה על המיקום של כתובות IP נכנסות.
הדוגמה שלהלן משתמשת ב- Microsoft Routing וב- Remote Access Server (RRAS) כדי לתאר את תהליך קביעת התצורה של VPN.
אם אתה משתמש בפתרון VPN של ספק חיצוני, עיין בתיעוד שלו לקבלת הוראות כיצד להפוך את RADIUS Accounting לזמין.
קביעת תצורה של RADIUS Accounting במערכת ה- VPN
בצע את השלבים הבאים בשרת RRAS.
פתח את מסוף הניתוב והגישה מרחוק.
לחץ באמצעות לחצן העכבר הימני על שם השרת ובחר מאפיינים.
בכרטיסיה אבטחה , תחת ספק חשבונאות, בחרRADIUS Accounting ולחץ על קבע תצורה.

בחלון Add RADIUS Server , הקלד את שם השרת של שער ATA או ATA Lightweight Gateway הקרוב ביותר. תחת יציאה, ודא שתצורת ברירת המחדל של 1813 נקבעה. לחץ על שנה והקלד מחרוזת סודית משותפת חדשה של תווים אלפאנומריים שתוכל לזכור. עליך למלא אותה מאוחר יותר ב'תצורת ATA'. סמן את תיבת ההודעות שלח חשבון RADIUS למצב מופעל וחשבונאות כבוי ולאחר מכן לחץ על אישור בכל תיבות הדו-שיח הפתוחות.

קביעת תצורה של VPN ב- ATA
ATA אוסף נתוני VPN ומזהה מתי והיכן נעשה שימוש באישורים באמצעות VPN ומשלב את הנתונים בחקירה שלך. פעולה זו מספקת מידע נוסף כדי לסייע לך לחקור התראות שדווחו על-ידי ATA.
כדי לקבוע תצורה של נתוני VPN ב- ATA:
במסוף ATA, פתח את הדף תצורת ATA ועבור אל VPN.

הפעל את Radius Accounting והקלד את הסוד המשותף שאת תצורתו קבעת קודם לכן בשרת ה- VPN של RRAS. לאחר מכן לחץ על שמור.

לאחר הפיכת תכונה זו לזמינה, כל שערי ATA ו- Lightweight Gateways מאזנים ביציאה 1813 עבור אירועי חשבונאות RADIUS.
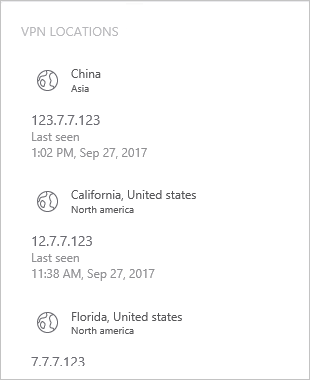
ההגדרה הושלמה, וכעת באפשרותך לראות את פעילות ה- VPN בדף הפרופיל של המשתמשים:

לאחר ששער ATA מקבל את אירועי ה- VPN ושולח אותם למרכז הנתונים לעיבוד, מרכז ATA זקוק לגישה ל- ti.ata.azure.com באמצעות HTTPS (יציאה 443) כדי שתוכל לזהות את כתובות ה- IP החיצוניות באירועי ה- VPN למיקום הגיאוגרפי שלהם.