QuickStart: Azure AI Content Safety Studio
This article explains how you can get started with the Azure AI Content Safety service using Content Safety Studio in your browser.
Caution
Some of the sample content provided by Content Safety Studio might be offensive. Sample images are blurred by default. User discretion is advised.
Prerequisites
- An Azure account. If you don't have one, you can create one for free.
- A Content Safety Azure resource.
- Assign the Cognitive Services User role to your account. Go to the Azure portal, navigate to your Content Safety resource or Azure AI Services resource, and select Access Control in the left navigation bar, then select + Add role assignment, choose the Cognitive Services User role, and select the member of your account that you need to assign this role to, then review and assign. It might take a few minutes for the assignment to take effect.
- Sign in to Content Safety Studio with your Azure subscription and Content Safety resource.
Important
You must assign the Cognitive Services User role to your Azure account to use the studio experience. Go to the Azure portal, navigate to your Content Safety resource or Azure AI Services resource, and select Access Control in the left navigation bar, then select + Add role assignment, choose the Cognitive Services User role, and select the member of your account that you need to assign this role to, then review and assign. It might take few minutes for the assignment to take effect.
Analyze text content
The Moderate text content page provides the capability for you to quickly try out text moderation.

- Select the Moderate text content panel.
- Add text to the input field, or select sample text from the panels on the page.
- Select Run test.
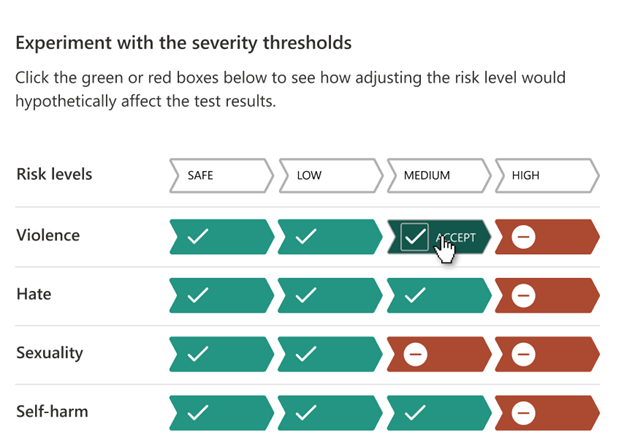
The service returns all the categories that were detected, with the severity level for each: 0-Safe, 2-Low, 4-Medium, 6-High. It also returns a binary Accepted/Rejected result, based on the filters you configure. Use the matrix in the Configure filters tab to set your allowed/prohibited severity levels for each category. Then you can run the text again to see how the filter works.
The Use blocklist tab lets you create, edit, and add a blocklist to the moderation workflow. If you have a blocklist enabled when you run the test, you get a Blocklist detection panel under Results. It reports any matches with the blocklist.
Detect user input attacks
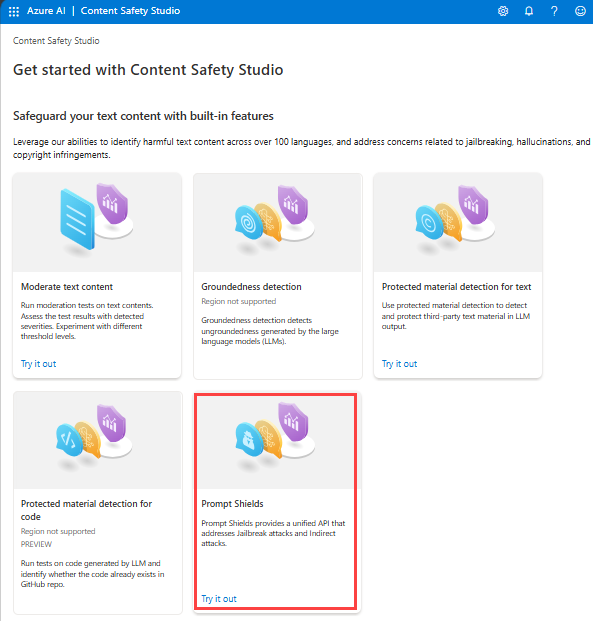
The Prompt Shields panel lets you try out user input risk detection. Detect User Prompts designed to provoke the Generative AI model into exhibiting behaviors it was trained to avoid or break the rules set in the System Message. These attacks can vary from intricate role-play to subtle subversion of the safety objective.

- Select the Prompt Shields panel.
- Select a sample text on the page, or input your own content for testing. You can also upload a CSV file to do a batch test.
- Select Run test.
The service returns the risk flag and type for each sample.
For more information, see the Prompt Shields conceptual guide.
Analyze image content
The Moderate image content page provides capability for you to quickly try out image moderation.

- Select the Moderate image content panel.
- Select a sample image from the panels on the page, or upload your own image. The maximum size for image submissions is 4 MB, and image dimensions must be between 50 x 50 pixels and 2,048 x 2,048 pixels. Images can be in JPEG, PNG, GIF, BMP, TIFF, or WEBP formats.
- Select Run test.
The service returns all the categories that were detected, with the severity level for each: 0-Safe, 2-Low, 4-Medium, 6-High. It also returns a binary Accepted/Rejected result, based on the filters you configure. Use the matrix in the Configure filters tab on the right to set your allowed/prohibited severity levels for each category. Then you can run the text again to see how the filter works.
View and export code
You can use the View Code feature in either the Analyze text content or Analyze image content pages to view and copy the sample code, which includes configuration for severity filtering, blocklists, and moderation functions. You can then deploy the code on your end.

Monitor online activity
The Monitor online activity panel lets you view your API usage and trends.

You can choose which Media type to monitor. You can also specify the time range that you want to check by selecting Show data for the last __.
In the Reject rate per category chart, you can also adjust the severity thresholds for each category.

You can also edit blocklists if you want to change some terms, based on the Top 10 blocked terms chart.
Manage your resource
To view resource details such as name and pricing tier, select the Settings icon in the top-right corner of the Content Safety Studio home page and select the Resource tab. If you have other resources, you can switch resources here as well.

Clean up resources
If you want to clean up and remove an Azure AI services resource, you can delete the resource or resource group. Deleting the resource group also deletes any other resources associated with it.
Next step
Next, get started using Azure AI Content Safety through the REST APIs or a client SDK, so you can seamlessly integrate the service into your application.