Create Azure Managed Application that deploys storage account encrypted with customer-managed key
מאמר
This article describes how to create an Azure Managed Application that deploys a storage account encrypted using a customer-managed key. Storage account, Cosmos DB, and Azure Database for Postgres support data encryption at rest using customer-managed keys or Microsoft-managed keys. You can use your own encryption key to protect the data in your storage account. When you specify a customer-managed key, that key is used to protect and control access to the key that encrypts your data. Customer-managed keys offer greater flexibility to manage access controls.
Prerequisites
An Azure account with an active subscription and permissions to Microsoft Entra resources like users, groups, or service principals. If you don't have an account, create a free account before you begin.
Be familiar with how to create and deploy a service catalog definition.
Managed identities
Configuring a customer-managed key for a storage account deployed by the managed application as a resource within the managed resource group requires a user-assigned managed identity. This user-assigned managed identity can be used to grant the managed application access to other existing resources. To learn how to configure your managed application with a user-assigned managed identity go to Azure Managed Application with managed identity.
Your application can be granted two types of identities:
A system-assigned managed identity is assigned to your application and is deleted if your app is deleted. An app can only have one system-assigned managed identity.
A user-assigned managed identity is a standalone Azure resource that can be assigned to your app. An app can have multiple user-assigned managed identities.
To deploy a storage account in your managed application's managed resource group that's encrypted with customer keys from existing key vault, more configuration is required. The managed identity configured with your managed application needs the built-in Azure role-based access control Managed Identity Operator over the managed identity that has access to the key vault. For more details, go to Managed Identity Operator role.
Grant key permission on key vault to the managed identity
Create a role assignment for the key vault managed identity demokeyvaultmi to wrap and unwrap keys.
Go to your key vault demo-cmek-keyvault.
Select Access control (IAM).
Select Add > Add role assignment.
Assign the following role:
Role: Key Vault Crypto Service Encryption User
Assign Access to: Managed identity
Member: demokeyvaultmi
Select Review + assign to view your settings.
Select Review + assign to create the role assignment.
Create a role assignment for your account
Create another role assignment so that your account can create a new key in your key vault.
Assign the following role:
Role: Key Vault Crypto Officer
Assign Access to: User, group, or service principal
Member: Your Microsoft Entra account
Select Review + assign to view your settings.
Select Review + assign to create the role assignment.
You can verify the key vault's role assignments in Access control (IAM) > Role assignments.
Create a key
You need to create a key that your key vault uses to encrypt a storage account.
Go to your key vault, demo-cmek-keyvault.
Select Keys.
Select Generate/Import.
On the Create a key page, select the following values:
Options: Generate
Name: demo-cmek-key
Accept the defaults for the other options.
Select Create.
Make a note of the key name. You use it when you deploy the managed application.
Create a user-assigned managed identity for the managed application
Create a user-assigned managed identity to be used as the managed identity for the managed application.
In the search box, enter Managed Identities.
Under Services, select Managed Identities.
Select Create.
Subscription: Select your subscription.
Resource group: Select the resource group demo-cmek-rg.
Region: Select a region like East US.
Name: Enter the name for your user-assigned managed identity, like demomanagedappmi.
Select Review + create.
After Validation Passed is displayed, select Create.
After a successful deployment, select Go to resource.
Assign role permission to managed identity
Assign the Managed Identity Operator role to the managed identity at the scope of the user-assigned managed identity named demokeyvaultmi.
Go to the user-assigned managed identity named demokeyvaultmi.
Select Access control (IAM).
Select Add > Add role assignment to open the Add role assignment page.
Assign the following role.
Role: Managed Identity Operator
Assign Access to: Managed Identity
Member: demomanagedappmi
Select Review + assign to view your settings.
Select Review + assign to create the role assignment.
You can verify the role assignment for demokeyvaultmi in Access control (IAM) > Role assignments.
Sample managed application template
Create a managed application that deploys a storage account in a managed resource group and use a pre-existing key vault's key to encrypt the data in the storage account.
To publish a managed application to your service catalog, do the following tasks:
Create the creatUIDefinition.json file from the sample in this article. The template defines the portal's user interface elements when deploying the managed application.
Create an Azure Resource Manager template named mainTemplate.json by converting the Bicep file in this article to JSON. The template defines the resources to deploy with the managed application.
Create a .zip package that contains the required JSON files: createUiDefinition.json and mainTemplate.json.
The following template creates a user-assigned managed identity for the managed application. In this example, we disable the system-assigned managed identity because we need our user-assigned managed identity to be configured in advance with the Managed Identity Operator permissions over the key vault's managed identity.
Create a new file in Visual Studio Code named creatUIDefinition.json.
Copy and paste the following code into the file.
Save the file.
JSON
{
  "$schema": "https://schema.management.azure.com/schemas/0.1.2-preview/CreateUIDefinition.MultiVm.json#",
  "handler": "Microsoft.Azure.CreateUIDef",
  "version": "0.1.2-preview",
  "parameters": {
    "basics": [],
    "steps": [
      {
        "name": "managedApplicationSetting",
        "label": "Application Settings",
        "subLabel": {
          "preValidation": "Configure your application settings and Managed Identity for the application",
          "postValidation": "Done"
        },
        "bladeTitle": "Application Settings - Config",
        "elements": [
          {
            "name": "appIdentity",
            "type": "Microsoft.ManagedIdentity.IdentitySelector",
            "label": "Managed Identity Configuration for the Application (Needs Managed Identity Operator permissions over KV Managed Identity).",
            "toolTip": {
              "systemAssignedIdentity": "Enable system assigned identity to grant the managed application access to additional existing resources.",
              "userAssignedIdentity": "Add user assigned identities to grant the managed application access to additional existing resources."
            },
            "defaultValue": {
              "systemAssignedIdentity": "Off"
            },
            "options": {
              "hideSystemAssignedIdentity": true,
              "hideUserAssignedIdentity": false,
              "readOnlySystemAssignedIdentity": true
            },
            "visible": true
          }
        ]
      },
      {
        "name": "configuration",
        "type": "Microsoft.Common.Section",
        "label": "Configuration",
        "elements": [
          {
            "name": "cmek",
            "type": "Microsoft.Common.Section",
            "label": "Customer Managed Encryption Key (CMEK)",
            "elements": [
              {
                "name": "cmekEnable",
                "type": "Microsoft.Common.CheckBox",
                "label": "Enable CMEK",
                "toolTip": "Enable to provide a CMEK",
                "constraints": {
                  "required": false
                }
              },
              {
                "name": "cmekKeyVaultUrl",
                "type": "Microsoft.Common.TextBox",
                "label": "Key Vault URL",
                "toolTip": "Specify the CMEK Key Vault URL",
                "defaultValue": "",
                "constraints": {
                  "required": "[steps('configuration').cmek.cmekEnable]",
                  "regex": ".*",
                  "validationMessage": "The value must not be empty."
                },
                "visible": "[steps('configuration').cmek.cmekEnable]"
              },
              {
                "name": "cmekKeyName",
                "type": "Microsoft.Common.TextBox",
                "label": "Key Name",
                "toolTip": "Specify the key name from your key vault.",
                "defaultValue": "",
                "constraints": {
                  "required": "[steps('configuration').cmek.cmekEnable]",
                  "regex": ".*",
                  "validationMessage": "The value must not be empty."
                },
                "visible": "[steps('configuration').cmek.cmekEnable]"
              },
              {
                "name": "cmekKeyIdentity",
                "type": "Microsoft.ManagedIdentity.IdentitySelector",
                "label": "Managed Identity Configuration for Key Vault Access",
                "toolTip": {
                  "systemAssignedIdentity": "Enable system assigned identity to grant the managed application access to additional existing resources.",
                  "userAssignedIdentity": "Add user assigned identities to grant the managed application access to additional existing resources."
                },
                "defaultValue": {
                  "systemAssignedIdentity": "Off"
                },
                "options": {
                  "hideSystemAssignedIdentity": true,
                  "hideUserAssignedIdentity": false,
                  "readOnlySystemAssignedIdentity": true
                },
                "visible": "[steps('configuration').cmek.cmekEnable]"
              }
            ],
            "visible": true
          }
        ]
      }
    ],
    "outputs": {
      "location": "[location()]",
      "managedIdentity": "[steps('managedApplicationSetting').appIdentity]",
      "cmekConfig": {
        "kvUrl": "[if(empty(steps('configuration').cmek.cmekKeyVaultUrl), '', steps('configuration').cmek.cmekKeyVaultUrl)]",
        "keyName": "[if(empty(steps('configuration').cmek.cmekKeyName), '', steps('configuration').cmek.cmekKeyName)]",
        "identityId": "[if(empty(steps('configuration').cmek.cmekKeyIdentity), '', steps('configuration').cmek.cmekKeyIdentity)]"
      }
    }
  }
}
Create template mainTemplate.json
The following Bicep file is the source code for your mainTemplate.json. The template uses the user-assigned managed identity defined in the createUiDefinition.json file.
Create a new file in Visual Studio Code named mainTemplate.bicep.
After the Bicep file is converted to JSON, your mainTemplate.json file should match the following example. You might have different values in the metadata properties for version and templateHash.
During the deployment, you use your user-assigned managed identities, key vault name, key vault URL, key vault's key name. The createUiDefinition.json file creates the use interface.
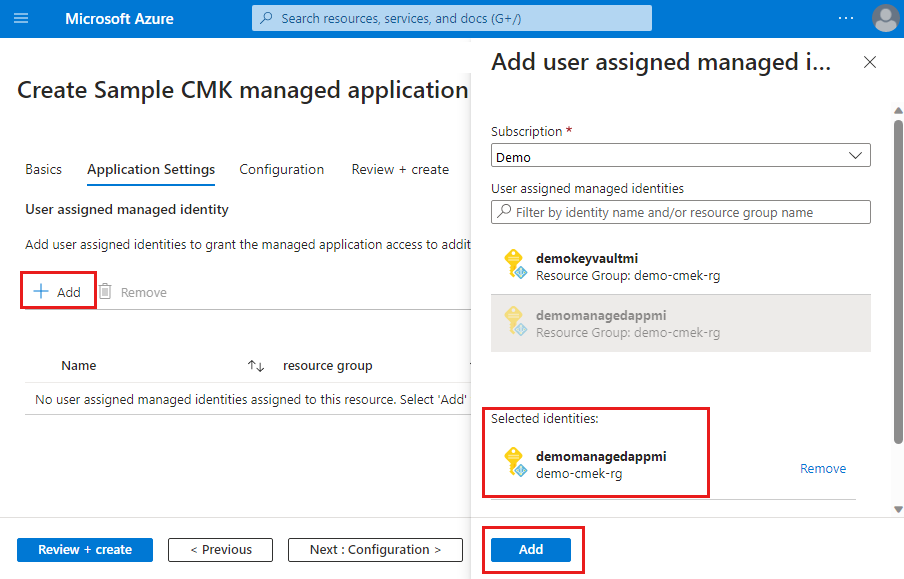
For example, in a portal deployment, on the Application Settings tab, you add the demomanagedappmi.
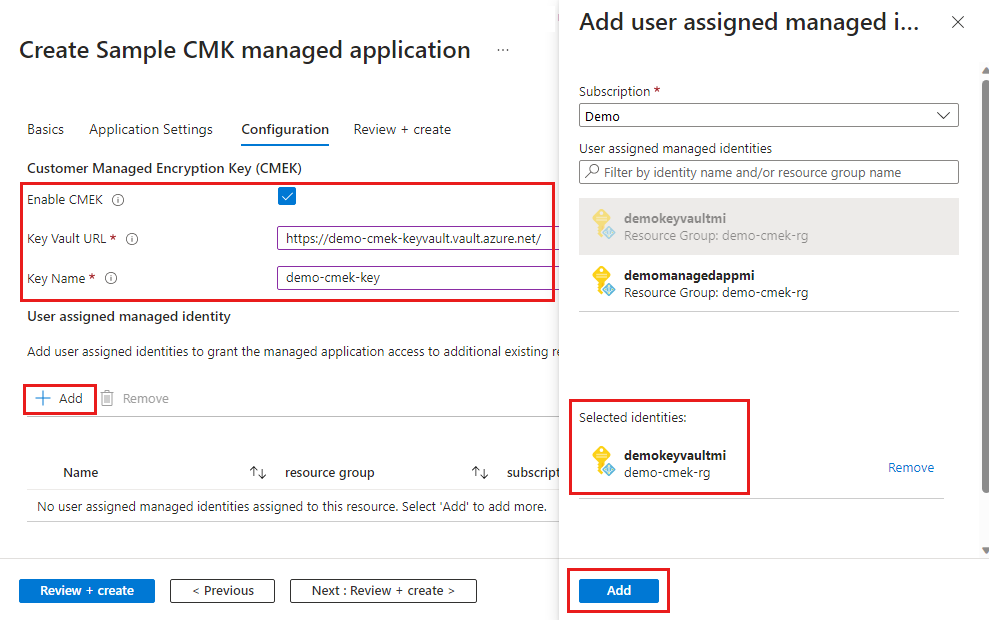
On the Configuration tab, you enable the customer-managed key and add the user-assigned managed identity for the key vault, demokeyvaultmi. You also specify the key vault's URL and the key vault's key name that you created.
Verify the deployment
After the deployment is complete, you can verify the managed application's identity assignment. The user-assigned managed identity demomanagedappmi is assigned to the managed application.
Go to the resource group where you deployed the managed application.
Under Settings > Identity select User assigned (preview).
You can also verify the storage account that the managed application deployed. The Encryption tab shows the key demo-cmek-key and the resource ID for the user-assigned managed identity.
Go to the managed resource group where the managed application's storage account is deployed.
Learn how to configure Azure Storage encryption with customer-managed keys for an existing storage account by using the Azure portal, PowerShell, or Azure CLI. Customer-managed keys are stored in an Azure key vault.