אירוע
17 במרץ, 21 - 21 במרץ, 10
הצטרף לסידרה של פגישות כדי לבנות פתרונות מדרגיים של בינה מלאכותית בהתבסס על מקרי שימוש מהעולם האמיתי עם מפתחים ומומחים אחרים.
הירשם עכשיוהדפדפן הזה אינו נתמך עוד.
שדרג ל- Microsoft Edge כדי לנצל את התכונות, עדכוני האבטחה והתמיכה הטכנית העדכניים ביותר.
In this article, you learn how to configure and attach an Azure compute gallery to a dev center in Microsoft Dev Box. With Azure Compute Gallery, you can give developers customized images for their dev box.
Azure Compute Gallery is a service for managing and sharing images. A gallery is a repository that's stored in your Azure subscription and helps you build structure and organization around your image resources. Dev Box supports GitHub, Azure Repos, and Bitbucket repositories to provide an image gallery.
After you attach a compute gallery to a dev center in Microsoft Dev Box, you can create dev box definitions based on images stored in the compute gallery.
Advantages of using a gallery include:
To learn more about Azure Compute Gallery and how to create galleries, see:
הערה
Microsoft Dev Box doesn't support community galleries.
A gallery used to configure dev box definitions must have at least one image definition and one image version.
When you create a virtual machine (VM) image, select an image from the Azure Marketplace that's compatible with Microsoft Dev Box. The following are examples of compatible images:
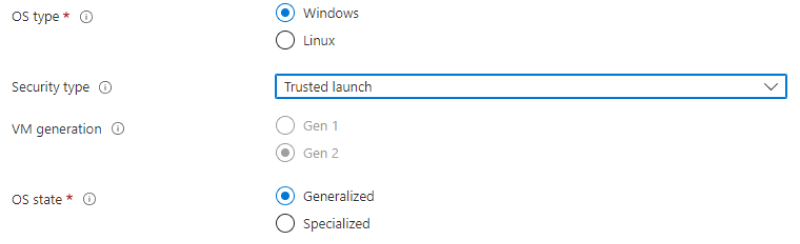
The image version must meet the following requirements:
Generation 2
Hyper-V v2
Windows OS
Generalized VM image
Single-session VM image (Multiple-session VM images aren't supported.)
No recovery partition
Default 64-GB OS disk size
The image definition must have trusted launch enabled as the security type. You configure the security type when you create the image definition.
חשוב
הערה
Microsoft Dev Box doesn't support preview builds from the Windows Insider Program.
When you create a generalized VM to capture to an image, the following issues can affect provisioning and startup times:
Create the image by using these three sysprep options: /generalize /oobe /mode:vm.
Enable the Read/Write cache on the OS disk.
properties.storageProfile.osDisk.caching value is ReadWrite.Enable nested virtualization in your base image:
Enable-WindowsOptionalFeature -FeatureName VirtualMachinePlatform -OnlineDisable the reserved storage state feature in the image by using the following command: DISM.exe /Online /Set-ReservedStorageState /State:Disabled.
Run defrag and chkdsk during image creation, then disable the chkdisk and defrag scheduled tasks.
When you use an Azure Compute Gallery image to create a dev box definition, Microsoft Dev Box validates the image to ensure that it meets the requirements to be provisioned for a dev box. It also replicates the image to the regions specified in the attached network connections, so the images are present in the region required for dev box creation.
To allow the service to perform these actions, you must provide permissions to your gallery as follows.
Follow the steps to create a user-assigned managed identity.
Sign in to the Azure portal.
In the search box, enter dev box. In the list of results, select Dev centers.
Open your dev center. On the left menu, select Identity.
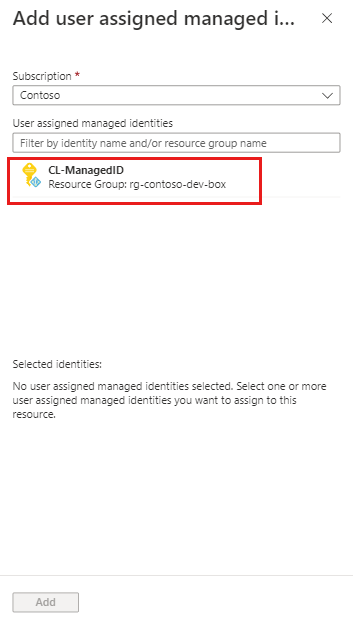
On the User assigned tab, select + Add.
In the Add user assigned managed identity pane, select the user-assigned managed identity that you created in step 1, and then select Add.
Microsoft Dev Box behaves differently depending how you attach your gallery:
Use the following steps to manually assign the role.
In the Azure portal, open the gallery that you want to attach to the dev center. You can also search for Azure Compute Gallery to find your gallery.
On the left menu, select Access Control (IAM).
Select Add > Add role assignment.
Assign the following role. For detailed steps, see Assign Azure roles using the Azure portal.
| Setting | Value |
|---|---|
| Role | Select Contributor. |
| Assign access to | Select Managed Identity. |
| Members | Search for and select the user-assigned managed identity that you created when you added a user-assigned identity to the dev center. |
You can use the same managed identity in multiple dev centers and compute galleries. Any dev center with the managed identity added has the necessary permissions to the images in the gallery that has the Contributor role assignment added.
To use the images from a compute gallery in dev box definitions, you must first associate the gallery with the dev center by attaching it:
Sign in to the Azure portal.
In the search box, enter dev box. In the list of results, select Dev centers.
Select the dev center that you want to attach the gallery to.

On the left menu, select Azure compute galleries to list the galleries that are attached to this dev center.

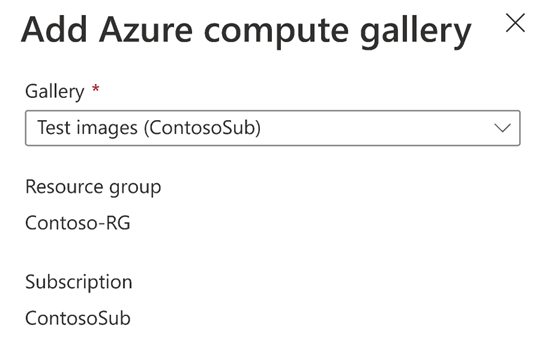
Select + Add to select a gallery to attach.
In Add Azure compute gallery, select your gallery. If you have access to more than one gallery that has the same name, the subscription name appears in parentheses.
If there's a name conflict in the dev center, you must provide a unique name to use for this gallery.
Select Add.
Confirm your gallery now appears on the Azure compute galleries page.

After you successfully add a gallery, the images in the gallery are available to select when you create and update dev box definitions.
You can detach galleries from dev centers so their images can no longer be used to create dev box definitions.
הערה
You can't remove galleries that are being actively used in dev box definitions. Before you can remove such a gallery, you must delete the associated dev box definition or update the definition to use an image from a different gallery.
Sign in to the Azure portal.
In the search box, enter dev box. In the list of results, select Dev centers.
Select the dev center that you want to remove the gallery from.
On the left menu, select Azure compute galleries to list the galleries that are attached to this dev center.
Select the gallery that you want to remove, and then select Remove.

In the confirmation dialog, select Continue.
The gallery is detached from the dev center. The gallery and its images aren't deleted, and you can reattach it if necessary.
אירוע
17 במרץ, 21 - 21 במרץ, 10
הצטרף לסידרה של פגישות כדי לבנות פתרונות מדרגיים של בינה מלאכותית בהתבסס על מקרי שימוש מהעולם האמיתי עם מפתחים ומומחים אחרים.
הירשם עכשיוהדרכה
מודול
Introduktion til Azure Compute Gallery - Training
Få mere at vide om, hvad Azure Compute Gallery er, hvordan det fungerer, og hvornår du skal bruge det.
אישור
Microsoft Certified: Azure Developer Associate - Certifications
Byg komplette løsninger i Microsoft Azure for at oprette Azure Functions, implementere og administrere webapps, udvikle løsninger ved hjælp af Azure Storage og meget mere.