Create reusable dev box customizations
Microsoft Dev Box customization is a config-as-code approach to customizing dev boxes. In this article, you learn how to customize dev boxes by using a catalog of tasks and a configuration file to install software, add extensions, clone repositories, and more. These tasks are applied to the new dev box in the final stage of the creation process. You can add settings and software without having to create a custom virtual machine (VM) image.
Customizations are useful for development teams. Developer team leads can use customizations to preconfigure the software required for their specific development team, and author configuration files that apply only the tasks relevant for their teams. This method lets developers create dev boxes that best fit their work, without needing to ask IT for changes or wait for the engineering team to create a custom VM image.
By using customizations, you can automate common setup steps, save time, and reduce the chance of configuration errors. Some example tasks include:
- Installing software with the WinGet package manager.
- Setting OS settings like enabling Windows Features.
- Configuring applications like installing Visual Studio extensions.
You can adopt customizations in stages, building from a simple but functional configuration to an automated process. The stages are as follows:
- Create a customized dev box by using an example configuration file
- Write a configuration file
- Share a configuration file from a code repository
- Define new tasks in a catalog
- Use secrets from an Azure Key Vault
Important
Customizations in Microsoft Dev Box are currently in PREVIEW. See the Supplemental Terms of Use for Microsoft Azure Previews for legal terms that apply to Azure features that are in beta, preview, or otherwise not yet released into general availability.
Prerequisites
- To complete the steps in this article, you must have a dev center configured with a dev box definition, dev box pool, and dev box project.
Permissions required to configure Microsoft Dev Box for customizations
To perform the actions required to create and apply customizations to a dev box, you need certain permissions. The following table describes the actions and permissions or roles you need to configure customizations.
| Action | Permission / Role |
|---|---|
| Attach a catalog to a dev center | Platform engineer with Contributor permission to the dev center. |
| Use the developer portal to upload and apply a yaml file during dev box creation | Dev Box User |
| Create a configuration file | Anyone can create a configuration file. |
| Add tasks to a catalog | Permission to add to the repository hosting the catalog. |
Create a customized dev box by using an example configuration file
Use the default quick start catalog and an example configuration file to get started with customizations.
Attach the quick start catalog
Attaching a catalog with customization tasks to a dev center means you can create a dev box in that dev center and reference the customization tasks from that catalog. Microsoft provides a sample repository on GitHub with a standard set of default tasks to help you get started, known as the quick start catalog.
To attach the quick start catalog to the dev center:
Sign in to the Microsoft Dev Box developer portal.
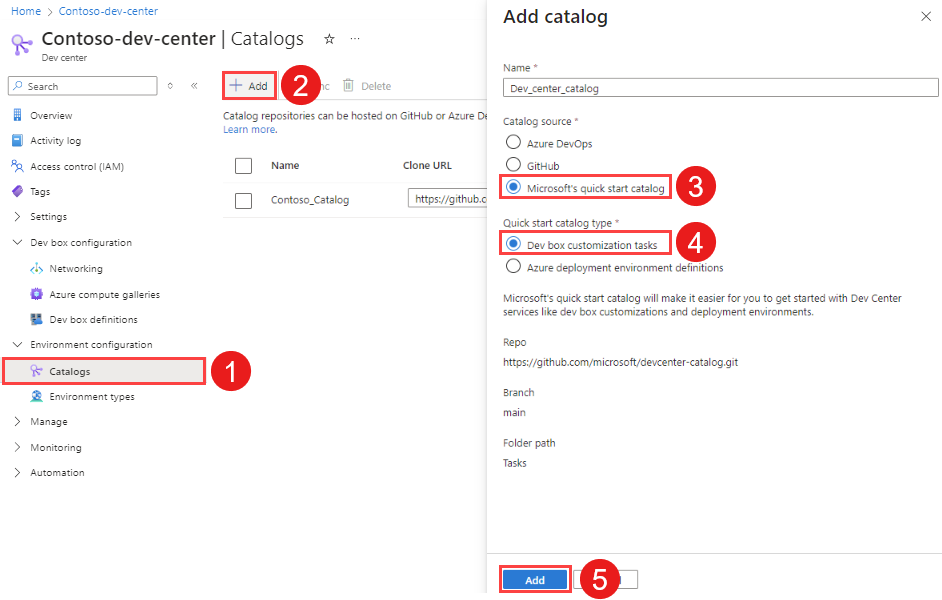
In the left menu under Environment configuration, select Catalogs, and then select Add.
In Add catalog, select Dev box customization tasks as the quick start catalog. Then, select Add.
In your dev center, select Catalogs, and verify that your catalog appears.
If the connection is successful, the Status is displayed as Sync successful.
Create your customized dev box
Now you have a catalog that defines the tasks your developers can use. You can reference those tasks from a configuration file and create a customized dev box.
Download an example yaml configuration from the samples repository. This example configuration installs Visual Studio Code, and clones the OrchardCore .NET web app repo to your dev box.
Sign in to the Microsoft Dev Box developer portal.
Select New > Dev Box.
In Add a dev box, enter the following values, and then select Continue:
Setting Value Name Enter a name for your dev box. Dev box names must be unique within a project. Project Select a project from the dropdown list. Dev box pool Select a pool from the dropdown list, which includes all the dev box pools for that project. Choose a dev box pool near to you for least latency. Apply customizations Select Apply customizations. 
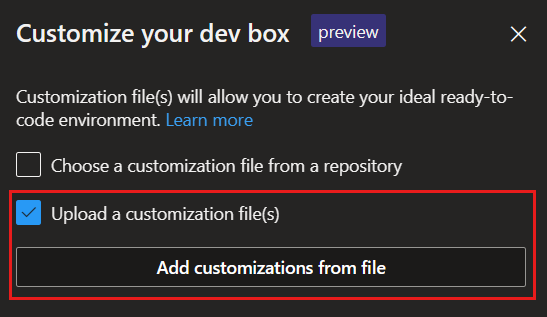
On the Customize your dev box page, select Upload a customization file, and then select Add customizations from file.
Browse to the location of the example yaml configuration file you downloaded, and then select Open.
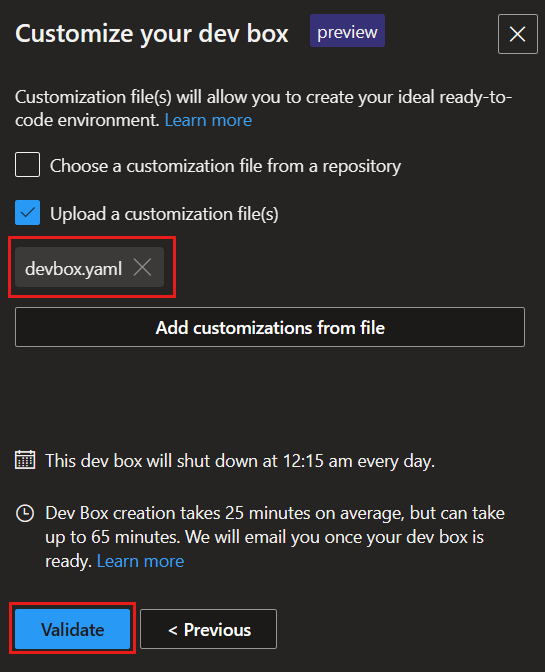
Check that the configuration file is listed under Upload a customization file(s), and then select Validate.
After Dev Box validates the configuration file, select Continue.

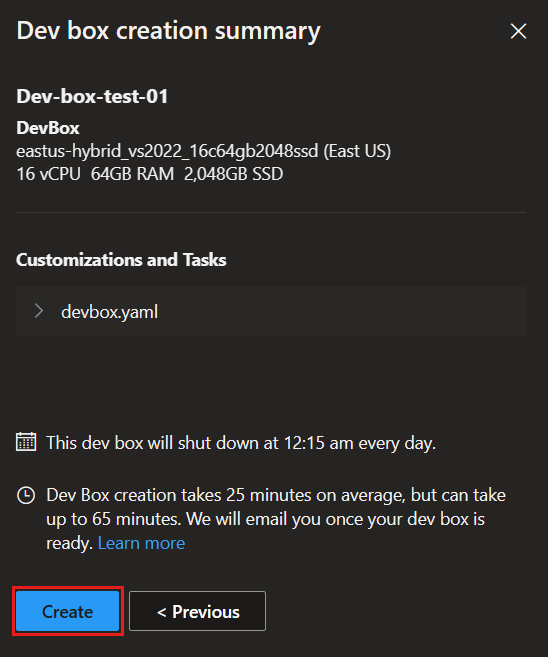
On the Dev box creation summary page, Dev Box displays the tasks it will apply. Select Create.


When the creation process is complete, the new dev box has nodejs and Visual Studio Code installed.
For more examples, see the dev center examples repository on GitHub.
Tip
As an alternative to the developer portal, you can use Dev Home to create, customize and connect to your dev boxes. Dev Home is a native Windows app that provides a single place to manage your dev boxes. Learn more about Dev Home at Create reusable dev box customizations with Dev Home.
What is a configuration file?
Dev Box customizations use a yaml formatted file to specify a list of tasks to apply from the catalog when creating a new dev box. These configuration files include one or more 'tasks', which identify the catalog task and provide parameters like the name of the software to install. The configuration file is then made available to the developers creating new dev boxes. The following example uses a winget task to install Visual Studio Code, and a git clone task to clone a repository.
# From https://github.com/microsoft/devcenter-examples
$schema: 1.0
tasks:
  - name: winget
    parameters:
      package: Microsoft.VisualStudioCode
      runAsUser: true
  - name: git-clone
    description: Clone this repository into C:\Workspaces
    parameters:
      repositoryUrl: https://github.com/OrchardCMS/OrchardCore.git
      directory: C:\Workspaces
What are tasks?
A task performs a specific action, like installing software. Each task consists of one or more PowerShell scripts, along with a task.yaml file that provides parameters and defines how the scripts run. You can also include a PowerShell command in the task.yaml file. You can store a collection of curated tasks in a catalog attached to your dev center, with each task in a separate folder. Dev Box supports using a GitHub repository or an Azure DevOps repository as a catalog, and scans a specified folder of the catalog recursively to find task definitions.
Microsoft provides a quick start catalog to help you get started with customizations. It includes a default set of tasks that define common tasks:
- Installing software with the WinGet package manager.
- Deploy desired state configuration (DSC) by using WinGet Configuration.
- Cloning a repository by using git-clone.
- Configuring applications like installing Visual Studio extensions.
- Running PowerShell scripts.
Customize your dev box by using existing WinGet Configuration files
WinGet Configuration takes a config-as-code approach to defining the unique sets of software and configuration settings required to get your Windows environment in a ready-to-code state. These configuration files can also be used to set up a Dev Box, by using a WinGet task included in the Microsoft provided quickstart catalog mentioned earlier.
The following example shows a dev box customization file that calls an existing WinGet DSC file.
tasks:
    - name: winget
      parameters:
          configure: "projectConfiguration.dsc.yaml"
To learn more about WinGet Configuration, see WinGet Configuration.
Write a configuration file
You can define new tasks to apply to your dev boxes by creating your own configuration file. You can test your configuration file in Visual Studio Code and make any required changes without the need to create a separate dev box for each test.
Before you can create and test your own configuration file, there must be a catalog that contains tasks attached to the dev center. You can use a Visual Studio Code extension to discover the tasks in the attached catalog.
Create a Dev Box (or use an existing Dev Box) for testing.
On the test dev box, install Visual Studio Code and then install the Dev Box v1.2.2 VS Code extension.
Download an example yaml configuration file from the samples repository and open it in Visual Studio Code.
Discover tasks available in the catalog by using the command palette. From View > Command Palette, select Dev Box: List available tasks for this dev box.

Test configuration in Visual Studio Code by using f5/command palette. From View > Command Palette, select Dev Box: Apply customizations tasks.

The configuration file runs immediately, applying the specified tasks to your test dev box. Inspect the changes and check the Visual Studio Code terminal for any errors or warnings generated during the task execution.
When the configuration file runs successfully, share it with developers to upload when they create a new dev box.


Tip
As an alternative to Visual Studio Code, you can use Dev Home to create and validate a configuration file in a graphical user interface. Learn more about Dev Home at Create reusable dev box customizations with Dev Home.
Note
The ability to create and upload a file isn't a security risk; the file uploaded can only apply settings defined in the catalog attached to the dev center. If the task isn't defined there, the developer will get an error saying the task isn't defined.
Share a configuration file from a code repository
Make your configuration file seamlessly available to your developers by naming it workload.yaml and uploading it to a repository accessible to the developers, usually their coding repository. When you create a dev box, you specify the repository URL and the configuration file is cloned along with the rest of the repository. Dev box searches the repository for a file named workload.yaml and, if one is located, performs the tasks listed. This configuration provides a seamless way to perform customizations on a dev box.
Create a configuration file named workload.yaml.
Add the configuration file to the root of a private Azure Repos repository with your code and commit it.
Sign in to the Microsoft Dev Box developer portal.
Select New > Dev Box.
In Add a dev box, enter the following values, and then select Continue:
Setting Value Name Enter a name for your dev box. Dev box names must be unique within a project. Project Select a project from the dropdown list. Dev box pool Select a pool from the dropdown list, which includes all the dev box pools for that project. Choose a dev box pool near to you for least latency. Apply customizations Select Apply customizations.
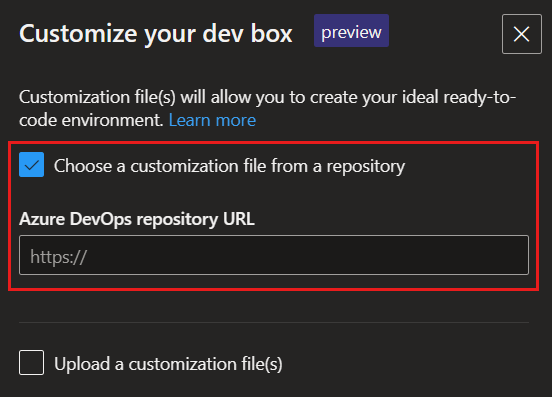
On the Customize your dev box page, select Choose a customization file from a repository, in Azure DevOps repository URL, enter the URL of the repository that hosts the configuration file that you want to apply, and then select Continue.
On the Dev box creation summary page, Dev Box displays the tasks it will apply. Select Create.

When the creation process is complete, the new dev box has nodejs and Visual Studio Code installed.
The new dev box has the repository cloned, and all instructions from configuration file applied.
Define new tasks in a catalog
Creating new tasks in a catalog allows you to create customizations tailored to your development teams and add guardrails around the configurations that are possible.
Create a repository to store your tasks.
Optionally, you can make a copy of the quick start catalog in your own repository to use as a starting point.
Create tasks in your repository by modifying existing PowerShell scripts, or creating new scripts.
To get started with creating tasks, you can use the examples given in the dev center examples repository on GitHub and PowerShell documentation.
Create a configuration file for those tasks by following the steps in Write a configuration file.
Use secrets from an Azure Key Vault
You can use secrets from your Azure Key Vault in your yaml configurations to clone private repositories, or with any custom task you author that requires an access token.
To configure your Key Vault secrets for use in your yaml configurations,
Ensure that your dev center project's managed identity has the Key Vault Reader role and Key Vault Secrets User role on your key vault.
Grant the Secrets User role for the Key Vault secret to each user or user group who should be able to consume the secret during the customization of a dev box. The user or group granted the role must include the managed identity for the dev center, your own user account, and any user or group who needs the secret during the customization of a dev box.
For more information, see:
- Learn how to Configure a managed identity for a dev center.
- Learn how to Grant the managed identity access to the key vault secret.
You can reference the secret in your yaml configuration in the following format, using the git-clone task as an example:
$schema: "1.0"
tasks:
   name: git-clone
   description: Clone this repository into C:\Workspaces
      parameters:
         repositoryUrl: https://myazdo.visualstudio.com/MyProject/_git/myrepo
         directory: C:\Workspaces
         pat: '{{KEY_VAULT_SECRET_URI}}'
If you wish to clone a private Azure DevOps repository (Azure Repos), you don't need to configure a secret in Key Vault. Instead, you can use {{ado}}, or {{ado://your-ado-organization-name}} as a parameter. This fetches an access token on your behalf when creating a dev box, which has read-only permission to your repository. The git-clone task in the quickstart catalog uses the access token to clone your repository. Here's an example:
tasks:
   name: git-clone
   description: Clone this repository into C:\Workspaces
      parameters:
         repositoryUrl: https://myazdo.visualstudio.com/MyProject/_git/myrepo
         directory: C:\Workspaces
         pat: '{{ado://YOUR_ADO_ORG}}'
If your organization's policies require you to keep your Key Vault private from the internet, you can set your Key Vault to allow trusted Microsoft services to bypass your firewall rule.

To learn how to allow trusted Microsoft services to bypass the firewall, see Configure Azure Key Vault networking settings.
Related content
משוב
בקרוב: במהלך 2024, נפתור בעיות GitHub כמנגנון המשוב לתוכן ונחליף אותו במערכת משוב חדשה. לקבלת מידע נוסף, ראה: https://aka.ms/ContentUserFeedback.
שלח והצג משוב עבור