Classic release triggers
Azure DevOps Services | Azure DevOps Server 2022 - Azure DevOps Server 2019
Release triggers are an automation tool that can be used in your deployment workflow to initiate actions when specific conditions are met. after certain conditions are met. Classic release pipelines support several types of triggers, which we'll cover in this article:
Continuous deployment triggers
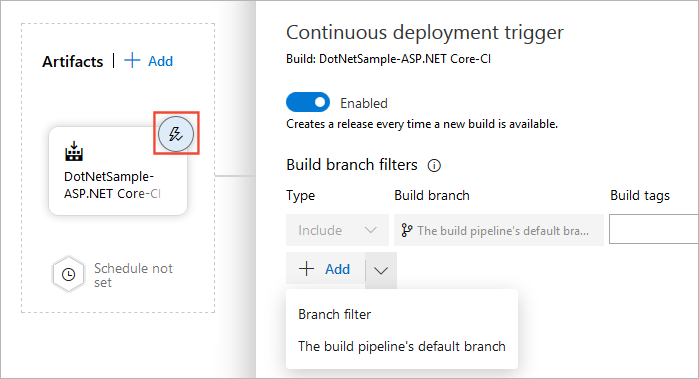
Continuous deployment triggers enable you to automatically create a release whenever a new artifact becomes available. By Using the build branch filters you can trigger deployment for a specific target branch. A release is triggered only for pipeline artifacts originating from one of the selected branches.
For example, selecting main will trigger a release every time a new artifact becomes available from the main branch. To trigger a release for any build under 'features/', enter 'features/'. To trigger a release for all builds, use ''. Note that all specified filters will be OR'ed meaning any artifact matching at least one filter condition will trigger a release.
Sign in to your Azure DevOps organization, and then navigate to your project.
Select Pipelines > Releases.
Select your release definition, and then select Edit.
Select the Continuous deployment triggers icon, and then select the toggle button to enable the Continuous deployment trigger, then add your Build branch filters.

Scheduled release triggers
Scheduled release triggers allow you to create new releases at specific times.
Sign in to your Azure DevOps organization, and then navigate to your project.
Select Pipelines > Releases.
Select your release definition, and then select Edit.
Under the Artifacts section, select the Schedule set icon, select the toggle button to enable the Scheduled release trigger, and then specify your release schedule. You can set up multiple schedules to trigger releases.

Pull request triggers
If you chose to enable the pull-request triggers, a release will be triggered whenever a new version of the selected artifact is created by the pull request pipeline workflow. To use a pull request trigger, you must also enable it for specific stages (covered in the next section). You may also want to set up branch policies for your branches.
Sign in to your Azure DevOps organization, and then navigate to your project.
Select Pipelines > Releases.
Select your release definition, and then select Edit.
Select the Continuous deployment triggers icon, and then select the toggle button to enable the Pull request trigger, then add your Target Branch Filters. In the example below, a release is triggered every time a new artifact version is created as part of a pull request to the main branch with the tags Migration and Deployment.

Stage triggers
Stage triggers allow you set up specific conditions to trigger deployment to a specific stage.
Sign in to your Azure DevOps organization, and then navigate to your project.
Select Pipelines > Releases.
Select your release definition, and then select Edit.
Under the Stages section, select the Pre-deployment conditions icon, and set up your triggers.
Select trigger: Choose the trigger to start deployment to this stage automatically. Select "After release" to deploy to this stage each time a new release is created. Select "After stage" to deploy after successful deployments to selected stages. Select "Manual only" to allow only manual deployments.
Artifacts filter: Specify artifact condition(s) that must be met to trigger a deployment. A release will be deployed to this stage only if all artifact conditions match.
Schedule: Set a specified time to trigger a deployment to this stage.
Pull-request deployment: Allow pull request-triggered releases to deploy to this stage. We recommend keeping this option disabled for critical or production stages.
