Tutorial: Protect your public load balancer with Azure DDoS Protection
Azure DDoS Protection enables enhanced DDoS mitigation capabilities such as adaptive tuning, attack alert notifications, and monitoring to protect your public load balancers from large scale DDoS attacks.
Important
Azure DDoS Protection incurs a cost when you use the Network Protection SKU. Overages charges only apply if more than 100 public IPs are protected in the tenant. Ensure you delete the resources in this tutorial if you aren't using the resources in the future. For information about pricing, see Azure DDoS Protection Pricing. For more information about Azure DDoS protection, see What is Azure DDoS Protection?.
In this tutorial, you learn how to:
- Create a DDoS Protection plan.
- Create a virtual network with DDoS Protection and Bastion service enabled.
- Create a standard SKU public load balancer with frontend IP, health probe, backend configuration, and load-balancing rule.
- Create a NAT gateway for outbound internet access for the backend pool.
- Create virtual machine, then install and configure IIS on the VMs to demonstrate the port forwarding and load-balancing rules.
If you don't have an Azure subscription, create a free account before you begin.
Prerequisites
- An Azure account with an active subscription.
Create a DDoS protection plan
Sign in to the Azure portal.
In the search box at the top of the portal, enter DDoS protection. Select DDoS protection plans in the search results and then select + Create.
In the Basics tab of Create a DDoS protection plan page, enter or select the following information:
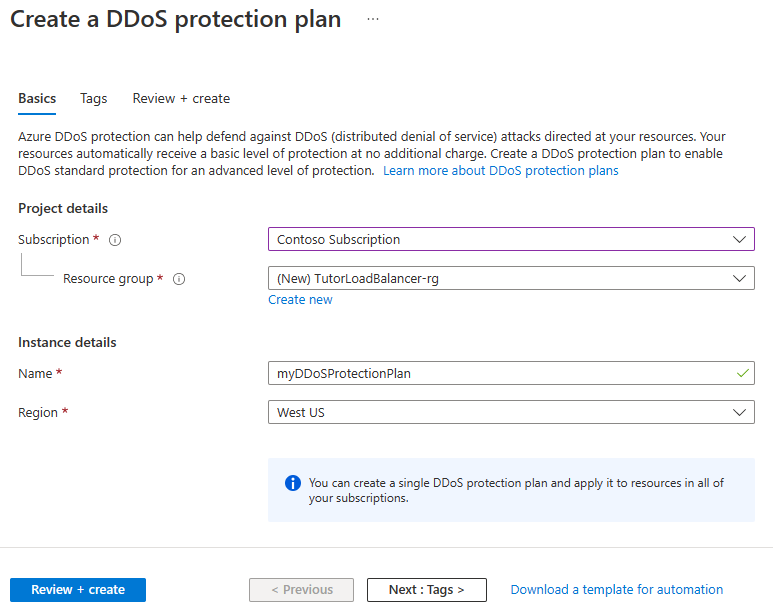
Setting Value Project details Subscription Select your Azure subscription. Resource group Select Create new.
Enter TutorLoadBalancer-rg.
Select OK.Instance details Name Enter myDDoSProtectionPlan. Region Select (US) East US. Select Review + create and then select Create to deploy the DDoS protection plan.
Create the virtual network
In this section, you'll create a virtual network, subnet, Azure Bastion host, and associate the DDoS Protection plan. The virtual network and subnet contains the load balancer and virtual machines. The bastion host is used to securely manage the virtual machines and install IIS to test the load balancer. The DDoS Protection plan will protect all public IP resources in the virtual network.
Important
Hourly pricing starts from the moment that Bastion is deployed, regardless of outbound data usage. For more information, see Pricing and SKUs. If you're deploying Bastion as part of a tutorial or test, we recommend that you delete this resource after you finish using it.
In the search box at the top of the portal, enter Virtual network. Select Virtual Networks in the search results.
In Virtual networks, select + Create.
In Create virtual network, enter or select the following information in the Basics tab:
Setting Value Project Details Subscription Select your Azure subscription. Resource Group Select TutorLoadBalancer-rg Instance details Name Enter myVNet Region Select East US Select the IP Addresses tab or select Next: IP Addresses at the bottom of the page.
In the IP Addresses tab, enter this information:
Setting Value IPv4 address space Enter 10.1.0.0/16 Under Subnet name, select the word default. If a subnet isn't present, select + Add subnet.
In Edit subnet, enter this information:
Setting Value Subnet name Enter myBackendSubnet Subnet address range Enter 10.1.0.0/24 Select Save or Add.
Select the Security tab.
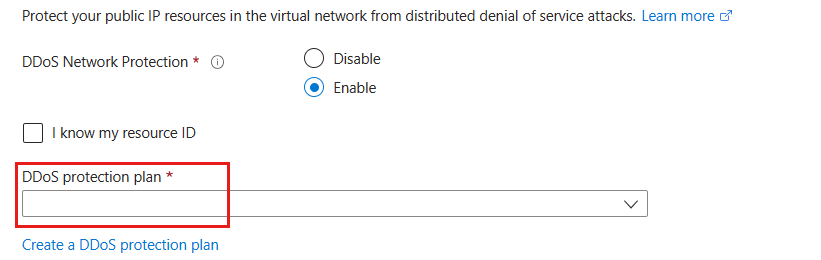
Under BastionHost, select Enable. Enter this information:
Setting Value Bastion name Enter myBastionHost AzureBastionSubnet address space Enter 10.1.1.0/26 Public IP Address Select Create new.
For Name, enter myBastionIP.
Select OK.Under DDoS Network Protection, select Enable. Then from the drop-down menu, select myDDoSProtectionPlan.
Select the Review + create tab or select the Review + create button.
Select Create.
Note
The virtual network and subnet are created immediately. The Bastion host creation is submitted as a job and will complete within 10 minutes. You can proceed to the next steps while the Bastion host is created.
Create load balancer
In this section, you'll create a zone redundant load balancer that load balances virtual machines. With zone-redundancy, one or more availability zones can fail and the data path survives as long as one zone in the region remains healthy.
During the creation of the load balancer, you'll configure:
- Frontend IP address
- Backend pool
- Inbound load-balancing rules
- Health probe
In the search box at the top of the portal, enter Load balancer. Select Load balancers in the search results.
In the Load balancer page, select + Create.
In the Basics tab of the Create load balancer page, enter or select the following information:
Setting Value Project details Subscription Select your subscription. Resource group Select TutorLoadBalancer-rg. Instance details Name Enter myLoadBalancer Region Select East US. SKU Leave the default Standard. Type Select Public. Tier Leave the default Regional. 
Select Next: Frontend IP configuration at the bottom of the page.
In Frontend IP configuration, select + Add a frontend IP configuration.
Enter myFrontend in Name.
Select IPv4 for the IP version.
Select IP address for the IP type.
Note
For more information on IP prefixes, see Azure Public IP address prefix.
Select Create new in Public IP address.
In Add a public IP address, enter myPublicIP for Name.
Select Zone-redundant in Availability zone.
Note
In regions with Availability Zones, you have the option to select no-zone (default option), a specific zone, or zone-redundant. The choice will depend on your specific domain failure requirements. In regions without Availability Zones, this field won't appear.
For more information on availability zones, see Availability zones overview.Leave the default of Microsoft Network for Routing preference.
Select OK.
Select Add.
Select Next: Backend pools at the bottom of the page.
In the Backend pools tab, select + Add a backend pool.
Enter myBackendPool for Name in Add backend pool.
Select myVNet in Virtual network.
Select IP Address for Backend Pool Configuration.
Select Save.
Select Next: Inbound rules at the bottom of the page.
Under Load balancing rule in the Inbound rules tab, select + Add a load balancing rule.
In Add load balancing rule, enter or select the following information:
Setting Value Name Enter myHTTPRule IP Version Select IPv4 or IPv6 depending on your requirements. Frontend IP address Select myFrontend (To be created). Backend pool Select myBackendPool. Protocol Select TCP. Port Enter 80. Backend port Enter 80. Health probe Select Create new.
In Name, enter myHealthProbe.
Select TCP in Protocol.
Leave the rest of the defaults, and select OK.Session persistence Select None. Idle timeout (minutes) Enter or select 15. TCP reset Select Enabled. Floating IP Select Disabled. Outbound source network address translation (SNAT) Leave the default of (Recommended) Use outbound rules to provide backend pool members access to the internet. Select Add.
Select the blue Review + create button at the bottom of the page.
Select Create.
Note
In this example we'll create a NAT gateway to provide outbound Internet access. The outbound rules tab in the configuration is bypassed as it's optional and isn't needed with the NAT gateway. For more information on Azure NAT gateway, see What is Azure Virtual Network NAT? For more information about outbound connections in Azure, see Source Network Address Translation (SNAT) for outbound connections
Create NAT gateway
In this section, you'll create a NAT gateway for outbound internet access for resources in the virtual network. For other options for outbound rules, check out Network Address Translation (SNAT) for outbound connections.
In the search box at the top of the portal, enter NAT gateway. Select NAT gateways in the search results.
In NAT gateways, select + Create.
In Create network address translation (NAT) gateway, enter or select the following information:
Setting Value Project details Subscription Select your subscription. Resource group Select TutorLoadBalancer-rg. Instance details NAT gateway name Enter myNATgateway. Region Select East US. Availability zone Select None. Idle timeout (minutes) Enter 15. Select the Outbound IP tab or select Next: Outbound IP at the bottom of the page.
In Outbound IP, select Create a new public IP address next to Public IP addresses.
Enter myNATgatewayIP in Name.
Select OK.
Select the Subnet tab or select the Next: Subnet button at the bottom of the page.
In Virtual network in the Subnet tab, select myVNet.
Select myBackendSubnet under Subnet name.
Select the blue Review + create button at the bottom of the page, or select the Review + create tab.
Select Create.
Create virtual machines
In this section, you'll create two VMs (myVM1 and myVM2) in two different zones (Zone 1, and Zone 2).
These VMs are added to the backend pool of the load balancer that was created earlier.
In the search box at the top of the portal, enter Virtual machine. Select Virtual machines in the search results.
In Virtual machines, select + Create > Azure virtual machine.
In Create a virtual machine, enter or select the following values in the Basics tab:
Setting Value Project Details Subscription Select your Azure subscription Resource Group Select TutorLoadBalancer-rg Instance details Virtual machine name Enter myVM1 Region Select ((US) East US) Availability Options Select Availability zones Availability zone Select Zone 1 Security type Select Standard. Image Select Windows Server 2022 Datacenter: Azure Edition - Gen2 Azure Spot instance Leave the default of unchecked. Size Choose VM size or take default setting Administrator account Username Enter a username Password Enter a password Confirm password Reenter password Inbound port rules Public inbound ports Select None Select the Networking tab, or select Next: Disks, then Next: Networking.
In the Networking tab, select or enter the following information:
Setting Value Network interface Virtual network Select myVNet Subnet Select myBackendSubnet Public IP Select None. NIC network security group Select Advanced Configure network security group Skip this setting until the rest of the settings are completed. Complete after Select a backend pool. Delete NIC when VM is deleted Leave the default of unselected. Accelerated networking Leave the default of selected. Load balancing Load balancing options Load-balancing options Select Azure load balancer Select a load balancer Select myLoadBalancer Select a backend pool Select myBackendPool Configure network security group Select Create new.
In the Create network security group, enter myNSG in Name.
Under Inbound rules, select +Add an inbound rule.
Under Service, select HTTP.
Under Priority, enter 100.
In Name, enter myNSGRule
Select Add
Select OKSelect Review + create.
Review the settings, and then select Create.
Follow the steps 1 through 7 to create another VM with the following values and all the other settings the same as myVM1:
Setting VM 2 Name myVM2 Availability zone Zone 2 Network security group Select the existing myNSG
Note
Azure provides a default outbound access IP for VMs that either aren't assigned a public IP address or are in the backend pool of an internal basic Azure load balancer. The default outbound access IP mechanism provides an outbound IP address that isn't configurable.
The default outbound access IP is disabled when one of the following events happens:
- A public IP address is assigned to the VM.
- The VM is placed in the backend pool of a standard load balancer, with or without outbound rules.
- An Azure NAT Gateway resource is assigned to the subnet of the VM.
VMs that you create by using virtual machine scale sets in flexible orchestration mode don't have default outbound access.
For more information about outbound connections in Azure, see Default outbound access in Azure and Use Source Network Address Translation (SNAT) for outbound connections.
Install IIS
In the search box at the top of the portal, enter Virtual machine. Select Virtual machines in the search results.
Select myVM1.
On the Overview page, select Connect, then Bastion.
Enter the username and password entered during VM creation.
Select Connect.
On the server desktop, navigate to Start > Windows PowerShell > Windows PowerShell.
In the PowerShell Window, run the following commands to:
- Install the IIS server
- Remove the default iisstart.htm file
- Add a new iisstart.htm file that displays the name of the VM:
 # Install IIS server role
 Install-WindowsFeature -name Web-Server -IncludeManagementTools

 # Remove default htm file
 Remove-Item  C:\inetpub\wwwroot\iisstart.htm

 # Add a new htm file that displays server name
 Add-Content -Path "C:\inetpub\wwwroot\iisstart.htm" -Value $("Hello World from " + $env:computername)
Close the Bastion session with myVM1.
Repeat steps 1 to 8 to install IIS and the updated iisstart.htm file on myVM2.
Test the load balancer
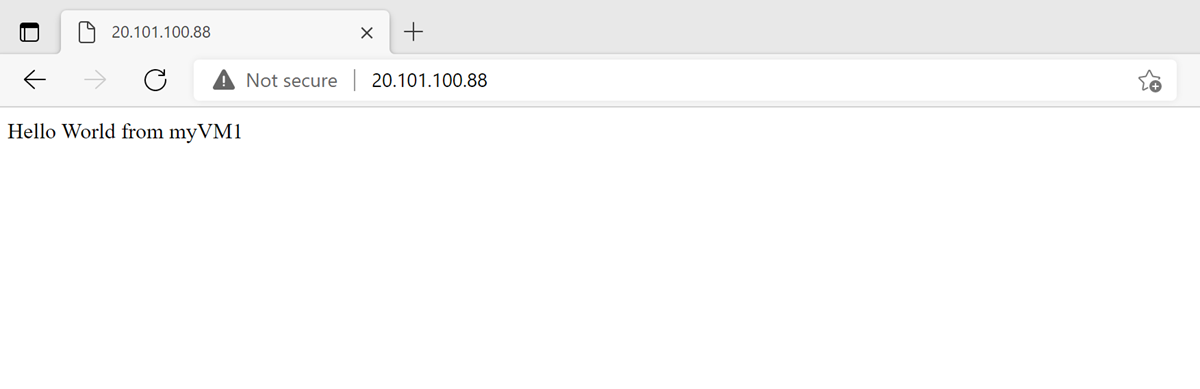
In the search box at the top of the page, enter Public IP. Select Public IP addresses in the search results.
In Public IP addresses, select myPublicIP.
Copy the item in IP address. Paste the public IP into the address bar of your browser. The custom VM page of the IIS Web server is displayed in the browser.
Clean up resources
When no longer needed, delete the resource group, load balancer, and all related resources. To do so, select the resource group TutorLoadBalancer-rg that contains the resources and then select Delete.
Next steps
Advance to the next article to learn how to:
משוב
בקרוב: במהלך 2024, נפתור בעיות GitHub כמנגנון המשוב לתוכן ונחליף אותו במערכת משוב חדשה. לקבלת מידע נוסף, ראה: https://aka.ms/ContentUserFeedback.
שלח והצג משוב עבור