Tutorial: Configure BGP peering between Azure Route Server and network virtual appliance (NVA)
This tutorial shows you how to deploy an Azure Route Server and a Windows Server network virtual appliance (NVA) into a virtual network and establish a BGP peering connection between them.
In this tutorial, you learn how to:
- Create a virtual network
- Deploy an Azure Route Server
- Deploy a virtual machine
- Configure BGP on the virtual machine
- Configure BGP peering between the Route Server and the NVA
- Check learned routes
If you don't have an Azure subscription, create a free account before you begin.
Prerequisites
- An active Azure subscription.
Sign in to Azure
Sign in to the Azure portal.
Create a virtual network
Create a virtual network to deploy both the Route Server and the NVA in it. Azure Route Server must be deployed in a dedicated subnet called RouteServerSubnet.
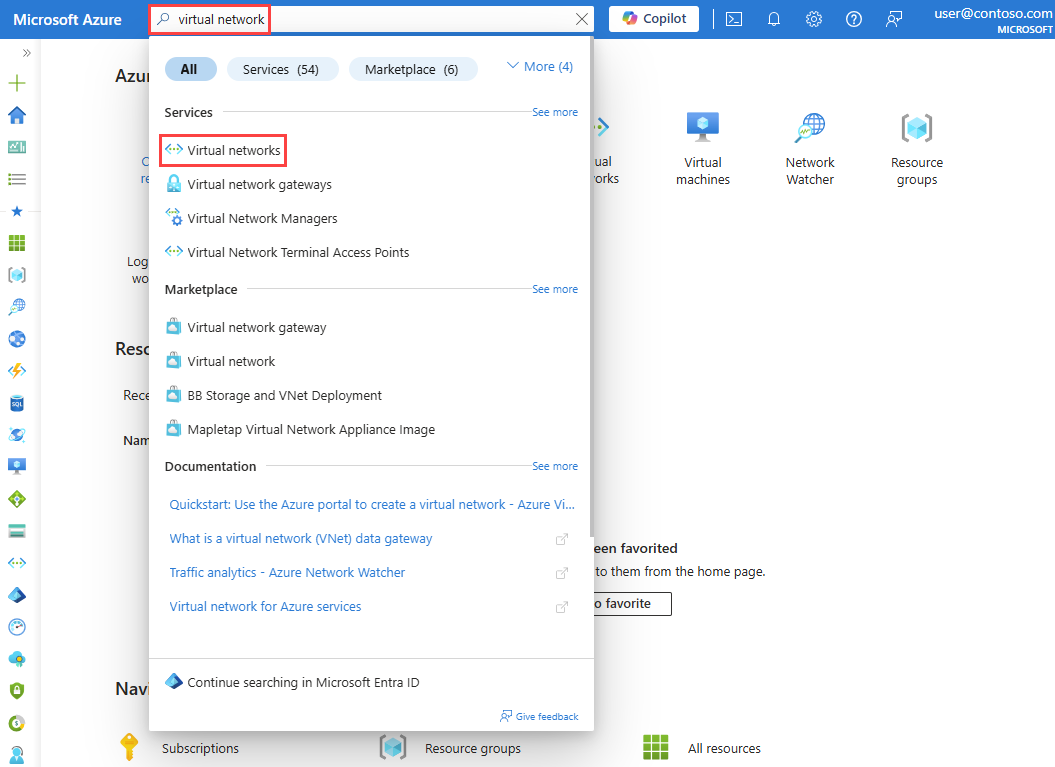
In the search box at the top of the portal, enter virtual network, and select Virtual networks from the search results.
On the Virtual networks page, select + Create.
On the Basics tab of Create virtual network, enter, or select the following information:
Settings Value Project details Subscription Select your Azure subscription. Resource group Select Create new.
In Name enter myResourceGroup.
Select OK.Instance details Name Enter myVirtualNetwork. Region Select an Azure region. This tutorial uses East US. Select IP Addresses tab or Next button twice.
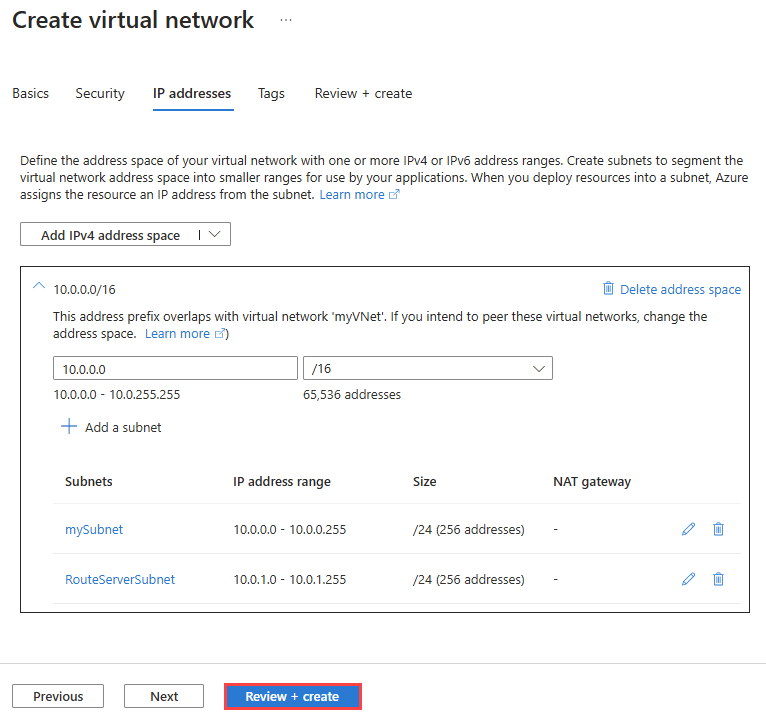
On the IP Addresses tab, configure IPv4 address space to 10.0.0.0/16, then configure the following subnets:
Subnet name Subnet address range mySubnet 10.0.0.0/24 RouteServerSubnet 10.0.1.0/24 Select Review + create and then select Create after the validation passes.
Create an Azure Route Server
In this section, you create an Azure Route Server.
In the search box at the top of the portal, enter route server, and select Route Servers from the search results.
On the Route Servers page, select + Create.
On the Basics tab of Create a Route Server page, enter, or select the following information:
Settings Value Project details Subscription Select your Azure subscription that you used for the virtual network. Resource group Select myResourceGroup. Instance details Name Enter myRouteServer. Region Select East US region. Routing Preference Select the default ExpressRoute option. Other available options are: VPN and ASPath.
You can change your selection later from the Route Server Configuration.Configure virtual networks Virtual Network Select myVirtualNetwork. Subnet Select RouteServerSubnet (10.0.1.0/24). This subnet is a dedicated Route Server subnet. Public IP address Public IP address Select Create new and accept the default name myVirtualNetwork-ip or enter a different one. This Standard IP address ensures connectivity to the backend service that manages the Route Server configuration. Select Review + create and then select Create after validation passes. The Route Server takes about 15 minutes to deploy.
Once the deployment is complete, select Go to resource to go to the Overview page of myRouteServer.
Take a note of the ASN and Peer IPs in the Overview page. You need this information to configure the NVA in the next section.
Note
- The ASN of Azure Route Server is always 65515.
- The Peer IPs are the private IP addresses of the Route Server in the RouteServerSubnet.
Create a network virtual appliance (NVA)
In this section, you create a Windows Server NVA that communicates and exchanges routes with the Route Server over a BGP peering connection.
Create a virtual machine (VM)
In this section, you create a Windows Server VM in the virtual network you created earlier to act as a network virtual appliance.
In the search box at the top of the portal, enter virtual machine, and select Virtual machines from the search results.
Select Create, then select Azure virtual machine.
On the Basics tab of Create a virtual machine, enter, or select the following information:
Settings Value Project details Subscription Select your Azure subscription that you used for the virtual network. Resource group Select myResourceGroup. Instance details Virtual machine name Enter myNVA. Region Select (US) East US. Availability options Select No infrastructure required. Security type Select a security type. This tutorial uses Standard. Image Select a Windows Server image. This tutorial uses Windows Server 2022 Datacenter: Azure Edition - x64 Gen2 image. Size Choose a size or leave the default setting. Administrator account Username Enter a username. Password Enter a password. Confirm password Reenter the password. Select Networking tab or Next: Disks > then Next: Networking >.
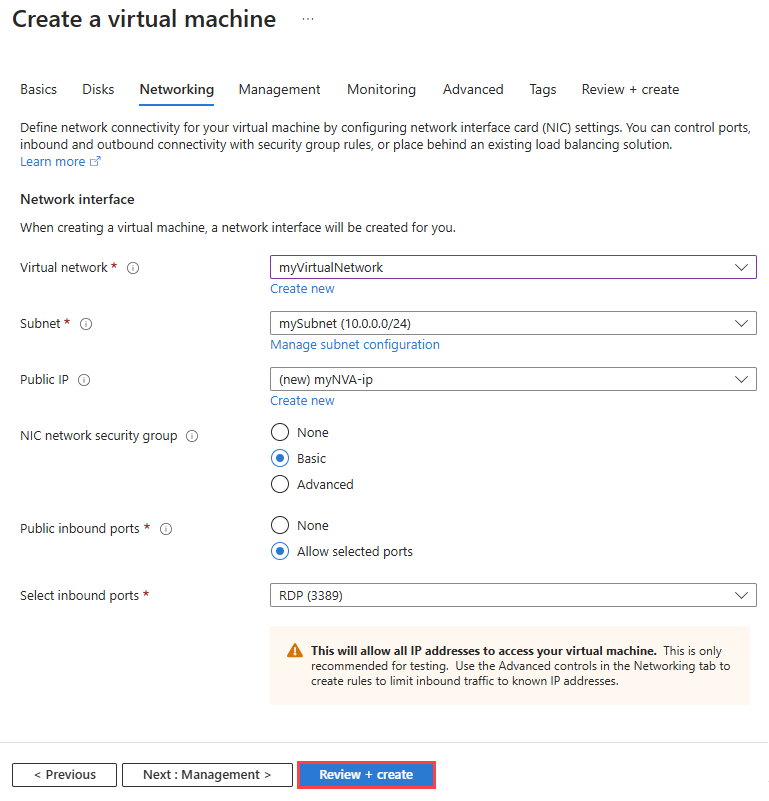
On the Networking tab, select the following network settings:
Settings Value Virtual network Select myVirtualNetwork. Subnet Select mySubnet (10.0.0.0/24). Public IP Leave as default. NIC network security group Select Basic. Public inbound ports Select Allow selected ports. Select inbound ports Select RDP (3389). Caution
Leaving the RDP port open to the internet is not recommended. Restrict access to the RDP port to a specific IP address or range of IP addresses. For production environments, it's recommended to block internet access to the RDP port and use Azure Bastion to securely connect to your virtual machine from the Azure portal.
Select Review + create and then Create after validation passes.
Configure BGP on the virtual machine
In this section, you configure BGP settings on the VM so it acts as an NVA and can exchange routes with the Route Server.
Go to myNVA virtual machine and select Connect.
On the Connect page, select Download RDP file under Native RDP.
Open the downloaded file.
Select Connect and then enter the username and password that you created in the previous steps. Accept the certificate if prompted.
Run PowerShell as an administrator.
In PowerShell, execute the following cmdlets:
# Install required Windows features.
Install-WindowsFeature RemoteAccess
Install-WindowsFeature RSAT-RemoteAccess-PowerShell
Install-WindowsFeature Routing
Install-RemoteAccess -VpnType RoutingOnly

# Configure BGP & Router ID on the Windows Server
Add-BgpRouter -BgpIdentifier 10.0.0.4 -LocalASN 65001

# Configure Azure Route Server as a BGP Peer.
Add-BgpPeer -LocalIPAddress 10.0.0.4 -PeerIPAddress 10.0.1.4 -PeerASN 65515 -Name RS_IP1
Add-BgpPeer -LocalIPAddress 10.0.0.4 -PeerIPAddress 10.0.1.5 -PeerASN 65515 -Name RS_IP2

# Originate and announce BGP routes.
Add-BgpCustomRoute -network 172.16.1.0/24
Add-BgpCustomRoute -network 172.16.2.0/24
Configure Route Server peering
Go to the Route Server you created in the previous steps.
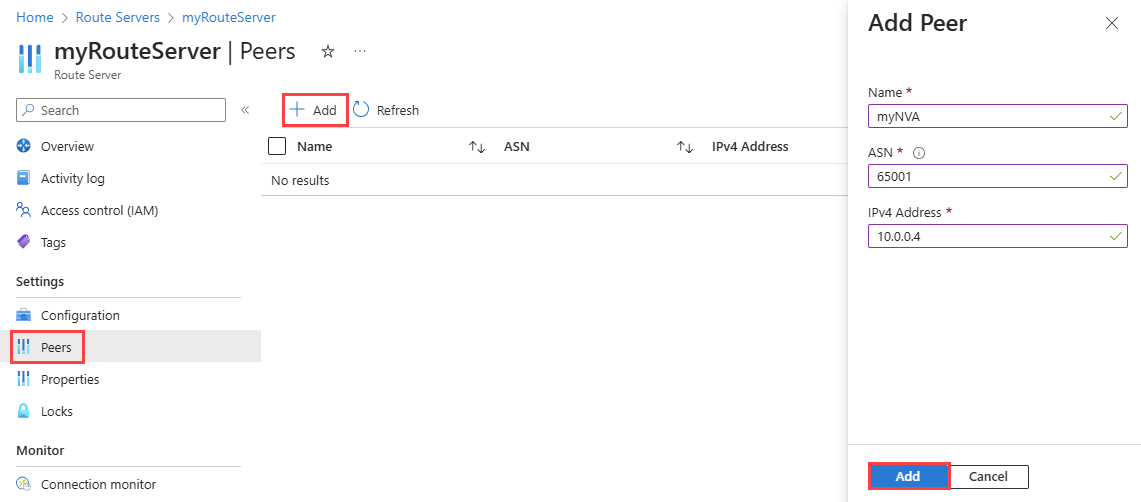
Select Peers under Settings. Then, select + Add to add a new peer.
On the Add Peer page, enter the following information:
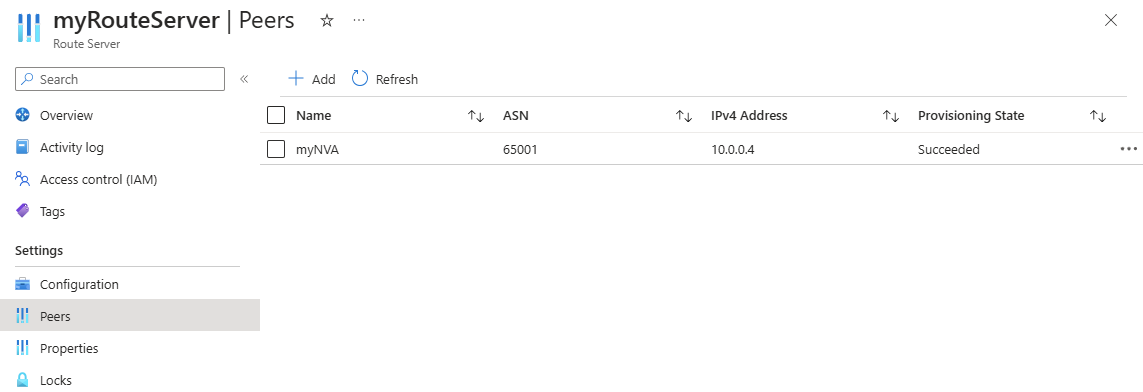
Setting Value Name Enter myNVA. Use this name to identify the peer. It doesn't have to be the same name of the VM that you configured as an NVA. ASN Enter 65001. This is the ASN of the NVA. You configured it in the previous section. IPv4 Address Enter 10.0.0.4. This is the private IP address of the NVA. Select Add to save the configuration.
Once you add the NVA as a peer, the Peers page shows the myNVA as a peer:
Check learned routes
Use Get-AzRouteServerPeerLearnedRoute cmdlet to check the routes learned by the Route Server.
Get-AzRouteServerPeerLearnedRoute -ResourceGroupName 'myResourceGroup' -RouteServerName 'myRouteServer' -PeerName 'myNVA'
The output should look like the following example. The output shows the two learned routes from the NVA:
LocalAddress Network       NextHop  SourcePeer Origin AsPath Weight
------------ -------       -------  ---------- ------ ------ ------
10.0.1.5     172.16.1.0/24 10.0.0.4 10.0.0.4   EBgp   65001  32768
10.0.1.5     172.16.2.0/24 10.0.0.4 10.0.0.4   EBgp   65001  32768
10.0.1.4     172.16.1.0/24 10.0.0.4 10.0.0.4   EBgp   65001  32768
10.0.1.4     172.16.2.0/24 10.0.0.4 10.0.0.4   EBgp   65001  32768
Clean up resources
When no longer needed, you can delete all resources created in this tutorial by deleting myResourceGroup resource group:
In the search box at the top of the portal, enter myResourceGroup. Select myResourceGroup from the search results.
Select Delete resource group.
In Delete a resource group, select Apply force delete for selected Virtual machines and Virtual machine scale sets.
Enter myResourceGroup, and then select Delete.
Select Delete to confirm the deletion of the resource group and all its resources.
Related content
In this tutorial, you learned how to create and configure an Azure Route Server with a network virtual appliance (NVA). To learn more about Route Servers, see Azure Route Server frequently asked questions (FAQ).
משוב
בקרוב: במהלך 2024, נפתור בעיות GitHub כמנגנון המשוב לתוכן ונחליף אותו במערכת משוב חדשה. לקבלת מידע נוסף, ראה: https://aka.ms/ContentUserFeedback.
שלח והצג משוב עבור
