Add an Eventhouse destination to an eventstream
This article shows you how to add an Eventhouse as a destination to an eventstream in Microsoft Fabric event streams.
Note
Enhanced capabilities are enabled by default when you create eventstreams now. If you have eventstreams that were created using standard capabilities, those eventstreams will continue to work. You can still edit and use them as usual. We recommend that you create a new eventstream to replace standard eventstreams so that you can take advantage of additional capabilities and benefits of enhanced eventstreams.
Prerequisites
- Access to a workspace in the Fabric capacity license mode (or) the Trial license mode with Contributor or higher permissions.
- Access to an Eventhouse created in a Fabric workspace where you have Contributor or higher permissions.
Note
The maximum number of sources and destinations for one eventstream is 11.
Add an Eventhouse as a destination
To add an Eventhouse as a destination, you can choose between two ingestion modes: Direct ingestion or Event processing before ingestion.
Direct ingestion mode
Direct ingestion mode ingests your event data directly into the Eventhouse without any processing. You can use direct ingestion mode to add an Eventhouse destination to your default stream.
Important
You can use Direct ingestion only for your default stream. Direct ingestion can't follow processing operators or derived streams. If you want to add an eventhouse destination after processing operators or derived streams, use Event processing before ingestion instead.
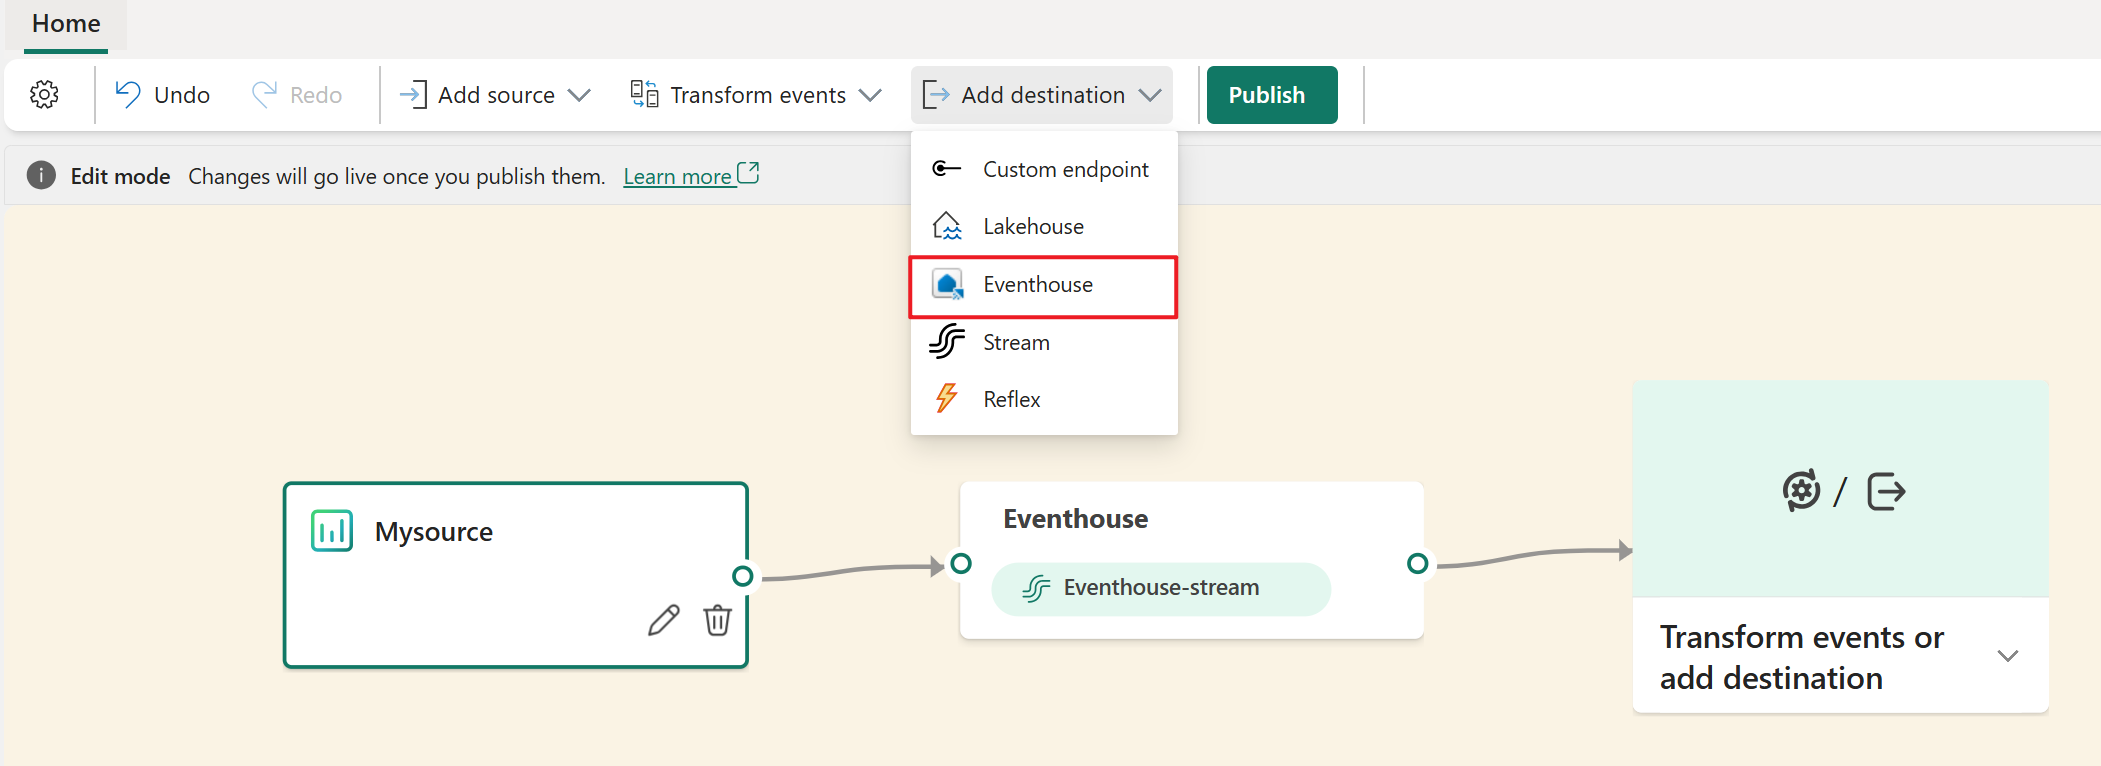
In Edit mode for your eventstream, select Add destination on the ribbon or select the Transform events or add destination card on the canvas, and then select Eventhouse.
On the Eventhouse screen, select Direct ingestion.
Enter a Destination name, a Workspace, and an Eventhouse from the selected workspace.
Select Save.

Connect the new Eventhouse destination card to the output of your eventstream if not already connected, and then select Publish.
In Live view, select Configure in the Eventhouse destination node.
Your Eventhouse opens in the Get data screen. Select an existing table of the KQL database, or select New table to create a new one to route and ingest the data.
Provide a Data connection name or keep the name provided, and then select Next. It can take a few minutes to pull data from the eventstream.

On the Inspect the data screen, you can:
- Select a Format to preview how the data is sent to your Eventhouse.
- Select Edit columns to configure the columns for your data.
- Select Advanced to select events to include or to choose mapping options.
If you select Edit columns, on the Edit columns screen you can:
- Select Add column to add a column.
- Select Source columns to map.
- Apply Mapping transformation to columns.
- Change Sample data values.
Then select Apply.
When you're finished configuring the data, select Finish on the Inspect the data screen.
On the Summary screen, review the details and status of your data ingestion, including the table with the schema you defined and the connection between the eventstream and the Eventhouse. Select Close to finalize the Eventhouse setup.
You can now see the Eventhouse destination on the canvas in Live view.
Event processing before ingestion
The event processing before ingestion mode processes your event data before ingesting it into the Eventhouse. Use this mode if you apply operators such as filtering or aggregation to process the data before ingestion, or after a derived stream.
In Edit mode for your eventstream, hover over an operator or derived stream, select +, and then select Eventhouse.
On the Eventhouse screen, Event processing before ingestion should already be selected. Complete the rest of the information about your Eventhouse, and then select Save.

To implement the newly added Eventhouse destination, select Publish.
Once you complete these steps, the eventstream with Eventhouse destination is available for visualization in Live view.
Related content
To learn how to add other destinations to an eventstream, see the following articles:
Prerequisites
Before you start, you must complete the following prerequisites:
- Access to a workspace in the Fabric capacity license mode (or) the Trial license mode with Contributor or higher permissions.
- Access to the workspace with Contributor or above permissions where your KQL database is located.
Note
The maximum number of sources and destinations for one eventstream is 11.
Add a KQL database as a destination
To add a KQL database as a destination, you need to have a KQL database created in the workspace, and choose between two ingestion modes: Direct ingestion and Event processing before ingestion.
Direct ingestion
This mode ingests your event data directly into the KQL database without any processing. You can use this mode if you want to ingest your event data as-is and perform any processing or transformation later in KQL database using KQL queries.
Select New destination on the ribbon or "+" in the main editor canvas and then select KQL Database. The KQL Database destination configuration screen appears.
Select Direct ingestion, enter a destination name, select a workspace, choose a KQL database from the selected workspace, and then select Add and configure.
Note
You can only select workspaces that have the same region Fabric capacity as the eventstream.
On the Get data page, navigate through the tabs to complete the configuration:
Configure: Use an existing table of your KQL database or create a new one to route and ingest the data. Complete the required fields and select Next.
Inspect: Select a data format, and preview how the data is sent to your KQL database.
You can also change the column name, data type, or update column by clicking the arrow in the table header. Complete the required fields and select Finish.
Summary: Review the status of your data ingestion, including the table created with the schema you defined, and connection between the eventstream and the KQL database.
After you configure everything and select Close, a KQL database destination appears on the canvas, connected to your eventstream.
Event processing before ingestion
This mode processes your event data before ingesting it into the KQL database. You can use this mode if you want to apply some processing or transformation to your event data before ingesting it, such as filtering, aggregating, or expanding. You can design the processing logic using event processor.
Select Event processing before ingestion, complete the information about your KQL Database, and then select Open event processor.
Design the event processing with event processor, and then select Save
When you choose an existing Kusto table, schema validation between the current schema in this eventstream and the target KQL table is performed. If the two schemas aren't matched, an error message is shown and reminds you to open event processor to adjust the schema in this eventstream accordingly.
When you open the event processor, the detailed mismatch information is shown in Authoring error tab.
After you configure everything and select Save, a KQL database destination appears on the canvas, connected to your eventstream, and you can check the metrics in the Data insights and logs in Runtime logs.
Manage a destination
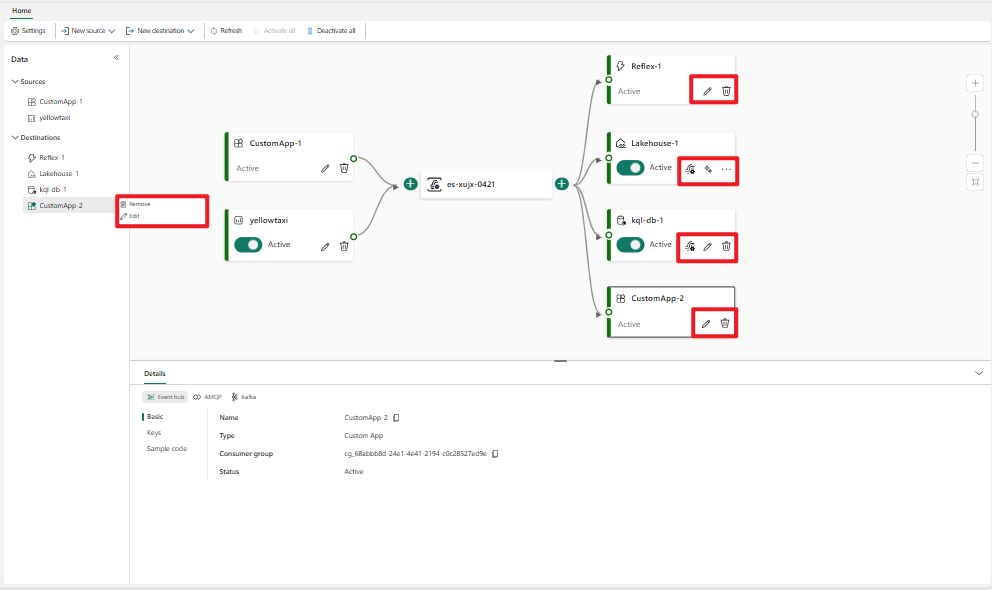
Edit/remove: You can edit or remove an eventstream destination either through the navigation pane or canvas.
When you select Edit, the edit pane opens in the right side of the main editor. You can modify the configuration as you wish, including the event transformation logic through the event processor editor.
Related content
To learn how to add other destinations to an eventstream, see the following articles:


