Process claims in Environmental Credit Service (preview)

Important
Some or all of this functionality is available as part of a preview release. The content and the functionality are subject to change. You can access the Environmental Credit Service (preview) sandbox environment for a 30-day trial. To use Environmental Credit Service (preview) in a production environment, complete the Environmental Credit Service (preview) sign up form.
This article shows you how to create, submit, and verify claims in Environmental Credit Service (preview).
For instructions on performing these tasks with Environmental Credit Service (preview) APIs, go to Environmental Credit Service (preview) API reference overview.
Create claims
Market role: Supplier
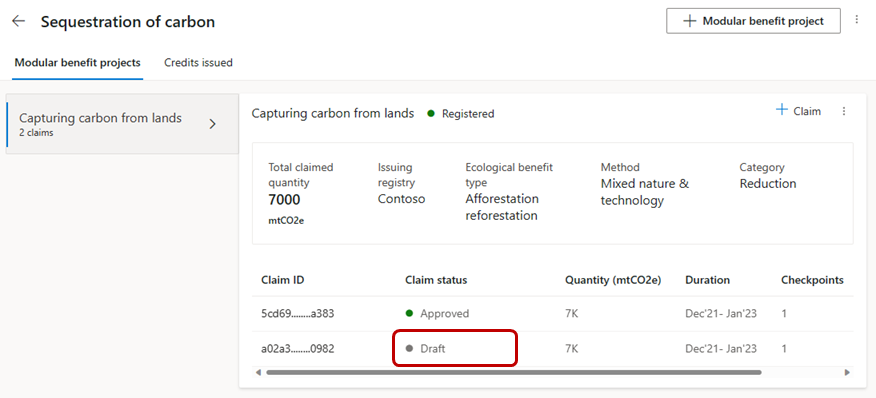
For each registered modular benefit project of an ecological project, the supplier can define the claims.
Sign into Environmental Credit Service (preview).
On the Modular benefit projects tab, select the modular benefit project for which you want to create a claim.
On the project detail screen, select the + Claim button on the modular benefit project card.
Enter the details on the New claim page, including the details of the claim checkpoint. Add more checkpoints if required.

For each claim checkpoint, attach relevant files that you want to share with validation and verification body for the purpose of claim verification. For more information about attaching files, go to Manage files in Environmental Credit Service (preview).
Select the Create claim button to save the claim in draft state.

Submit claims
Market role: Supplier
After you create a claim, it displays on the project details screen.
Select the Claim ID in the claim table to view the claim details page. On the Claim details page, you can view the checkpoint details and the files attached to each checkpoint.
You can update the claim, checkpoint details, attach more files for each checkpoint or delete the already attached files before submitting the claim for verification. To attach files to a checkpoint, open the checkpoint details by selecting View more or by selecting the checkpoint date range. For more information about attaching files, go to Manage files in Environmental Credit Service (preview).

Select the Send for verification button, and then select the validation and verification body to create a claim verification proposal and submit it to the validation and verification body.
After you submit the claims, view the status of the claims for each registered modular benefit project from the project details page. For a submitted claim, the status will display as Submitted.

Verify a claim
Market role: Validation and verification body
These instructions show you how to review, accept, reject, or ask for modifications or clarifications to a submitted ecological claim from the supplier.
Sign into Environmental Credit Service (preview).
On the Validation and verification body dashboard, select a claim under Claim ID to view it.
Select the Accept button at the top of the screen to accept the task of verifying the claim.

Select View overlaps to check for double counting. For more information about double counting, go to Avoid double counting credits in Environmental Credit Service (preview).
If there are no overlaps, a message displays saying No overlapping projects found.
If there are overlaps, the Overlapping projects page displays.
On the claim verification view, you can view the ecological claim details along with checkpoint details. You can also view the associated modular benefit project and ecological project details by selecting the modular benefit project or ecological project. You can also view the attached files for each asset. Select the accordion link next to each file to view the file details.
After the claim verification completes, record your findings in the Verification findings section of the processed claim.
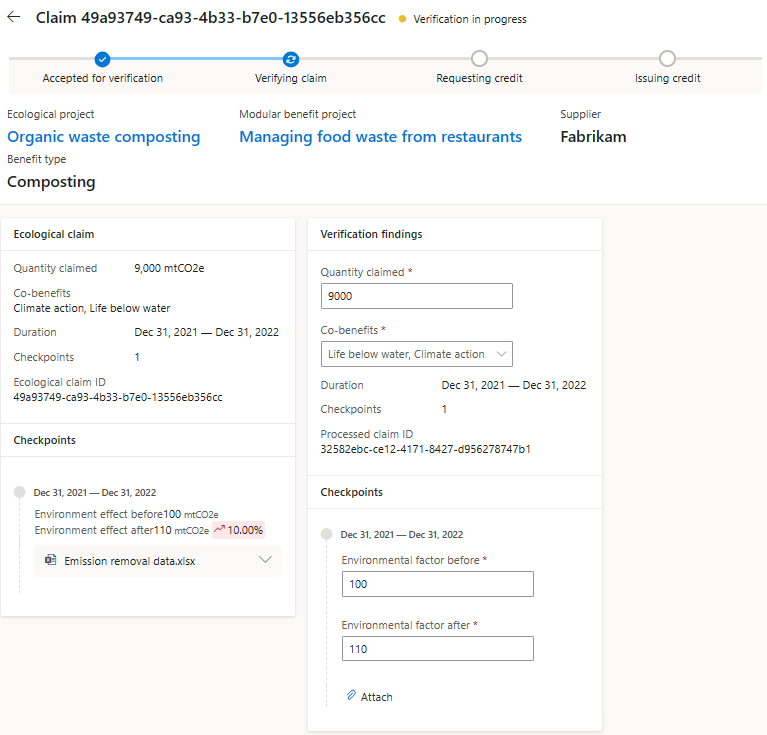
Attach required verification reports and documents for each of the checkpoints by selecting Attach under the checkpoint details.
After the verification findings have been recorded, select Verify to approve the claim verification.
If the verification is unsuccessful, you can reject the claim by selecting Reject. If you require additional details or clarifications from the supplier during verification, you can send the ecological claim back to the supplier by selecting Request modification. On the Request modification? popup, describe the required modifications, and then select Confirm.
The status of the claim changes to Returned for modification. The supplier can now edit the claim details, save, or resubmit the claim for verification to the validation and verification body. After the ecological claim is resubmitted, its status changes to Verification resumed. The validation and verification body can now take further action on the ecological claim.
After the ecological claim is verified, add recommended attributes of the proposed credit in the Credit recommendations section of the processed claim, and then select Request credit issuance to submit the request to issue credit for the verified ecological claim to the issuing registry.
After the processed claim is submitted for credit issuance, the status on the claim page changes to Credit requested.
If the validation and verification body wants to further modify the submitted issuance request, they can select Withdraw to withdraw a submitted issuance request. After the request is withdrawn, the validation and verification body can update the verification findings and credit recommendations, and then resubmit the request for credit issuance.

See also
Environmental Credit Service (preview) overview Environmental Credit Service (preview) glossary