Customize window layouts and personalize tabs
In Visual Studio, you can customize the position, size, and behavior of windows to create window layouts that work best for various development workflows. You can also personalize how you use tabs to interact with your code.
Customize window layouts
When you customize a window layout, the Visual Studio integrated development environment (IDE) remembers it. For example, if you change the docking location of Solution Explorer and then close Visual Studio, the next time that you open Visual Studio, Solution Explorer will be docked in the same location. The Visual Studio IDE remembers the docking location even if you're working on another computer.
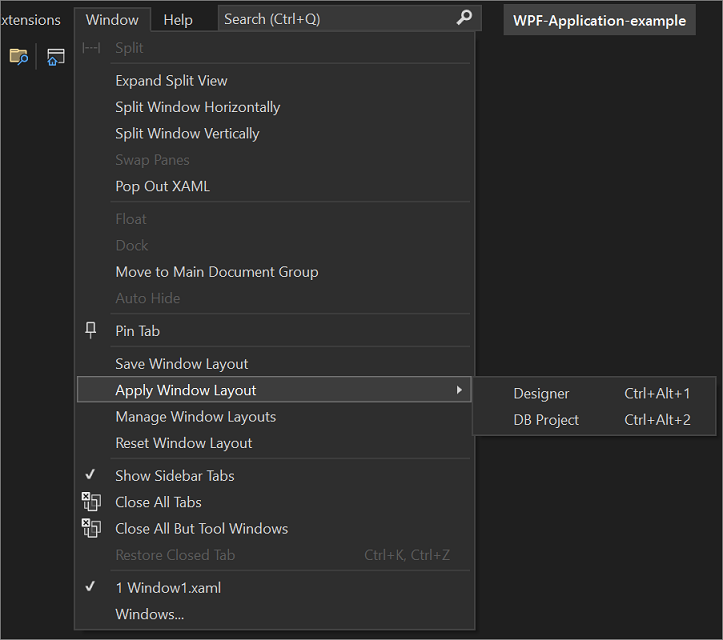
You can also name and save a custom layout and then switch between layouts with a single command. For example, you could create a layout for editing and a layout for debugging, and switch between them by selecting Window > Apply Window Layout.
Tip
Starting with Visual Studio 17.9, the list of open documents was moved from a binary format in the .suo file to a plain text format in a JSON file. The JSON file is saved in the hidden .vs folder in the same location as the .suo file (solutionFolder.vs\solutionName\v17). This JSON file contains the list of open documents and their properties, the layout of document groups and containers, and vertical tab column width. Storing in plain text as JSON enables easier backup and the ability to check in different sets of open documents that can be restored as needed.
Tool and document windows
The IDE has two basic window types: tool windows and document windows. Tool windows include Solution Explorer, Server Explorer, the Output window, Error List, the designers, and the debugger windows. Document windows contain source code files, arbitrary text files, config files, and so on. You can resize tool windows and drag them by their title bar. You can drag document windows by their tab.
The Window menu contains options for docking, floating, and hiding windows in the IDE. Right-click a window's tab or title bar to see more options for that specific window. You can display more than one instance of certain tool windows at a time. For example, you can display more than one web browser window, and you can create extra instances of some tool windows by selecting New Window on the Window menu.
Split windows
When you need to view or edit two locations simultaneously in a document, you can split the window. To divide your document into two independently scrolling sections, select Split on the Window menu. Select Remove Split on the Window menu to restore the single view.
Toolbars
You can arrange toolbars by dragging them to where you want them, or by using the Customize dialog. For more information about how to position and customize toolbars, see Customize menus and toolbars.
Arrange and dock windows
You can dock a document window or tool window so that it has a position and size within the IDE window frame. You can also position it as a separate floating window that's outside of the IDE.
You can dock a tool window anywhere inside the IDE frame. You can also dock some tool windows as tabbed windows in the editor frame. And you can dock document windows within the editor frame or pin them to their current position in the tab order.
You can also arrange windows in the following ways:
- Dock multiple windows to float together in a raft over or outside of the IDE.
- Hide tool windows along the edge of the IDE.
- Minimize tool windows.
- Display windows on different monitors.
- Reset window placement to the default layout or to a saved custom layout.
To arrange tool and document windows, you can place your cursor on the title bar of a window and then drag it to where you want it. Alternatively, you can right-click the title bar of the window to use its context menu, or you can use the commands on the Window menu.
Dock windows
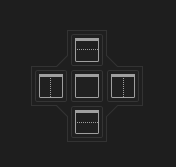
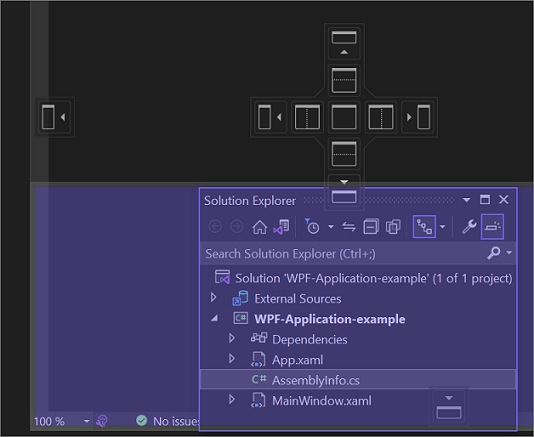
When you select and drag the title bar of a tool window or the tab of document window, a docking guide diamond appears. During the drag operation, when the mouse cursor is over one of the arrows in the diamond, a shaded area appears that shows you where the window will dock if you release the mouse button.
To move a dockable window without snapping it into place, select Ctrl while you drag the window.
To return a tool window or document window to its most recent docked location, select Ctrl while you double-click the title bar or tab of the window.
The following screenshot shows the guide diamond for document windows, which can be docked only within the editing frame:
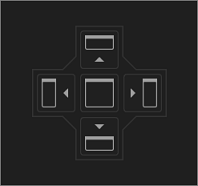
You can fasten tool windows to one side of a frame in the IDE or within the editing frame. To help you to easily redock the window, a guide diamond appears when you drag the window to another location.
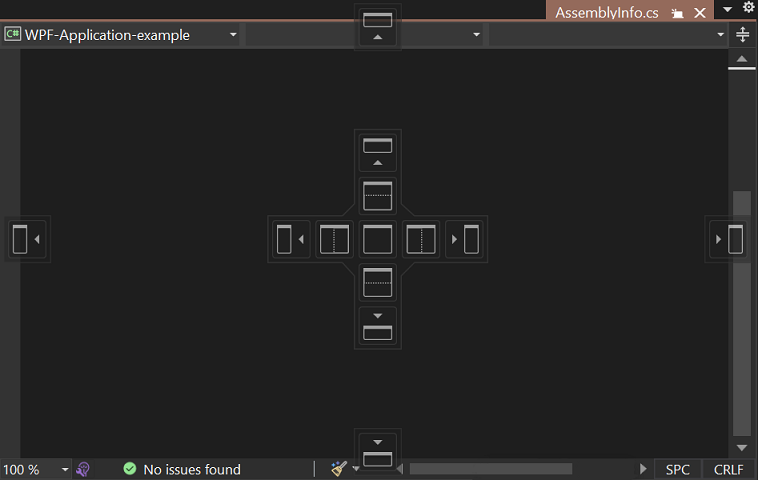
The following screenshot shows Solution Explorer being docked in a new location that's demarcated by a purple shaded area:
Close and autohide tool windows
You can close a tool window by selecting the Close button in the upper-right corner of the title bar. To reopen the window, select the tool window you want on the View menu, or use the associated keyboard shortcut.
If you right-click the title bar of a tool window and then select Auto Hide, the window will slide out of the way when you use a different window. When a window is automatically hidden, its name appears on a tab at the edge of the IDE. To use the window again, select the tab so that the window slides back into view.

Tip
To specify whether auto hide operates on tool windows individually or as docked groups, select or clear Auto Hide button affects active tool window only in the Options dialog. For more information, see Options dialog box: Environment > General.
Note
When auto hide is enabled on a tool window, the window might temporarily slide into view when it has focus. To hide the window again, select an item outside of the current window. When the window loses focus, it slides back out of view.
Use a second monitor
If you have a second monitor and your operating system supports the use of dual monitors, you can select which monitor displays a window. You can even group multiple windows together in rafts on other monitors.
Tip
You can create multiple instances of Solution Explorer and move them to another monitor. Right-click the Solution node and select New Solution Explorer View. To close an extra instance, double-click the title bar while selecting the Ctrl key.
Reset window layouts
You can return the IDE to the original window layout for your settings collection by selecting Windows > Reset Window Layout from the menu bar. When you run this command, the following actions occur:
All windows are moved to their default positions.
Windows that are closed in the default window layout are closed.
Windows that are open in the default window layout are opened.
Create and save custom layouts
Visual Studio enables you to save up to 10 custom window layouts and quickly switch among them. The following steps show how to create, save, invoke, and manage two custom layouts that take advantage of multiple monitors and have both docked and floating tool windows.
Create a project and customize the layout
First, create a user interface (UI) project. The idea is to maximize the space for the designer window by moving other tool windows out of the way.
Create a new C# WPF Application project.
If you have multiple monitors, drag Solution Explorer and the Properties window to your second monitor.
If you're using only one monitor, close all windows except for the designer.
Select Ctrl+Alt+X to display the Toolbox window. If the window is docked, drag it so that it floats where you want to position it.
When your layout is how you want it, select Window > Save Window Layout. Name the layout Designer.
Notice that your new layout is assigned the next keyboard shortcut from the reserved list of Ctrl+Alt+1...0 shortcuts.
Create a database project and layout
Next, add a new SQL Server database project to the solution.
Right-click the Solution node in Solution Explorer to open its context menu, select Add, and then select New Project.
In the Add a new project dialog, select SQL from the All project types list, and then select SQL Server Database Project. (You might need to clear the other filters.)
(You can also use the search box to find the template. To do so, enter SQL in the box that contains the text Search for templates (Alt+S).)
Right-click the new database project in Solution Explorer, and then select View in Object Explorer.
When you select this option, Visual Studio displays the SQL Server Object Explorer window, which enables you to access tables, views, and other objects in your database. You can either float this window or leave it docked. Adjust the other tool windows the way you want them. To make this walkthrough more realistic, you can add an actual database, but you don't need to.
When your layout is how you want it, select Window from the menu bar, and then select Save Window Layout. Name this layout DB Project.
Switch between the layouts
To switch between layouts, use the keyboard shortcuts from the reserved list of Ctrl+Alt+1...0 shortcuts. Or, from the main menu, select Window > Apply Window Layout.
If you have a multi-monitor setup at work and a single monitor laptop at home, you can create layouts that are optimized for each machine.
Note
If you apply a multi-monitor layout on a single-monitor system, the floating windows that you placed on the second monitor will be hidden behind the Visual Studio window. You can bring these windows to the front by pressing Alt+Tab. If you later open Visual Studio with multiple monitors, you can restore the windows to their specified positions by reapplying the layout.
Manage and roam your layouts
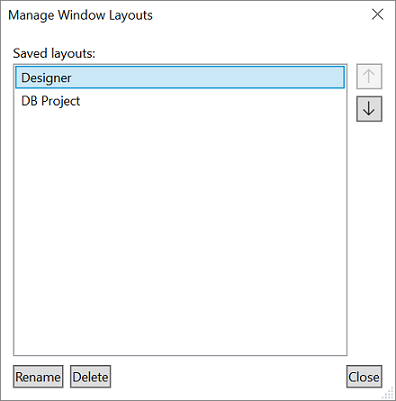
You can remove, rename, or reorder your custom layout by selecting Window > Manage Window Layouts. If you move a layout, the key binding is automatically adjusted to reflect the new position in the list. The key bindings themselves can't be modified, but you can store up to 10 layouts at a time.
To remind yourself which keyboard shortcut is assigned to which layout, select Window > Apply Window Layout.
These layouts automatically roam between Visual Studio editions and Blend instances on separate machines.
Personalize tabs
You can personalize tabs to interact with document windows in several different ways. For example, you can view a preview of a file in the editor without opening the file, you can group your tabs, arrange them in multiple rows, and more.
Tip
To learn more about how to manage tabs in Visual Studio 2022 and later, see the following blog post: Too many tabs open? No problem!.
Preview tab
On the Preview tab, you can view files in the editor without opening them. You can preview files by selecting them in Solution Explorer, during debugging when you step into files, with Go to Definition, and when you browse through results of a search. Preview files appear in a tab on the right side of the document tab well. The file opens for editing if you modify it or select Open on the file's context menu in Solution Explorer.
Tab groups
Tab groups extend your ability to manage limited workspace while you're working with two or more open documents in the IDE. You can organize multiple document windows and tool windows into either vertical or horizontal tab groups and shuffle documents from one tab group to another.
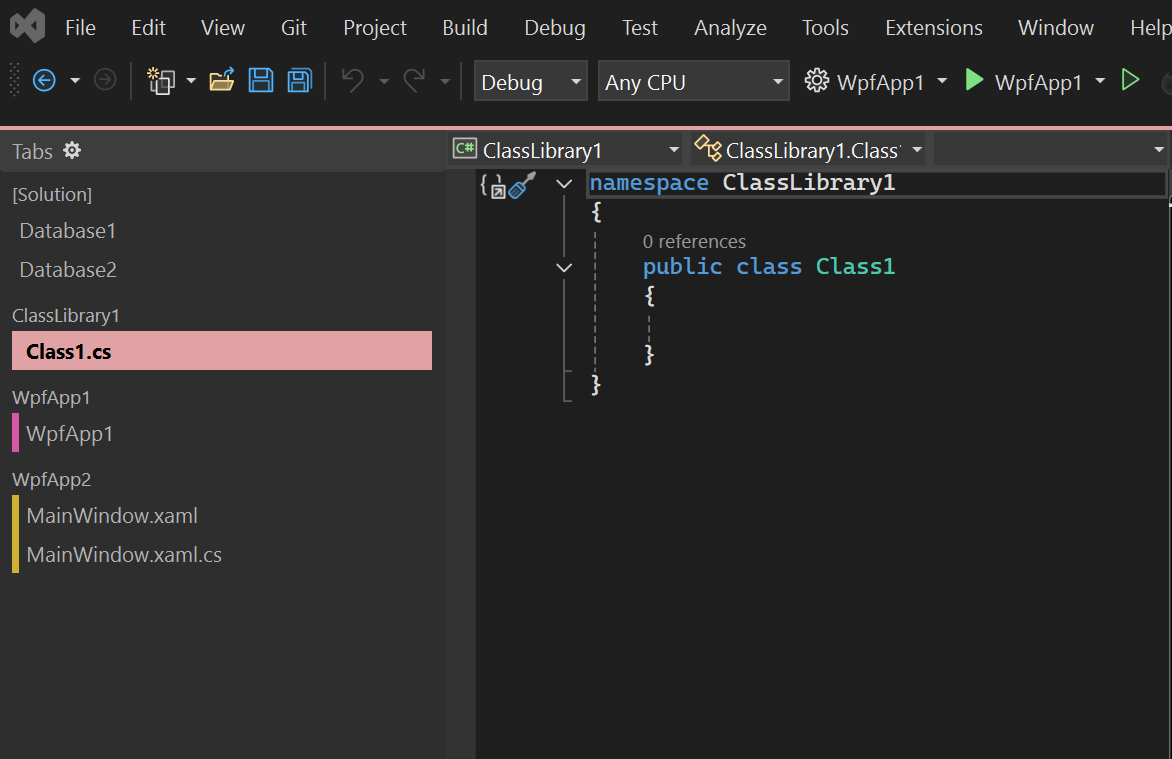
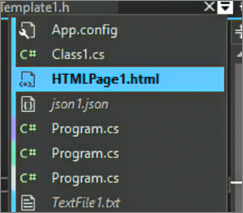
Vertical document tabs
You can manage your document tabs in a vertical list on either the left or right side of the editor.
New in Visual Studio 2019 version 16.4 and later. These versions support one of the top feature requests: vertical document tabs. You can now manage your document tabs in a vertical list on either the left or right side of the editor.
You can apply vertical document tabs in the following ways:
- Select Tools > Options > Environment > Tabs and Windows. Then, in the Set tab layout list, select Top, Left, or Right.
- Right-click a tab, select Set Tab Layout, and then select either Left or Right. (To return the tabs to their default position, select Top.)
- Right-click a tab, select Set Tab Layout, and then select Place Tabs on the Left, Place Tabs on the Top, or Place Tabs on the Right. (To return the tabs to their default position, select Place Tabs on the Top.)
Color-code document tabs
Visual Studio 2022 includes new personalization options that can help you work more efficiently. You can now color-code file tabs by project so that you don't need to hunt for your open files.
To color-code tabs, go to Tools > Options > Environment > Tabs and Windows. Then select the Colorize document tabs by checkbox and select either Project, File extension, or Regular Expression in the dropdown list.
Colorize tabs in different views
You can colorize tabs in both vertical and horizontal views in the editor.
The following screenshot shows an example of color tabs in the vertical view:
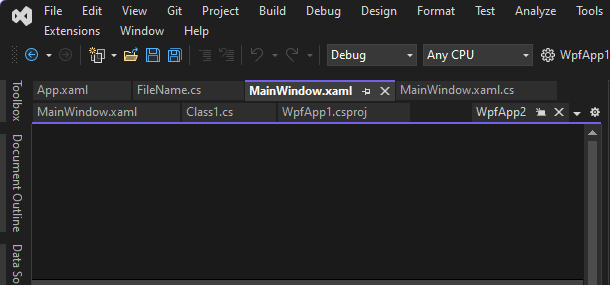
The following screenshot shows an example of color tabs in the horizontal view:
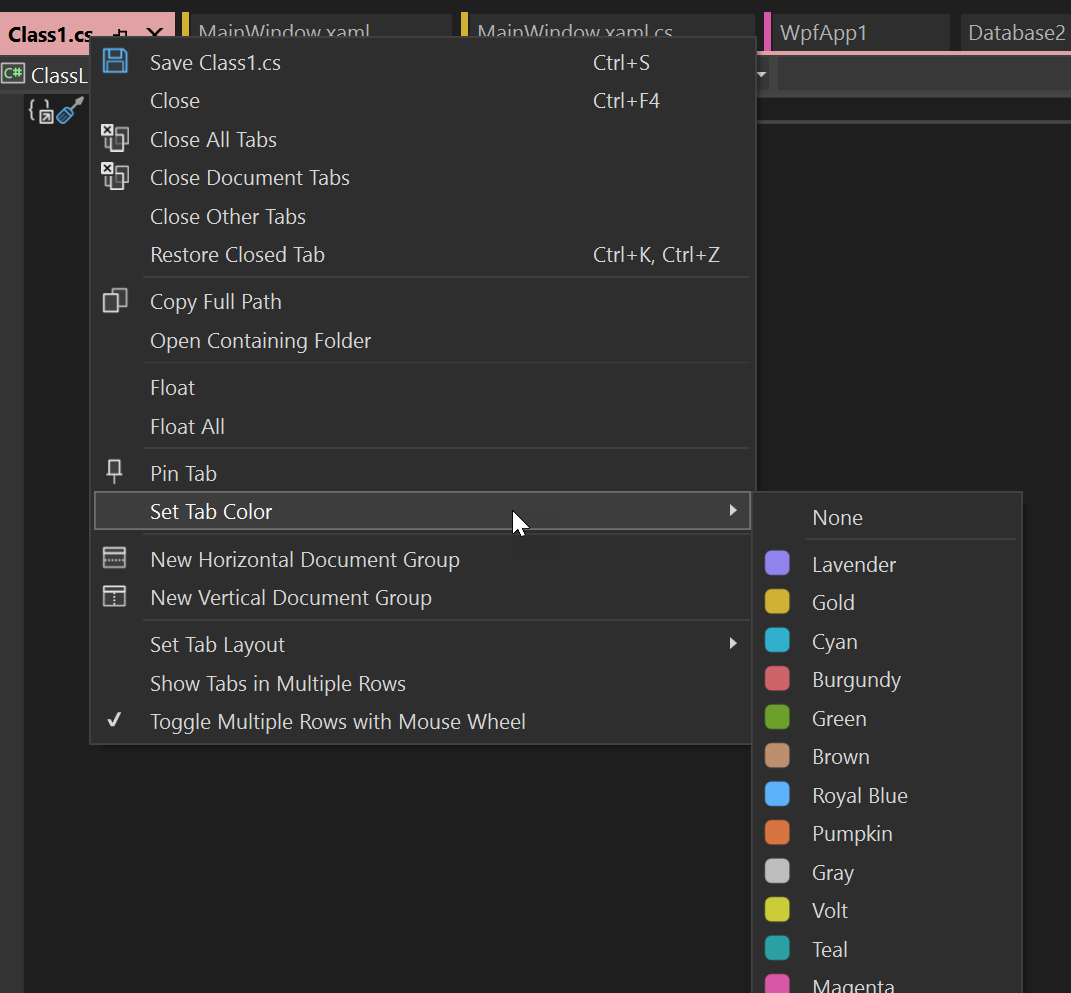
Select your own colors
You can also select your own tab colors. To do so, right-click a tab, select Set Tab Color, and then select a color.
The following screenshot shows an example of how to personalize the color scheme of tabs:
Multiple rows of tabs
You can now wrap tabs into multiple rows. This enables you to have more horizontal tabs open at once. Pinned tabs show up in a separate row from unpinned tabs.
To change these options, go to Tools > Options > Environment > Tabs and Windows > Show tabs in multiple rows.
Custom organization system
You can now apply bold formatting to your current active tab, change your tab width, and add an extra close button at the top of a document.
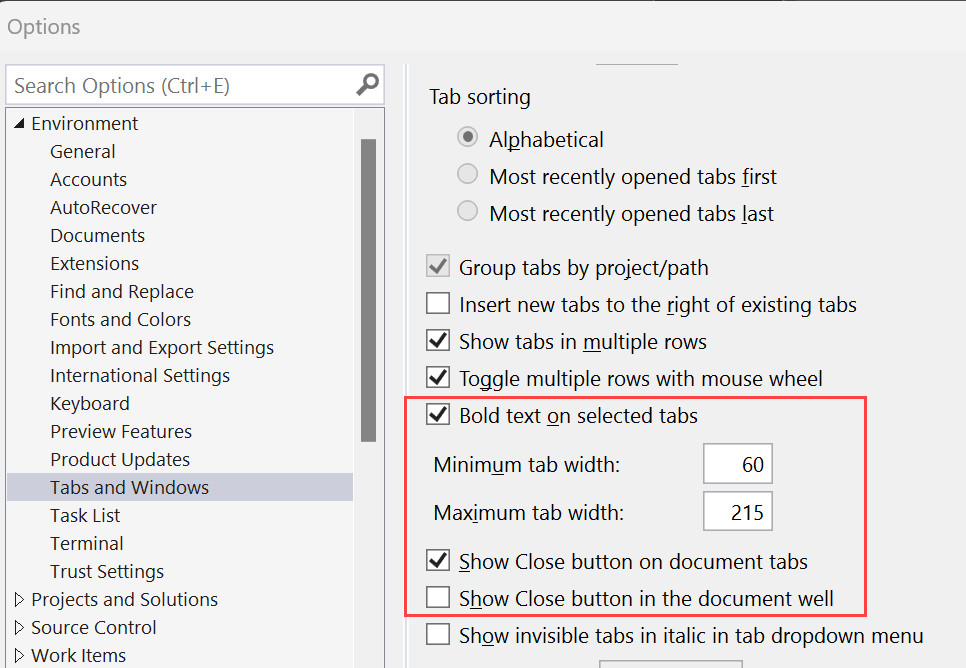
To change these options, navigate to Tools > Options > Environment > Tabs and Windows.
Improved accessibility
You can change the indicator for documents that have unsaved changes to a larger, more visible dot.
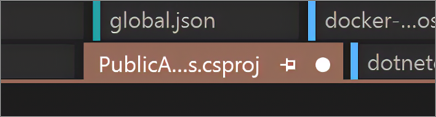
To change this setting, select your preference in Tools > Options > Environment > Tabs and Windows > Dirty Indicator.
Show names in italics
You can show the names of documents that aren't visible in italics.
To enable this option, go to Tools > Options > Environment > Tabs and Windows and select Show invisible tabs in italic in tab dropdown menu.
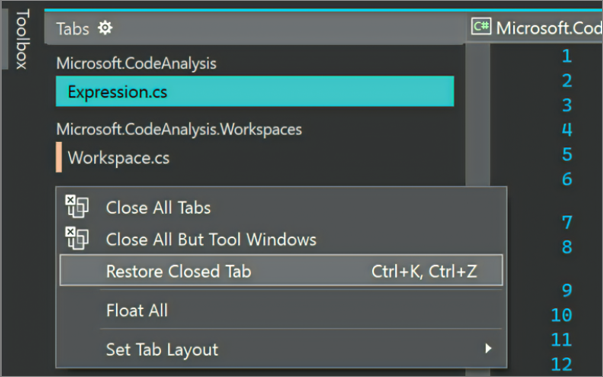
Restore closed tabs
You can reopen the last tab you closed by right-clicking a tab, by using the Ctrl+K, Ctrl+Z keyboard shortcut, or by selecting Window > Restore Closed Tab.