Use the Azure OpenAI web app
Along with Azure AI Studio, Azure OpenAI Studio, APIs, and SDKs, you can use the customizable standalone web app to interact with Azure OpenAI models by using a graphical user interface. Key features include:
- Connectivity with multiple data sources to support rich querying and retrieval-augmented generation, including Azure AI Search, Prompt Flow, and more.
- Conversation history and user feedback collection through Cosmos DB.
- Authentication with role-based access control via Microsoft Entra ID.
- Customization of the user interface, data sources, and features using environment variables (no-code via Azure portal).
- Support for modifying the underlying web application source code as an open-source repository.
You can deploy the app by using either Azure AI Studio or Azure OpenAI Studio, or through a manual deployment through the Azure portal or the Azure Developer CLI via your local machine (instructions available at the repository here). Depending on your deployment channel, you can preload a data source to chat with via the web application, but this can be changed after deployment.
For Azure OpenAI beginners aspiring to chat with their data through the web application, Azure AI Studio is the recommended medium for initial deployment and data source configuration.
Important considerations
- This web application and many of its features are in preview, meaning that bugs might occur and that not all features might be complete. If you find a bug or require assistance, raise an issue in the associated GitHub repository.
- Publishing a web app creates an Azure App Service instance in your subscription. It might incur costs depending on the pricing plan that you select. When you're done with your app, you can delete it and any associated resources from the Azure portal.
- GPT-4 Turbo with Vision models are not currently supported.
- By default, the app is deployed with the Microsoft identity provider already configured. The identity provider restricts access to the app to members of your Azure tenant. To add or modify authentication:
Go to the Azure portal and search for the app name that you specified during publishing. Select the web app, and then select Authentication on the left menu. Then select Add identity provider.
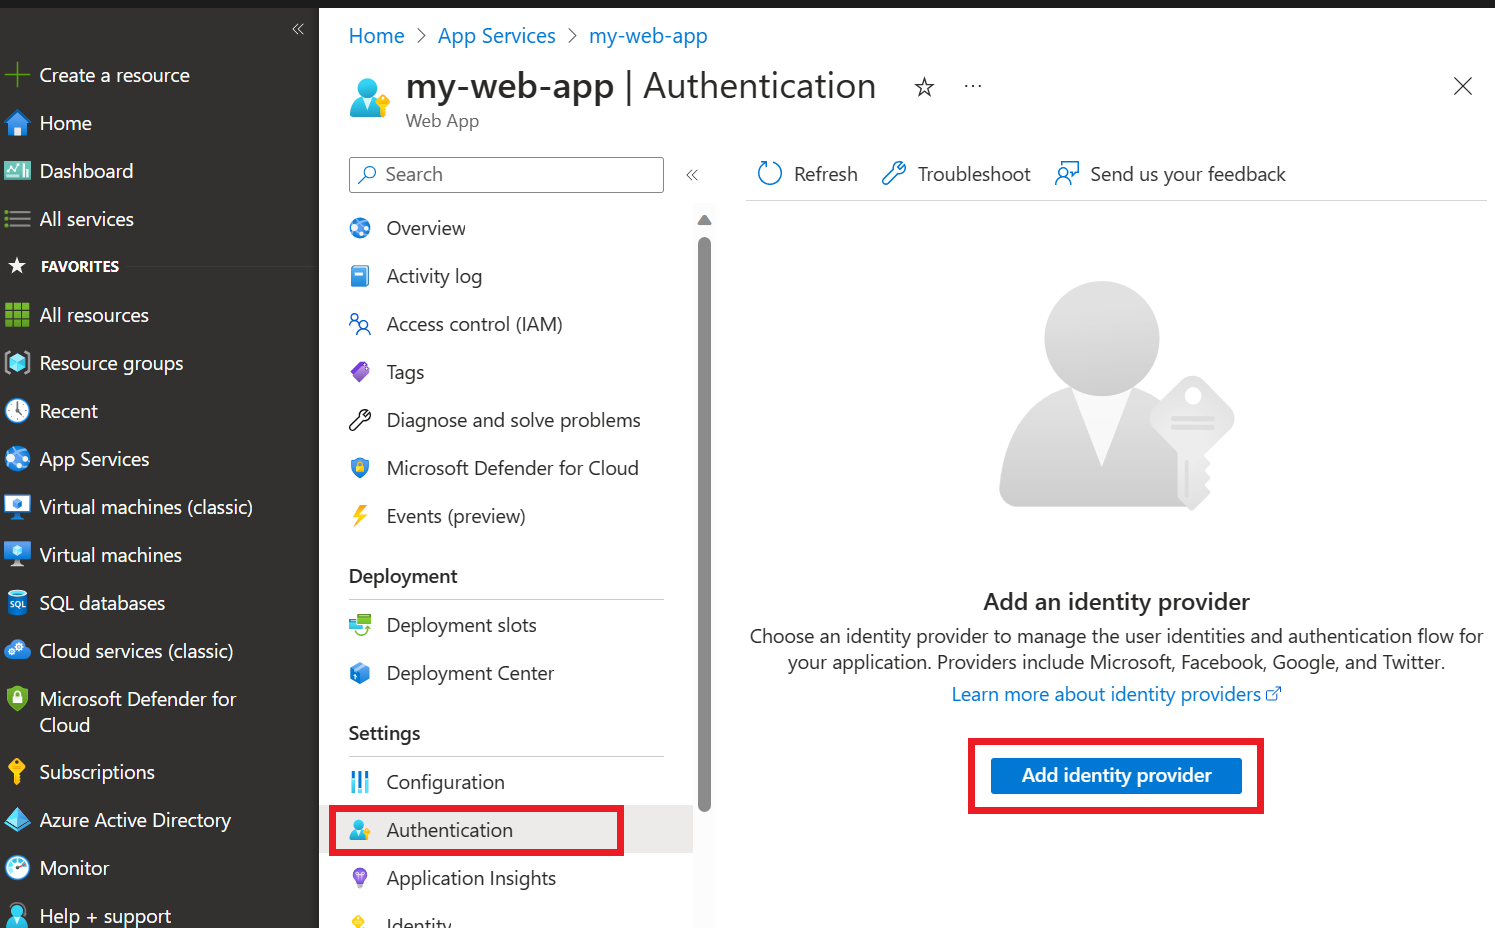
Select Microsoft as the identity provider. The default settings on this page restrict the app to your tenant only, so you don't need to change anything else here. Select Add.

Now users will be asked to sign in with their Microsoft Entra account to access your app. You can follow a similar process to add another identity provider if you prefer. The app doesn't use the user's sign-in information in any way other than verifying that the user is a member of your tenant. For more information on managing authentication, view this quickstart on authentication for web apps on Azure App Service.
Customizing the application using environment variables
You can customize the app's front-end and back-end logic. The app provides several environment variables for common customization scenarios such as changing the icon in the app.
These environment variables can be modified through the Azure portal after deploying the web application.
- In the Azure portal, search for and select the App Services page.
- Select the web app that you have just deployed.
- In the left menu of the app, select Settings > Environment variables.
- To modify an existing environment variable, click on its name.
- To add a single new environment variable, click on Add in the panel's top menu bar.
- To use the JSON-based editor to manage environment variables, click Advanced edit.
When you're customizing the app, we recommend:
Clearly communicating how each setting that you implement affects the user experience.
Updating the app settings for each of your deployed apps to use new API keys after you rotate keys for your Azure OpenAI or Azure AI Search resource.
Sample source code for the web app is available on GitHub. Source code is provided "as is" and as a sample only. Customers are responsible for all customization and implementation of their web apps.
Modifying the application user interface
The environment variables relevant to user interface customization are:
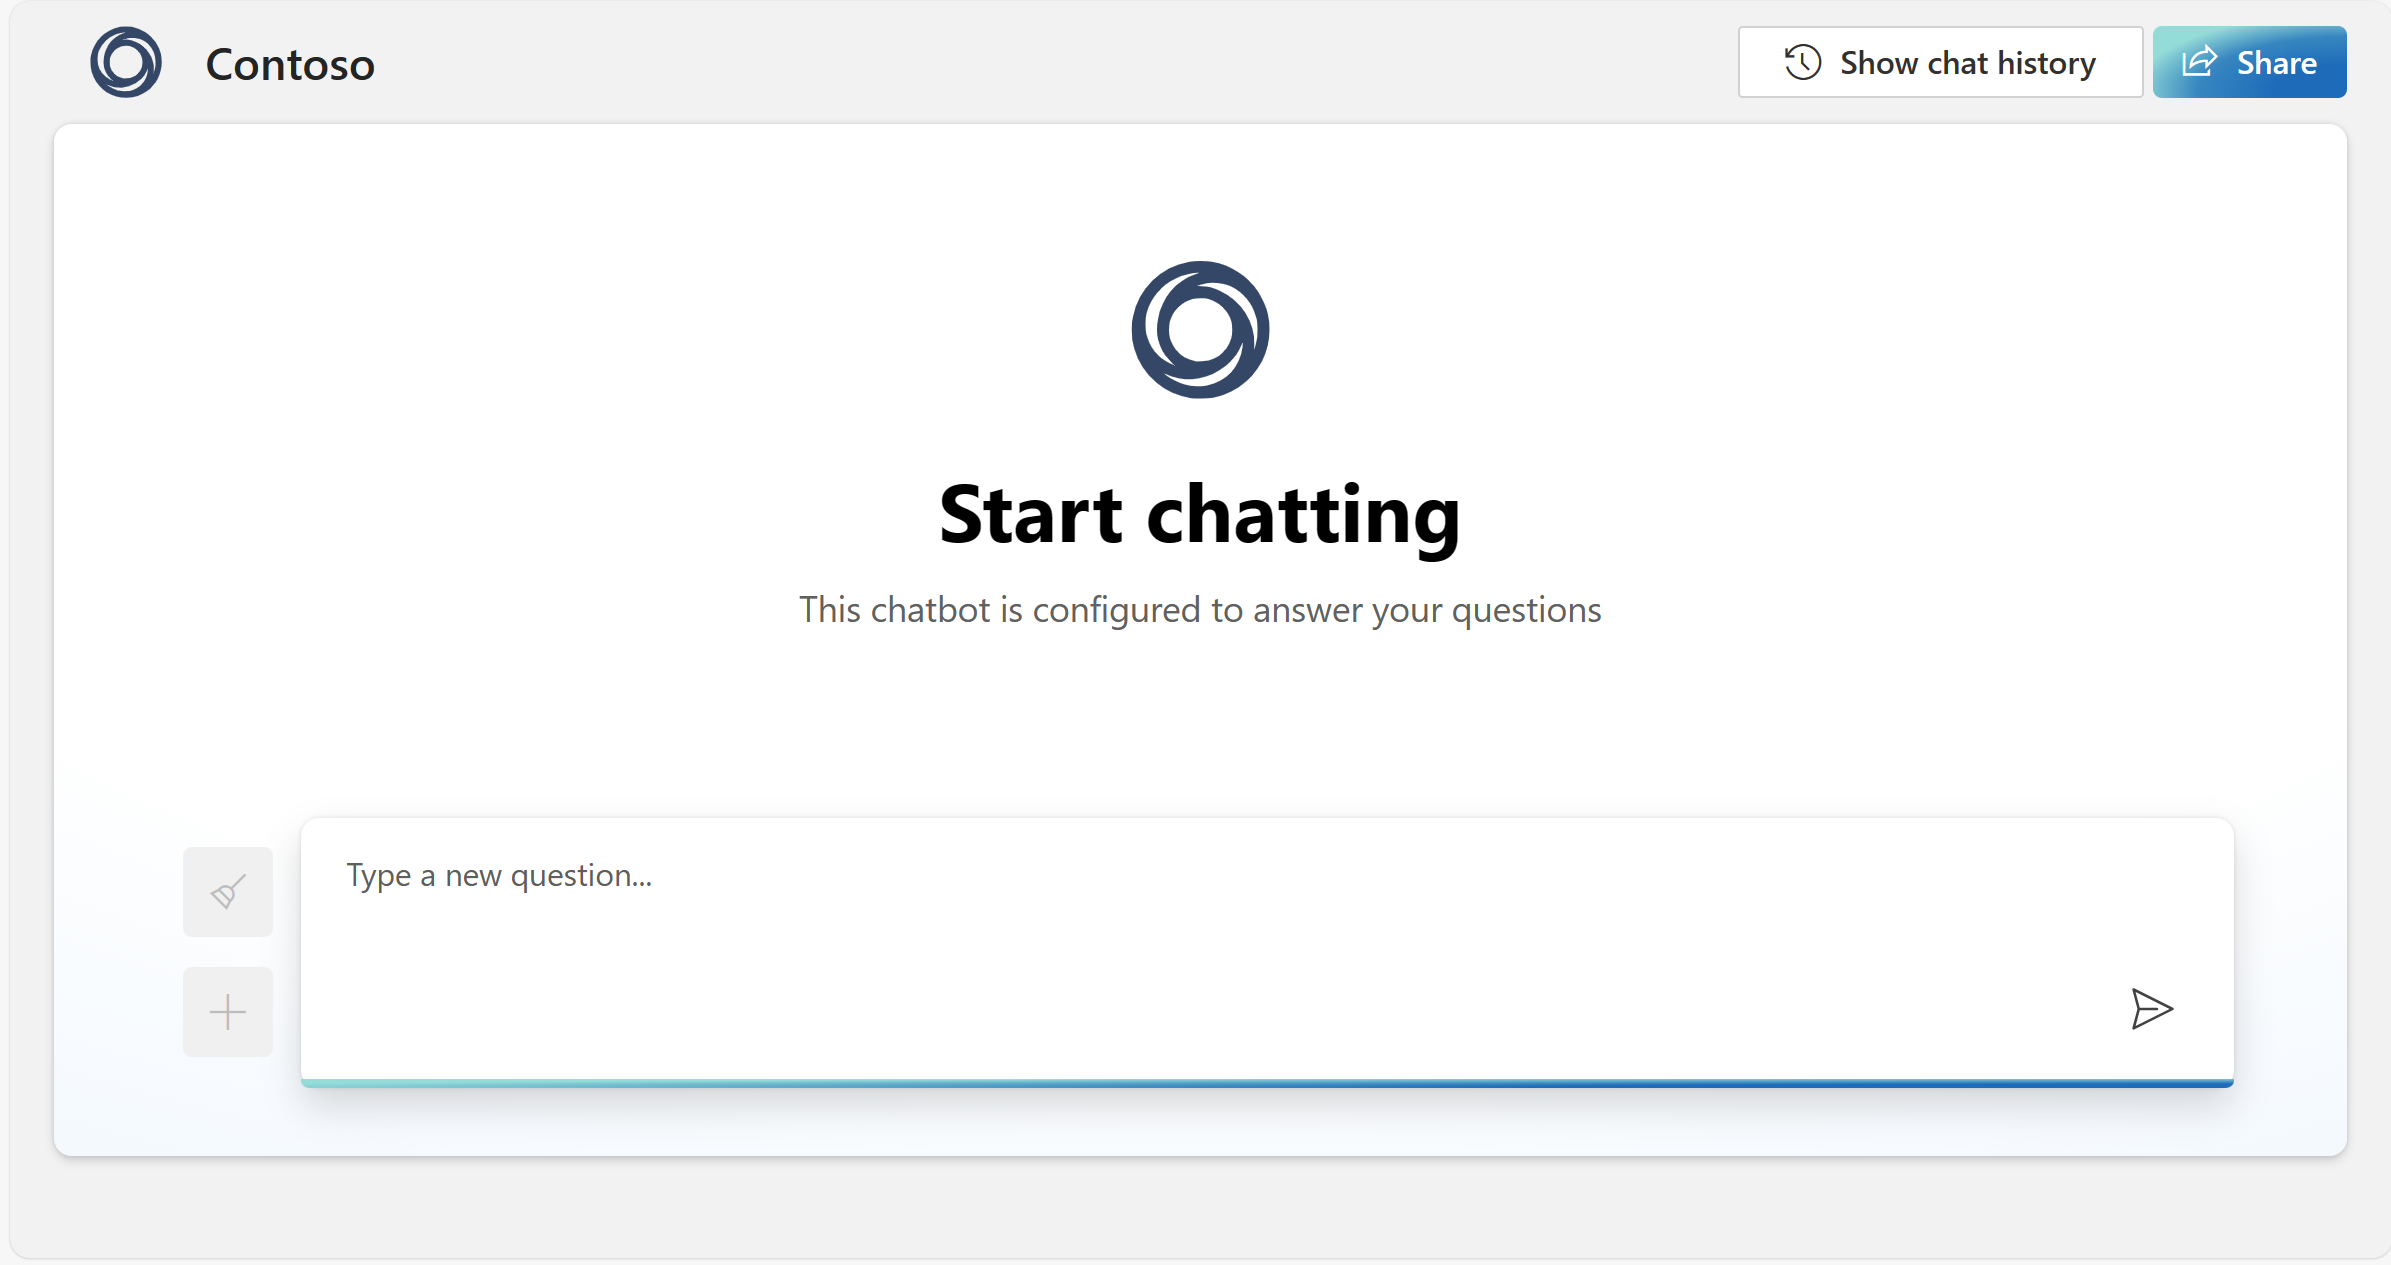
UI_CHAT_DESCRIPTION: This is the smaller paragraph text shown below theUI_CHAT_TITLEin the center of the page upon loading.- Data type: text
UI_CHAT_LOGO: This is the large image shown in the center of the page upon loading.- Data type: URL to image
UI_CHAT_TITLE: This is the large text shown in the center of the page upon loading.- Data type: text
UI_FAVICON: This is the favicon shown on the browser window/tab.- Data type: URL to image
UI_LOGO: This is logo appears in the top left of the page and to the left of the title.- Data type: URL to image
UI_TITLE: This is the title shown on the browser window/tab. It also appears in the top left of the page by the logo.- Data type: text
UI_SHOW_SHARE_BUTTON: This button appears on the top right of the page, and allows users to share a URL linking to the web app.- Data type: Boolean, must enter either True or False, defaults to True if left blank or unspecified.
UI_SHOW_CHAT_HISTORY_BUTTON: This appears on the top right of the page and to the left of the UI_SHOW_SHARE_BUTTON.- Data type: Boolean, must enter either True or False, defaults to True if left blank or unspecified.
To modify the application user interface, follow the instructions in the previous step to open the environment variables page for your web app. Then, use Advanced edit to open the JSON-based editor. At the top of the JSON (after the [ character), paste the below code block and customize the values accordingly:
  {
    "name": "UI_CHAT_DESCRIPTION",
    "value": "This is an example of a UI Chat Description. Chatbots can make mistakes. Check important info and sensitive info.",
    "slotSetting": false
  },
  {
    "name": "UI_CHAT_LOGO",
    "value": "https://learn-bot.azurewebsites.net/assets/Contoso-ff70ad88.svg",
    "slotSetting": false
  },
  {
    "name": "UI_CHAT_TITLE",
    "value": "This is an example of a UI Chat Title. Start chatting",
    "slotSetting": false
  },
  {
    "name": "UI_FAVICON",
    "value": "https://learn-bot.azurewebsites.net/assets/Contoso-ff70ad88.svg",
    "slotSetting": false
  },
  {
    "name": "UI_LOGO",
    "value": "https://learn-bot.azurewebsites.net/assets/Contoso-ff70ad88.svg",
    "slotSetting": false
  },
  {
    "name": "UI_TITLE",
    "value": "This is an example of a UI Title",
    "slotSetting": false
  },
Enabling chat history using Cosmos DB
You can turn on chat history for your users of the web app. When you turn on the feature, users have access to their individual previous queries and responses.
To turn on chat history, deploy or redeploy your model as a web app by using Azure OpenAI Studio or Azure AI Studio and select Enable chat history and user feedback in the web app.

Important
Turning on chat history creates an Azure Cosmos DB instance in your resource group, and it incurs additional charges for the storage that you use beyond any free tiers.
After you turn on chat history, your users can show and hide it in the upper-right corner of the app. When users show chat history, they can rename or delete conversations. You can modify whether users can access this function using the environment variable UI_SHOW_CHAT_HISTORY_BUTTON as specified in the previous section. Because the users are signed in to the app, conversations are automatically ordered from newest to oldest. Conversations are named based on the first query in the conversation.
Note
Popular Azure regions such as East US can experience periods of high-demand where it might not be possible to deploy a new instance of Cosmos DB. In that case, opt to deploy to alternative region such as East US 2 or retry your deployment until it succeeds. Should the deployment of Cosmos DB fail, your app will be available at its specified URL, but chat history will not be available. Enabling conversation history will also enable the view conversation history button in the top-right.
Deploying with the chat history option selected will automatically populate the following environment variables, so there is no need to modify them unless you wish to switch Cosmos DB instances. They are:
AZURE_COSMOSDB_ACCOUNT: This is the name of the Cosmos DB account that is deployed along with your web app.- Data type: text
AZURE_COSMOSDB_ACCOUNT_KEY: This is an alternative environment variable that is used only when permissions are not granted via Microsoft Entra ID and key-based authentication is used instead.- Data type: text. Is normally not present or populated.
AZURE_COSMOSDB_DATABASE: This is the name of the database object within Cosmos DB that is deployed along with your web app.- Data type: text, should be
db_conversation_history
- Data type: text, should be
AZURE_COSMOSDB_CONTAINER: This is the name of the database container object within Cosmos DB that is deployed along with your web app.- Data type: text, should be
conversations
- Data type: text, should be
AZURE_COSMOSDB_ACCOUNT: This is the name of the Cosmos DB account that is deployed along with your web app.- Data type: text

Collecting user feedback
To collect user feedback, you can enable a set of 'thumbs up' and 'thumbs down' icons that appear on each of the chatbot's responses. This will allow users to evaluate a response's quality, and indicate where errors occur using a 'provide negative feedback' modal window.
To enable this feature, set the following environment variable to True:
AZURE_COSMOSDB_ENABLE_FEEDBACK: This is the name of the Cosmos DB account that is deployed along with your web app.- Data type: Data type: Boolean, must enter either True or False
This can be accomplished using the Advanced edit or simple Edit options as previously explained. The JSON to paste in the Advanced edit JSON editor is:
  {
    "name": "AZURE_COSMOSDB_ENABLE_FEEDBACK",
    "value": "True",
    "slotSetting": false
  },
Connecting to Azure AI Search and uploaded files as a data source
Using Azure AI Studio
Follow this tutorial on integrating Azure AI Search with AI Studio and redeploy your application.
Using Azure OpenAI Studio
Follow this tutorial on integrating Azure AI Search with OpenAI Studio and redeploy your application.
Using environment variables
To connect to Azure AI Search without redeploying your app, you can modify the following mandatory environment variables using any of the editing options as previously described.
DATASOURCE_TYPE: This determines which data source to use when answering a user's queries.- Data type: text. Should be set to
AzureCognitiveSearch(former name for Azure AI Search)
- Data type: text. Should be set to
AZURE_SEARCH_SERVICE: This is the name of your Azure AI Search instance.- Data type: text
AZURE_SEARCH_INDEX: This is the name of your Azure AI Search instance's index name.- Data type: text
AZURE_SEARCH_KEY: This is the authentication key of your Azure AI Search instance. Optional if using Microsoft Entra ID for authentication.- Data type: text
Further customization scenarios using environment variables
AZURE_SEARCH_USE_SEMANTIC_SEARCH: Indicates whether to use semantic search in Azure AI Search.- Data type: boolean, should be set to
Falseif not using semantic search.
- Data type: boolean, should be set to
AZURE_SEARCH_SEMANTIC_SEARCH_CONFIG: Specifies the name of the semantic search configuration to use if semantic search is enabled.- Data type: text, defaults to
azureml-default.
- Data type: text, defaults to
AZURE_SEARCH_INDEX_TOP_K: Defines the number of top documents to retrieve from Azure AI Search.- Data type: integer, should be set to
5.
- Data type: integer, should be set to
AZURE_SEARCH_ENABLE_IN_DOMAIN: Limits responses to queries related only to your data.- Data type: boolean, should be set to
True.
- Data type: boolean, should be set to
AZURE_SEARCH_CONTENT_COLUMNS: Specifies the list of fields in your Azure AI Search index that contain the text content of your documents, used when formulating a bot response.- Data type: text, defaults to
contentif deployed from Azure AI Studio or Azure OpenAI Studio,
- Data type: text, defaults to
AZURE_SEARCH_FILENAME_COLUMN: Specifies the field from your Azure AI Search index that provides a unique identifier of the source data to display in the UI.- Data type: text, defaults to
filepathif deployed from Azure AI Studio or Azure OpenAI Studio,
- Data type: text, defaults to
AZURE_SEARCH_TITLE_COLUMN: Specifies the field from your Azure AI Search index that provides a relevant title or header for your data content to display in the UI.- Data type: text, defaults to
titleif deployed from Azure AI Studio or Azure OpenAI Studio,
- Data type: text, defaults to
AZURE_SEARCH_URL_COLUMN: Specifies the field from your Azure AI Search index that contains a URL for the document.- Data type: text, defaults to
urlif deployed from Azure AI Studio or Azure OpenAI Studio,
- Data type: text, defaults to
AZURE_SEARCH_VECTOR_COLUMNS: Specifies the list of fields in your Azure AI Search index that contain vector embeddings of your documents, used when formulating a bot response.- Data type: text, defaults to
contentVectorif deployed from Azure AI Studio or Azure OpenAI Studio,
- Data type: text, defaults to
AZURE_SEARCH_QUERY_TYPE: Specifies the query type to use:simple,semantic,vector,vectorSimpleHybrid, orvectorSemanticHybrid. This setting takes precedence overAZURE_SEARCH_USE_SEMANTIC_SEARCH.- Data type: text, we recommend testing with
vectorSemanticHybrid.
- Data type: text, we recommend testing with
AZURE_SEARCH_PERMITTED_GROUPS_COLUMN: Specifies the field from your Azure AI Search index that contains Microsoft Entra group IDs, determining document-level access control.- Data type: text
AZURE_SEARCH_STRICTNESS: Specifies the strictness level for the model limiting responses to your data.- Data type: integer, should be set between
1and5, with3being recommended.
- Data type: integer, should be set between
AZURE_OPENAI_EMBEDDING_NAME: Specifies the name of your embedding model deployment if using vector search.- Data type: text
The JSON to paste in the Advanced edit JSON editor is:
{
    "name": "AZURE_SEARCH_CONTENT_COLUMNS",
    "value": "",
    "slotSetting": false
  },
  {
    "name": "AZURE_SEARCH_ENABLE_IN_DOMAIN",
    "value": "true",
    "slotSetting": false
  },
  {
    "name": "AZURE_SEARCH_FILENAME_COLUMN",
    "value": "",
    "slotSetting": false
  },
  {
    "name": "AZURE_SEARCH_INDEX",
    "value": "",
    "slotSetting": false
  },
  {
    "name": "AZURE_SEARCH_KEY",
    "value": "",
    "slotSetting": false
  },
  {
    "name": "AZURE_SEARCH_PERMITTED_GROUPS_COLUMN",
    "value": "",
    "slotSetting": false
  },
  {
    "name": "AZURE_SEARCH_QUERY_TYPE",
    "value": "vectorSemanticHybrid",
    "slotSetting": false
  },
  {
    "name": "AZURE_SEARCH_SEMANTIC_SEARCH_CONFIG",
    "value": "azureml-default",
    "slotSetting": false
  },
  {
    "name": "AZURE_SEARCH_SERVICE",
    "value": "",
    "slotSetting": false
  },
  {
    "name": "AZURE_SEARCH_STRICTNESS",
    "value": "3",
    "slotSetting": false
  },
  {
    "name": "AZURE_SEARCH_TITLE_COLUMN",
    "value": "",
    "slotSetting": false
  },
  {
    "name": "AZURE_SEARCH_TOP_K",
    "value": "5",
    "slotSetting": false
  },
  {
    "name": "AZURE_SEARCH_URL_COLUMN",
    "value": "",
    "slotSetting": false
  },
  {
    "name": "AZURE_SEARCH_USE_SEMANTIC_SEARCH",
    "value": "true",
    "slotSetting": false
  },
  {
    "name": "AZURE_SEARCH_VECTOR_COLUMNS",
    "value": "contentVector",
    "slotSetting": false
  },
Connecting to Prompt Flow as a data source
Prompt flows allow you to define highly customizable RAG and processing logic on a user's queries.
Creating and deploying your prompt flow in Azure AI Studio
Follow this tutorial to create, test, and deploy an inferencing endpoint for your prompt flow in Azure AI Studio.
Enable underlying citations from your prompt flow
When configuring your prompt flow to display citations when integrated this web application, it must return two key outputs: one called documents (your citations), and one called reply (your natural language answer).
documentsis a JSON object, which should contain the following elements.citationsis a list that can contain multiple items following the same schema. thedocumentsobject should be generated and populated based on your selected RAG pattern.
{
    "citations": [
        {
                "content": "string",
                "id": 12345,
                "title": "string",
                "filepath": "string",
                "url": "string",
                "metadata": "string",
                "chunk_id": None,
                "reindex_id": None,
                "part_index": None
        }
    ],
    "intent": "Your_string_here"
}
replyconsists of a returned string that represents the final natural language to a given user query. Yourreplymust contain references to each of the documents (sources) in the following format:[doc1], [doc2], etc. The web application will parsereplyand process the references, replacing all instances of[doc1]with small superscript numeric indicators that link directly to the ordereddocumentsthat are returned. Hence, you must prompt your LLM that generates the final natural language to include these references, which should also be passed in your LLM call to ensure that they align correctly. For example:
system:
You are a helpful chat assistant that answers a user's question based on the information retrieved from a data source.

YOU MUST ALWAYS USE CITATIONS FOR ALL FACTUAL RESPONSES. YOU MUST INCLUDE CITATIONS IN YOUR ANSWER IN THE FORMAT [doc1], [doc2], ... AND SO FORTH WHEN YOU ARE USING INFORMATION RELATING TO SAID SOURCE. THIS MUST BE RETURNED IN YOUR ANSWER.

Provide sort and concise answers with details directly related to the query.

## Conversation history for context
{% for item in chat_history %}
user:
{{item.inputs.query}}

assistant:
{{item.outputs.reply}}
{% endfor %}

## Current question
user:
### HERE ARE SOME CITED SOURCE INFORMATION FROM A MOCKED API TO ASSIST WITH ANSWERING THE QUESTION BELOW. ANSWER ONLY BASED ON THE TRUTHS PRESENTED HERE.
{{your_input_name_for_documents}}
FOR EACH OF THE CITATIONS ABOVE, YOU MUST INCLUDE IN YOUR ANSWER [doc1], [doc2], ... AND SO FORTH WHEN YOU ARE USING INFORMATION RELATING TO SAID SOURCE. THIS MUST BE RETURNED IN YOUR ANSWER.
### HERE IS THE QUESTION TO ANSWER.
{{question}}
Configuring environment variables to integrate prompt flow
The environment variables to modify are:
AZURE_OPENAI_STREAM: This determines whether the answer is loaded in a streaming (incremental load) format. This is not supported for prompt flow and thus must be set toFalseto use this feature.- Data type: boolean, set to
Trueif not using prompt flow,Falseif using prompt flow
- Data type: boolean, set to
USE_PROMPTFLOW: Indicates whether to use an existing Prompt flow deployed endpoint. If set toTrue, bothPROMPTFLOW_ENDPOINTandPROMPTFLOW_API_KEYmust be set.- Data type: boolean, should be set to
Falseif not using Prompt flow.
- Data type: boolean, should be set to
PROMPTFLOW_ENDPOINT: Specifies the URL of the deployed Prompt flow endpoint.- Data type: text, for example
https://pf-deployment-name.region.inference.ml.azure.com/score
- Data type: text, for example
PROMPTFLOW_API_KEY: The authentication key for the deployed Prompt flow endpoint. Note: only Key-based authentication is supported.- Data type: text
PROMPTFLOW_RESPONSE_TIMEOUT: Defines the timeout value in seconds for the Prompt flow endpoint to respond.- Data type: integer, should be set to
120.
- Data type: integer, should be set to
PROMPTFLOW_REQUEST_FIELD_NAME: The default field name to construct the Prompt flow request. Note:chat_historyis automatically constructed based on the interaction. If your API expects other mandatory fields, you will need to change the request parameters under thepromptflow_requestfunction.- Data type: text, should be set to
query.
- Data type: text, should be set to
PROMPTFLOW_RESPONSE_FIELD_NAME: The default field name to process the response from the Prompt flow request.- Data type: text, should be set to
reply.
- Data type: text, should be set to
PROMPTFLOW_CITATIONS_FIELD_NAME: The default field name to process the citations output from the Prompt flow request.- Data type: text, should be set to
documents.
- Data type: text, should be set to
Connecting to other data sources
Other data sources are supported, including:
- Azure Cosmos DB
- Elasticsearch
- Azure SQL Server
- Pinecone
- Azure Machine Learning Index
For further instructions on enabling these data sources, see the GitHub repository.
Updating the web app to include the latest changes
Note
As of February 1, 2024, the web app requires the app startup command to be set to python3 -m gunicorn app:app. When you're updating an app that was published before February 1, 2024, you need to manually add the startup command from the App Service Configuration page.
We recommend pulling changes from the main branch for the web app's source code frequently to ensure that you have the latest bug fixes, API version, and improvements. Additionally, the web app must be synchronized every time the API version that you're using is retired. Consider selecting either the Watch or the Star button on the web app's GitHub repo to be notified about changes and updates to the source code.
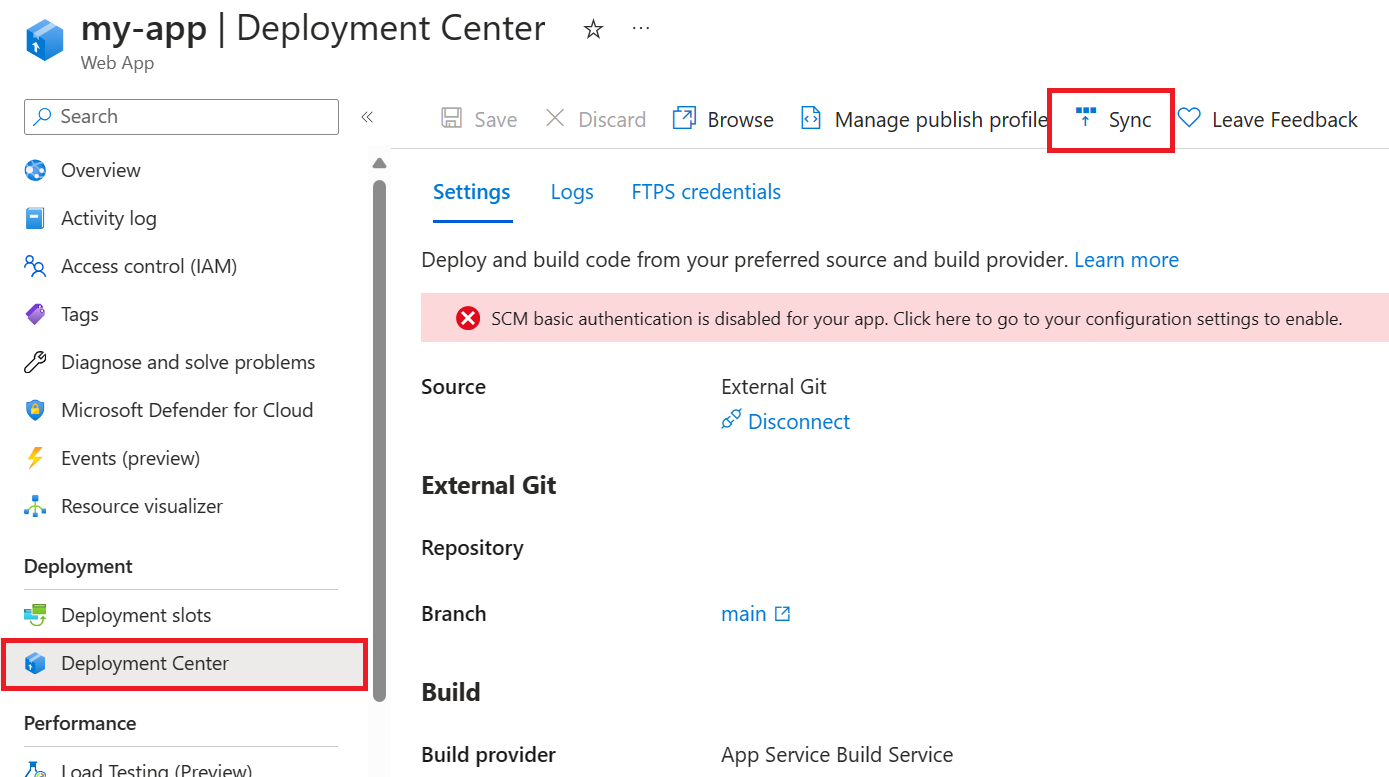
If you haven't customized the web app, you can use these steps to synchronize it:
Go to your web app in the Azure portal.
On the left menu, under Deployment, select Deployment Center.
Select Sync at the top of the pane, and confirm that the app will be redeployed.

If you customized or changed the app's source code, you need to update your app's source code manually and redeploy it:
- If your app is hosted on GitHub, push your code changes to your repo, and then use the preceding synchronization steps.
- If you're redeploying the app manually (for example, by using the Azure CLI), follow the steps for your deployment strategy.
Deleting your Cosmos DB instance
Deleting your web app doesn't delete your Cosmos DB instance automatically. To delete your Cosmos DB instance along with all stored chats, you need to go to the associated resource in the Azure portal and delete it. If you delete the Cosmos DB resource but keep the chat history option selected on subsequent updates from the Azure OpenAI Studio, the application notifies the user of a connection error. However, the user can continue to use the web app without access to the chat history.
Enabling Microsoft Entra ID authentication between services
To enable Microsoft Entra ID for intra-service authentication for your web app, follow these steps.
Enable managed identity on your Azure OpenAI resource and Azure App Service
You can enable managed identity for the Azure OpenAI resource and the Azure App Service by navigating to "Identity" and turning on the system assigned managed identity in the Azure portal for each resource.

Note
If you're using an embedding model deployed to the same resource used for inference, you only need to enable managed identity on one Azure OpenAI resource. If using an embedding model deployed to a different resource from the one used for inference, you also need to enable managed identity on the Azure OpenAI resource used to deploy your embedding model.
Enable role-based access control (RBAC) on your Azure Search resource (optional)
If using On Your Data with Azure Search, you should follow this step.
To enable your Azure OpenAI resource to access your Azure Search resource, you need to enable role-based access control on your Azure Search resource. Learn more about enabling RBAC roles for your resources.
Assign RBAC roles to enable intra-service communication
The following table summarizes the RBAC role assignments needed for all Azure resources associated with your application.
| Role | Assignee | Resource |
|---|---|---|
Search Index Data Reader |
Azure OpenAI (Inference) | Azure AI Search |
Search Service Contributor |
Azure OpenAI (Inference) | Azure AI Search |
Cognitive Services OpenAI User |
Web app | Azure OpenAI (Inference) |
Cognitive Services OpenAI User |
Azure OpenAI (Inference) | Azure OpenAI (Embeddings) |
To assign these roles, follow these instructions to create the needed role assignments.
App Settings Changes
In the webapp application settings, navigate to "Environment Variables" and make the following changes:
- Remove the environment variable
AZURE_OPENAI_KEY, as it's no longer needed. - If using On Your Data with Azure Search and are using Microsoft Entra ID authentication between Azure OpenAI and Azure Search, you should also delete the
AZURE_SEARCH_KEYenvironment variables for the data source access keys as well.
If using an embedding model deployed to the same resource as your model used for inference, there are no other settings changes required.
However, if you're using an embedding model deployed to a different resource, make the following extra changes to your app's environment variables:
- Set
AZURE_OPENAI_EMBEDDING_ENDPOINTvariable to the full API path of the embedding API for the resource you're using for embeddings, for example,https://<your embedding AOAI resource name>.openai.azure.com/openai/deployments/<your embedding deployment name>/embeddings - Delete the
AZURE_OPENAI_EMBEDDING_KEYvariable to use Microsoft Entra ID authentication.
Once all of the environment variable changes are completed, restart the webapp to begin using Microsoft Entra ID authentication between services in the webapp. It will take a few minutes after restarting for any settings changes to take effect.
Related content
प्रतिक्रिया
जल्द आ रहा है: 2024 के दौरान हम सामग्री के लिए फीडबैक तंत्र के रूप में GitHub मुद्दों को चरणबद्ध तरीके से समाप्त कर देंगे और इसे एक नई फीडबैक प्रणाली से बदल देंगे. अधिक जानकारी के लिए, देखें: https://aka.ms/ContentUserFeedback.
के लिए प्रतिक्रिया सबमिट करें और देखें