Configure credential manager - user-delegated access to backend API
APPLIES TO: All API Management tiers
This article guides you through the high level steps to configure and use a managed connection that grants Microsoft Entra users or groups delegated permissions to a backend OAuth 2.0 API. Follow these steps for scenarios when a client app (or bot) needs to access backend secured online resources on behalf of an authenticated user (for example, checking emails or placing an order).
Scenario overview
Note
This scenario only applies to credential providers configured with the authorization code grant type.
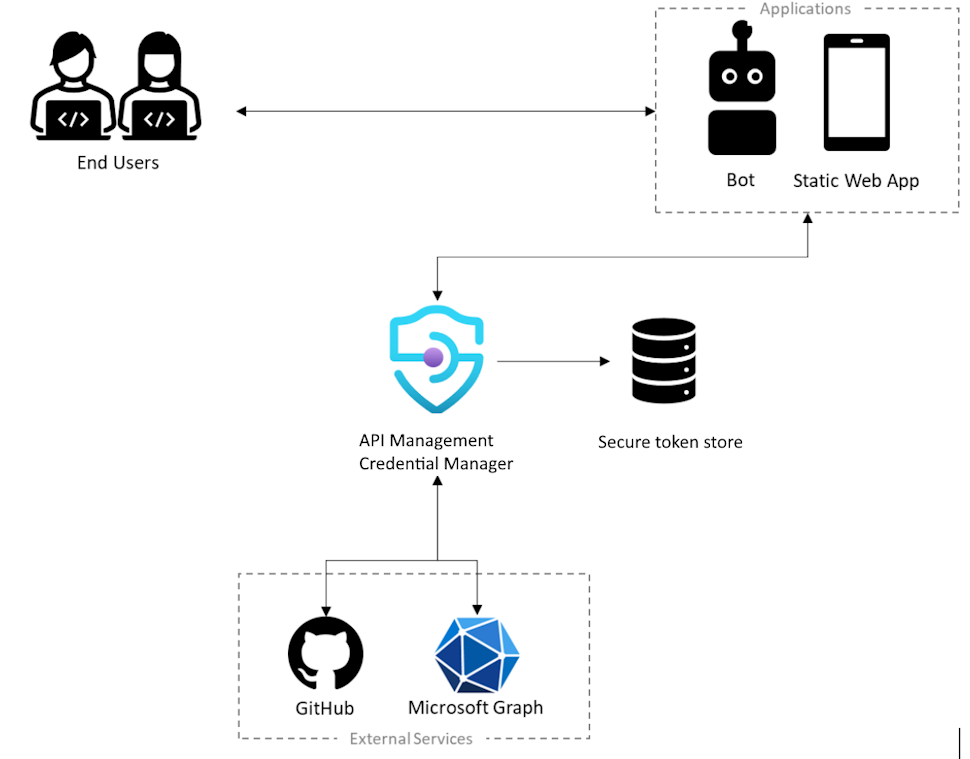
In this scenario, you configure a managed connection that enables a client app (or bot) to access a backend API on behalf of a Microsoft Entra user or group. For example, you might have a static web app that accesses a backend GitHub API and which you want to access data specific to the signed-in user. The following diagram illustrates the scenario.

- The user must authorize the app to access secured resources on their behalf, and to authorize the app, the user must authenticate their identity
- To perform operations on behalf of a user, the app calls the external backend service, such as Microsoft Graph or GitHub
- Each external service has a way of securing those calls - for example, with a user token that uniquely identifies the user
- To secure the call to the external service, the app must ask the user to sign-in, so it can acquire the user's token
- As part of the configuration, a credential provider is registered using the credential manager in the API Management instance. It contains information about the identity provider to use, along with a valid OAuth client ID and secret, the OAuth scopes to enable, and other connection metadata required by that identity provider.
- Also, a connection is created and used to help sign-in the user and get the user token so it can be managed
Prerequisites
Access to a Microsoft Entra tenant where you have permissions to create an app registration and to grant admin consent for the app's permissions. Learn more
If you want to create your own developer tenant, you can sign up for the Microsoft 365 Developer Program.
One or more users or groups in the tenant to delegate permissions to.
A running API Management instance. If you need to, create an Azure API Management instance.
A backend OAuth 2.0 API that you want to access on behalf of the user or group.
- If you choose to use Azure PowerShell locally:
- Install the latest version of the Az PowerShell module.
- Connect to your Azure account using the Connect-AzAccount cmdlet.
- If you choose to use Azure Cloud Shell:
- See Overview of Azure Cloud Shell for more information.
Step 1: Provision Azure API Management Data Plane service principal
You need to provision the Azure API Management Data Plane service principal to grant users or groups the necessary delegated permissions. Use the following steps to provision the service principal using Azure PowerShell.
Sign in to Azure PowerShell.
If the AzureAD module isn't already installed, install it with the following command:
Install-Module -Name AzureAD -Scope CurrentUser -Repository PSGallery -ForceConnect to your tenant with the following command:
Connect-AzureAD -TenantId "<YOUR_TENANT_ID>"If prompted, sign in with administrator account credentials of your tenant.
Provision the Azure API Management Data Plane service principal with the following command:
New-AzureADServicePrincipal -AppId c8623e40-e6ab-4d2b-b123-2ca193542c65 -DisplayName "Azure API Management Data Plane"
Step 2: Create a Microsoft Entra app registration
Create a Microsoft Entra ID application for user delegation and give it the appropriate permissions to read the connection in API Management.
- Sign in to the Azure portal with an account with sufficient permissions in the tenant.
- Under Azure Services, search for Microsoft Entra ID.
- On the left menu, select App registrations, and then select + New registration.
- On the Register an application page, enter your application registration settings:
- In Name, enter a meaningful name that will be displayed to users of the app, such as UserPermissions.
- In Supported account types, select an option that suits your scenario, for example, Accounts in this organizational directory only (Single tenant).
- Set the Redirect URI to Web, and enter
https://www.postman-echo.com/get.
- On the left menu, select API permissions, and then select + Add a permission.
- Select the APIs my organization uses tab, type Azure API Management Data Plane, and select it.
- Under Permissions, select Authorizations.Read, and then select Add permissions.
- On the left menu, select Overview. On the Overview page, find the Application (client) ID value and record it for use in a later step.
- On the left menu, select Certificates & secrets, and then select + New client secret.
- Enter a Description.
- Select an option for Expires.
- Select Add.
- Copy the client secret's Value before leaving the page. You need it in a later step.
Step 3: Configure a credential provider in API Management
- Sign into the portal and go to your API Management instance.
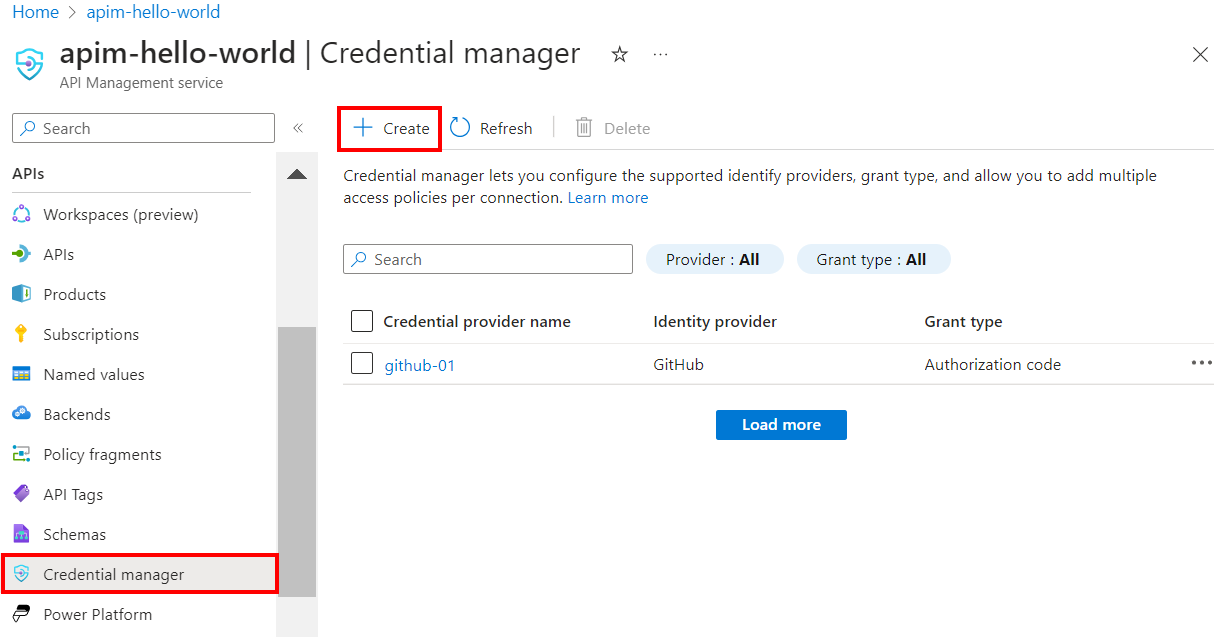
- On the left menu, select Credential manager, and then select + Create.

- On the Create credential provider page, enter the settings for the credential provider for your API. For this scenario, in Grant type, you must select Authorization code. For more information, see Configure credential providers in credential manager.
- Select Create.
- When prompted, review the OAuth redirect URL that's displayed, and select Yes to confirm that it matches the URL you entered in the app registration.
Step 4: Configure a connection
After you create a credential provider, you can add a connection to the provider. On the Connection tab, complete the steps for your connection:
- Enter a Connection name, then select Save.
- Under Step 2: Login to your connection, select the link to login to the credential provider. Complete steps there to authorize access, and return to API Management.
- Under Step 3: Determine who will have access to this connection (Access policy), select + Add. Depending on your delegation scenario, select Users or Group.
- In the Select item window, make selections in the following order:
- First, search for one or more users (or groups) to add and check the selection box.
- Then, in the list that appears, search for the app registration that you created in a previous section.
- Then click Select.
- Select Complete.
The new connection appears in the list of connections, and shows a status of Connected. If you want to create another connection for the credential provider, complete the preceding steps.
Tip
Use the portal to add, update, or delete connections to a credential provider at any time. For more information, see Configure multiple connections.
Step 5: Acquire a Microsoft Entra ID access token
To enable user-delegated access to the backend API, an access token for the delegated user or group must be provided at runtime in the get-authorization-context policy. Typically this is done programmatically in your client app by using the Microsoft Authentication Library (MSAL). This section provides manual steps to create an access token for testing.
Paste the following URL in your browser, replacing the values for
<tenant-id>and<client-id>with values from your Microsoft Entra app registration:https://login.microsoftonline.com/<tenant-id>/oauth2/authorize?client_id=<client-id>&response_type=code&redirect_uri=https://www.postman-echo.com/get&response_mode=query&resource=https://azure-api.net/authorization-manager&state=1234`When prompted, sign in. In the response body, copy the value of code that’s provided (example:
"0.AXYAh2yl…").Send the following
POSTrequest to the token endpoint, replacing<tenant-id>with your tenant ID and including the indicated header and the body parameters from your app registration and the code you copied in the previous step.POST https://login.microsoftonline.com/<tenant-id>/oauth2/token HTTP/1.1Header
Content-Type: application/x-www-form-urlencodedBody
grant_type: "authorization_code"
client_id: <client-id>
client_secret: <client-secret>
redirect_uri: <redirect-url>
code: <code>   ## The code you copied in the previous step
In the response body, copy the value of access_token that’s provided (example:
eyJ0eXAiOiJKV1QiLCJhbGciOiJSUzI1NiIsIng1dCI6IjZqQmZ1...). You'll pass this value in the policy configuration in the next step.
Step 6: Configure get-authorization-context policy for backend API
Configure the get-authorization-context policy for the backend API that you want to access on behalf of the user or group. For test purposes, you can configure the policy using the Microsoft Entra ID access token for the user that you obtained in the previous section.
Sign into the portal and go to your API Management instance.
On the left menu, select APIs and then select your OAuth 2.0 backend API.
Select All operations. In the Inbound processing section, select the (</>) (code editor) icon.
Configure the
get-authorization-contextpolicy in theinboundsection, settingidentity-typetojwt:<policies> <inbound> [...] <get-authorization-context provider-id="<credential-provider-id>" authorization-id="<connection-id>" context-variable-name="auth-context" identity-type="jwt" identity="<access-token>" ignore-error="false" /> [...] </inbound> </policies>
In the preceding policy definition, replace:
<credential-provider-id>and<connection-id>with the names of the credential provider and connection, respectively, that you configured in a preceding step.<access-token>with the Microsoft Entra ID access token that you generated in the preceding step.
Step 7: Test the API
On the Test tab, select one operation that you configured.
Select Send.
A successful response returns user data from the backend API.
Related content
- Learn more about authentication and authorization policies
- Learn more about scopes and permissions in Microsoft Entra ID.