नोट
इस पृष्ठ तक पहुंच के लिए प्राधिकरण की आवश्यकता होती है। आप साइन इन करने या निर्देशिकाएँ बदलने का प्रयास कर सकते हैं।
इस पृष्ठ तक पहुंच के लिए प्राधिकरण की आवश्यकता होती है। आप निर्देशिकाएँ बदलने का प्रयास कर सकते हैं।
Several features of Azure NetApp Files require that you have an Active Directory connection. For example, you need to have an Active Directory connection before you can create an SMB volume, a NFSv4.1 Kerberos volume, or a dual-protocol volume. This article shows you how to create and manage Active Directory connections for Azure NetApp Files.
Requirements and considerations for Active Directory connections
Important
You must follow guidelines described in Understand guidelines for Active Directory Domain Services site design and planning for Azure NetApp Files for Active Directory Domain Services (AD DS) or Microsoft Entra Domain Services used with Azure NetApp Files.
Before creating the AD connection, review Modify Active Directory connections for Azure NetApp Files to understand the impact of making changes to the AD connection configuration options after the AD connection has been created. Changes to the AD connection configuration options are disruptive to client access and some options can't be changed at all.
An Azure NetApp Files account must be created in the region where the Azure NetApp Files volumes are to be deployed.
Azure NetApp Files, by default, allows one Active Directory (AD) connection per subscription and account. You can modify the default to create one Active Directory connection per NetApp account.
The Azure NetApp Files AD connection admin account must have the following properties:
- It must be an AD DS domain user account in the same domain where the Azure NetApp Files computer accounts are created.
- It must have the permission to create computer accounts (for example, AD domain join) in the AD DS organizational unit path specified in the Organizational unit path option of the AD connection.
- It can't be a Group Managed Service Account.
The AD connection admin account supports Kerberos AES-128 and Kerberos AES-256 encryption types for authentication with AD DS for Azure NetApp Files computer account creation (for example, AD domain join operations).
To enable AES encryption, you should first enable AES-128, AES-256, RC4, and DES encryption types on Active Directory (AD) then enable AES on the control plane. You must enable encryption in Active Directory first.
Important
AES-256 encryption is required if you plan to use Windows Server 2025 domain controllers in your Active Directory environment.
To enable AES encryption support for the admin account in the AD connection, run the following Active Directory PowerShell commands:
Get-ADUser -Identity <ANF AD connection account username> Set-ADUser -KerberosEncryptionType <encryption_type>KerberosEncryptionTypeis a multivalued parameter that supports the values DES, RC4, AES-128, and AES-256.For more information, refer to the Set-ADUser documentation.
To enable the AES encryption on the Azure NetApp Files AD connection admin account, you must use an AD domain user account that is a member of one of the following AD DS groups:
- Domain Admins
- Enterprise Admins
- Administrators
- Account Operators
- Microsoft Entra Domain Services Administrators (Microsoft Entra Domain Services Only)
- Alternatively, an AD domain user account with
msDS-SupportedEncryptionTypeswrite permission on the AD connection admin account can also be used to set the Kerberos encryption type property on the AD connection admin account.
Note
When you modify the setting to enable AES on the AD connection admin account, it's a best practice to use a user account that has write permission to the AD object that is not the Azure NetApp Files AD admin. You can do so with another domain admin account or by delegating control to an account. For more information, see Delegating Administration by Using OU Objects.
If you set both AES-128 and AES-256 Kerberos encryption on the admin account of the AD connection, the Windows client negotiates the highest level of encryption supported by your AD DS. For example, if both AES-128 and AES-256 are supported, and the client supports AES-256, then AES-256 will be used.
If you change the Kerberos Distribution Center (KDC) IP address or AD Server Name, you must wait for the Kerberos ticket lifetime to mount the volume on the same NFS Linux client. The Kerberos ticket lifetime can be configured on both the client and the KDC. By default, Microsoft Active Directory sets the Kerberos ticket lifetime to 600 minutes (10 hours). For more information, see Maximum lifetime for service ticket.
If you have a requirement to enable and disable certain Kerberos encryption types for Active Directory computer accounts for domain-joined Windows hosts used with Azure NetApp Files, you must use the Group Policy
Network Security: Configure Encryption types allowed for Kerberos.Do not set the registry key
HKEY_LOCAL_MACHINE\Software\Microsoft\Windows\CurrentVersion\Policies\System\Kerberos\Parameters\SupportedEncryptionTypes. Doing this will break Kerberos authentication with Azure NetApp Files for the Windows host where this registry key was manually set.Note
The default policy setting for
Network Security: Configure Encryption types allowed for KerberosisNot Defined. When this policy setting is set toNot Defined, all encryption types except DES will be available for Kerberos encryption. You have the option to enable support for only certain Kerberos encryption types (for example,AES128_HMAC_SHA1orAES256_HMAC_SHA1). However, the default policy should be sufficient in most cases when enabling AES encryption support with Azure NetApp Files.For more information, refer to Network security: Configure encryption types allowed for Kerberos or Windows Configurations for Kerberos Supported Encryption Types
LDAP queries take effect only in the domain specified in the Active Directory connections (the AD DNS Domain Name field). This behavior applies to NFS, SMB, and dual-protocol volumes.
-
By default, LDAP queries timeout if they can't be completed in a timely fashion. If an LDAP query fails due to a timeout, the user and/or group lookup will fail and access to the Azure NetApp Files volume may be denied, depending on the permission settings of the volume.
Query timeouts can occur in large LDAP environments with many user and group objects, over slow WAN connections, and if an LDAP server is over-utilized with requests. Azure NetApp Files time-out setting for LDAP queries is set to 10 seconds. Consider leveraging the user and group DN features on the Active Directory Connection for the LDAP server to filter searches if you're experiencing LDAP query time-out issues.
NetApp accounts and Active Directory type
You can use the NetApp account overview page to confirm the Active Directory account type. There are three values for AD type:
NA: Existing NetApp account which supports only one AD configuration per subscription and region. The AD configuration is not shared with other NetApp accounts in the subscription.
Multi AD: NetApp account supports one AD configuration in each NetApp account in the subscription. This allows for more than one AD connection per subscription when using multiple NetApp accounts.
Note
Ensure that you are using API version 2024-11-01 or later to use Multi AD.
Shared AD: NetApp account supports only one AD configuration per subscription and region, but the configuration is shared across NetApp accounts in the subscription and region.
For more information about the relationship between NetApp accounts and subscriptions, see Storage hierarchy of Azure NetApp Files.
Create an Active Directory connection
From your NetApp account, select Active Directory connections then Join.

Note
By default, Azure NetApp Files supports only one Active Directory connection within the same region and the same subscription. You can modify this setting to create one Active Directory connection per NetApp account.
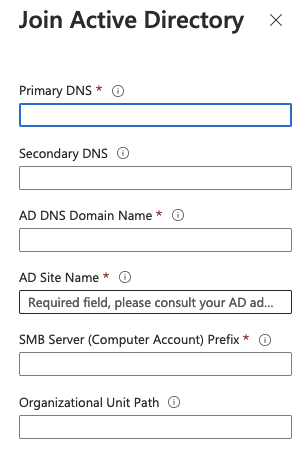
In the Join Active Directory window, provide the following information, based on the Domain Services you want to use:
Primary DNS (required)
This is the IP address of the primary DNS server that is required for Active Directory domain join operations, SMB authentication, Kerberos, and LDAP operations.Secondary DNS
This is the IP address of the secondary DNS server that is required for Active Directory domain join operations, SMB authentication, Kerberos, and LDAP operations.Note
It's recommended that you configure a Secondary DNS server. See Understand guidelines for Active Directory Domain Services site design and planning for Azure NetApp Files. Ensure that your DNS server configuration meets the requirements for Azure NetApp Files. Otherwise, Azure NetApp Files service operations, SMB authentication, Kerberos, or LDAP operations might fail.
If you use Microsoft Entra Domain Services, use the IP addresses of the Microsoft Entra Domain Services domain controllers for Primary DNS and Secondary DNS respectively.
AD DNS Domain Name (required)
This is the fully qualified domain name of the AD DS used with Azure NetApp Files (for example,contoso.com).AD Site Name (required)
This is the AD DS site name that Azure NetApp Files uses for domain controller discovery.The default site name for both AD DS and Microsoft Entra Domain Services is
Default-First-Site-Name. Follow the naming conventions for site names if you want to rename the site name.Note
See Understand guidelines for Active Directory Domain Services site design and planning for Azure NetApp Files. Ensure that your AD DS site design and configuration meets the requirements for Azure NetApp Files. Otherwise, Azure NetApp Files service operations, SMB authentication, Kerberos, or LDAP operations might fail.
SMB server (computer account) prefix (required)
This is the naming prefix for new computer accounts created in AD DS for Azure NetApp Files SMB, dual protocol, and NFSv4.1 Kerberos volumes.For example, if the naming standard that your organization uses for file services is
NAS-01,NAS-02, and so on, then you would useNASfor the prefix.Azure NetApp Files will create additional computer accounts in AD DS as needed.
Important
Renaming the SMB server prefix after you create the Active Directory connection is disruptive. You need to re-mount existing SMB shares after renaming the SMB server prefix.
Organizational unit path
This is the LDAP path for the organizational unit (OU) where SMB server computer accounts will be created. That is,OU=second level, OU=first level. For example, if you want to use an OU calledANFcreated at the root of the domain, the value would beOU=ANF.If no value is provided, Azure NetApp Files uses the
CN=Computerscontainer.If you're using Azure NetApp Files with Microsoft Entra Domain Services, the organizational unit path is
OU=AADDC Computers
AES Encryption
This option enables AES encryption authentication support for the admin account of the AD connection.
See Requirements for Active Directory connections for requirements.
-
This option enables LDAP signing. This functionality enables integrity verification for Simple Authentication and Security Layer (SASL) LDAP binds from Azure NetApp Files and the user-specified Active Directory Domain Services domain controllers.
Azure NetApp Files supports LDAP Channel Binding if both LDAP Signing and LDAP over TLS settings options are enabled in the Active Directory Connection. For more information, see ADV190023 | Microsoft Guidance for Enabling LDAP Channel Binding and LDAP Signing.
Note
DNS PTR records for the AD DS computer account(s) must be created in the AD DS Organizational Unit specified in the Azure NetApp Files AD connection for LDAP Signing to work.

Allow local NFS users with LDAP This option enables local NFS client users to access to NFS volumes. Setting this option disables extended groups for NFS volumes, which limits the number of supported groups for a user to 16. When enabled, groups beyond the 16 group limit aren't honored in access permissions. For more information, see Allow local NFS users with LDAP to access a dual-protocol volume.
LDAP over TLS
This option enables LDAP over TLS for secure communication between an Azure NetApp Files volume and the Active Directory LDAP server. You can enable LDAP over TLS for NFS, SMB, and dual-protocol volumes of Azure NetApp Files.
Note
LDAP over TLS must not be enabled if you're using Microsoft Entra Domain Services. Microsoft Entra Domain Services uses LDAPS (port 636) to secure LDAP traffic instead of LDAP over TLS (port 389).
For more information, see Enable Active Directory Domain Services (AD DS) LDAP authentication for NFS volumes.
Server root CA Certificate
This option uploads the CA certificate used with LDAP over TLS.
For more information, see Enable Active Directory Domain Services (AD DS) LDAP authentication for NFS volumes.
LDAP Search Scope, User DN, Group DN, and Group Membership Filter
The LDAP search scope option optimizes Azure NetApp Files storage LDAP queries for use with large AD DS topologies and LDAP with extended groups or Unix security style with an Azure NetApp Files dual-protocol volume.
The User DN and Group DN options allow you to set the search base in AD DS LDAP. These options limit the search areas for LDAP queries, reducing the search time and helping to reduce LDAP query time outs.
The Group Membership Filter option allows you to create a custom search filter for users who are members of specific AD DS groups.

See Configure AD DS LDAP with extended groups for NFS volume access for information about these options.
Preferred server for LDAP client
The Preferred server for LDAP client option allows you to submit the IP addresses of up to two AD servers as a comma-separated list. Rather than sequentially contacting all of the discovered AD services for a domain, the LDAP client will contact the specified servers first.
Encrypted SMB connections to Domain Controller
Encrypted SMB connections to Domain Controller specifies whether encryption should be used for communication between an SMB server and domain controller. When enabled, only SMB3 will be used for encrypted domain controller connections.
This feature is currently in preview. If this is your first time using Encrypted SMB connections to domain controller, you must register it:
Register-AzProviderFeature -ProviderNamespace Microsoft.NetApp -FeatureName ANFEncryptedSMBConnectionsToDCCheck the status of the feature registration:
Note
The RegistrationState may be in the
Registeringstate for up to 60 minutes before changing toRegistered. Wait until the status isRegisteredbefore continuing.Get-AzProviderFeature -ProviderNamespace Microsoft.NetApp -FeatureName ANFEncryptedSMBConnectionsToDCYou can also use Azure CLI commands
az feature registerandaz feature showto register the feature and display the registration status.Backup policy users This option grants addition security privileges to AD DS domain users or groups that require elevated backup privileges to support backup, restore, and migration workflows in Azure NetApp Files. The specified AD DS user accounts or groups will have elevated NTFS permissions at the file or folder level.

The following privileges apply when you use the Backup policy users setting:
Privilege Description SeBackupPrivilegeBack up files and directories, overriding any ACLs. SeRestorePrivilegeRestore files and directories, overriding any ACLs.
Set any valid user or group SID as the file owner.SeChangeNotifyPrivilegeBypass traverse checking.
Users with this privilege aren't required to have traversed (x) permissions to traverse folders or symlinks.Security privilege users
This option grants security privilege (SeSecurityPrivilege) to AD DS domain users or groups that require elevated privileges to access Azure NetApp Files volumes. The specified AD DS users or groups will be allowed to perform certain actions on SMB shares that require security privilege not assigned by default to domain users.
The following privilege applies when you use the Security privilege users setting:
Privilege Description SeSecurityPrivilegeManage log operations. This feature is used for installing SQL Server in certain scenarios where a non-administrator AD DS domain account must temporarily be granted elevated security privilege.
Note
Using the Security privilege users feature relies on the SMB Continuous Availability Shares feature. SMB Continuous Availability is not supported on custom applications. It's only supported for workloads using Citrix App Layering, FSLogix user profile containers, and Microsoft SQL Server (not Linux SQL Server).
Important
This feature is optional and supported only with SQL server. The AD DS domain account used for installing SQL server must already exist before you add it to the Security privilege users option. When you add the SQL Server installer account to Security privilege users option, the Azure NetApp Files service might validate the account by contacting an AD DS domain controller. This action might fail if Azure NetApp Files can't contact the AD DS domain controller.
For more information about
SeSecurityPrivilegeand SQL Server, see SQL Server installation fails if the Setup account doesn't have certain user rights.Administrators privilege users
This option grants additional security privileges to AD DS domain users or groups that require elevated privileges to access the Azure NetApp Files volumes. The specified accounts will have elevated permissions at the file or folder level.
Note
The domain admins are automatically added to the Administrators privilege users group.

Note
This privilege is useful for data migrations.
The following privileges apply when you use the Administrators privilege users setting:
Privilege Description SeBackupPrivilegeBack up files and directories, overriding any ACLs. SeRestorePrivilegeRestore files and directories, overriding any ACLs.
Set any valid user or group SID as the file owner.SeChangeNotifyPrivilegeBypass traverse checking.
Users with this privilege aren't required to have traverse (x) permissions to traverse folders or symlinks.SeTakeOwnershipPrivilegeTake ownership of files or other objects. SeSecurityPrivilegeManage log operations. SeChangeNotifyPrivilegeBypass traverse checking.
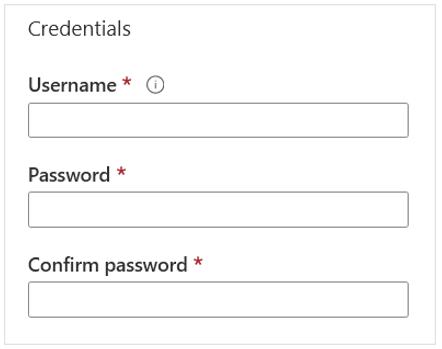
Users with this privilege aren't required to have traverse (x) permissions to traverse folders or symlinks.Credentials, including your username and password

Important
Although Active Directory supports 256-character passwords, Active Directory passwords with Azure NetApp Files cannot exceed 64 characters.
Select Join.
The Active Directory connection you created appears.

Create one Active Directory connection per NetApp account
The current default behavior of Azure NetApp Files supports one AD connection per subscription and region. By enabling this feature, you modify behavior so that each NetApp account within an Azure subscription can have its own AD connection. When this feature is enabled, newly created NetApp accounts maintain their own AD connection.
Once configured, the AD connection of the NetApp account is used when you create an SMB volume, a NFSv4.1 Kerberos volume, or a dual-protocol volume. That means Azure NetApp Files supports more than one AD connection per Azure subscription when multiple NetApp accounts are used.
Note
If a subscription has both this feature and the Shared Active Directory feature enabled, its existing accounts still share the AD configuration. Any new NetApp accounts created on the subscription can use their own AD configurations. You can confirm your configuration in your account overview page in the AD type field.
Important
The scope of each AD configuration is limited to its parent NetApp account.
Register the feature
The ability to create one AD connection per NetApp account is generally available. You need to register the feature before using it for the first time. After registration, the feature is enabled and works in the background.
Register the feature:
Register-AzProviderFeature -ProviderNamespace Microsoft.NetApp -FeatureName ANFMultipleActiveDirectoryCheck the status of the feature registration:
Note
The RegistrationState may be in the
Registeringstate for up to 60 minutes before changing toRegistered. Wait until the status is Registered before continuing.Get-AzProviderFeature -ProviderNamespace Microsoft.NetApp -FeatureName ANFMultipleActiveDirectoryYou can also use Azure CLI commands
az feature registerandaz feature showto register the feature and display the registration status.
Map multiple NetApp accounts in the same subscription and region to one AD connection (preview)
The Shared AD feature enables all NetApp accounts to share an AD connection created by one of the NetApp accounts that belong to the same subscription and the same region. For example, using this feature, all NetApp accounts in the same subscription and region can use the common AD configuration to create an SMB volume, a NFSv4.1 Kerberos volume, or a dual-protocol volume. When you use this feature, the AD connection is visible in all NetApp accounts that are under the same subscription and same region.
With the introduction of the feature to create one AD connection per NetApp account, new feature registrations for the Shared AD feature aren't accepted.
Note
You can register to use one AD connection per NetApp account if you're already enrolled in the preview for Shared AD. If you currently meet the maximum of 10 NetApp accounts per Azure region per subscription, you must initiate a support request to increase the limit. You can confirm your configuration in your account overview page in the AD type field.
Reset Active Directory computer account password
If you accidentally reset the password of the AD computer account on the AD server or the AD server is unreachable, you can safely reset the computer account password to preserve connectivity to your volumes. A reset affects all volumes on the SMB server.
Register the feature
The reset Active Directory computer account password feature is currently in public preview. If you're using this feature for the first time, you need to register the feature first.
- Register the reset Active Directory computer account password feature:
Register-AzProviderFeature -ProviderNamespace Microsoft.NetApp -FeatureName ANFResetADAccountForVolume
- Check the status of the feature registration. The RegistrationState may be in the
Registeringstate for up to 60 minutes before changing toRegistered. Wait until the status isRegisteredbefore continuing.
Get-AzProviderFeature -ProviderNamespace Microsoft.NetApp -FeatureName ANFResetADAccountForVolume
You can also use Azure CLI commands az feature register and az feature show to register the feature and display the registration status.
Steps
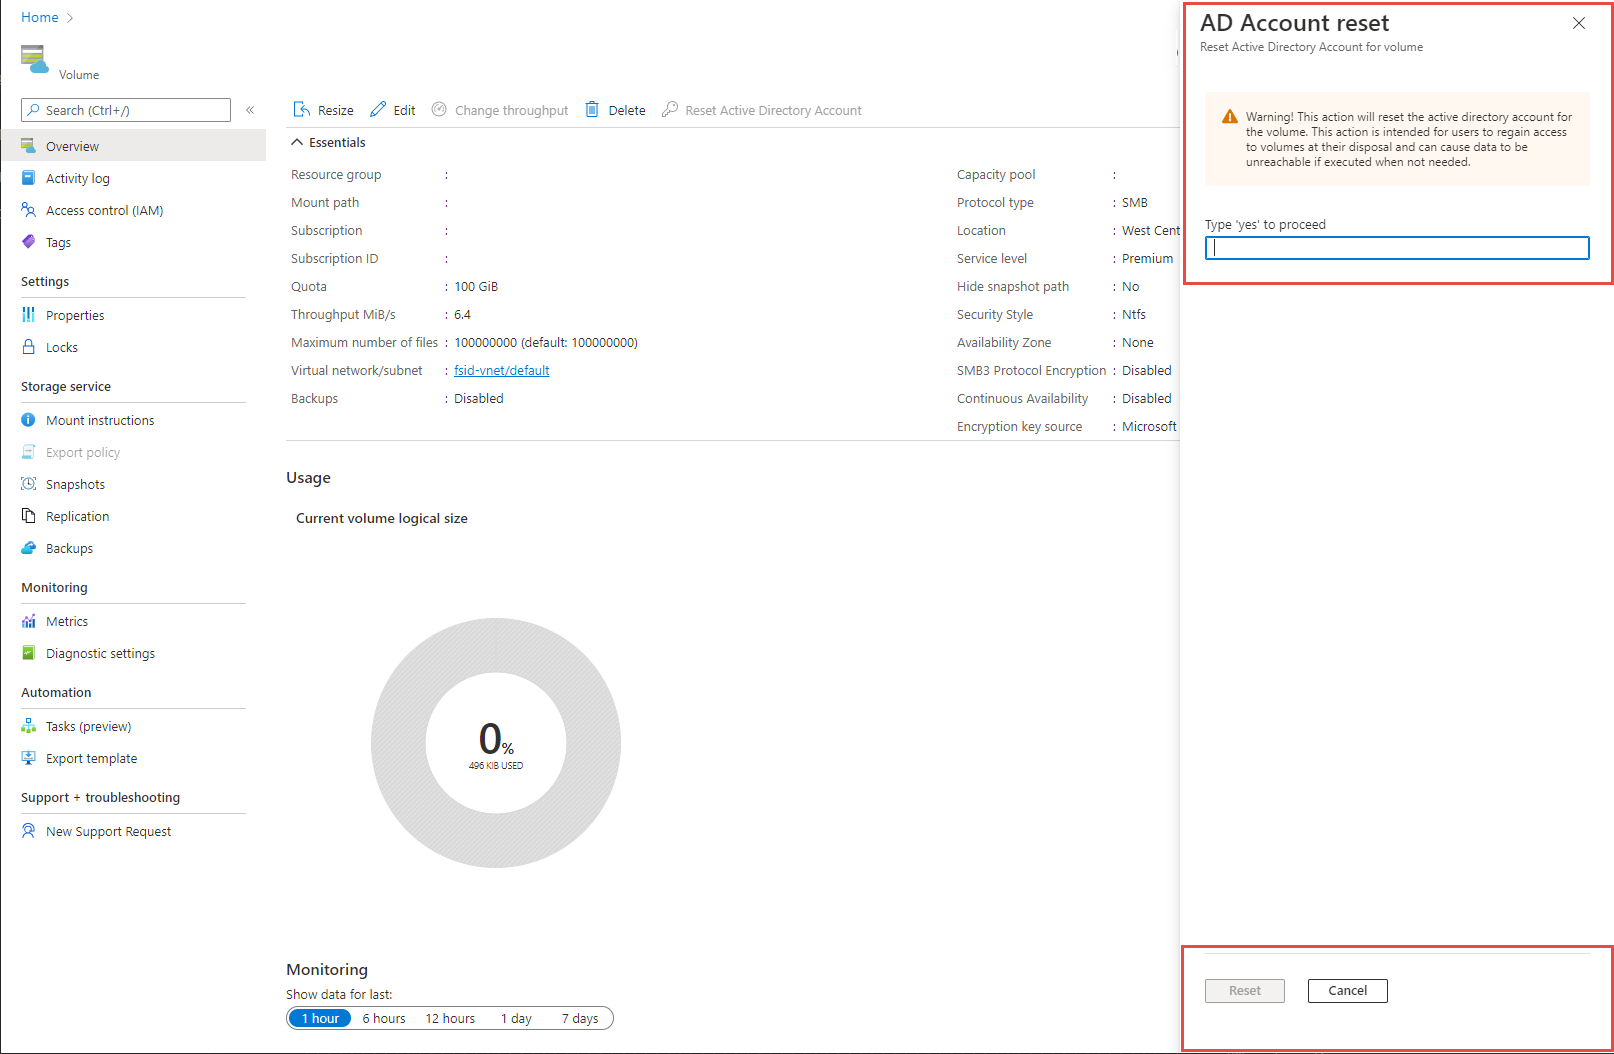
- Navigate to the volume Overview menu. Select Reset Active Directory Account.
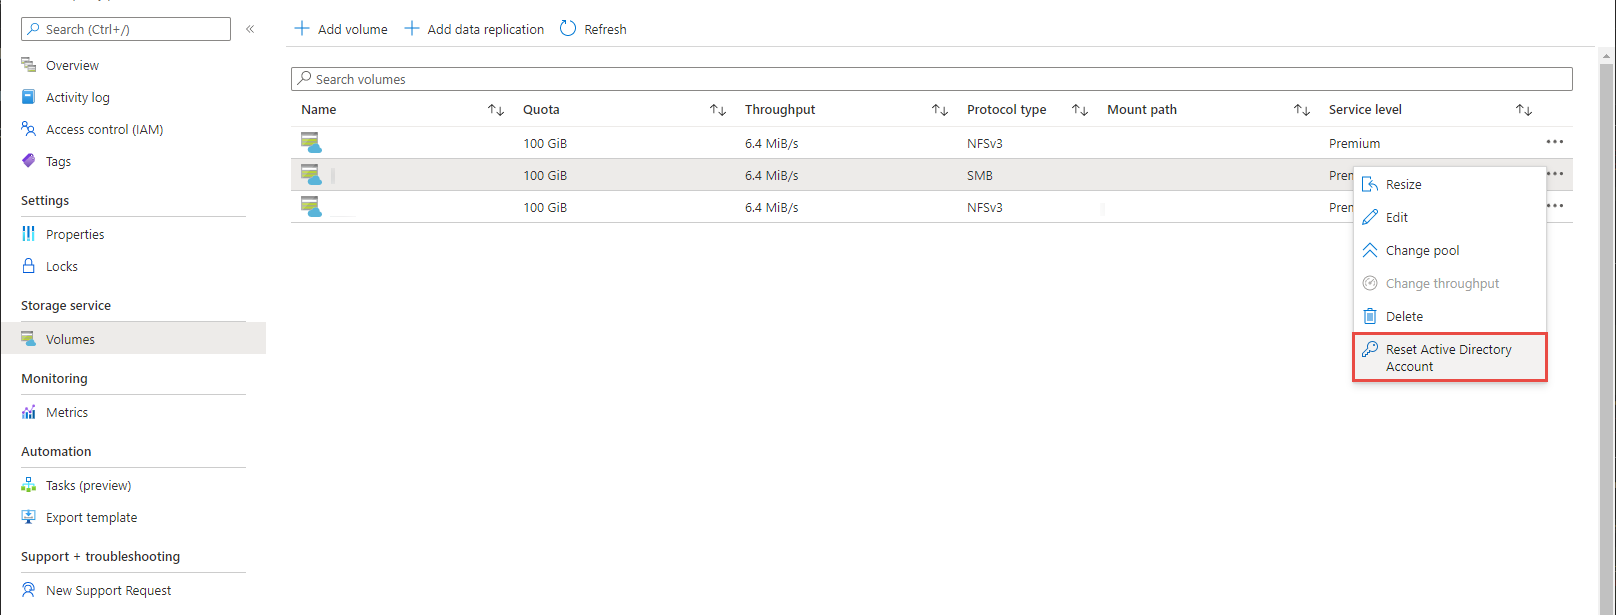
 Alternately, navigate to the Volumes menu. Identify the volume for which you want to reset the Active Directory account and select the three dots (
...) at the end of the row. Select Reset Active Directory Account.
- A warning message that explains the implications of this action will pop up. Type yes in the text box to proceed.

Next steps
- Understand guidelines for Active Directory Domain Services site design and planning for Azure NetApp Files
- Modify Active Directory connections
- Create an SMB volume
- Create a dual-protocol volume
- Configure NFSv4.1 Kerberos encryption
- Install a new Active Directory forest using Azure CLI
- Enable Active Directory Domain Services (AD DS) LDAP authentication for NFS volumes
- AD DS LDAP with extended groups for NFS volume access