नोट
इस पृष्ठ तक पहुंच के लिए प्राधिकरण की आवश्यकता होती है। आप साइन इन करने या निर्देशिकाएँ बदलने का प्रयास कर सकते हैं।
इस पृष्ठ तक पहुंच के लिए प्राधिकरण की आवश्यकता होती है। आप निर्देशिकाएँ बदलने का प्रयास कर सकते हैं।
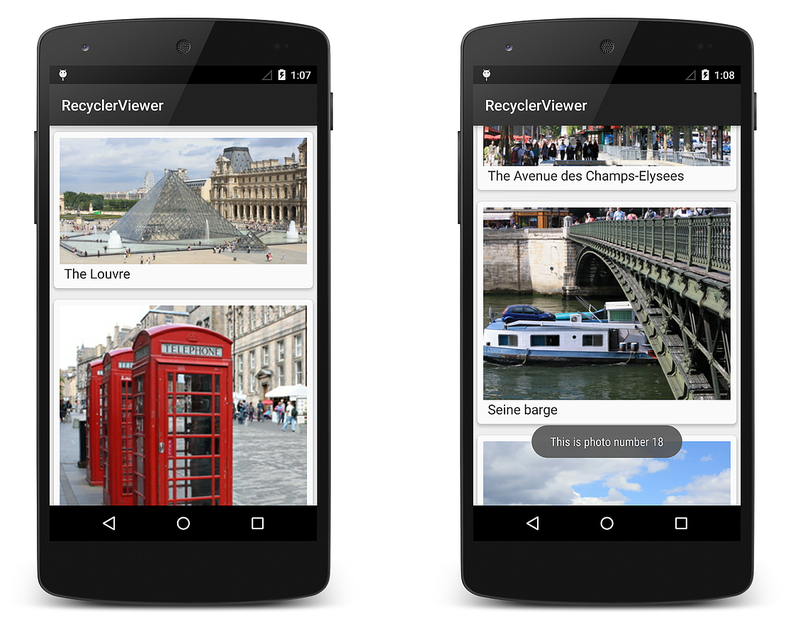
To understand how RecyclerView works in a typical application, this
topic explores a simple code example that uses RecyclerView to display a large
collection of photos:
RecyclerViewer uses
CardView to
implement each photograph item in the RecyclerView layout. Because
of RecyclerView's performance advantages, this sample app is able
to quickly scroll through a large collection of photos smoothly and
without noticeable delays.
An Example Data Source
In this example app, a "photo album" data source (represented by
the PhotoAlbum class) supplies RecyclerView with item content.
PhotoAlbum is a collection of photos with captions; when you
instantiate it, you get a ready-made collection of 32 photos:
PhotoAlbum mPhotoAlbum = new PhotoAlbum ();
Each photo instance in PhotoAlbum exposes properties that allow you
to read its image resource ID, PhotoID, and its caption string,
Caption. The collection of photos is organized such that each photo
can be accessed by an indexer. For example, the following lines of code
access the image resource ID and caption for the tenth photo in the
collection:
int imageId = mPhotoAlbum[9].ImageId;
string caption = mPhotoAlbum[9].Caption;
PhotoAlbum also provides a RandomSwap method that you can call to
swap the first photo in the collection with a randomly-chosen photo
elsewhere in the collection:
mPhotoAlbum.RandomSwap ();
Because the implementation details of PhotoAlbum are not relevant to
understanding RecyclerView, the PhotoAlbum source code is not
presented here.
Layout and Initialization
The layout file, Main.axml, consists of a single RecyclerView within
a LinearLayout:
<?xml version="1.0" encoding="utf-8"?>
<LinearLayout xmlns:android="http://schemas.android.com/apk/res/android"
    android:orientation="vertical"
    android:layout_width="fill_parent"
    android:layout_height="fill_parent">
    <android.support.v7.widget.RecyclerView
        android:id="@+id/recyclerView"
        android:scrollbars="vertical"
        android:layout_width="fill_parent"
        android:layout_height="fill_parent" />
</LinearLayout>
Note that you must use the fully-qualified name
android.support.v7.widget.RecyclerView because RecyclerView is
packaged in a support library. The OnCreate method of MainActivity
initializes this layout, instantiates the adapter, and prepares the
underlying data source:
public class MainActivity : Activity
{
    RecyclerView mRecyclerView;
    RecyclerView.LayoutManager mLayoutManager;
    PhotoAlbumAdapter mAdapter;
    PhotoAlbum mPhotoAlbum;

    protected override void OnCreate (Bundle bundle)
    {
        base.OnCreate (bundle);

        // Prepare the data source:
        mPhotoAlbum = new PhotoAlbum ();

        // Instantiate the adapter and pass in its data source:
        mAdapter = new PhotoAlbumAdapter (mPhotoAlbum);

        // Set our view from the "main" layout resource:
        SetContentView (Resource.Layout.Main);

        // Get our RecyclerView layout:
        mRecyclerView = FindViewById<RecyclerView> (Resource.Id.recyclerView);

        // Plug the adapter into the RecyclerView:
        mRecyclerView.SetAdapter (mAdapter);
This code does the following:
Instantiates the
PhotoAlbumdata source.Passes the photo album data source to the constructor of the adapter,
PhotoAlbumAdapter(which is defined later in this guide). Note that it is considered a best practice to pass the data source as a parameter to the constructor of the adapter.Gets the
RecyclerViewfrom the layout.Plugs the adapter into the
RecyclerViewinstance by calling theRecyclerViewSetAdaptermethod as shown above.
Layout Manager
Each item in the RecyclerView is made up of a CardView that
contains a photo image and photo caption (details are covered in the
View Holder section below). The predefined
LinearLayoutManager is used to lay out each CardView in a vertical
scrolling arrangement:
mLayoutManager = new LinearLayoutManager (this);
mRecyclerView.SetLayoutManager (mLayoutManager);
This code resides in the main activity's OnCreate method. The
constructor to the layout manager requires a context, so the
MainActivity is passed using this as seen above.
Instead of using the predefined LinearLayoutManager, you can
plug in a custom layout manager that displays two CardView items
side-by-side, implementing a page-turning animation effect to traverse
through the collection of photos. Later in this guide, you will see an
example of how to modify the layout by swapping in a different layout
manager.
View Holder
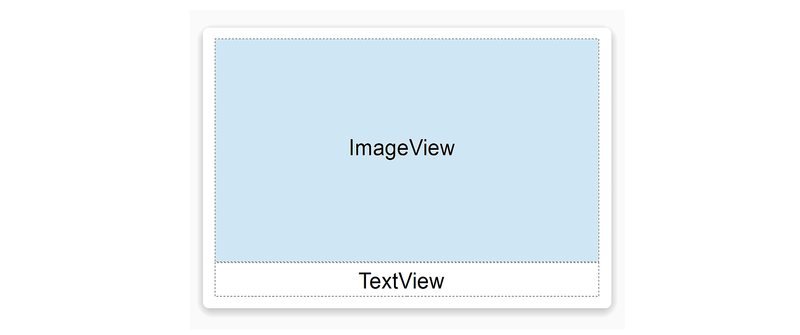
The view holder class is called PhotoViewHolder. Each
PhotoViewHolder instance holds references to the ImageView and
TextView of an associated row item, which is laid out in a CardView
as diagrammed here:
PhotoViewHolder derives from RecyclerView.ViewHolder and contains properties
to store references to the ImageView and TextView shown in the above layout.
PhotoViewHolder consists of two properties and one constructor:
public class PhotoViewHolder : RecyclerView.ViewHolder
{
    public ImageView Image { get; private set; }
    public TextView Caption { get; private set; }

    public PhotoViewHolder (View itemView) : base (itemView)
    {
        // Locate and cache view references:
        Image = itemView.FindViewById<ImageView> (Resource.Id.imageView);
        Caption = itemView.FindViewById<TextView> (Resource.Id.textView);
    }
}
In this code example, the PhotoViewHolder constructor is passed a
reference to the parent item view (the CardView) that
PhotoViewHolder wraps. Note that you always forward the parent item
view to the base constructor. The PhotoViewHolder constructor calls
FindViewById on the parent item view to locate each of its child view
references, ImageView and TextView, storing the results in the
Image and Caption properties, respectively. The adapter later
retrieves view references from these properties when it updates this
CardView's child views with new data.
For more information about RecyclerView.ViewHolder, see the
RecyclerView.ViewHolder class reference.
Adapter
The adapter loads each RecyclerView row with data for a particular
photograph. For a given photograph at row position P, for example,
the adapter locates the associated data at position P within the data
source and copies this data to the row item at position P in the
RecyclerView collection. The adapter uses the view holder to lookup
the references for the ImageView and TextView at that position so
it doesn't have to repeatedly call FindViewById for those views as
the user scrolls through the photograph collection and reuses views.
In RecyclerViewer, an adapter class is derived from
RecyclerView.Adapter to create PhotoAlbumAdapter:
public class PhotoAlbumAdapter : RecyclerView.Adapter
{
    public PhotoAlbum mPhotoAlbum;

    public PhotoAlbumAdapter (PhotoAlbum photoAlbum)
    {
        mPhotoAlbum = photoAlbum;
    }
    ...
}
The mPhotoAlbum member contains the data source (the photo album)
that is passed into the constructor; the constructor copies the photo
album into this member variable. The following required
RecyclerView.Adapter methods are implemented:
OnCreateViewHolder– Instantiates the item layout file and view holder.OnBindViewHolder– Loads the data at the specified position into the views whose references are stored in the given view holder.ItemCount– Returns the number of items in the data source.
The layout manager calls these methods while it is positioning items
within the RecyclerView. The implementation of these methods is
examined in the following sections.
OnCreateViewHolder
The layout manager calls OnCreateViewHolder when the RecyclerView
needs a new view holder to represent an item. OnCreateViewHolder
inflates the item view from the view's layout file and wraps the view
in a new PhotoViewHolder instance. The PhotoViewHolder constructor
locates and stores references to child views in the layout as described
previously in View Holder.
Each row item is represented by a CardView that contains an
ImageView (for the photo) and a TextView (for the caption). This
layout resides in the file PhotoCardView.axml:
<?xml version="1.0" encoding="utf-8"?>
<FrameLayout xmlns:card_view="http://schemas.android.com/apk/res-auto"
    xmlns:android="http://schemas.android.com/apk/res/android"
    android:layout_width="fill_parent"
    android:layout_height="wrap_content">
    <android.support.v7.widget.CardView
        android:layout_width="match_parent"
        android:layout_height="wrap_content"
        card_view:cardElevation="4dp"
        card_view:cardUseCompatPadding="true"
        card_view:cardCornerRadius="5dp">
        <LinearLayout
            android:layout_width="match_parent"
            android:layout_height="wrap_content"
            android:orientation="vertical"
            android:padding="8dp">
            <ImageView
                android:layout_width="match_parent"
                android:layout_height="wrap_content"
                android:id="@+id/imageView"
                android:scaleType="centerCrop" />
            <TextView
                android:layout_width="match_parent"
                android:layout_height="wrap_content"
                android:textAppearance="?android:attr/textAppearanceMedium"
                android:textColor="#333333"
                android:text="Caption"
                android:id="@+id/textView"
                android:layout_gravity="center_horizontal"
                android:layout_marginLeft="4dp" />
        </LinearLayout>
    </android.support.v7.widget.CardView>
</FrameLayout>
This layout represents a single row item in the RecyclerView. The
OnBindViewHolder method (described below) copies data from the data
source into the ImageView and TextView of this layout.
OnCreateViewHolder inflates this layout for a given photo location in
the RecyclerView and instantiates a new PhotoViewHolder instance
(which locates and caches references to the ImageView and TextView
child views in the associated CardView layout):
public override RecyclerView.ViewHolder
    OnCreateViewHolder (ViewGroup parent, int viewType)
{
    // Inflate the CardView for the photo:
    View itemView = LayoutInflater.From (parent.Context).
                Inflate (Resource.Layout.PhotoCardView, parent, false);

    // Create a ViewHolder to hold view references inside the CardView:
    PhotoViewHolder vh = new PhotoViewHolder (itemView);
    return vh;
}
The resulting view holder instance, vh, is returned back to the
caller (the layout manager).
OnBindViewHolder
When the layout manager is ready to display a particular view in the
RecyclerView's visible screen area, it calls the adapter's
OnBindViewHolder method to fill the item at the specified row
position with content from the data source. OnBindViewHolder gets the
photo information for the specified row position (the photo's image
resource and the string for the photo's caption) and copies this data
to the associated views. Views are located via references stored in the
view holder object (which is passed in through the holder parameter):
public override void
    OnBindViewHolder (RecyclerView.ViewHolder holder, int position)
{
    PhotoViewHolder vh = holder as PhotoViewHolder;

    // Load the photo image resource from the photo album:
    vh.Image.SetImageResource (mPhotoAlbum[position].PhotoID);

    // Load the photo caption from the photo album:
    vh.Caption.Text = mPhotoAlbum[position].Caption;
}
The passed-in view holder object must first be cast into the derived
view holder type (in this case, PhotoViewHolder) before it is used.
The adapter loads the image resource into the view referenced by the
view holder's Image property, and it copies the caption text into the
view referenced by the view holder's Caption property. This binds
the associated view with its data.
Notice that OnBindViewHolder is the code that deals directly with the
structure of the data. In this case, OnBindViewHolder understands how
to map the RecyclerView item position to its associated data item in
the data source. The mapping is straightforward in this case because
the position can be used as an array index into the photo album;
however, more complex data sources may require extra code to establish
such a mapping.
ItemCount
The ItemCount method returns the number of items in the data
collection. In the example photo viewer app, the item count is the
number of photos in the photo album:
public override int ItemCount
{
    get { return mPhotoAlbum.NumPhotos; }
}
For more information about RecyclerView.Adapter, see the
RecyclerView.Adapter class reference.
Putting it All Together
The resulting RecyclerView implementation for the example photo app
consists of MainActivity code that creates the data source, layout
manager and the adapter. MainActivity creates the mRecyclerView
instance, instantiates the data source and the adapter, and plugs in
the layout manager and adapter:
public class MainActivity : Activity
{
    RecyclerView mRecyclerView;
    RecyclerView.LayoutManager mLayoutManager;
    PhotoAlbumAdapter mAdapter;
    PhotoAlbum mPhotoAlbum;

    protected override void OnCreate (Bundle bundle)
    {
        base.OnCreate (bundle);
        mPhotoAlbum = new PhotoAlbum();
        SetContentView (Resource.Layout.Main);
        mRecyclerView = FindViewById<RecyclerView> (Resource.Id.recyclerView);

        // Plug in the linear layout manager:
        mLayoutManager = new LinearLayoutManager (this);
        mRecyclerView.SetLayoutManager (mLayoutManager);

        // Plug in my adapter:
        mAdapter = new PhotoAlbumAdapter (mPhotoAlbum);
        mRecyclerView.SetAdapter (mAdapter);
    }
}
PhotoViewHolder locates and caches the view references:
public class PhotoViewHolder : RecyclerView.ViewHolder
{
    public ImageView Image { get; private set; }
    public TextView Caption { get; private set; }

    public PhotoViewHolder (View itemView) : base (itemView)
    {
        // Locate and cache view references:
        Image = itemView.FindViewById<ImageView> (Resource.Id.imageView);
        Caption = itemView.FindViewById<TextView> (Resource.Id.textView);
    }
}
PhotoAlbumAdapter implements the three required method overrides:
public class PhotoAlbumAdapter : RecyclerView.Adapter
{
    public PhotoAlbum mPhotoAlbum;
    public PhotoAlbumAdapter (PhotoAlbum photoAlbum)
    {
        mPhotoAlbum = photoAlbum;
    }

    public override RecyclerView.ViewHolder
        OnCreateViewHolder (ViewGroup parent, int viewType)
    {
        View itemView = LayoutInflater.From (parent.Context).
                    Inflate (Resource.Layout.PhotoCardView, parent, false);
        PhotoViewHolder vh = new PhotoViewHolder (itemView);
        return vh;
    }

    public override void
        OnBindViewHolder (RecyclerView.ViewHolder holder, int position)
    {
        PhotoViewHolder vh = holder as PhotoViewHolder;
        vh.Image.SetImageResource (mPhotoAlbum[position].PhotoID);
        vh.Caption.Text = mPhotoAlbum[position].Caption;
    }

    public override int ItemCount
    {
        get { return mPhotoAlbum.NumPhotos; }
    }
}
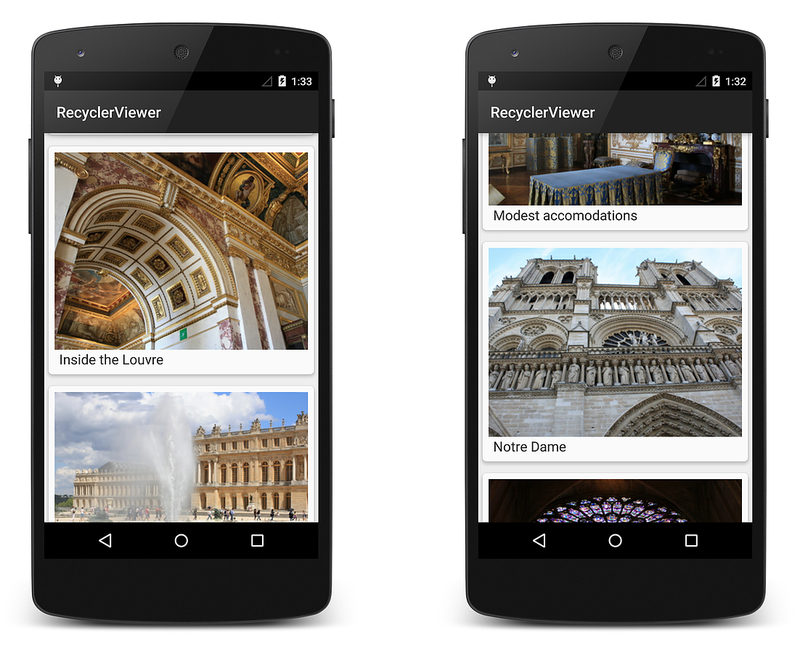
When this code is compiled and run, it creates the basic photo viewing app as shown in the following screenshots:
If shadows are not being drawn (as seen in the above screenshot), edit
Properties/AndroidManifest.xml and add the following attribute
setting to the <application> element:
android:hardwareAccelerated="true"
This basic app only supports browsing of the photo album. It does not respond to item-touch events, nor does it handle changes in the underlying data. This functionality is added in Extending the RecyclerView Example.
Changing the LayoutManager
Because of RecyclerView's flexibility, it's easy to modify the app to
use a different layout manager. In the following example, it is
modified to display the photo album with a grid layout that scrolls
horizontally rather than with a vertical linear layout. To do this, the
layout manager instantiation is modified to use the GridLayoutManager
as follows:
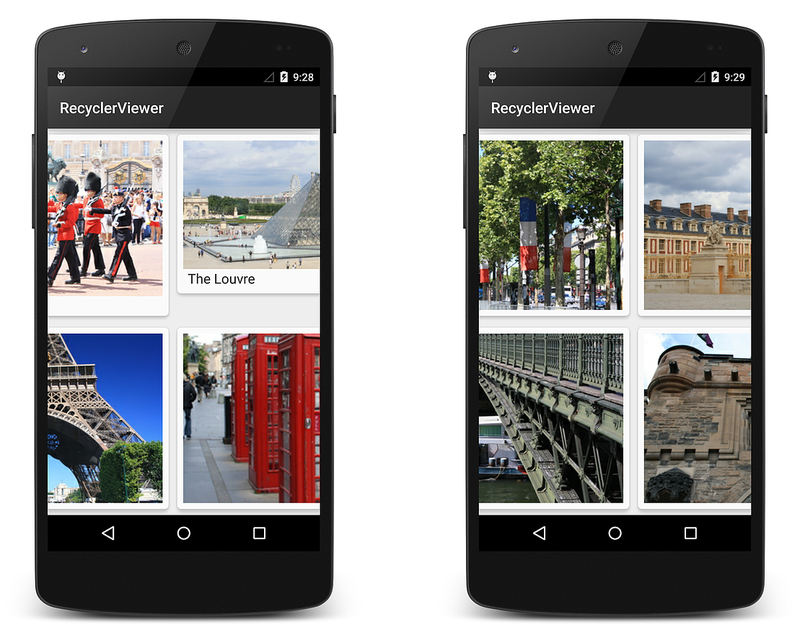
mLayoutManager = new GridLayoutManager(this, 2, GridLayoutManager.Horizontal, false);
This code change replaces the vertical LinearLayoutManager with a
GridLayoutManager that presents a grid made up of two rows that
scroll in the horizontal direction. When you compile and run the app
again, you'll see that the photographs are displayed in a grid and that
scrolling is horizontal rather than vertical:
By changing only one line of code, it is possible to modify the photo-viewing app to use a different layout with different behavior. Notice that neither the adapter code nor the layout XML had to be modified to change the layout style.
In the next topic,
Extending the RecyclerView Example,
this basic sample app is extended to handle item-click events and
update RecyclerView when the underlying data source changes.


