Exercise - Apply table permissions
The purpose of this hands-on lab is to set up table permissions to help secure access to Microsoft Dataverse table rows.
The exercises work best when you have sample data to work with. Depending on the environment that you're working with, you might want to install some sample data to assist with the exercises. Microsoft Power Platform allows you to add sample data as needed. If the environment that you're working in doesn't have sample data installed, follow the steps in the Add or remove sample data documentation to install the sample data into your environment.
Learning objectives
The goal for these exercises is for you to learn how to:
Use the Power Pages design studio to set up table permissions.
Create and assign a web role.
Create a table permission row.
Link the table permission to the web role and then associate the web role to a Dataverse contact.
Prerequisites
For this exercise, you need to have the following parameters set up in your environment:
A provisioned Power Pages website. If you don't have a website available, follow the Create a site with Power Pages instructions.
Access to the Power Pages design studio.
Scenario
Your organization has provisioned a Power Pages website and wants to create a directory of supplier organizations. After initial provisioning of the website pages and of the list to manage the supplier directory, administrators have discovered that no users have access to the data, regardless of their security roles.
Your organization wants to provide access to the data to the specific authenticated users but not to anonymous visitors.
High-level steps
To finish the exercise, complete the following tasks:
Add a webpage with a list component that shows the Account table.
Register a new user on the website by using local authentication.
Create a new Web Role row for the supplier list access.
Create a Table Permission row, providing global read access to the Accounts table to the users who have the supplier list access role.
Link the website user to the web role and then link the web role to the table permission.
Confirm that the user who has the supplier list access role has access to the list of accounts.
Detailed steps
Follow the detailed steps in the following sections to complete this exercise.
Launch Power Pages design studio
Follow these steps to launch Power Pages design studio:
Sign in to Power Pages.
Select the correct environment in the upper-right corner.
Select the website and then select Edit.
Create the Suppliers webpage
To create the Suppliers webpage, follow these steps:
Select the Pages workspace.
Select + Page.
Enter Suppliers as the page name.
Select the Start from blank template.
Select Add.
Add a list
To add a list, follow these steps:
On the page canvas, in the empty section, select the List component.
Note
If the List component isn't visible, select the ellipsis (...) menu to show more components.
Enter the following information in the Add a list dialog. If prompted, select + New list.
Choose a table - Account
Select the data views - Active Accounts
Name your list - Suppliers
Select Done.
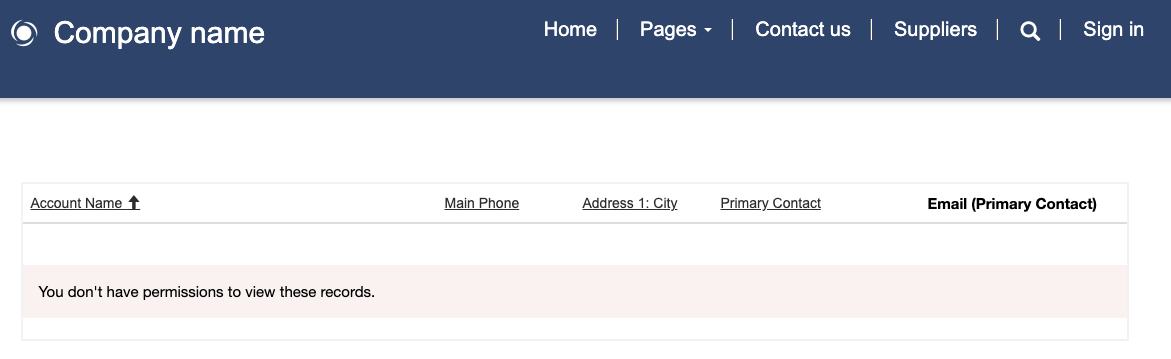
Select Preview > Desktop site to view the page. You'll receive a message indicating that you don't have permission to view the rows.
Add a website user
Follow these steps to add a website user:
Select the Sign in menu item.
Select the Register tab.
Fill in the email, username, and password information.
Select Register. The profile page will appear.
Fill in the First Name and Last Name columns and then scroll down and select Update.
Close the page.
Add a web role and assign a contact
Follow these steps to add a web role and assign a contact:
In Power Pages design studio, select the ellipsis (...) menu and then select Portal Management.
In the Portal Management app, in the Security area, select Web Roles.
Add a new Web Role row and then enter the following values:
Name - Supplier List Access
Website - your website
Save the row.
Select the Related tab and then select Contacts.
Select Add Existing Contact.
From the list on the right, select the contact that you registered on the website and then select Add.
Keep the Portal Management app open.
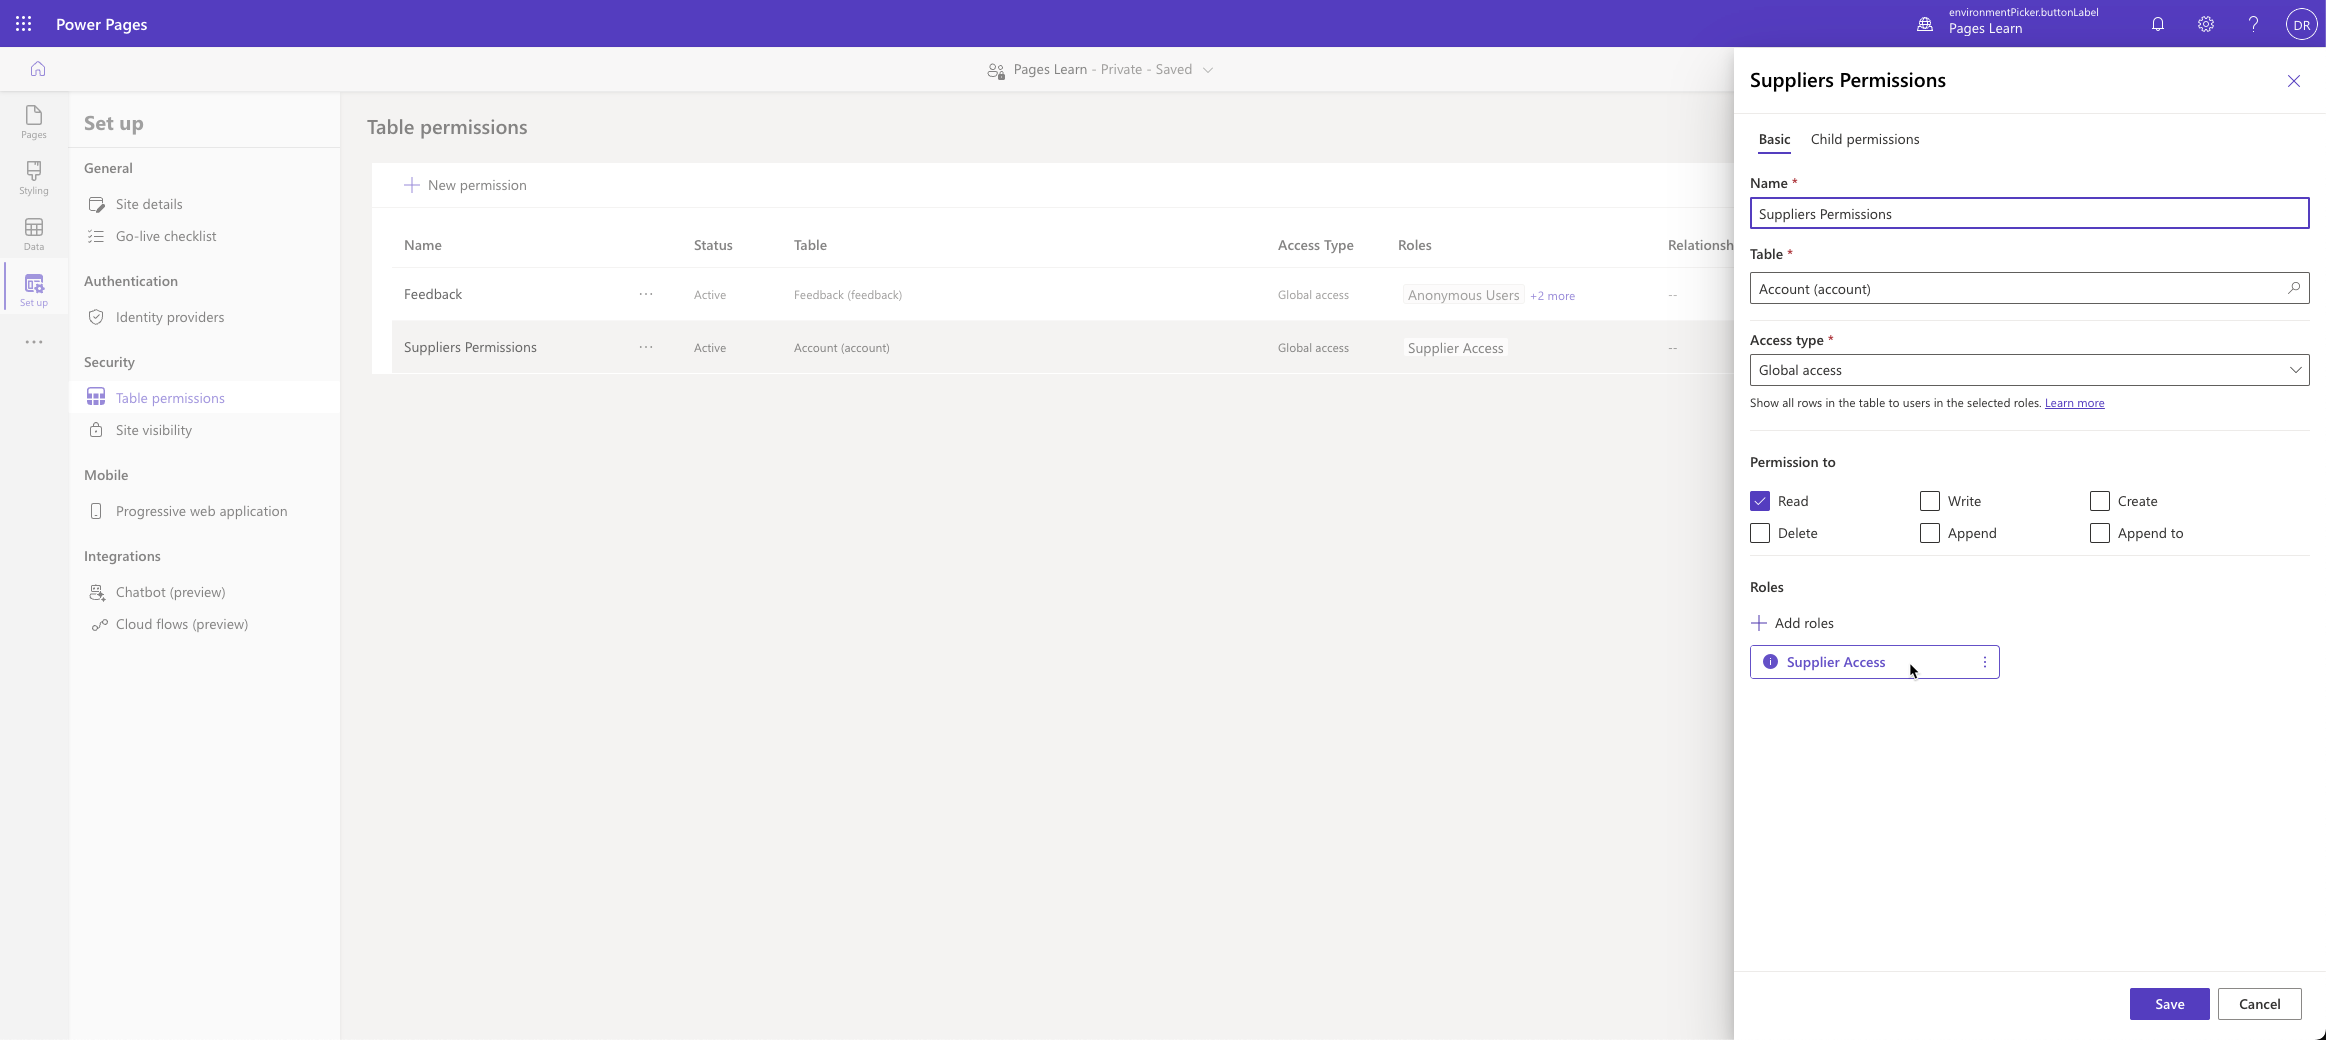
Create the table permission
Next, create the table permission by following these steps:
Switch to Power Pages design studio.
Select the Set up workspace and then select Table permissions.
Select + New permission and then enter the following values:
Name - Suppliers Permission
Table Name - Account
Access type - Global access
Permission to - Read
Select Save.
Link web role and table permissions
To link web role and table permissions, follow these steps:
Switch to the Portal Management app.
On the Web Role form, select the Related tab and then select Table permissions.
Select Add Existing Table Permission.
From the list on the right, select Suppliers Permission.
Select Add.
Switch to design studio, select the ellipsis (...) menu, and then select Edit for the Suppliers Permission row.
The Properties panel should now show the associated Supplier List Access role.
Select Cancel.

Verify access
Your last task is to verify access by following these steps:
Select Preview > Desktop.
Select Sign in and then enter the username and password for the website user that you previously created.
Go to the Suppliers page, where you should be able to view the list of account rows.

Select the username and then select Sign out. The page should display a message about not having permission to view the rows.
