नोट
इस पेज तक पहुँच के लिए प्रमाणन की आवश्यकता होती है. आप साइन इन करने या निर्देशिकाओं को बदलने का प्रयास कर सकते हैं.
इस पेज तक पहुँच के लिए प्रमाणन की आवश्यकता होती है. आप निर्देशिकाओं को बदलने का प्रयास कर सकते हैं.
As a Visual Studio Subscriptions administrator, use the Visual Studio Subscriptions Admin portal to assign subscriptions to individual users and groups. Assign subscriptions one at a time or upload subscriber information by using the Bulk add feature. If your organization uses Microsoft Entra ID, you can assign subscriptions by using Microsoft Entra groups.
Add a single subscriber
Watch the video or read on to learn how to assign a Visual Studio Subscription to a new user and grant access to subscription benefits.
- Sign in to the Visual Studio Subscriptions Admin portal.
- At the top of the table, select Add, then select Individual subscriber.
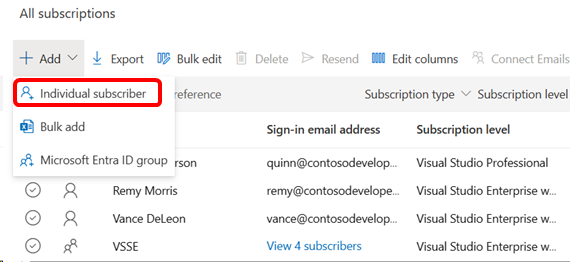
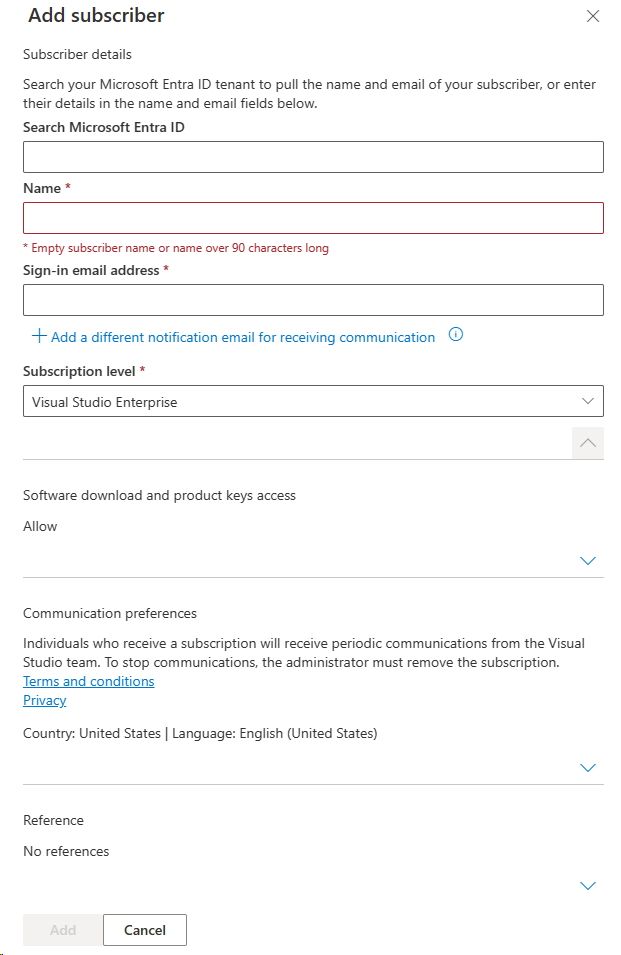
- A fly-out panel appears. Enter the new subscriber's information in the form fields.
If your organization uses Microsoft Entra ID, enter the subscriber's name in the Search Microsoft Entra ID box. The search returns matching Microsoft Entra group members. After you select a user, the sign-in email and notification email fields populate automatically.
If you don't find the subscriber in your organization, enter the subscriber's name in the Name field.
Enter the email address the subscriber uses to sign in. To use a different notification email address, select the Add a different notification email for receiving communication link. Subscribers and administrators receive important subscription-related emails from Microsoft at that address.
Note
To view members of a Microsoft Entra tenant when you enter a subscriber name, you must be a member of that tenant.
Select the subscription level you want to assign to the user. The list contains only the subscription levels purchased as part of your agreement.
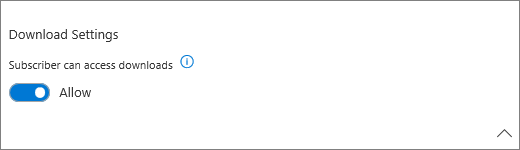
To allow software downloads, leave the downloads toggle enabled in the Download Settings section. If you disable downloads, the user can't access software downloads or product keys. The subscriber still has access to all other subscription benefits.
To add reference notes to the subscription, use the Add reference section.

When you're done entering the subscriber's information, select Add at the bottom of the Add Subscriber fly-out.

Why use a different notification email address?
Some organizations configure their email services to block incoming emails from other domains. As a result, subscribers and administrators miss important communications:
- Subscribers don't receive a notification when you assign a subscription to them. They might also be unable to activate some included benefits.
- Subscribers assigned Visual Studio Subscriptions with GitHub Enterprise don't receive the invitation to join your GitHub organization. They can't access GitHub because they must accept the emailed invitation before they gain access to your GitHub organization.
- Administrators aren't notified when you add them to an agreement. They don't receive monthly administrator statements or notifications about feature changes that affect subscription management.
Using a notification email address allows subscribers to receive important subscription communications without changing their sign-in email addresses.
Resend assignment emails
After you add a subscriber, the system automatically sends an assignment email with further instructions. To resend the assignment email, select one or more subscribers, then select Resend from the top menu. When you select Resend, a confirmation dialog appears. Review the selected subscribers, then confirm that you want to resend the assignment email.
Resources
Need help? Contact Visual Studio Subscriptions support.
See also
- Visual Studio documentation
- Azure DevOps Services documentation
- Azure documentation
- Microsoft 365 documentation
- Microsoft Entra documentation
Next steps
Have lots of users to add? Learn how to assign subscriptions to multiple subscribers.