Enable staged rollout of features for targeted audiences
Targeting is a feature management strategy that enables developers to progressively roll out new features to their user base. The strategy is built on the concept of targeting a set of users known as the target audience. An audience is made up of specific users, groups, and a designated percentage of the entire user base.
The users can be actual user accounts, but they can also be machines, devices, or any uniquely identifiable entities to which you want to roll out a feature.
The groups are up to your application to define. For example, when targeting user accounts, you can use Microsoft Entra groups or groups denoting user locations. When targeting machines, you can group them based on rollout stages. Groups can be any common attributes based on which you want to categorize your audience.
In this article, you learn how to roll out a new feature in an ASP.NET Core web application to specified users and groups, using TargetingFilter with Azure App Configuration.
Prerequisites
- Finish the Quickstart: Add feature flags to an ASP.NET Core app.
- Update the
Microsoft.FeatureManagement.AspNetCorepackage to version 3.0.0 or later.
Create a web application with authentication and feature flags
In this section, you will create a web application that allows users to sign in and use the Beta feature flag you created before. Most of the steps are very similar to what you have done in Quickstart.
Create a web application that authenticates against a local database using the following command.
dotnet new mvc --auth Individual -o TestFeatureFlagsAdd references to the following NuGet packages.
dotnet add package Microsoft.Azure.AppConfiguration.AspNetCore
dotnet add package Microsoft.FeatureManagement.AspNetCore
Store the connection string for your App Configuration store.
dotnet user-secrets init
dotnet user-secrets set ConnectionStrings:AppConfig "<your_connection_string>"
Update Program.cs with the following code.
// Existing code in Program.cs
// ... ...

var builder = WebApplication.CreateBuilder(args);

// Retrieve the App Config connection string
string AppConfigConnectionString = builder.Configuration.GetConnectionString("AppConfig");

// Load configuration from Azure App Configuration
builder.Configuration.AddAzureAppConfiguration(options =>
{
    options.Connect(AppConfigConnectionString);
    options.UseFeatureFlags();
});

// Add Azure App Configuration middleware to the container of services
builder.Services.AddAzureAppConfiguration();

// Add feature management to the container of services
builder.Services.AddFeatureManagement();

// The rest of existing code in Program.cs
// ... ...
// Existing code in Program.cs // ... ... var app = builder.Build(); // Use Azure App Configuration middleware for dynamic configuration refresh app.UseAzureAppConfiguration(); // The rest of existing code in Program.cs // ... ...Add Beta.cshtml under the Views\Home directory and update it with the following markup.
@{
    ViewData["Title"] = "Beta Page";
}

<h1>This is the beta website.</h1>
Open HomeController.cs under the Controllers directory and update it with the following code.
public IActionResult Beta()
{
    return View();
}
Open _ViewImports.cshtml, and register the feature manager Tag Helper using an
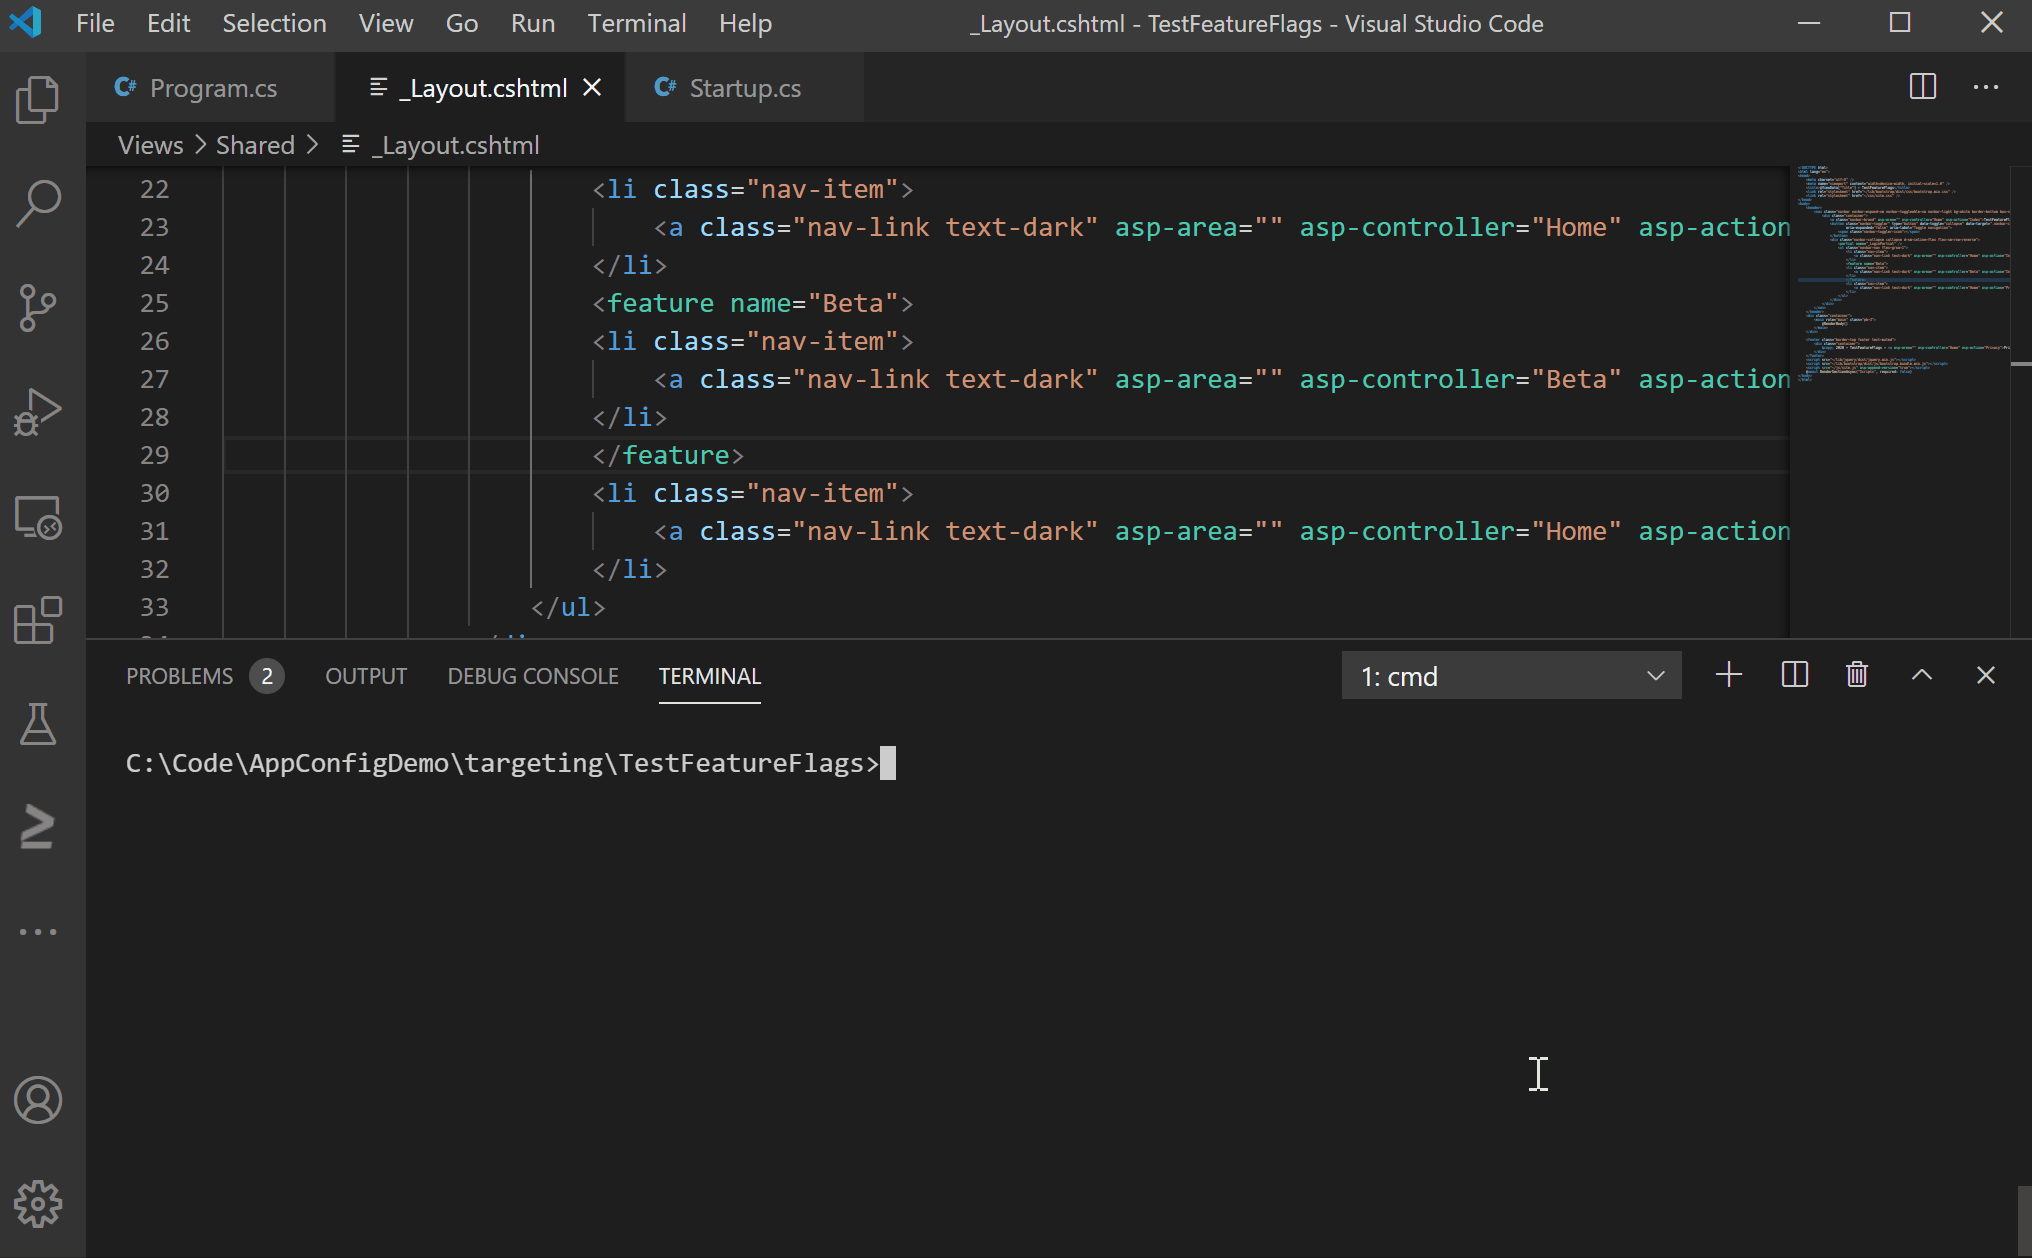
@addTagHelperdirective:@addTagHelper *, Microsoft.FeatureManagement.AspNetCoreOpen _Layout.cshtml in the Views\Shared directory. Insert a new
<feature>tag in between the Home and Privacy navbar items.<div class="navbar-collapse collapse d-sm-inline-flex justify-content-between"> <ul class="navbar-nav flex-grow-1"> <li class="nav-item"> <a class="nav-link text-dark" asp-area="" asp-controller="Home" asp-action="Index">Home</a> </li> <feature name="Beta"> <li class="nav-item"> <a class="nav-link text-dark" asp-area="" asp-controller="Home" asp-action="Beta">Beta</a> </li> </feature> <li class="nav-item"> <a class="nav-link text-dark" asp-area="" asp-controller="Home" asp-action="Privacy">Privacy</a> </li> </ul> <partial name="_LoginPartial" /> </div>Build and run. Then select the Register link in the upper right corner to create a new user account. Use an email address of
test@contoso.com. On the Register Confirmation screen, select Click here to confirm your account.Toggle the feature flag in App Configuration. Validate that this action controls the visibility of the Beta item on the navigation bar.
Update the web application code to use TargetingFilter
At this point, you can use the feature flag to enable or disable the Beta feature for all users. To enable the feature flag for some users while disabling it for others, update your code to use TargetingFilter. In this example, you use the signed-in user's email address as the user ID, and the domain name portion of the email address as the group. You add the user and group to the TargetingContext. The TargetingFilter uses this context to determine the state of the feature flag for each request.
Add ExampleTargetingContextAccessor.cs file.
using Microsoft.AspNetCore.Http;
using Microsoft.FeatureManagement.FeatureFilters;
using System;
using System.Collections.Generic;
using System.Threading.Tasks;

namespace TestFeatureFlags
{
    public class ExampleTargetingContextAccessor : ITargetingContextAccessor
    {
        private const string TargetingContextLookup = "ExampleTargetingContextAccessor.TargetingContext";
        private readonly IHttpContextAccessor _httpContextAccessor;

        public ExampleTargetingContextAccessor(IHttpContextAccessor httpContextAccessor)
        {
            _httpContextAccessor = httpContextAccessor ?? throw new ArgumentNullException(nameof(httpContextAccessor));
        }

        public ValueTask<TargetingContext> GetContextAsync()
        {
            HttpContext httpContext = _httpContextAccessor.HttpContext;
            if (httpContext.Items.TryGetValue(TargetingContextLookup, out object value))
            {
                return new ValueTask<TargetingContext>((TargetingContext)value);
            }
            List<string> groups = new List<string>();
            if (httpContext.User.Identity.Name != null)
            {
                groups.Add(httpContext.User.Identity.Name.Split("@", StringSplitOptions.None)[1]);
            }
            TargetingContext targetingContext = new TargetingContext
            {
                UserId = httpContext.User.Identity.Name,
                Groups = groups
            };
            httpContext.Items[TargetingContextLookup] = targetingContext;
            return new ValueTask<TargetingContext>(targetingContext);
        }
    }
}
Open
Program.csand add theExampleTargetingContextAccessorcreated in the earlier step andTargetingFilterto the service collection by calling theWithTargetingmethod after the existing line ofAddFeatureManagement. TheTargetingFilterwill use theExampleTargetingContextAccessorto determine the targeting context every time that the feature flag is evaluated.// Existing code in Program.cs // ... ... // Add feature management to the container of services builder.Services.AddFeatureManagement() .WithTargeting<ExampleTargetingContextAccessor>(); // The rest of existing code in Program.cs // ... ...Note
For Blazor applications, see instructions for enabling feature management as scoped services.
Update the feature flag to use TargetingFilter
In the Azure portal, go to your App Configuration store and select Feature manager.
Select the context menu for the Beta feature flag that you created in the quickstart. Select Edit.
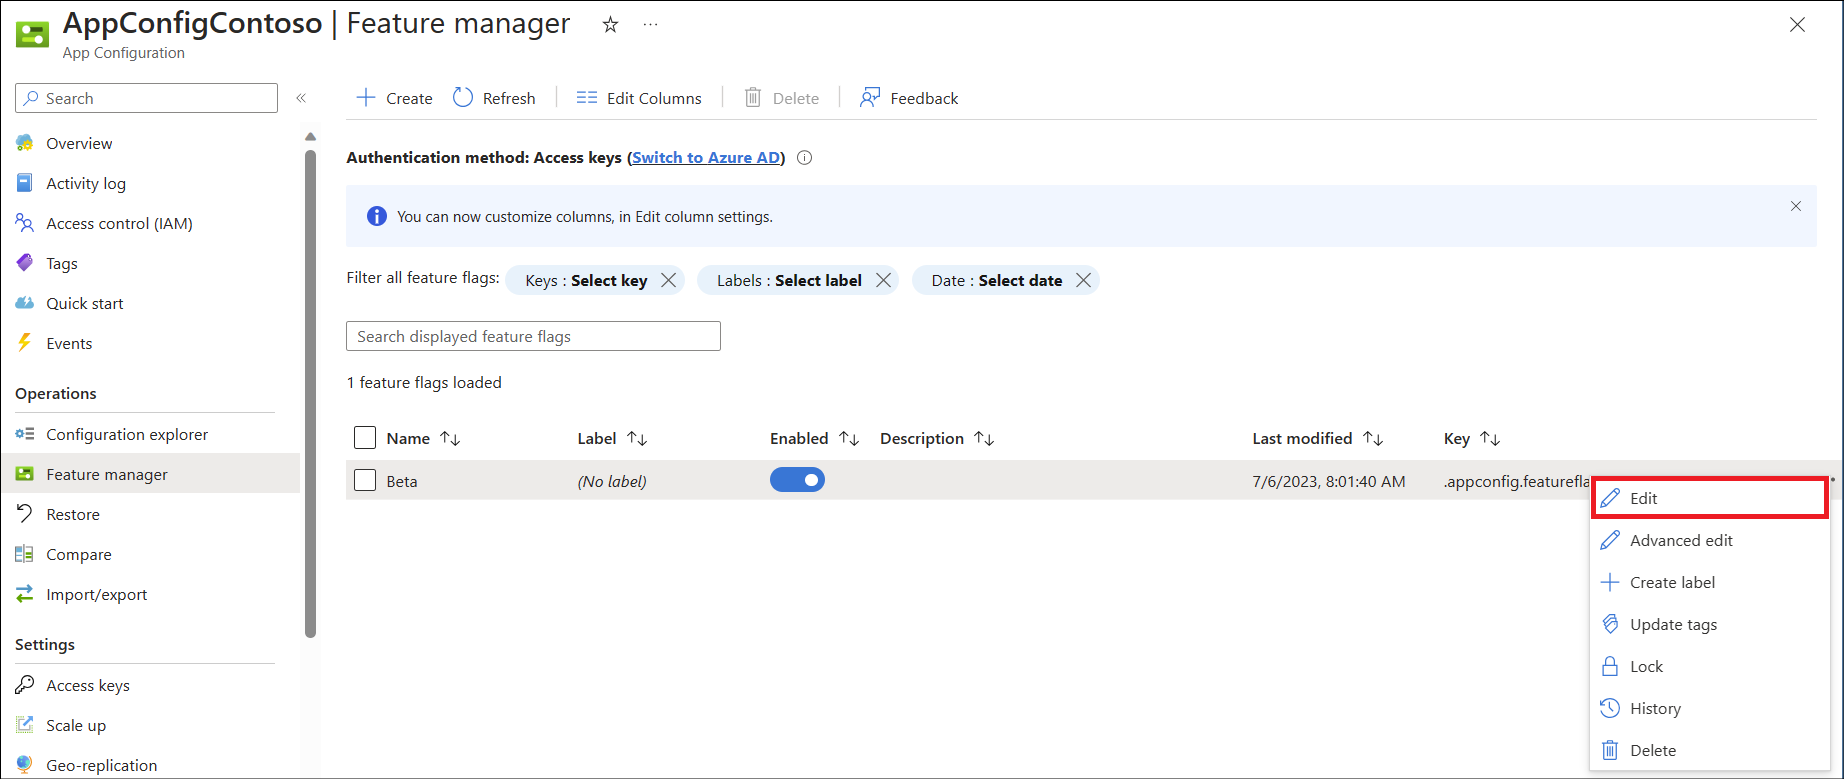
In the Edit screen, select the Enable feature flag checkbox if it isn't already selected. Then select the Use feature filter checkbox.
Select the Create button.
Select the Targeting filter in the filter type dropdown.
Select the Override by Groups and Override by Users checkbox.
Select the following options.
- Default percentage: 0
- Include Groups: Enter a Name of contoso.com and a Percentage of 50
- Exclude Groups:
contoso-xyz.com - Include Users:
test@contoso.com - Exclude Users:
testuser@contoso.com
The feature filter screen will look like this.
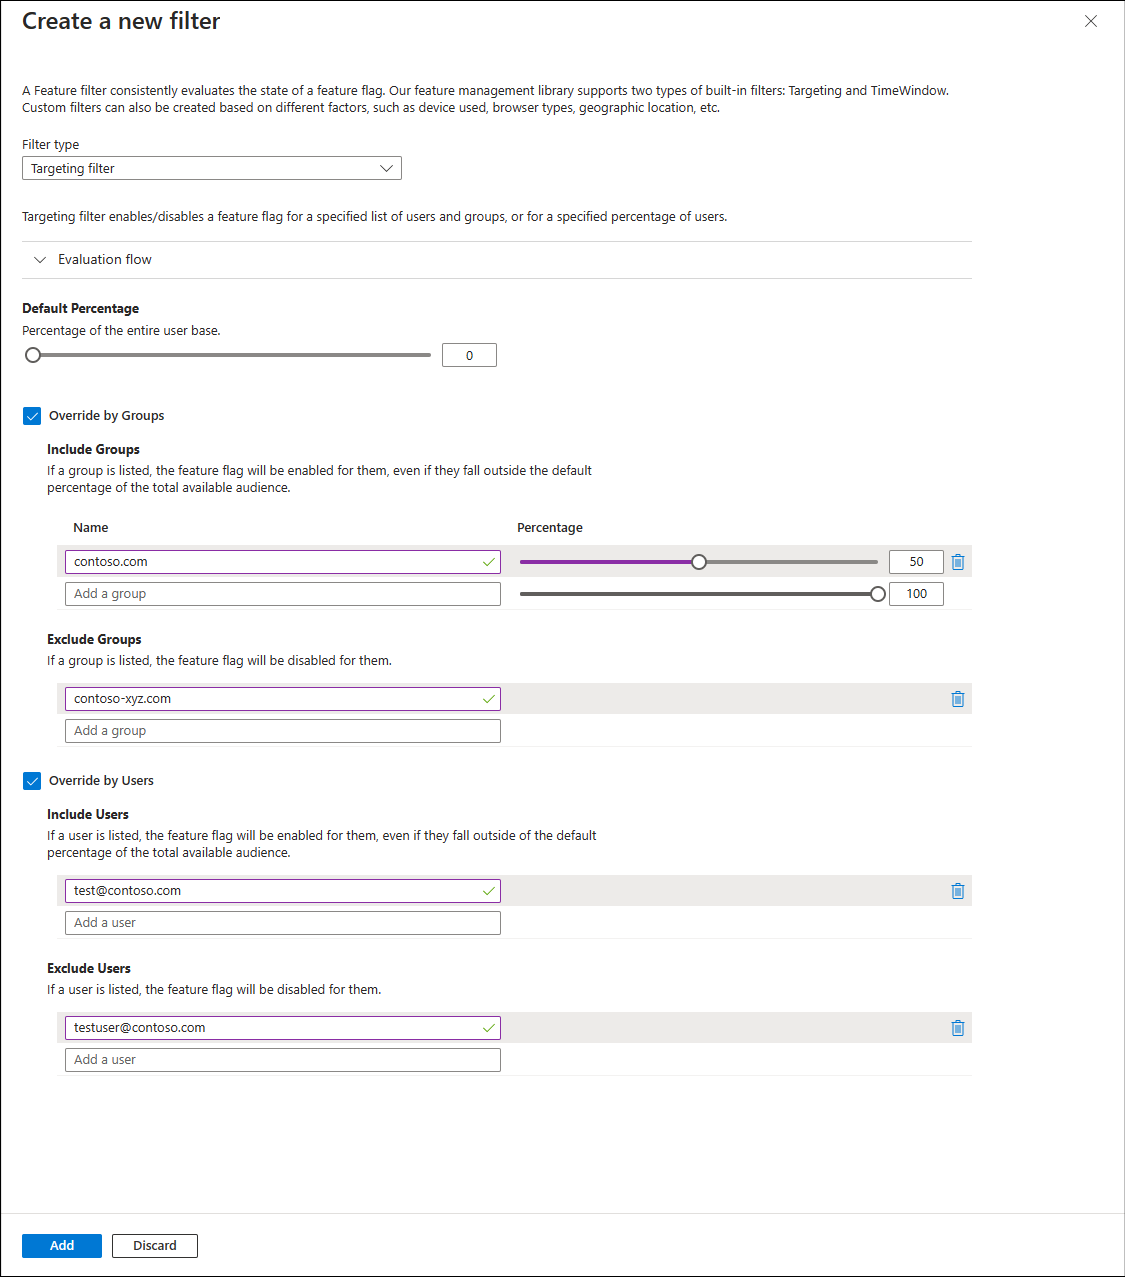
These settings result in the following behavior.
- The feature flag is always disabled for user
testuser@contoso.com, becausetestuser@contoso.comis listed in the Exclude Users section. - The feature flag is always disabled for users in the
contoso-xyz.com, becausecontoso-xyz.comis listed in the Exclude Groups section. - The feature flag is always enabled for user
test@contoso.com, becausetest@contoso.comis listed in the Include Users section. - The feature flag is enabled for 50% of users in the contoso.com group, because contoso.com is listed in the Include Groups section with a Percentage of 50.
- The feature is always disabled for all other users, because the Default percentage is set to 0.
Select Add to save the targeting filter.
Select Apply to save these settings and return to the Feature manager screen.
The Feature filter for the feature flag now appears as Targeting. This state indicates that the feature flag is enabled or disabled on a per-request basis, based on the criteria enforced by the Targeting feature filter.
TargetingFilter in action
To see the effects of this feature flag, build and run the application. Initially, the Beta item doesn't appear on the toolbar, because the Default percentage option is set to 0.
Now sign in as test@contoso.com, using the password you set when registering. The Beta item now appears on the toolbar, because test@contoso.com is specified as a targeted user.
Now sign in as testuser@contoso.com, using the password you set when registering. The Beta item doesn't appear on the toolbar, because testuser@contoso.com is specified as an excluded user.
The following video shows this behavior in action.
You can create more users with @contoso.com and @contoso-xyz.com email addresses to see the behavior of the group settings.
Users with contoso-xyz.com email addresses won't see the Beta item. While 50% of users with @contoso.com email addresses will see the Beta item, the other 50% won't see the Beta item.
Next steps
Povratne informacije
Stiže uskoro: Tijekom 2024. postupno ćemo ukinuti servis Problemi sa servisom GitHub kao mehanizam za povratne informacije za sadržaj i zamijeniti ga novim sustavom za povratne informacije. Dodatne informacije potražite u članku: https://aka.ms/ContentUserFeedback.
Pošaljite i pogledajte povratne informacije za