Tutorial: Use Azure Cache for Redis as a semantic cache
In this tutorial, you use Azure Cache for Redis as a semantic cache with an AI-based large language model (LLM). You use Azure OpenAI Service to generate LLM responses to queries and cache those responses using Azure Cache for Redis, delivering faster responses and lowering costs.
Because Azure Cache for Redis offers built-in vector search capability, you can also perform semantic caching. You can return cached responses for identical queries and also for queries that are similar in meaning, even if the text isn't the same.
In this tutorial, you learn how to:
- Create an Azure Cache for Redis instance configured for semantic caching
- Use LangChain other popular Python libraries.
- Use Azure OpenAI service to generate text from AI models and cache results.
- See the performance gains from using caching with LLMs.
Important
This tutorial walks you through building a Jupyter Notebook. You can follow this tutorial with a Python code file (.py) and get similar results, but you need to add all of the code blocks in this tutorial into the .py file and execute once to see results. In other words, Jupyter Notebooks provides intermediate results as you execute cells, but this is not behavior you should expect when working in a Python code file.
Important
If you would like to follow along in a completed Jupyter notebook instead, download the Jupyter notebook file named semanticcache.ipynb and save it into the new semanticcache folder.
Prerequisites
An Azure subscription - Create one for free
Access granted to Azure OpenAI in the desired Azure subscription Currently, you must apply for access to Azure OpenAI. You can apply for access to Azure OpenAI by completing the form at https://aka.ms/oai/access.
Jupyter Notebooks (optional)
An Azure OpenAI resource with the text-embedding-ada-002 (Version 2) and gpt-35-turbo-instruct models deployed. These models are currently only available in certain regions. See the resource deployment guide for instructions on how to deploy the models.
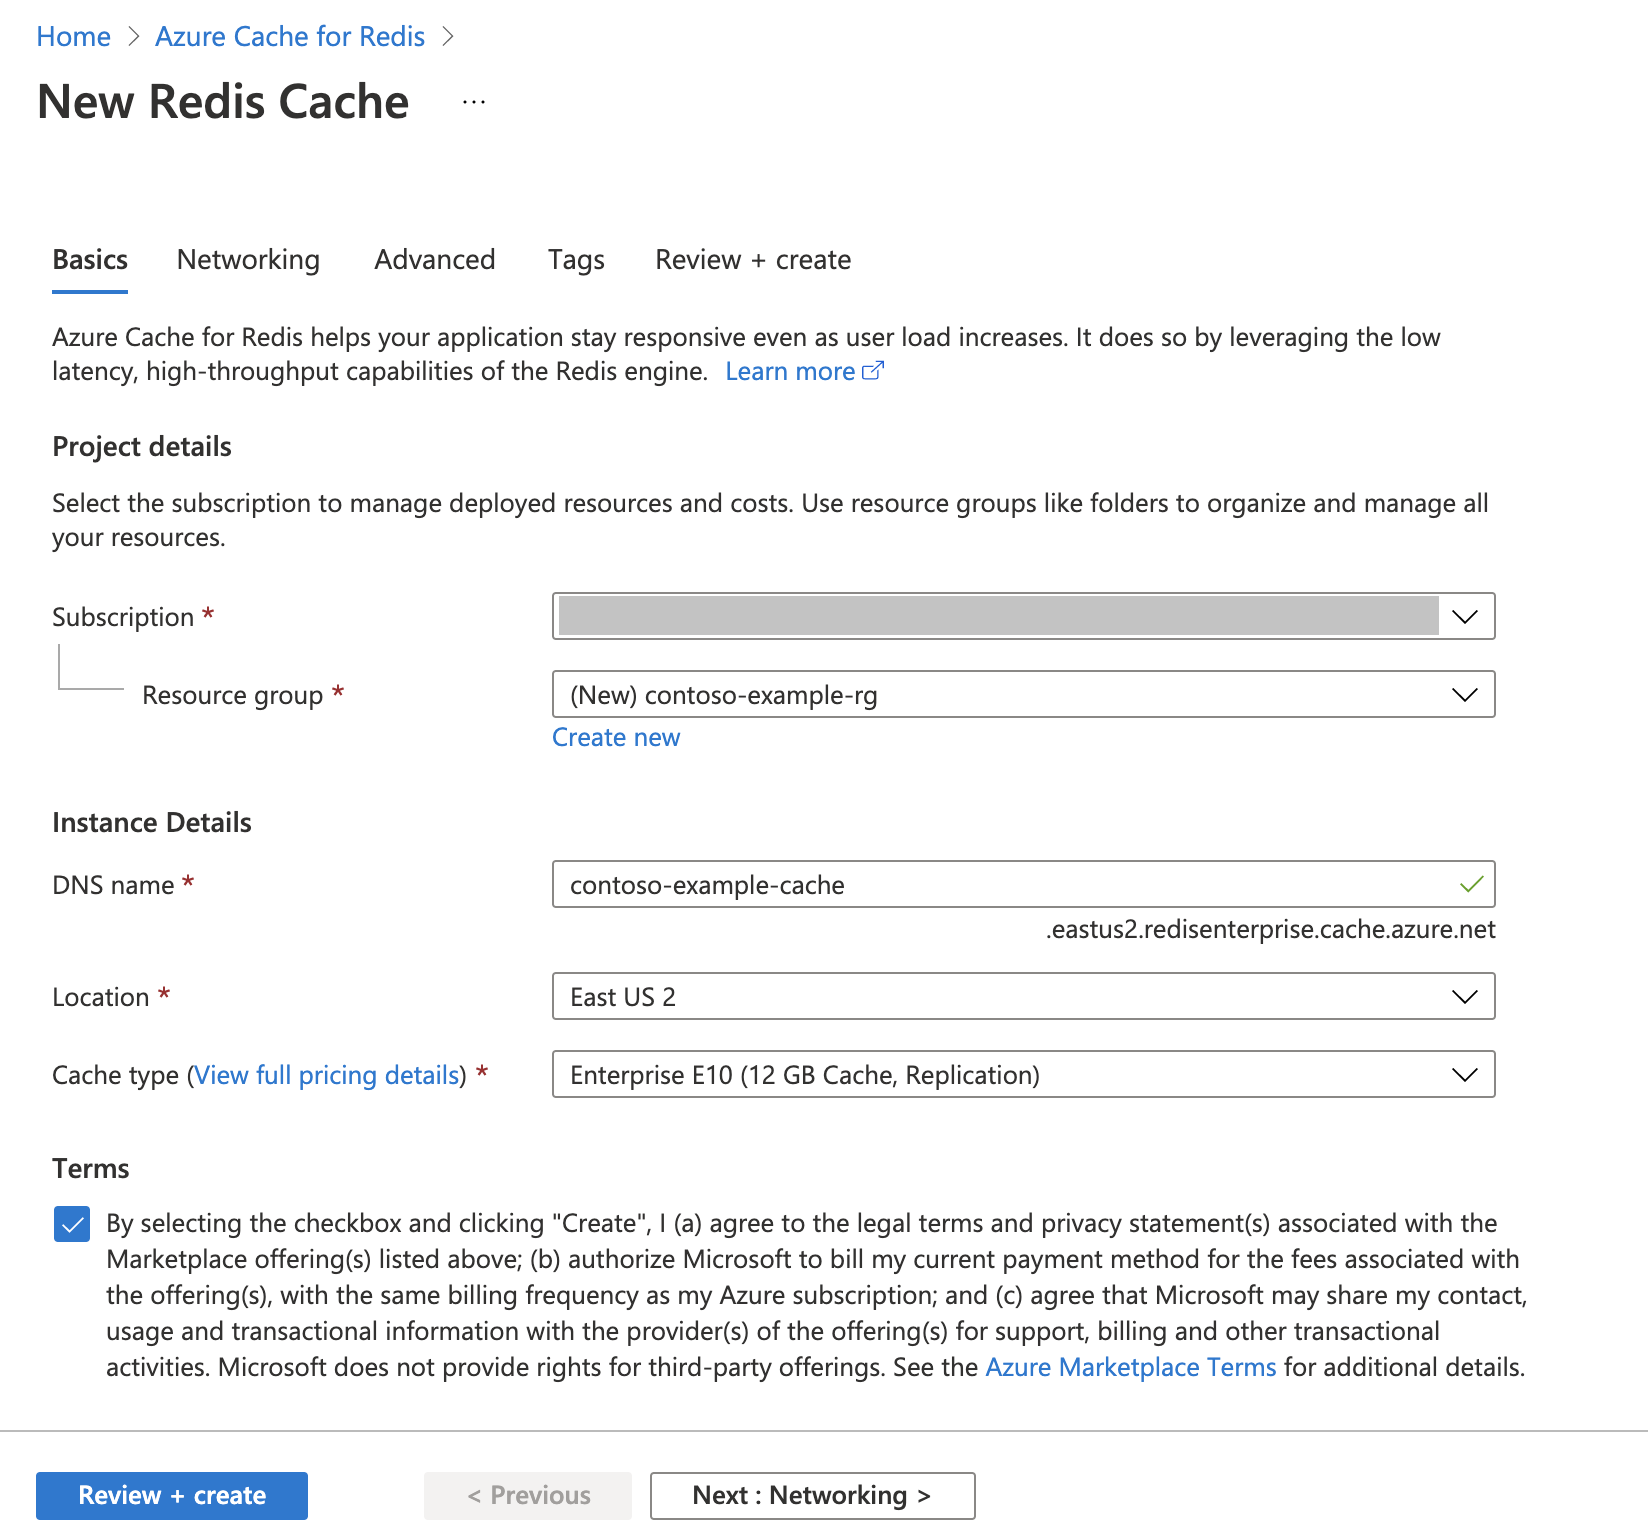
Create an Azure Cache for Redis instance
Follow the Quickstart: Create a Redis Enterprise cache guide. On the Advanced page, make sure that you added the RediSearch module and chose the Enterprise Cluster Policy. All other settings can match the default described in the quickstart.
It takes a few minutes for the cache to create. You can move on to the next step in the meantime.
Set up your development environment
Create a folder on your local computer named semanticcache in the location where you typically save your projects.
Create a new python file (tutorial.py) or Jupyter notebook (tutorial.ipynb) in the folder.
Install the required Python packages:
pip install openai langchain redis tiktoken
Create Azure OpenAI models
Make sure you have two models deployed to your Azure OpenAI resource:
An LLM that provides text responses. We use the GPT-3.5-turbo-instruct model for this tutorial.
An embeddings model that converts queries into vectors to allow them to be compared to past queries. We use the text-embedding-ada-002 (Version 2) model for this tutorial.
See Deploy a model for more detailed instructions. Record the name you chose for each model deployment.
Import libraries and set up connection information
To successfully make a call against Azure OpenAI, you need an endpoint and a key. You also need an endpoint and a key to connect to Azure Cache for Redis.
Go to your Azure OpenAI resource in the Azure portal.
Locate Endpoint and Keys in the Resource Management section of your Azure OpenAI resource. Copy your endpoint and access key because you need both for authenticating your API calls. An example endpoint is:
https://docs-test-001.openai.azure.com. You can use eitherKEY1orKEY2.Go to the Overview page of your Azure Cache for Redis resource in the Azure portal. Copy your endpoint.
Locate Access keys in the Settings section. Copy your access key. You can use either
PrimaryorSecondary.Add the following code to a new code cell:
   # Code cell 2

import openai
import redis
import os
import langchain
from langchain.llms import AzureOpenAI
from langchain.embeddings import AzureOpenAIEmbeddings
from langchain.globals import set_llm_cache
from langchain.cache import RedisSemanticCache
import time


AZURE_ENDPOINT=<your-openai-endpoint>
API_KEY=<your-openai-key>
API_VERSION="2023-05-15"
LLM_DEPLOYMENT_NAME=<your-llm-model-name>
LLM_MODEL_NAME="gpt-35-turbo-instruct"
EMBEDDINGS_DEPLOYMENT_NAME=<your-embeddings-model-name>
EMBEDDINGS_MODEL_NAME="text-embedding-ada-002"

REDIS_ENDPOINT = <your-redis-endpoint>
REDIS_PASSWORD = <your-redis-password>
Update the value of
API_KEYandRESOURCE_ENDPOINTwith the key and endpoint values from your Azure OpenAI deployment.Set
LLM_DEPLOYMENT_NAMEandEMBEDDINGS_DEPLOYMENT_NAMEto the name of your two models deployed in Azure OpenAI Service.Update
REDIS_ENDPOINTandREDIS_PASSWORDwith the endpoint and key value from your Azure Cache for Redis instance.Important
We strongly recommend using environmental variables or a secret manager like Azure Key Vault to pass in the API key, endpoint, and deployment name information. These variables are set in plaintext here for the sake of simplicity.
Execute code cell 2.
Initialize AI models
Next, you initialize the LLM and embeddings models
Add the following code to a new code cell:
   # Code cell 3

llm = AzureOpenAI(
    deployment_name=LLM_DEPLOYMENT_NAME,
    model_name="gpt-35-turbo-instruct",
    openai_api_key=API_KEY,
    azure_endpoint=AZURE_ENDPOINT,
    openai_api_version=API_VERSION,
)
embeddings = AzureOpenAIEmbeddings(
    azure_deployment=EMBEDDINGS_DEPLOYMENT_NAME,
    model="text-embedding-ada-002",
    openai_api_key=API_KEY,
    azure_endpoint=AZURE_ENDPOINT,
    openai_api_version=API_VERSION
)
Execute code cell 3.
Set up Redis as a semantic cache
Next, specify Redis as a semantic cache for your LLM.
Add the following code to a new code cell:
   # Code cell 4

redis_url = "rediss://:" + REDIS_PASSWORD + "@"+ REDIS_ENDPOINT
set_llm_cache(RedisSemanticCache(redis_url = redis_url, embedding=embeddings, score_threshold=0.05))
Important
The value of the
score_thresholdparameter determines how similar two queries need to be in order to return a cached result. The lower the number, the more similar the queries need to be. You can play around with this value to fine-tune it to your application.Execute code cell 4.
Query and get responses from the LLM
Finally, query the LLM to get an AI generated response. If you're using a Jupyter notebook, you can add %%time at the top of the cell to output the amount of time taken to execute the code.
Add the following code to a new code cell and execute it:
# Code cell 5
%%time
response = llm("Please write a poem about cute kittens.")
print(response)
You should see an output and output similar to this:
Fluffy balls of fur,
With eyes so bright and pure,
Kittens are a true delight,
Bringing joy into our sight.

With tiny paws and playful hearts,
They chase and pounce, a work of art,
Their innocence and curiosity,
Fills our hearts with such serenity.

Their soft meows and gentle purrs,
Are like music to our ears,
They curl up in our laps,
And take the stress away in a snap.

Their whiskers twitch, they're always ready,
To explore and be adventurous and steady,
With their tails held high,
They're a sight to make us sigh.

Their tiny faces, oh so sweet,
With button noses and paw-sized feet,
They're the epitome of cuteness,
...
Cute kittens, a true blessing,
In our hearts, they'll always be reigning.
CPU times: total: 0 ns
Wall time: 2.67 s
The
Wall timeshows a value of 2.67 seconds. That's how much real-world time it took to query the LLM and for the LLM to generate a response.Execute cell 5 again. You should see the exact same output, but with a smaller wall time:
Fluffy balls of fur,
With eyes so bright and pure,
Kittens are a true delight,
Bringing joy into our sight.

With tiny paws and playful hearts,
They chase and pounce, a work of art,
Their innocence and curiosity,
Fills our hearts with such serenity.

Their soft meows and gentle purrs,
Are like music to our ears,
They curl up in our laps,
And take the stress away in a snap.

Their whiskers twitch, they're always ready,
To explore and be adventurous and steady,
With their tails held high,
They're a sight to make us sigh.

Their tiny faces, oh so sweet,
With button noses and paw-sized feet,
They're the epitome of cuteness,
...
Cute kittens, a true blessing,
In our hearts, they'll always be reigning.
CPU times: total: 0 ns
Wall time: 575 ms
The wall time appears to shorten by a factor of five--all the way down to 575 milliseconds.
Change the query from
Please write a poem about cute kittenstoWrite a poem about cute kittensand run cell 5 again. You should see the exact same output and a lower wall time than the original query. Even though the query changed, the semantic meaning of the query remained the same so the same cached output was returned. This is the advantage of semantic caching!
Change the similarity threshold
Try running a similar query with a different meaning, like
Please write a poem about cute puppies. Notice that the cached result is returned here as well. The semantic meaning of the wordpuppiesis close enough to the wordkittensthat the cached result is returned.The similarity threshold can be modified to determine when the semantic cache should return a cached result and when it should return a new output from the LLM. In code cell 4, change
score_thresholdfrom0.05to0.01:# Code cell 4 redis_url = "rediss://:" + REDIS_PASSWORD + "@"+ REDIS_ENDPOINT set_llm_cache(RedisSemanticCache(redis_url = redis_url, embedding=embeddings, score_threshold=0.01))Try the query
Please write a poem about cute puppiesagain. You should receive a new output that's specific to puppies:Oh, little balls of fluff and fur With wagging tails and tiny paws Puppies, oh puppies, so pure The epitome of cuteness, no flaws With big round eyes that melt our hearts And floppy ears that bounce with glee Their playful antics, like works of art They bring joy to all they see Their soft, warm bodies, so cuddly As they curl up in our laps Their gentle kisses, so lovingly Like tiny, wet, puppy taps Their clumsy steps and wobbly walks As they explore the world anew Their curiosity, like a ticking clock Always eager to learn and pursue Their little barks and yips so sweet Fill our days with endless delight Their unconditional love, so complete ... For they bring us love and laughter, year after year Our cute little pups, in every way. CPU times: total: 15.6 ms Wall time: 4.3 sYou likely need to fine-tune the similarity threshold based on your application to ensure that the right sensitivity is used when determining which queries to cache.
Clean up resources
If you want to continue to use the resources you created in this article, keep the resource group.
Otherwise, if you're finished with the resources, you can delete the Azure resource group that you created to avoid charges.
Important
Deleting a resource group is irreversible. When you delete a resource group, all the resources in it are permanently deleted. Make sure that you do not accidentally delete the wrong resource group or resources. If you created the resources inside an existing resource group that contains resources you want to keep, you can delete each resource individually instead of deleting the resource group.
To delete a resource group
Sign in to the Azure portal, and then select Resource groups.
Select the resource group you want to delete.
If there are many resource groups, use the Filter for any field... box, type the name of your resource group you created for this article. Select the resource group in the results list.
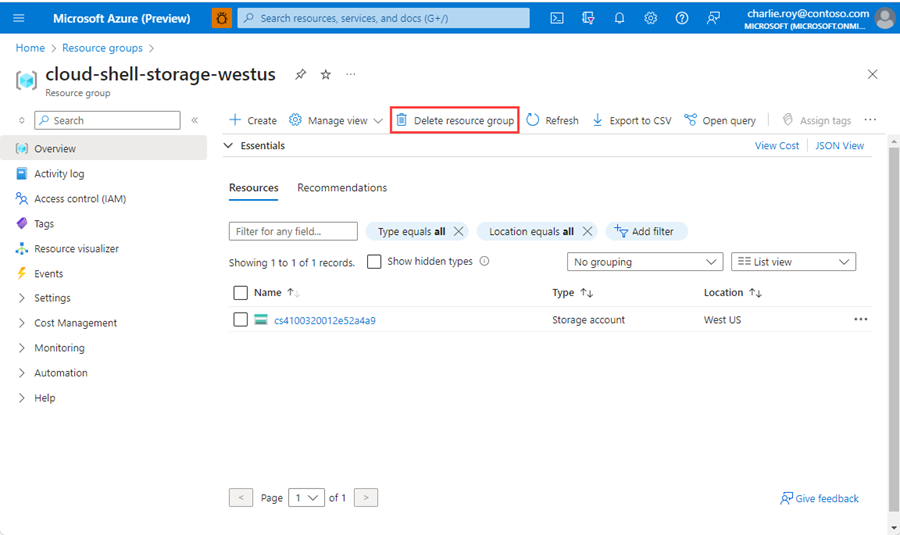
Select Delete resource group.
You're asked to confirm the deletion of the resource group. Type the name of your resource group to confirm, and then select Delete.
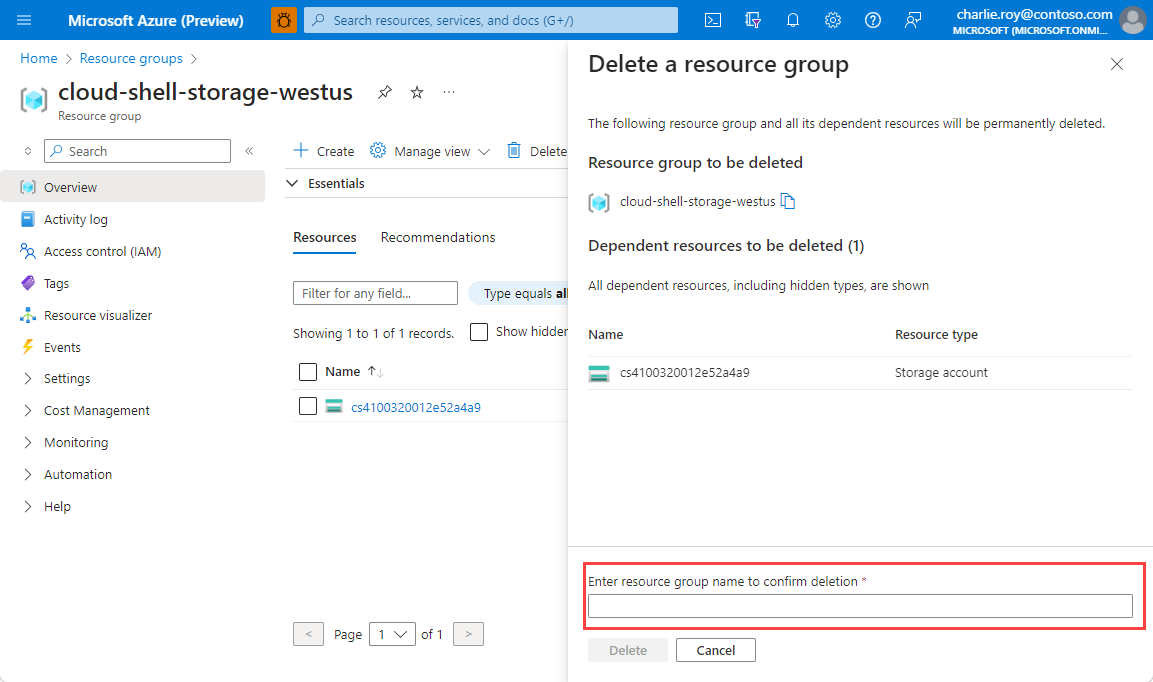
After a few moments, the resource group and all of its resources are deleted.
Related content
Povratne informacije
Stiže uskoro: Tijekom 2024. postupno ćemo ukinuti servis Problemi sa servisom GitHub kao mehanizam za povratne informacije za sadržaj i zamijeniti ga novim sustavom za povratne informacije. Dodatne informacije potražite u članku: https://aka.ms/ContentUserFeedback.
Pošaljite i pogledajte povratne informacije za