Get started with multi-slot for Azure AI Personalizer
Important
Starting on the 20th of September, 2023 you won’t be able to create new Personalizer resources. The Personalizer service is being retired on the 1st of October, 2026.
Multi-slot personalization (Preview) allows you to target content in web layouts, carousels, and lists where more than one action (such as a product or piece of content) is shown to your users. With Personalizer multi-slot APIs, you can have the AI models in Personalizer learn what user contexts and products drive certain behaviors, considering and learning from the placement in your user interface. For example, Personalizer may learn that certain products or content drive more clicks as a sidebar or a footer than as a main highlight on a page.
In this guide, you'll learn how to use the Personalizer multi-slot APIs.
Reference documentation | Library source code | Package (NuGet) | Multi-slot conceptual | Samples
Prerequisites
- Azure subscription - Create one for free
- The current version of .NET Core.
- Once you have your Azure subscription, create a Personalizer resource in the Azure portal to get your key and endpoint. After it deploys, select Go to resource.
- You'll need the key and endpoint from the resource you create to connect your application to the Personalizer API. Paste your key and endpoint into the code below later in the quickstart.
- You can use the free pricing tier (
F0) to try the service, and upgrade later to a paid tier for production.
Setting up
Upgrade Personalizer instance to Multi-Slot
Note
Multi-slot personalization (Preview) impacts other functionality of the Personalizer service. This change cannot be undone. Before you enable multi-slot personalization, see Multi-slot personalization (Preview).
- Disable Automatic-Optimization In the Azure portal, in the Personalizer resource, under Resource Management, on the Model and learning settings page, turn Automatic Optimization off and save.
Note
Multi-slot personalization will not work unless you disable Automatic Optimization. Automatic Optimization for multi-slot personalization will be supported in the future.
- Update Personalizer to multi-slot In the Azure portal, in the Personalizer resource, under Resource Management, on the Model and learning settings page, select Export learning settings. The arguments field in the downloaded json file will start with --cb_explore_adf. Change this to --ccb_explore_adf and save the file. CB (contextual bandits) and CCB (conditional contextual bandits) are the algorithms Personalizer uses for single-slot and multi-slot personalization, respectively. ADF (action dependent features) means that the actions are expressed / identified with features.


In the same tab in the portal, under import learning settings browse to find your recently modified json file and upload it. This will update your Personalizer instance to be a "Multi Slot" Personalizer and will now support multi-slot Rank and Reward calls.
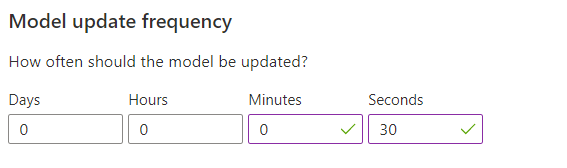
Change the model update frequency
In the Azure portal, go to your Personalizer resource's Configuration page, and change the Model update frequency to 30 seconds. This short duration will train the model rapidly, allowing you to see how the recommended action changes for each iteration.
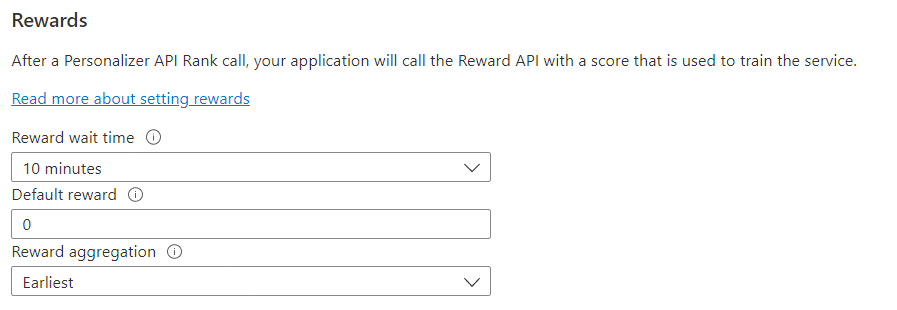
Change the reward wait time
In the Azure portal, go to your Personalizer resource's Configuration page, and change the Reward wait time to 10 minutes. This determines how long the model will wait after sending a recommendation, to receive the reward feedback from that recommendation. Training won't occur until the reward wait time has passed.
Create a new C# application
Create a new .NET Core application in your preferred editor or IDE.
In a console window (such as cmd, PowerShell, or Bash), use the dotnet new command to create a new console app with the name personalizer-quickstart. This command creates a simple "Hello World" C# project with a single source file: Program.cs.
dotnet new console -n personalizer-quickstart
Change your directory to the newly created app folder. You can build the application with:
dotnet build
The build output should contain no warnings or errors.
...
Build succeeded.
 0 Warning(s)
 0 Error(s)
...
Install the client library
Within the application directory, install the Personalizer client library for .NET with the following command:
dotnet add package Azure.AI.Personalizer --version 2.0.0-beta.2
From the project directory, open the Program.cs file in your preferred editor or IDE. Add the following using directives:
using System;
using Azure;
using Azure.AI.Personalizer;
using System.Collections.Generic;
using System.Linq;
Object model
The Personalizer client is a PersonalizerClient object that authenticates to Azure using Azure.AzureKeyCredential, which contains your key.
To ask for the single best item of the content for each slot, create a PersonalizerRankMultiSlotOptions object, then pass it to PersonalizerClient.RankMultiSlot. The RankMultiSlot method returns a PersonalizerMultiSlotRankResult.
To send a reward score to Personalizer, create a PersonalizerRewardMultiSlotOptions, then pass it to the PersonalizerClient.RewardMultiSlot method along with the corresponding event ID.
The reward score in this quickstart is trivial. In a production system, the determination of what impacts the reward score and by how much can be a complex process, that you may decide to change over time. This design decision should be one of the primary decisions in your Personalizer architecture.
Code examples
These code snippets show you how to do the following tasks with the Personalizer client library for .NET:
Authenticate the client
In this section you'll do two things:
- Specify your key and endpoint
- Create a Personalizer client
Start by adding the following lines to your Program class. Make sure to add your key and endpoint from your Personalizer resource.
Important
Go to the Azure portal. If the Personalizer resource you created in the Prerequisites section deployed successfully, click the Go to Resource button under Next Steps. You can find your key and endpoint in the resource's key and endpoint page, under resource management.
Remember to remove the key from your code when you're done, and never post it publicly. For production, consider using a secure way of storing and accessing your credentials. For example, Azure key vault.
private const string ServiceEndpoint  = "https://REPLACE-WITH-YOUR-PERSONALIZER-RESOURCE-NAME.cognitiveservices.azure.com";
private const string ResourceKey = "<REPLACE-WITH-YOUR-PERSONALIZER-KEY>";
Next, construct the Rank and Reward URLs.
static PersonalizerClient InitializePersonalizerClient(Uri url)
{
    return new PersonalizerClient(url, new AzureKeyCredential(ResourceKey));
}
Get content choices represented as actions
Actions represent the content choices from which you want Personalizer to select the best content item. Add the following methods to the Program class to represent the set of actions and their features.
private static IList<PersonalizerRankableAction> GetActions()
{
    IList<PersonalizerRankableAction> actions = new List<PersonalizerRankableAction>
    {
        new PersonalizerRankableAction(
            id: "Red-Polo-Shirt-432",
            features:
            new List<object>() { new { onSale = "true", price = "20", category = "Clothing" } }
        ),

        new PersonalizerRankableAction(
            id: "Tennis-Racket-133",
            features:
            new List<object>() { new { onSale = "false", price = "70", category = "Sports" } }
        ),

        new PersonalizerRankableAction(
            id: "31-Inch-Monitor-771",
            features:
            new List<object>() { new { onSale = "true", price = "200", category = "Electronics" } }
        ),

        new PersonalizerRankableAction(
            id: "XBox-Series X-117",
            features:
            new List<object>() { new { onSale = "false", price = "499", category = "Electronics" } }
        )
    };

    return actions;
}
Get slots
Slots make up the page that the user will interact with. Personalizer will decide which action to display in each one of the defined slots. Actions can be excluded from specific slots, shown as ExcludeActions. BaselineAction is the default action for the slot, which would have been displayed without the use of Personalizer.
This quickstart has simple slot features. In production systems, determining and evaluating features can be a non-trivial matter.
private static IList<PersonalizerSlotOptions> GetSlots()
{
    IList<PersonalizerSlotOptions> slots = new List<PersonalizerSlotOptions>
    {
        new PersonalizerSlotOptions(
            id: "BigHeroPosition",
            features: new List<object>() { new { size = "large", position = "left" } },
            excludedActions: new List<string>() { "31-Inch-Monitor-771" },
            baselineAction: "Red-Polo-Shirt-432"

        ),

        new PersonalizerSlotOptions(
            id: "SmallSidebar",
            features: new List<object>() { new { size = "small", position = "right" } },
            excludedActions: new List<string>() { "Tennis-Racket-133" },
            baselineAction: "XBox-Series X-117"
        ),
    };

    return slots;
}
Get user preferences for context
Add the following methods to the Program class to get a user's input from the command line for the time of day and the type of device the user is on. These methods will be used as context features.
static string GetTimeOfDayForContext()
{
    string[] timeOfDayFeatures = new string[] { "morning", "afternoon", "evening", "night" };

    Console.WriteLine("\nWhat time of day is it (enter number)? 1. morning 2. afternoon 3. evening 4. night");
    if (!int.TryParse(GetKey(), out int timeIndex) || timeIndex < 1 || timeIndex > timeOfDayFeatures.Length)
    {
        Console.WriteLine("\nEntered value is invalid. Setting feature value to " + timeOfDayFeatures[0] + ".");
        timeIndex = 1;
    }

    return timeOfDayFeatures[timeIndex - 1];
}
static string GetDeviceForContext()
{
    string[] deviceFeatures = new string[] { "mobile", "tablet", "desktop" };

    Console.WriteLine("\nWhat is the device type (enter number)? 1. Mobile 2. Tablet 3. Desktop");
    if (!int.TryParse(GetKey(), out int deviceIndex) || deviceIndex < 1 || deviceIndex > deviceFeatures.Length)
    {
        Console.WriteLine("\nEntered value is invalid. Setting feature value to " + deviceFeatures[0] + ".");
        deviceIndex = 1;
    }

    return deviceFeatures[deviceIndex - 1];
}
Both methods use the GetKey method to read the user's selection from the command line.
private static string GetKey()
{
    return Console.ReadKey().Key.ToString().Last().ToString().ToUpper();
}
private static IList<object> GetContext(string time, string device)
{
    return new List<object>()
    {
        new { time = time },
        new { device = device }
    };
}
Create the learning loop
The Personalizer learning loop is a cycle of RankMultiSlot and RewardMultiSlot calls. In this quickstart, each Rank call, to personalize the content, is followed by a Reward call to tell Personalizer how well the service performed.
The following code loops through a cycle of asking the user their preferences through the command line, sending that information to Personalizer to select the best action for each slot, presenting the selection to the customer to choose from among the list, then sending a reward score to Personalizer signaling how well the service did in its selection.
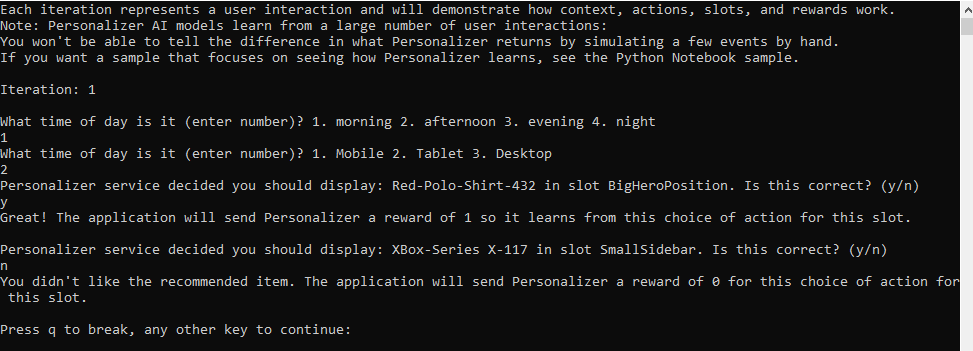
static void Main(string[] args)
{
    Console.WriteLine($"Welcome to this Personalizer Quickstart!\n" +
    $"This code will help you understand how to use the Personalizer APIs (multislot rank and multislot reward).\n" +
    $"Each iteration represents a user interaction and will demonstrate how context, actions, slots, and rewards work.\n" +
    $"Note: Personalizer AI models learn from a large number of user interactions:\n" +
    $"You won't be able to tell the difference in what Personalizer returns by simulating a few events by hand.\n" +
    $"If you want a sample that focuses on seeing how Personalizer learns, see the Python Notebook sample.");

    int iteration = 1;
    bool runLoop = true;

    IList<PersonalizerRankableAction> actions = GetActions();
    IList<PersonalizerSlotOptions> slots = GetSlots();
    PersonalizerClient client = InitializePersonalizerClient(new Uri(ServiceEndpoint));

    do
    {
        Console.WriteLine("\nIteration: " + iteration++);

        string timeOfDayFeature = GetTimeOfDayForContext();
        string deviceFeature = GetDeviceForContext();

        IList<object> currentContext = GetContext(timeOfDayFeature, deviceFeature);

        string eventId = Guid.NewGuid().ToString();

        var multiSlotRankOptions = new PersonalizerRankMultiSlotOptions(actions, slots, currentContext, eventId);
        PersonalizerMultiSlotRankResult multiSlotRankResult = client.RankMultiSlot(multiSlotRankOptions);

        for (int i = 0; i < multiSlotRankResult.Slots.Count(); ++i)
        {
            string slotId = multiSlotRankResult.Slots[i].SlotId;
            Console.WriteLine($"\nPersonalizer service decided you should display: { multiSlotRankResult.Slots[i].RewardActionId} in slot {slotId}. Is this correct? (y/n)");

            string answer = GetKey();

            if (answer == "Y")
            {
                client.RewardMultiSlot(eventId, slotId, 1f);
                Console.WriteLine("\nGreat! The application will send Personalizer a reward of 1 so it learns from this choice of action for this slot.");
            }
            else if (answer == "N")
            {
                client.RewardMultiSlot(eventId, slotId, 0f);
                Console.WriteLine("\nYou didn't like the recommended item. The application will send Personalizer a reward of 0 for this choice of action for this slot.");
            }
            else
            {
                client.RewardMultiSlot(eventId, slotId, 0f);
                Console.WriteLine("\nEntered choice is invalid. Service assumes that you didn't like the recommended item.");
            }
        }

        Console.WriteLine("\nPress q to break, any other key to continue:");
        runLoop = !(GetKey() == "Q");

    } while (runLoop);
}
Take a closer look at the rank and reward calls in the following sections. Add the following methods, which get the content choices, get slots, and send multi-slot rank and reward requests before running the code file:
GetActionsGetSlotsGetTimeOfDayForContextGetDeviceForContextGetKeyGetContext
Request the best action
To complete the Rank request, the program asks the user's preferences to create a Context of the content choices. The request contains the context, actions and slots with their respective features and a unique event ID, to receive a response.
This quickstart has simple context features of time of day and user device. In production systems, determining and evaluating actions and features can be a non-trivial matter.
string timeOfDayFeature = GetTimeOfDayForContext();
string deviceFeature = GetDeviceForContext();

IList<object> currentContext = GetContext(timeOfDayFeature, deviceFeature);

string eventId = Guid.NewGuid().ToString();

var multiSlotRankOptions = new PersonalizerRankMultiSlotOptions(actions, slots, currentContext, eventId);
PersonalizerMultiSlotRankResult multiSlotRankResult = client.RankMultiSlot(multiSlotRankOptions);
Send a reward
To get the reward score for the Reward request, the program gets the user's selection for each slot through the command line, assigns a numeric value (reward score) to the selection, then sends the unique event ID, slot ID, and the reward score for each slot as the numeric value to the Reward API. A reward doesn't need to be defined for each slot.
This quickstart assigns a simple number as a reward score, either a zero or a 1. In production systems, determining when and what to send to the Reward call can be a non-trivial matter, depending on your specific needs.
for (int i = 0; i < multiSlotRankResult.Slots.Count(); ++i)
{
    string slotId = multiSlotRankResult.Slots[i].SlotId;
    Console.WriteLine($"\nPersonalizer service decided you should display: { multiSlotRankResult.Slots[i].RewardActionId} in slot {slotId}. Is this correct? (y/n)");

    string answer = GetKey();

    if (answer == "Y")
    {
        client.RewardMultiSlot(eventId, slotId, 1f);
        Console.WriteLine("\nGreat! The application will send Personalizer a reward of 1 so it learns from this choice of action for this slot.");
    }
    else if (answer == "N")
    {
        client.RewardMultiSlot(eventId, slotId, 0f);
        Console.WriteLine("\nYou didn't like the recommended item. The application will send Personalizer a reward of 0 for this choice of action for this slot.");
    }
    else
    {
        client.RewardMultiSlot(eventId, slotId, 0f);
        Console.WriteLine("\nEntered choice is invalid. Service assumes that you didn't like the recommended item.");
    }
}
Run the program
Run the application with the dotnet run command from your application directory.
dotnet run
The source code for this quickstart is available.
Reference documentation | Multi-slot conceptual | Samples
Prerequisites
- Azure subscription - Create one for free
- Install Node.js and NPM (verified with Node.js v14.16.0 and NPM 6.14.11).
- Once you have your Azure subscription, create a Personalizer resource in the Azure portal to get your key and endpoint. After it deploys, select Go to resource.
- You will need the key and endpoint from the resource you create to connect your application to the Personalizer API. Paste your key and endpoint into the code below later in the quickstart.
- You can use the free pricing tier (
F0) to try the service, and upgrade later to a paid tier for production.
Setting up
Upgrade Personalizer instance to Multi-Slot
Note
Multi-slot personalization (Preview) impacts other functionality of the Personalizer service. This change cannot be undone. Before you enable multi-slot personalization, see Multi-slot personalization (Preview).
- Disable Automatic-Optimization In the Azure portal, in the Personalizer resource, under Resource Management, on the Model and learning settings page, turn Automatic Optimization off and save.
Note
Multi-slot personalization will not work unless you disable Automatic Optimization. Automatic Optimization for multi-slot personalization will be supported in the future.
- Update Personalizer to multi-slot In the Azure portal, in the Personalizer resource, under Resource Management, on the Model and learning settings page, select Export learning settings. The arguments field in the downloaded json file will start with --cb_explore_adf. Change this to --ccb_explore_adf and save the file. CB (contextual bandits) and CCB (conditional contextual bandits) are the algorithms Personalizer uses for single-slot and multi-slot personalization, respectively. ADF (action dependent features) means that the actions are expressed / identified with features.
In the same tab in the portal, under import learning settings browse to find your recently modified json file and upload it. This will update your Personalizer instance to be a "Multi Slot" Personalizer and will now support multi-slot Rank and Reward calls.
Change the model update frequency
In the Azure portal, go to your Personalizer resource's Configuration page, and change the Model update frequency to 30 seconds. This short duration will train the model rapidly, allowing you to see how the recommended action changes for each iteration.
Change the reward wait time
In the Azure portal, go to your Personalizer resource's Configuration page, and change the Reward wait time to 10 minutes. This determines how long the model will wait after sending a recommendation, to receive the reward feedback from that recommendation. Training won't occur until the reward wait time has passed.
Create a new Node.js application
In a console window (such as cmd, PowerShell, or Bash), create a new directory for your app, and navigate to it.
mkdir myapp && cd myapp
Run the npm init -y command to create a package.json file.
npm init -y
Create a new Node.js application in your preferred editor or IDE named sample.js and create variables for your resource's endpoint and subscription key.
Important
Go to the Azure portal. If the Personalizer resource you created in the Prerequisites section deployed successfully, click the Go to Resource button under Next Steps. You can find your key and endpoint in the resource's key and endpoint page, under resource management.
Remember to remove the key from your code when you're done, and never post it publicly. For production, consider using a secure way of storing and accessing your credentials. For example, Azure key vault.
const axios = require('axios');
const { v4: uuidv4 } = require('uuid');
const readline = require('readline-sync');
// The endpoint specific to your personalization service instance;
// e.g. https://<your-resource-name>.cognitiveservices.azure.com
const PersonalizationBaseUrl = '<REPLACE-WITH-YOUR-PERSONALIZER-ENDPOINT>';
// The key specific to your personalization service instance; e.g. "0123456789abcdef0123456789ABCDEF"
const ResourceKey = '<REPLACE-WITH-YOUR-PERSONALIZER-KEY>';
Install the NPM packages for quickstart
npm install readline-sync uuid axios --save
Object model
To ask for the single best item of the content for each slot, create a rankRequest, then send a post request to multislot/rank. The response is then parsed into a rankResponse.
To send a reward score to Personalizer, create a rewards, then send a post request to multislot/events/{eventId}/reward.
Determining the reward score, in this quickstart is trivial. In a production system, the determination of what impacts the reward score and by how much can be a complex process, that you may decide to change over time. This design decision should be one of the primary decisions in your Personalizer architecture.
Code examples
These code snippets show you how to do the following tasks by sending HTTP requests for NodeJS:
Create base URLs
In this section you'll construct the Rank / Reward URLs using the base url and the request headers using the resource key.
const MultiSlotRankUrl = PersonalizationBaseUrl.concat('personalizer/v1.1-preview.1/multislot/rank');
const MultiSlotRewardUrlBase = PersonalizationBaseUrl.concat('personalizer/v1.1-preview.1/multislot/events/');
const Headers = {
    'ocp-apim-subscription-key': ResourceKey,
    'Content-Type': 'application/json'
};
Get content choices represented as actions
Actions represent the content choices from which you want Personalizer to select the best content item. Add the following methods to the script to represent the set of actions and their features.
function getActions() {
    return [
        {
            'id': 'Red-Polo-Shirt-432',
            'features': [
                {
                    'onSale': 'true',
                    'price': 20,
                    'category': 'Clothing'
                }
            ]
        },
        {
            'id': 'Tennis-Racket-133',
            'features': [
                {
                    'onSale': 'false',
                    'price': 70,
                    'category': 'Sports'
                }
            ]
        },
        {
            'id': '31-Inch-Monitor-771',
            'features': [
                {
                    'onSale': 'true',
                    'price': 200,
                    'category': 'Electronics'
                }
            ]
        },
        {
            'id': 'XBox-Series X-117',
            'features': [
                {
                    'onSale': 'false',
                    'price': 499,
                    'category': 'Electronics'
                }
            ]
        }
    ];
}
Get user preferences for context
Add the following methods to the script to get a user's input from the command line for the time of day and the type of device the user is on. These will be used as context features.
function getContextFeatures() {
    const timeOfDayFeatures = ['morning', 'afternoon', 'evening', 'night'];
    const deviceFeatures = ['mobile', 'tablet', 'desktop'];

    let answer = readline.question('\nWhat time of day is it (enter number)? 1. morning 2. afternoon 3. evening 4. night\n');
    let selection = parseInt(answer);
    const timeOfDay = selection >= 1 && selection <= 4 ? timeOfDayFeatures[selection - 1] : timeOfDayFeatures[0];

    answer = readline.question('\nWhat type of device is the user on (enter number)? 1. mobile 2. tablet 3. desktop\n');
    selection = parseInt(answer);
    const device = selection >= 1 && selection <= 3 ? deviceFeatures[selection - 1] : deviceFeatures[0];

    console.log('Selected features:\n');
    console.log('Time of day: ' + timeOfDay + '\n');
    console.log('Device: ' + device + '\n');

    return [
        {
            'time': timeOfDay
        },
        {
            'device': device
        }
    ];
}
Get slots
Slots make up the page that the user will interact with. Personalizer will decide which action to display in each one of the defined slots. Actions can be excluded from specific slots, shown as ExcludeActions. BaselineAction is the default action for the slot which would have been displayed without the use of Personalizer.
This quickstart has simple slot features. In production systems, determining and evaluating features can be a non-trivial matter.
function getSlots() {
    return [
        {
            'id': 'BigHeroPosition',
            'features': [
                {
                    'size': 'large',
                    'position': 'left',
                }
            ],
            'excludedActions': ['31-Inch-Monitor-771'],
            'baselineAction': 'Red-Polo-Shirt-432'
        },
        {
            'id': 'SmallSidebar',
            'features': [
                {
                    'size': 'small',
                    'position': 'right',
                }
            ],
            'excludedActions': ['Tennis-Racket-133'],
            'baselineAction': 'XBox-Series X-117'
        }
    ];
}
Make HTTP requests
Add these functions to send post requests to the Personalizer endpoint for multi-slot rank and reward calls.
async function sendMultiSlotRank(rankRequest) {
    try {
        let response = await axios.post(MultiSlotRankUrl, rankRequest, { headers: Headers })
        return response.data;
    }
    catch (err) {
        if(err.response)
        {
            throw err.response.data
        }
        console.log(err)
        throw err;
    }
}
async function sendMultiSlotReward(rewardRequest, eventId) {
    try {
        let rewardUrl = MultiSlotRewardUrlBase.concat(eventId, '/reward');
        let response = await axios.post(rewardUrl, rewardRequest, { headers: Headers })
    }
    catch (err) {
        console.log(err);
        throw err;
    }
}
Get feedback for Personalizer decisions
Add the following method to the script. You will signal if Personalizer made a good decision for each slot through command-line prompt.
function getRewardForSlot() {
    let answer = readline.question('\nIs this correct? (y/n)\n').toUpperCase();
    if (answer === 'Y') {
        console.log('\nGreat! The application will send Personalizer a reward of 1 so it learns from this choice of action for this slot.\n');
        return 1;
    }
    else if (answer === 'N') {
        console.log('\nYou didn\'t like the recommended item.The application will send Personalizer a reward of 0 for this choice of action for this slot.\n');
        return 0;
    }
    console.log('\nEntered choice is invalid. Service assumes that you didn\'t like the recommended item.\n');
    return 0;
}
Create the learning loop
The Personalizer learning loop is a cycle of Rank and Reward calls. In this quickstart, each Rank call, to personalize the content, is followed by a Reward call to tell Personalizer how well the service performed.
The following code loops through a cycle of asking the user their preferences through the command line, sending that information to Personalizer to select the best action for each slot, presenting the selection to the customer to choose from among the list, then sending a reward score to Personalizer signaling how well the service did in its selection.
let runLoop = true;

(async () => {
    do {

        let multiSlotRankRequest = {};

        // Generate an ID to associate with the request.
        multiSlotRankRequest.eventId = uuidv4();

        // Get context information from the user.
        multiSlotRankRequest.contextFeatures = getContextFeatures();

        // Get the actions list to choose from personalization with their features.
        multiSlotRankRequest.actions = getActions();

        // Get the list of slots for which Personalizer will pick the best action.
        multiSlotRankRequest.slots = getSlots();

        multiSlotRankRequest.deferActivation = false;

        try {
            //Rank the actions for each slot
            let multiSlotRankResponse = await sendMultiSlotRank(multiSlotRankRequest);
            let multiSlotrewards = {};
            multiSlotrewards.reward = [];

            for (let i = 0; i < multiSlotRankResponse.slots.length; i++) {
                console.log('\nPersonalizer service decided you should display: '.concat(multiSlotRankResponse.slots[i].rewardActionId, ' in slot ', multiSlotRankResponse.slots[i].id, '\n'));

                let slotReward = {};
                slotReward.slotId = multiSlotRankResponse.slots[i].id;
                // User agrees or disagrees with Personalizer decision for slot
                slotReward.value = getRewardForSlot();
                multiSlotrewards.reward.push(slotReward);
            }

            // Send the rewards for the event
            await sendMultiSlotReward(multiSlotrewards, multiSlotRankResponse.eventId);

            let answer = readline.question('\nPress q to break, any other key to continue:\n').toUpperCase();
            if (answer === 'Q') {
                runLoop = false;
            }
        }
        catch (err) {
            console.log(err);
            throw err;
        }


    } while (runLoop);
})()
Take a closer look at the rank and reward calls in the following sections.
Add the following methods, which get the content choices, get user preferences for context, get the slots, Make HTTP requests, Get reward for each slot before running the code file:
- getActions
- getContextFeatures
- getSlots
- sendRank
- sendReward
- getRewardForSlot
Request the best action
To complete the Rank request, the program asks the user's preferences to create content choices. The request body contains the context, actions and slots with their respective features. The sendMultiSlotRank method takes in a rankRequest and executes the multi-slot rank request.
This quickstart has simple context features of time of day and user device. In production systems, determining and evaluating actions and features can be a non-trivial matter.
let multiSlotRankRequest = {};

// Generate an ID to associate with the request.
multiSlotRankRequest.eventId = uuidv4();

// Get context information from the user.
multiSlotRankRequest.contextFeatures = getContextFeatures();

// Get the actions list to choose from personalization with their features.
multiSlotRankRequest.actions = getActions();

// Get the list of slots for which Personalizer will pick the best action.
multiSlotRankRequest.slots = getSlots();

multiSlotRankRequest.deferActivation = false;

//Rank the actions for each slot
try {
    let multiSlotRankResponse = await sendMultiSlotRank(multiSlotRankRequest);
}
catch (err) {
    console.log(err);
    throw err;
}
Send a reward
To get the reward score for the Reward request, the program gets the user's selection for each slot through the command line, assigns a numeric value (reward score) to the selection, then sends the unique event ID, slot ID, and the reward score for each slot to the sendMultiSlotReward method. A reward does not need to be defined for each slot.
This quickstart assigns a simple number as a reward score, either a zero or a 1. In production systems, determining when and what to send to the Reward call can be a non-trivial matter, depending on your specific needs.
let multiSlotrewards = {};
multiSlotrewards.reward = [];

for (i = 0; i < multiSlotRankResponse.slots.length; i++) {
    console.log('\nPersonalizer service decided you should display: '.concat(multiSlotRankResponse.slots[i].rewardActionId, ' in slot ', multiSlotRankResponse.slots[i].id, '\n'));

    let slotReward = {};
    slotReward.slotId = multiSlotRankResponse.slots[i].id;
    // User agrees or disagrees with Personalizer decision for slot
    slotReward.value = getRewardForSlot();
    multiSlotrewards.reward.push(slotReward);
}

// Send the rewards for the event
await sendMultiSlotReward(multiSlotrewards, multiSlotRankResponse.eventId);
Run the program
Run the application with the Node.js from your application directory.
node sample.js
The source code for this quickstart is available.
Multi-slot conceptual | Samples
Prerequisites
- Azure subscription - Create one for free
- Python 3.x
- Once you have your Azure subscription, create a Personalizer resource in the Azure portal to get your key and endpoint. After it deploys, select Go to resource.
- You will need the key and endpoint from the resource you create to connect your application to the Personalizer API. Paste your key and endpoint into the code below later in the quickstart.
- You can use the free pricing tier (
F0) to try the service, and upgrade later to a paid tier for production.
Setting up
Upgrade Personalizer instance to Multi-Slot
Note
Multi-slot personalization (Preview) impacts other functionality of the Personalizer service. This change cannot be undone. Before you enable multi-slot personalization, see Multi-slot personalization (Preview).
- Disable Automatic-Optimization In the Azure portal, in the Personalizer resource, under Resource Management, on the Model and learning settings page, turn Automatic Optimization off and save.
Note
Multi-slot personalization will not work unless you disable Automatic Optimization. Automatic Optimization for multi-slot personalization will be supported in the future.
- Update Personalizer to multi-slot In the Azure portal, in the Personalizer resource, under Resource Management, on the Model and learning settings page, select Export learning settings. The arguments field in the downloaded json file will start with --cb_explore_adf. Change this to --ccb_explore_adf and save the file. CB (contextual bandits) and CCB (conditional contextual bandits) are the algorithms Personalizer uses for single-slot and multi-slot personalization, respectively. ADF (action dependent features) means that the actions are expressed / identified with features.
In the same tab in the portal, under import learning settings browse to find your recently modified json file and upload it. This will update your Personalizer instance to be a "Multi Slot" Personalizer and will now support multi-slot Rank and Reward calls.
Change the model update frequency
In the Azure portal, go to your Personalizer resource's Configuration page, and change the Model update frequency to 30 seconds. This short duration will train the model rapidly, allowing you to see how the recommended action changes for each iteration.
Change the reward wait time
In the Azure portal, go to your Personalizer resource's Configuration page, and change the Reward wait time to 10 minutes. This determines how long the model will wait after sending a recommendation, to receive the reward feedback from that recommendation. Training won't occur until the reward wait time has passed.
Create a new Python application
Create a new Python file and create variables for your resource's endpoint and subscription key.
Important
Go to the Azure portal. If the Personalizer resource you created in the Prerequisites section deployed successfully, click the Go to Resource button under Next Steps. You can find your key and endpoint in the resource's key and endpoint page, under resource management.
Remember to remove the key from your code when you're done, and never post it publicly. For production, consider using a secure way of storing and accessing your credentials. For example, Azure key vault.
import json, uuid, requests

# The endpoint specific to your personalization service instance;
# e.g. https://<your-resource-name>.cognitiveservices.azure.com
PERSONALIZATION_BASE_URL = "<REPLACE-WITH-YOUR-PERSONALIZER-ENDPOINT>"
# The key specific to your personalization service instance; e.g. "0123456789abcdef0123456789ABCDEF"
RESOURCE_KEY = "<REPLACE-WITH-YOUR-PERSONALIZER-KEY>"
Object model
To ask for the single best item of the content for each slot, create a rank_request, then send a post request to multislot/rank. The response is then parsed into a rank_response.
To send a reward score to Personalizer, create a rewards, then send a post request to multislot/events/{eventId}/reward.
In this quickstart, determining the reward score is trivial. In a production system, the determination of what impacts the reward score and by how much can be a complex process that you may decide to change over time. This design decision should be one of the primary decisions in your Personalizer architecture.
Code examples
These code snippets show you how to do the following tasks by sending HTTP requests for Python:
Create base URLs
In this section you'll construct the Rank / Reward URLs using the base url and the request headers using the resource key.
MULTI_SLOT_RANK_URL = '{0}personalizer/v1.1-preview.1/multislot/rank'.format(PERSONALIZATION_BASE_URL)
MULTI_SLOT_REWARD_URL_BASE = '{0}personalizer/v1.1-preview.1/multislot/events/'.format(PERSONALIZATION_BASE_URL)
HEADERS = {
    'ocp-apim-subscription-key': RESOURCE_KEY,
    'Content-Type': 'application/json'
}
Get content choices represented as actions
Actions represent the content choices from which you want Personalizer to select the best content item. Add the following methods to the script to represent the set of actions and their features.
def get_actions():
    return [
        {
            "id": "Red-Polo-Shirt-432",
            "features": [
                {
                    "onSale": "true",
                    "price": 20,
                    "category": "Clothing"
                }
            ]
        },
        {
            "id": "Tennis-Racket-133",
            "features": [
                {
                    "onSale": "false",
                    "price": 70,
                    "category": "Sports"
                }
            ]
        },
        {
            "id": "31-Inch-Monitor-771",
            "features": [
                {
                    "onSale": "true",
                    "price": 200,
                    "category": "Electronics"
                }
            ]
        },
        {
            "id": "XBox-Series X-117",
            "features": [
                {
                    "onSale": "false",
                    "price": 499,
                    "category": "Electronics"
                }
            ]
        }
    ]
Get user preferences for context
Add the following methods to the script to get a user's input from the command line for the time of day and the type of device the user is on. These will be used as context features.
def get_context_features():
    time_features = ["morning", "afternoon", "evening", "night"]
    time_pref = input("What time of day is it (enter number)? 1. morning 2. afternoon 3. evening 4. night\n")
    try:
        parsed_time = int(time_pref)
        if(parsed_time <=0 or parsed_time > len(time_features)):
            raise IndexError
        time_of_day = time_features[parsed_time-1]
    except (ValueError, IndexError):
        print("Entered value is invalid. Setting feature value to", time_features[0] + ".")
        time_of_day = time_features[0]

    device_features = ['mobile', 'tablet', 'desktop']
    device_pref = input("What type of device is the user on (enter number)? 1. mobile 2. tablet 3. desktop\n")
    try:
        parsed_device = int(device_pref)
        if(parsed_device <=0 or parsed_device > len(device_features)):
            raise IndexError
        device = device_features[parsed_device-1]
    except (ValueError, IndexError):
        print("Entered value is invalid. Setting feature value to", device_features[0]+ ".")
        device = device_features[0]

    return [
        {'time': time_of_day},
        {'device': device}
        ]
Get slots
Slots make up the page that the user will interact with. Personalizer will decide which action to display in each one of the defined slots. Actions can be excluded from specific slots, shown as ExcludeActions. BaselineAction is the default action for the slot which would have been displayed without the use of Personalizer.
This quickstart has simple slot features. In production systems, determining and evaluating features can be a non-trivial matter.
def get_slots():
    return [
        {
            "id": "BigHeroPosition",
            "features": [
                {
                    "size": "large",
                    "position": "left",
                }
            ],
            "excludedActions": ["31-Inch-Monitor-771"],
            "baselineAction": "Red-Polo-Shirt-432"
        },
        {
            "id": "SmallSidebar",
            "features": [
                {
                    "size": "small",
                    "position": "right",
                }
            ],
            "excludedActions": ["Tennis-Racket-133"],
            "baselineAction": "XBox-Series X-117"
        }
    ]
Make HTTP requests
Add these functions to send post requests to the Personalizer endpoint for multi-slot rank and reward calls.
def send_multi_slot_rank(rank_request):
multi_slot_response = requests.post(MULTI_SLOT_RANK_URL, data=json.dumps(rank_request), headers=HEADERS)
if multi_slot_response.status_code != 201:
    raise Exception(multi_slot_response.text)
return json.loads(multi_slot_response.text)
def send_multi_slot_reward(reward_request, event_id):
    reward_url = '{0}{1}/reward'.format(MULTI_SLOT_REWARD_URL_BASE, event_id)
    requests.post(reward_url, data=json.dumps(reward_request), headers=HEADERS)
Get feedback for Personalizer decisions
Add the following method to the script. You will signal if Personalizer made a good decision for each slot through command-line prompt.
def get_reward_for_slot():
    answer = input('\nIs this correct? (y/n)\n').upper()
    if (answer == 'Y'):
        print('\nGreat! The application will send Personalizer a reward of 1 so it learns from this choice of action for this slot.\n')
        return 1
    elif (answer == 'N'):
        print('\nYou didn\'t like the recommended item.The application will send Personalizer a reward of 0 for this choice of action for this slot.\n')
        return 0
    print('\nEntered choice is invalid. Service assumes that you didn\'t like the recommended item.\n')
    return 0
Create the learning loop
The Personalizer learning loop is a cycle of Rank and Reward calls. In this quickstart, each Rank call, to personalize the content, is followed by a Reward call to tell Personalizer how well the service performed.
The following code loops through a cycle of asking the user their preferences through the command line, sending that information to Personalizer to select the best action for each slot, presenting the selection to the customer to choose from among the list, then sending a reward score to Personalizer signaling how well the service did in its selection.
run_loop = True

while run_loop:

    eventId = str(uuid.uuid4())
    context = get_context_features()
    actions = get_actions()
    slots = get_slots()

    rank_request = {
        "eventId": eventId,
        "contextFeatures": context,
        "actions": actions,
        "slots": slots,
        "deferActivation": False
      }

    #Rank the actions for each slot
    multi_slot_rank_response = send_multi_slot_rank(rank_request)
    multi_slot_rewards = {"reward": []}

    for i in range(len(multi_slot_rank_response['slots'])):
        print('\nPersonalizer service decided you should display: {0} in slot {1}\n'.format(multi_slot_rank_response['slots'][i]['rewardActionId'], multi_slot_rank_response['slots'][i]['id']))

        slot_reward = {'slotId': multi_slot_rank_response['slots'][i]['id']}
        # User agrees or disagrees with Personalizer decision for slot
        slot_reward['value'] = get_reward_for_slot()
        multi_slot_rewards['reward'].append(slot_reward)

    # Send the rewards for the event
    send_multi_slot_reward(multi_slot_rewards, multi_slot_rank_response['eventId'])

    answer = input('\nPress q to break, any other key to continue:\n').upper()
    if (answer == 'Q'):
        run_loop = False
Take a closer look at the rank and reward calls in the following sections.
Add the following methods, which get the content choices, get user preferences for context, get the slots, Make HTTP requests, Get reward for each slot before running the code file:
- get_actions
- get_context_features
- get_slots
- send_rank
- send_reward
- get_reward_for_dsot
Request the best action
To complete the Rank request, the program asks the user's preferences to create content choices. The request body contains the context, actions and slots with their respective features. The send_multi_slot_rank method takes in a rankRequest and executes the multi-slot rank request.
This quickstart has simple context features of time of day and user device. In production systems, determining and evaluating actions and features can be a non-trivial matter.
eventId = str(uuid.uuid4())
context = get_context_features()
actions = get_actions()
slots = get_slots()

rank_request = {
    "eventId": eventId,
    "contextFeatures": context,
    "actions": actions,
    "slots": slots,
    "deferActivation": False
    }

#Rank the actions for each slot
multi_slot_rank_response = send_multi_slot_rank(rank_request)
Send a reward
To get the reward score for the Reward request, the program gets the user's selection for each slot through the command line, assigns a numeric value (reward score) to the selection, then sends the unique event ID, slot ID, and the reward score for each slot to the send_multi_slot_reward method. A reward does not need to be defined for each slot.
This quickstart assigns a simple number as a reward score, either a zero or a 1. In production systems, determining when and what to send to the Reward call can be a non-trivial matter, depending on your specific needs.
multi_slot_rewards = {"reward": []}

for i in range(len(multi_slot_rank_response['slots'])):
    print('\nPersonalizer service decided you should display: {0} in slot {1}\n'.format(multi_slot_rank_response['slots'][i]['rewardActionId'], multi_slot_rank_response['slots'][i]['id']))

    slot_reward = {'slotId': multi_slot_rank_response['slots'][i]['id']}
    # User agrees or disagrees with Personalizer decision for slot
    slot_reward['value'] = get_reward_for_slot()
    multi_slot_rewards['reward'].append(slot_reward)

# Send the rewards for the event
send_multi_slot_reward(multi_slot_rewards, multi_slot_rank_response['eventId'])
Run the program
Run the application with the Python from your application directory.
python sample.py
The source code for this quickstart is available.