Quickstart: Stream data with Azure Event Hubs and Apache Kafka
This quickstart shows you how to stream data into and from Azure Event Hubs using the Apache Kafka protocol. You'll not change any code in the sample Kafka producer or consumer apps. You just update the configurations that the clients use to point to an Event Hubs namespace, which exposes a Kafka endpoint. You also don't build and use a Kafka cluster on your own. Instead, you use the Event Hubs namespace with the Kafka endpoint.
Note
This sample is available on GitHub
Prerequisites
To complete this quickstart, make sure you have the following prerequisites:
- Read through the Event Hubs for Apache Kafka article.
- An Azure subscription. If you don't have one, create a free account before you begin.
- Create a Windows virtual machine and install the following components:
- Java Development Kit (JDK) 1.7+.
- Download and install a Maven binary archive.
- Git
Create an Azure Event Hubs namespace
When you create an Event Hubs namespace, the Kafka endpoint for the namespace is automatically enabled. You can stream events from your applications that use the Kafka protocol into event hubs. Follow step-by-step instructions in the Create an event hub using Azure portal to create an Event Hubs namespace. If you're using a dedicated cluster, see Create a namespace and event hub in a dedicated cluster.
Note
Event Hubs for Kafka isn't supported in the basic tier.
Send and receive messages with Kafka in Event Hubs
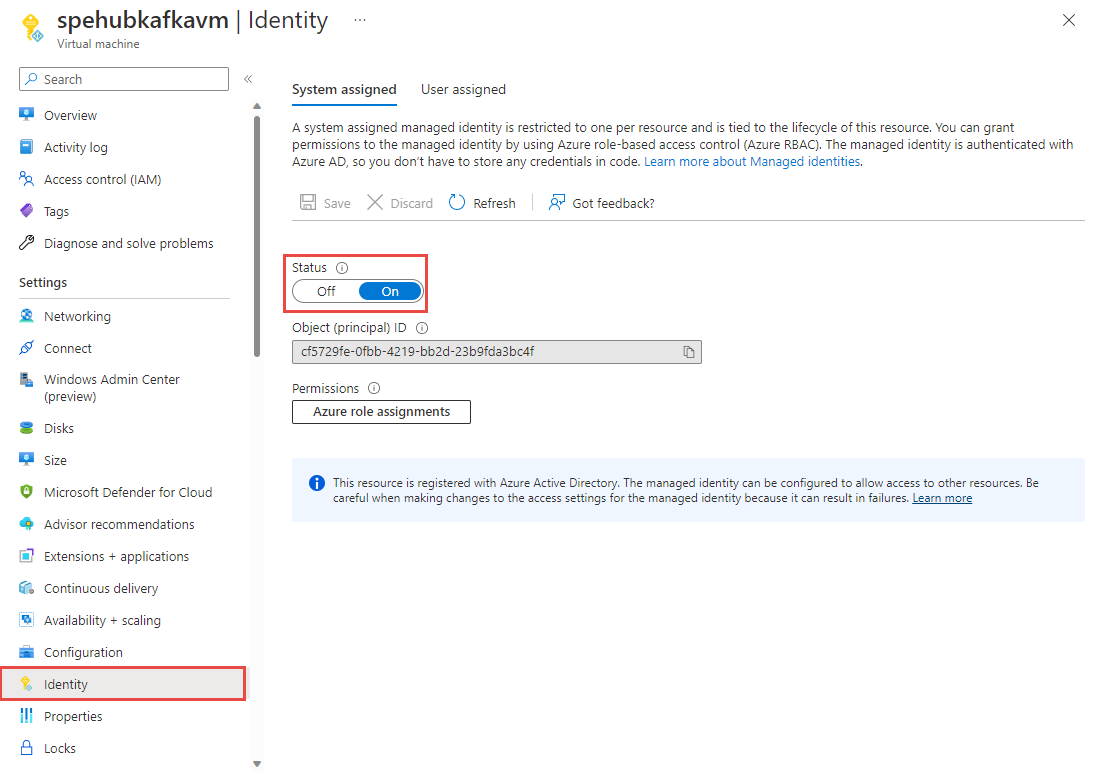
Enable a system-assigned managed identity for the virtual machine. For more information about configuring managed identity on a VM, see Configure managed identities for Azure resources on a VM using the Azure portal. Managed identities for Azure resources provide Azure services with an automatically managed identity in Microsoft Entra ID. You can use this identity to authenticate to any service that supports Microsoft Entra authentication, without having credentials in your code.
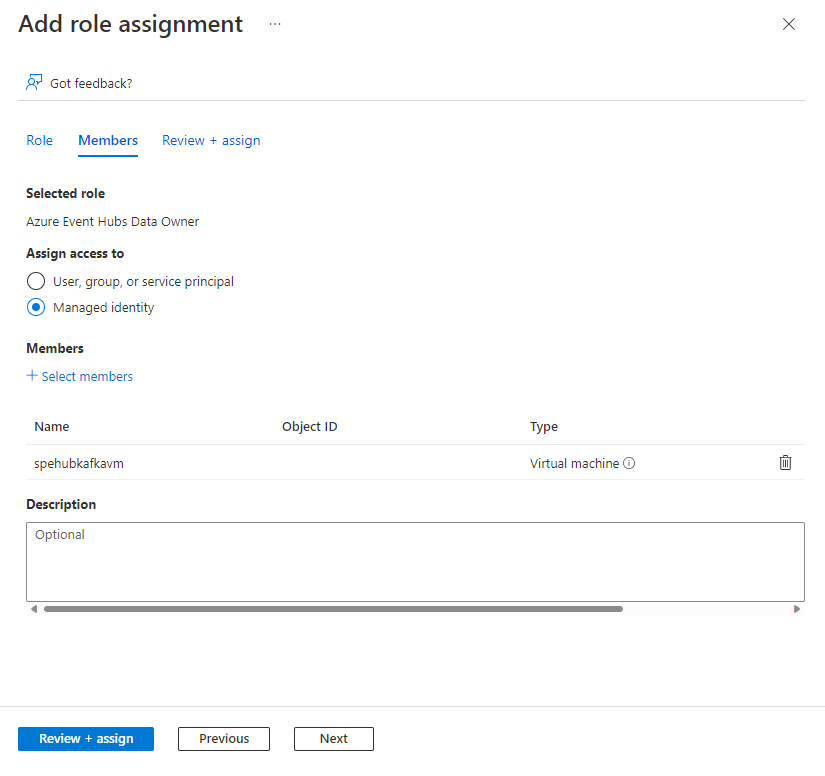
Using the Access control page of the Event Hubs namespace you created, assign Azure Event Hubs Data Owner role to the VM's managed identity. Azure Event Hubs supports using Microsoft Entra ID to authorize requests to Event Hubs resources. With Microsoft Entra ID, you can use Azure role-based access control (Azure RBAC) to grant permissions to a security principal, which may be a user, or an application service principal.
In the Azure portal, navigate to your Event Hubs namespace. Go to "Access Control (IAM)" in the left navigation.
Select + Add and select
Add role assignment.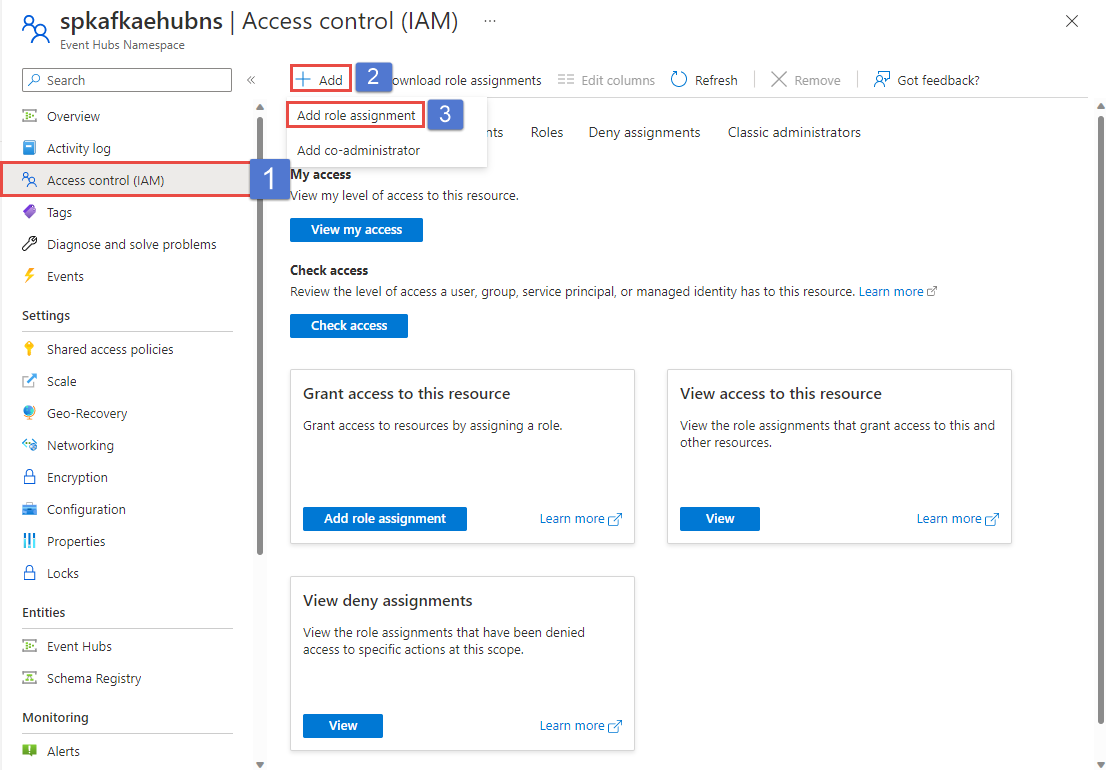
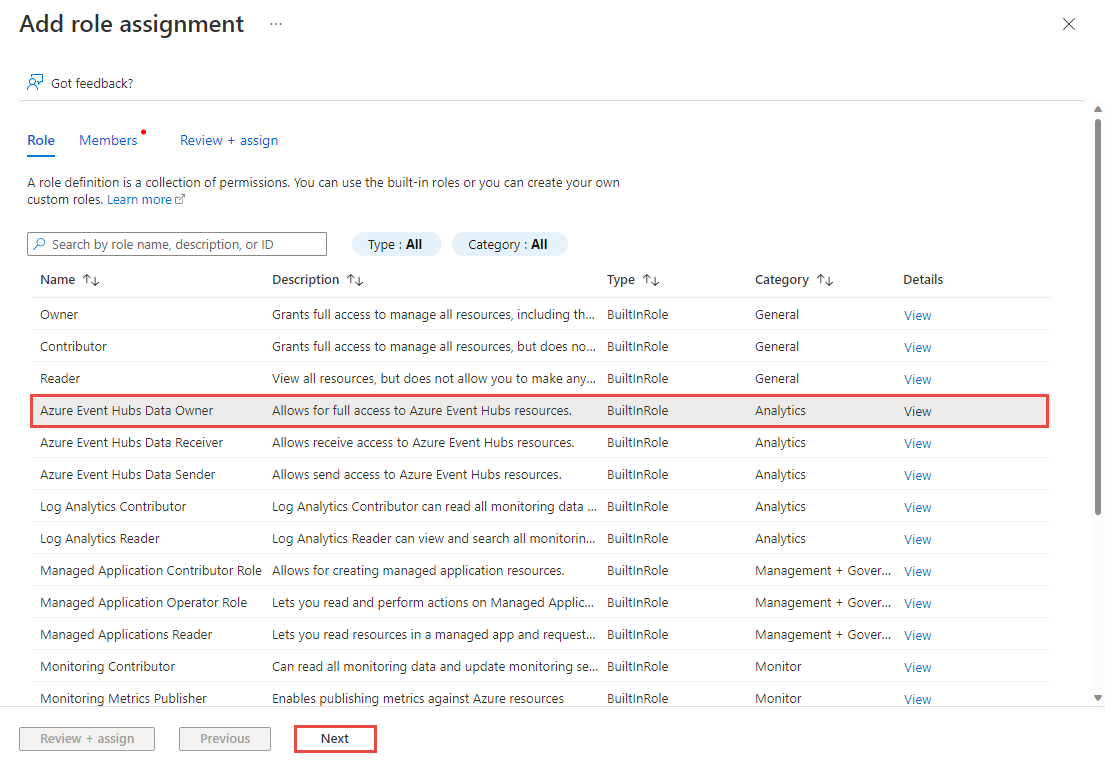
In the Role tab, select Azure Event Hubs Data Owner, and select the Next button.
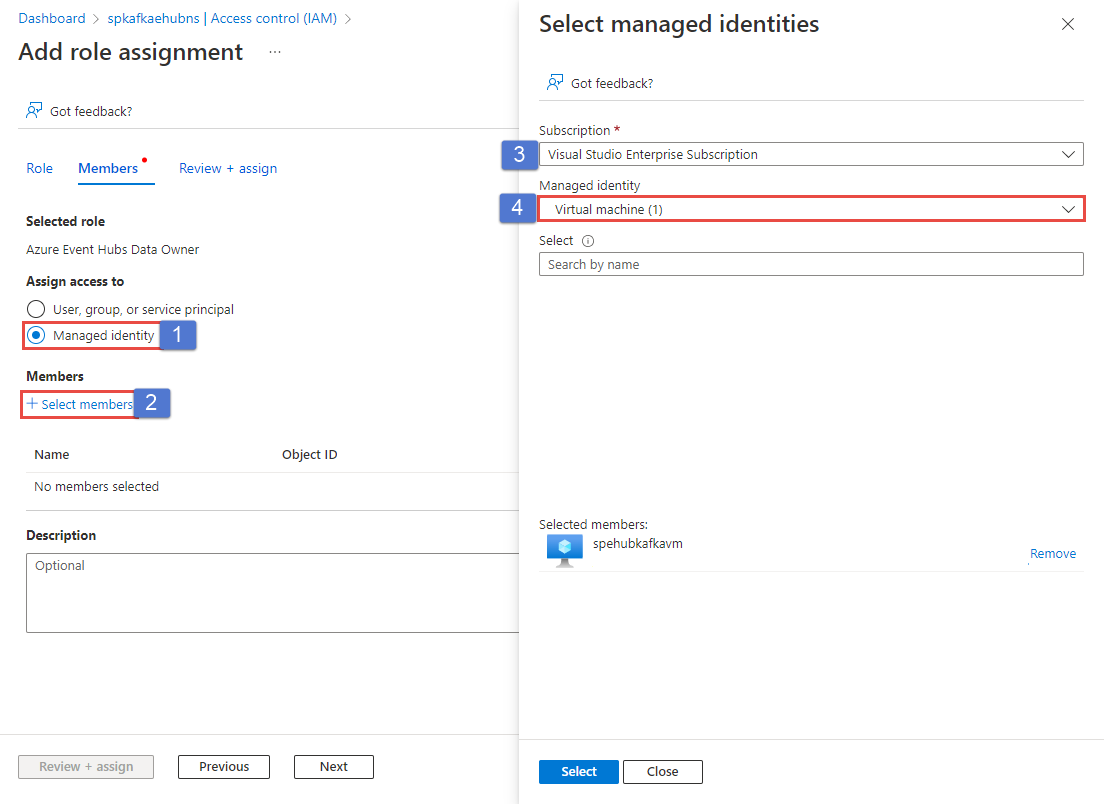
In the Members tab, select the Managed Identity in the Assign access to section.
Select the +Select members link.
On the Select managed identities page, follow these steps:
Select the Azure subscription that has the VM.
For Managed identity, select Virtual machine
Select your virtual machine's managed identity.
Select Select at the bottom of the page.
Select Review + Assign.
Restart the VM and sign in back to the VM for which you configured the managed identity.
Clone the Azure Event Hubs for Kafka repository.
Navigate to
azure-event-hubs-for-kafka/tutorials/oauth/java/managedidentity/consumer.Switch to the
src/main/resources/folder, and openconsumer.config. Replacenamespacenamewith the name of your Event Hubs namespace.bootstrap.servers=NAMESPACENAME.servicebus.windows.net:9093 security.protocol=SASL_SSL sasl.mechanism=OAUTHBEARER sasl.jaas.config=org.apache.kafka.common.security.oauthbearer.OAuthBearerLoginModule required; sasl.login.callback.handler.class=CustomAuthenticateCallbackHandler;Note
You can find all the OAuth samples for Event Hubs for Kafka here.
Switch back to the Consumer folder where the pom.xml file is and, and run the consumer code and process events from event hub using your Kafka clients:
mvn clean package
mvn exec:java -Dexec.mainClass="TestConsumer"
Launch another command prompt window, and navigate to
azure-event-hubs-for-kafka/tutorials/oauth/java/managedidentity/producer.Switch to the
src/main/resources/folder, and openproducer.config. Replacemynamespacewith the name of your Event Hubs namespace.Switch back to the Producer folder where the
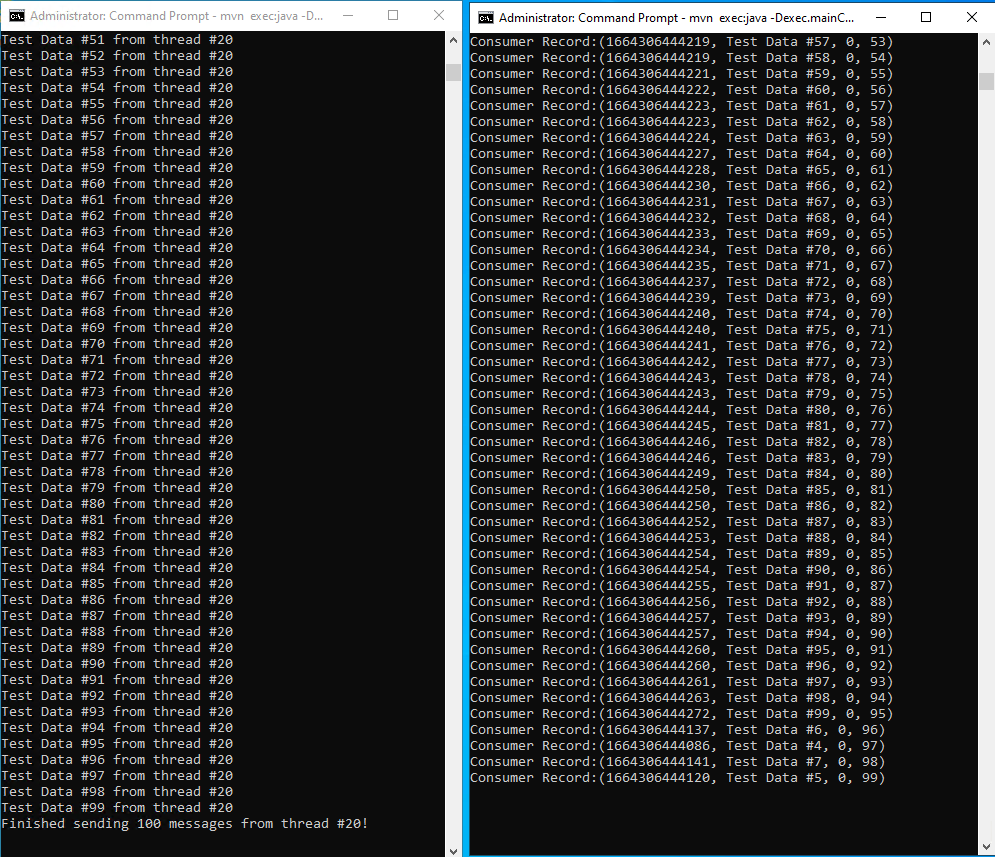
pom.xmlfile is and, run the producer code and stream events into Event Hubs:mvn clean package mvn exec:java -Dexec.mainClass="TestProducer"You should see messages about events sent in the producer window. Now, check the consumer app window to see the messages that it receives from the event hub.
Schema validation for Kafka with Schema Registry
You can use Azure Schema Registry to perform schema validation when you stream data with your Kafka applications using Event Hubs. Azure Schema Registry of Event Hubs provides a centralized repository for managing schemas and you can seamlessly connect your new or existing Kafka applications with Schema Registry.
To learn more, see Validate schemas for Apache Kafka applications using Avro.
Next steps
In this article, you learned how to stream into Event Hubs without changing your protocol clients or running your own clusters. To learn more, see Apache Kafka developer guide for Azure Event Hubs.