Step 3: Create a SharePoint Application to Retrieve Data from SAP

Time to complete: 15 minutes
Objective: You must now take the application definition file that you created by using the Business Data Catalog Definition Editor tool, and import it into Microsoft Office SharePoint Server.
Prerequisites
You should have created an application definition file as described in Step 2: Create an Application Definition File for the SAP Artifacts.
The Microsoft Single Sign-on service must be running.
How to Create a SharePoint Application
Creating a SharePoint application involves the following steps:
Create a single sign-on (SSO) application in SharePoint
Create a Shared Services provider
Import the application definition file
Create a Web Part page, and add Web Parts
This topic demonstrates how to perform these steps.
Creating an SSO Application in SharePoint
To access the data in an SAP system from a SharePoint application, you must set up an SSO application that maps a SharePoint user to an SAP user. Creating an SSO application in SharePoint involves the following steps:
Manage server settings for single sign-on. In this step, you specify a user account that can manage and set up the single sign-on service. You can do so on the Manage Server Settings page. This option is available from the SharePoint Central Administration console. For more information about this step, refer to the “Configure Single Sign-On for Office SharePoint Server 2007” section at https://go.microsoft.com/fwlink/?LinkId=105291.
Manage settings for enterprise application definitions. In this step, you configure the settings for the enterprise application definition. You can do so from the Manage Settings for Enterprise Application Definitions page. This option is available from the SharePoint Central Administration console.
On Central Administration, on the top navigation bar, click Operations.
On the Operations page, in the Security Configuration section, click Manage settings for single sign-on.
On the Manage Settings for Single Sign-On page, in the Enterprise Application Definition Settings section, click Manage settings for enterprise application definitions.
On the Manage Enterprise Application Definitions page, provide values for the Display name, Application name, and the Contact e-mail address fields.
Important
For the Application name field, make sure you specify the same SSO application name that you specified for the SecondarySsoApplicationId variable while creating the application definition file, as described in Step 2: Create an Application Definition File for the SAP Artifacts.
Leave the other fields as default, and click OK.
Manage account information for enterprise application definitions. In this step, you enable individual users or groups to connect to an enterprise application from SharePoint. Essentially, in this step you map an individual user or group to a user in the LOB system. You also specify the credentials to connect to the LOB system. You can do so from the Manage Account Information for Enterprise Application Definitions page. This option is available from the SharePoint Central Administration console. For more information about this step, refer to the “Manage account information for an enterprise application definition” section at https://go.microsoft.com/fwlink/?LinkId=105291.
Creating a Shared Services Provider
A Shared Service Provider is a logical grouping of shared services and their supporting resources. You can create an SSP by using the SharePoint Central Administration console.
You must define a Web site when creating an SSP. Remember the port number and the site address that you create. You will import the Business Data Catalog application definition to this site.
For more information about creating an SSP, see "Chapter overview: Create and configure Shared Services Providers" at https://go.microsoft.com/fwlink/?LinkId=105119.
Importing the Application Definition File
You must now import the application definition file into the SSP.
To import the application definition file
Start SharePoint 3.0 Central Administration. Click Start, point to All Programs, point to Microsoft Office Server, and then click SharePoint 3.0 Central Administration.
In the left navigation pane, click the name of the SSP to which you want to import the application definition.
In the Business Data Catalog section, click Import application definition.
On the Import Application Definition page that opens, browse to Customer_Orders.xml, select the file, and then click Open.
Click Import.
Click OK.
After importing the application, you can view your application by going to the View Applications link. Click the application name to see the entities in the application.
Creating Web Parts
You must now create Web Parts in your SharePoint site to view and manage the business data that will be extracted from the SAP system. Web Parts are reusable components that can contain any kind of Web-based information, including analytical, collaborative, and database information.
In this tutorial, Web Parts are created for the method instances that were created in the Business Data Catalog Definition Editor. Office SharePoint Server provides different kinds of Web Parts for specific use. The following Web Parts are used here:
Business Data List Web Part for the Finder method instance. This Web Part enables you to specify a search expression to retrieve a list of customers from the SAP system. For this tutorial, this is called the Search Customers Web Part.
Business Data Item Web Part for the Specific Finder method instance. This Web Part presents the details for a specific customer that you select from the Search Customers Web Part. This Web Part is mapped to the Search Customer Web Part. For this tutorial, this is called the Customer Details Web Part.
Business Data Related List Web Part for the Association method instance. This Web Part lists the sales orders for a specific customer that you select from the Search Customers Web Part. This Web Part is associated with the Search Customer Web Part. For this tutorial, this is called the Sales Order Details Web Part.
This section provides instructions to create these Web Parts and to create associations between them. For more information about creating Web Parts, see "Customize business data lists, Web Parts, and sites" at https://go.microsoft.com/fwlink/?LinkId=104131.
The Web Parts will be added to a single Web Part page. You must create a Web Part page before adding the Web Parts. For this tutorial, this Web Part page is called Customer_SalesOrders.
Creating a Web Part Page
This section provides instructions to create a Web Part page.
To create a Web Part page
Start SharePoint 3.0 Central Administration. Click Start, point to All Programs, point to Microsoft Office Server, and click SharePoint 3.0 Central Administration.
In the left navigation pane, click the name of the SSP to which you want to import the application definition.
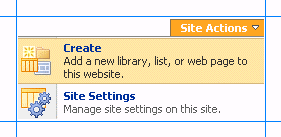
On the Shared Services Administration page, in the upper-right corner, click Site Actions, and then click Create.

On the Create page, in the Web Pages section, click Web Part Page.
On the New Web Part page, do the following:
In the Name field, type a name for the page. For this tutorial, type the name as Customer_SalesOrders.
Select the Overwrite if file already exists check box, if you want to overwrite old pages with the same name as the new page you create.
In the Layout section, from the Choose a Layout Template box, select a layout for the Web Part page. For this tutorial, select Header, Left Column, Body.
In the Save Location section, in the Document Library list, click Form Templates.
Click Create. The following figure shows a Web Part page after it is just created.

You must now add the different Web Parts to this page.
Adding a Business Data List Web Part
You must now add a Business Data List Web Part to the Web Part page. Using this Web Part you will retrieve a list of customers from the SAP system that matches a search expression. This Web Part corresponds to the Finder method instance (GetCustomerByName_Instance) that you created in the Business Data Catalog Definition Editor.
To add a Business Data List Web Part
On the Customer_SalesOrders page, in the Header section, click Add a Web Part.
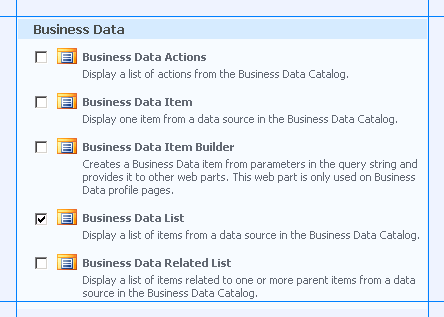
In the Add Web Parts dialog box, in the Business Data section, select the Business Data List check box, and then click Add.

In the newly added Business Data List Web Part, click the Open the tool pane link.

The Business Data List tool pane opens in the right pane. In the Business Data List section, for the Type field, click the Browse button.

In the Business Data Type Picker dialog box, select the Customer_Order_Instance application, and then click OK.

Expand the Appearance node, and in the Title box, type a title for the Web Part. For this Web Part, type Customer List.
In the Business Data List tool pane, click Apply, and then click OK. The Business Data List Web Part now looks like the following:

The Web Part lists the fields that are returned by executing the SD_RFC_CUSTOMER_GET RFC. You can remove the fields that you do not want to display on the SharePoint portal. To remove the fields, click the Edit View link in the upper-right corner of the Web Part.
On the Edit View page, in the Columns section, clear the check boxes against the columns that you do not want to display.

Click OK.
Adding a Business Data Item Web Part
You must now add a Business Data Item Web Part to the Web Part page. You will also connect this Web Part to the Business Data List Web Part that you just created. By doing so, you will be able to see the details for a customer that you select in the Business Data List Web Part. This Web Part corresponds to the Specific Finder method instance (GetCustomerByNumber_Instance) that you created in the Business Data Catalog Definition Editor.
To add a Business Data Item Web Part
On the Customer_SalesOrders page, in the upper-right corner, click Site Actions, and then click Edit Page.
On the Customer_SalesOrders page, in the Left Column section, click Add a Web Part.
In the Add Web Parts dialog box, in the Business Data section, select the Business Data Item check box, and then click Add.
In the newly added Business Data Item Web Part, click the Open the tool pane link.
The Business Data Item tool pane opens in the right pane. In the Business Data Item section, for the Type field, click the Browse button.

In the Business Data Type Picker dialog box, select the Customer_Order_Instance application, and then click OK.
In the View list, select Default.
Leave the Item list empty.
Note
For the Item field, you must specify a customer name or customer number for which you want to see the details. That serves as an input parameter for this Web Part. Because you will be getting the input parameter by connecting to the Business Data List Web Part, you need not specify an item explicitly.
In the Fields section, click Choose to select the fields you want to display on the page.
Expand the Appearance node, and in the Title field, specify a title for the Web Part. For this Web Part, specify Details for a Specific Customer.
Click Apply, and then click OK.
Connect the Web Part to the Customer List Web Part. To do so:
Click edit towards the upper-right corner of the Web Part.
From the context menu point to Connections, point to Get Item From, and click Customer List.

Adding a Business Data Related List Web Part
You must now add a Business Data Related List Web Part to the Web Part page. You will also connect this Web Part to the Business Data List Web Part you created earlier. By doing so, you will be able to see the sales orders for a customer that you select in the Business Data List Web Part. This Web Part corresponds to the Association method instance (SalesOrderForCustomer_Instance) you created in the Business Data Catalog Definition Editor.
To add a Business Data Related List Web Part
On the Customer_SalesOrders page, in the Body section, click Add a Web Part.
In the Add Web Parts dialog box, in the Business Data section, select the Business Data Related List check box, and click Add.
In the newly added Business Data Related List Web Part, click the Open the tool pane link.
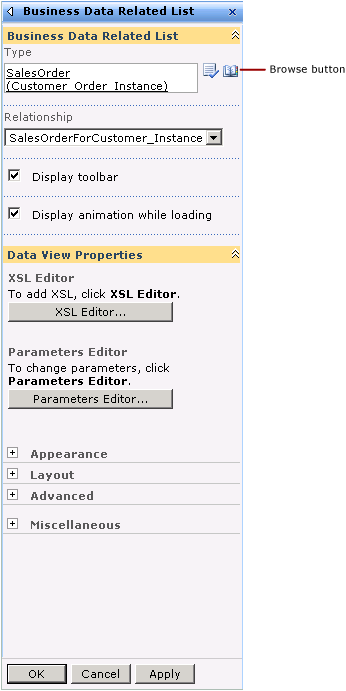
The Business Data Related List tool pane opens in the right pane. In the Business Data Related List section, for the Type field, click the Browse button.

In the Business Data Type Picker dialog box, select the Customer_Order_Instance application, and then click OK. The Relationship list populates with the name of the Association method instance (SalesOrderForCustomer_Instance).
Expand the Appearance node, and in the Title box, type a title for the Web Part. For this Web Part, type Sales Order for a Specific Customer.
Click Apply, and then click OK.
The Web Part lists the fields that are returned by executing the BAPI_SALESORDER_GETLIST RFC. You can remove the fields that you do not want to display on the SharePoint portal. To remove the fields, click the Edit View link in the upper-right corner of the Web Part.
On the Edit View page, in the Columns section, clear the text boxes against the columns that you do not want to display.
Click OK.
Connect the Web Part to the Customer List Web Part. To do so:
Click edit towards the upper-right corner of the Sales Order for a Specific Customer Web Part.
From the context menu, point to Connections, point to Get Related Item From, and then click Customer List.
Click Exit Edit Mode from the upper-right corner of the page.
Next Steps
Test the SharePoint application by retrieving data from an SAP system. See Step 4: Test Your SharePoint Application.
See Also
Tutorial 1: Presenting Data from an SAP System on a SharePoint Site