Use Azure Cloud Shell
Azure hosts Azure Cloud Shell, an interactive shell environment that you can use through your browser. You can use either Bash or PowerShell with Cloud Shell to work with Azure services. You can use the Cloud Shell preinstalled commands to run the code in this article without having to install anything on your local environment.
To start Azure Cloud Shell:
| Option |
Example/Link |
| Select Try It in the upper-right corner of a code block. Selecting Try It doesn't automatically copy the code to Cloud Shell. |
 |
| Go to https://shell.azure.com, or select the Launch Cloud Shell button to open Cloud Shell in your browser. |
 |
| Select the Cloud Shell button on the menu bar at the upper right in the Azure portal. |
 |
To run the code in this article in Azure Cloud Shell:
Start Cloud Shell.
Select the Copy button on a code block to copy the code.
Paste the code into the Cloud Shell session by selecting Ctrl+Shift+V on Windows and Linux or by selecting Cmd+Shift+V on macOS.
Select Enter to run the code.
Prepare your environment
Power BI embedded capacity commands require version 2.3.1 or later of the Azure CLI. Run az --version to find the version and dependent libraries that are installed. To install or upgrade, see Install Azure CLI.
Sign in.
Sign in using the az login command if you're using a local install of the CLI.
az login
Follow the steps displayed in your terminal to complete the authentication process.
Install the Azure CLI extension.
When working with extension references for the Azure CLI, you must first install the extension. Azure CLI extensions give you access to experimental and pre-release commands that haven't yet shipped as part of the core CLI. To learn more about extensions including updating and uninstalling, see Use extensions with Azure CLI.
Install the extension for Power BI embedded capacity by running the following command:
az extension add --name powerbidedicated
Create a capacity with Azure CLI
Use the az Power BI embedded-capacity create command to create a capacity.
az powerbi embedded-capacity create --location westeurope
                                    --name
                                    --resource-group
                                    --sku-name "A1"
                                    --sku-tier "PBIE_Azure"
Delete a capacity with Azure CLI
To delete a capacity using Azure CLI, use the Azure Power BI embedded-capacity delete command.
az powerbi embedded-capacity delete --name
                                    --resource-group
Manage your capacity with Azure CLI
You can view all the Power BI Embedded Azure CLI commands, in Azure Power BI.
Use Resource Manager template
Resource Manager template is a JavaScript Object Notation (JSON) file that defines the infrastructure and configuration for your project. The template uses declarative syntax, which lets you state what you intend to deploy without having to write the sequence of programming commands to create it. If you want to learn more about developing Resource Manager templates, see Resource Manager documentation and the template reference.
If you don't have an Azure subscription, create a free account before you begin.
Review the template
The templates used in this quickstart are from Azure Quickstart Templates.
Once Azure resource is defined in the template, Microsoft.PowerBIDedicated/capacities Az - create a Power BI Embedded capacity.
Use this template to create a Power BI Embedded resource.
{
    "$schema": "https://schema.management.azure.com/schemas/2019-04-01/deploymentTemplate.json#",
    "contentVersion": "1.0.0.0",
    "parameters": {
        "name": {
            "type": "string",
            "metadata": {
                "description": "The capacity name, which is displayed in the Azure portal and the Power BI admin portal"
            }
        },
        "location": {
            "type": "string",
            "defaultValue": "[resourceGroup().location]",
            "metadata": {
                "description": "The location where Power BI is hosted for your tenant"
            }
        },
        "sku": {
            "type": "string",
            "allowedValues": [
                "A1",
                "A2",
                "A3",
                "A4",
                "A5",
                "A6"
            ],
            "metadata": {
                "description": "The pricing tier, which determines the v-core count and memory size for the capacity"
            }
        },
        "admin": {
            "type": "string",
            "metadata": {
                "description": "A user within your Power BI tenant, who will serve as an admin for this capacity"
            }
        }
    },
    "resources": [
        {
            "type": "Microsoft.PowerBIDedicated/capacities",
            "apiVersion": "2021-01-01",
            "name": "[parameters('name')]",
            "location": "[parameters('location')]",
            "sku": {
                "name": "[parameters('sku')]"
            },
            "properties": {
                "administration": {
                    "members": [
                        "[parameters('admin')]"
                    ]
                }
            }
        }
    ]
}
Deploy the template
Select the following link to sign in to Azure and open a template. The template creates a Power BI Embedded capacity.

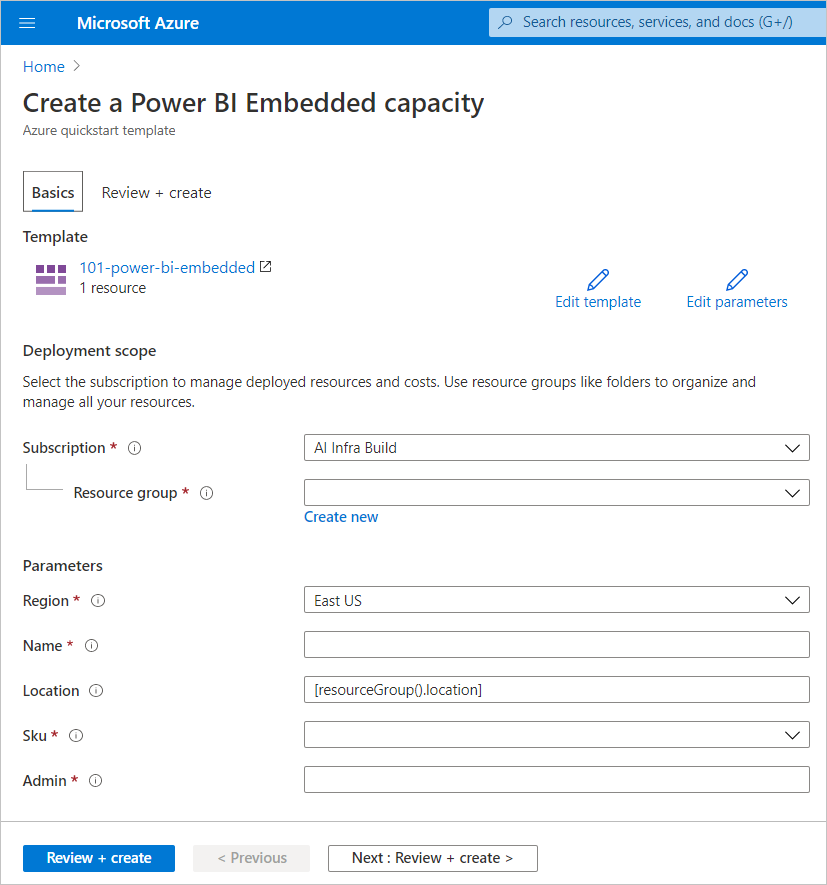
Fill in the required information and then select Review + Create.

Subscription - The subscription you would like to create the capacity against.
Resource group - The resource group that contains this new capacity. Pick from an existing resource group, or create another. For more information, see Azure Resource Manager overview.
Region - The region the capacity will belong to.
Name - The capacity name.
Location - The location where Power BI is hosted for your tenant. Your default location is your home region, but you can change the location using Multi-Geo options.
SKU - The A SKU you require. For more information, see SKU memory and computing power.
Admin - An admin for the capacity.
Note
- By default, the capacity administrator is the user creating the capacity.
- You can select a different user or service principal, as capacity administrator.
- The capacity administrator must belong to the tenant where the capacity is provisioned. Business to business (B2B) users cannot be capacity administrators.
Validate the deployment
To validate the deployment, do the following:
Sign into the Azure portal.
In the search box, search for Power BI Embedded.
Review the list of Power BI Embedded capacities, and verify that the new capacity you created is listed.

Clean up resources
To delete the capacity you created, follow these steps:
Sign into the Azure portal.
In the search box, search for Power BI Embedded.
Open the context menu of the capacity you created and select Delete.

In the confirmation page, enter the name of the capacity and select Delete.


