How to add Machine Learning Server modules to multi-user Jupyter Notebook instances
Important
This content is being retired and may not be updated in the future. The support for Machine Learning Server will end on July 1, 2022. For more information, see What's happening to Machine Learning Server?
This article explains how to add our libraries to a remote Jupyter server acting as central hub for multi-user notebooks on your network.
Jupyter Notebooks is distributed with Anaconda, which is the Python distribution used by Machine Learning Server. If you installed Machine Learning Server, you have the components necessary for running notebooks as a single user on localhost.
Both Machine Learning Server and Jupyter Notebooks must be on the same computer.
Configure for multi-user access on Linux
This procedure applies to Linux or Spark edge node upon which you are hosting a JupyterHub or multi-user server. It does not apply to single-user localhost servers.
For a multi-user server, add our custom kernel MLSPython to the data directory of your server. Machine Learning Server provides this kernel for notebooks and scripts that make calls to revoscalepy, microsoftml, and azureml.
Run the following command to install the kernel:
sudo /usr/bin/anaconda/bin/jupyter kernelspec install /opt/microsoft/mlserver/9.2.1/libraries/jupyter/kernels/MMLSPy
If the /usr/bin/anaconda/bin/jupyter folder doesn't exist, then the server is not a JupyterHub or multi-user server. For more information, see JupyterHub documentation.
Check kernel installation
Verify the file is in the expected location.
- Run
jupyter –-data-dirfrom the node on which Jupyter Notebook Server is installed. - Note the path returned by
--data-dir. This is where Jupyter stores its data directories, including kernels. - Navigate to the folder. You should see MLSPython listed.
If the installation command did not succeed, you can manually copy the MLSPython directory from /opt/microsoft/mlserver/9.4.7/libraries/kernels/ to the kernels subdirectory under the data directory.
You might need to restart your server in order for the server to pick up the kernel.
Use the MMLSPy notebook option
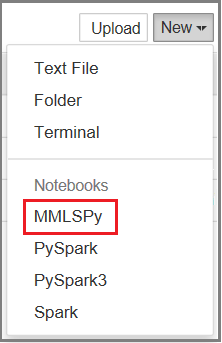
In Jupyter dashboard, click New to create a new notebook. You should see the new kernel (MMLSPy) in the drop down.
