.NET Project Designer (C#)
Use the Project Designer to specify the project's settings and properties for .NET Core and .NET 5+. For .NET Framework and Visual Basic projects, see What is the .NET Project Designer?.
To access the Project Designer, choose a project node (not the Solution node) in Solution Explorer. Then choose Project > Properties on the menu bar. The Project Designer appears.
Note
Your computer might show different names or locations for some of the Visual Studio user interface elements in this article. You might be using a different edition of Visual Studio or different environment settings. For more information, see Personalize the IDE.
Application, General settings
The following options enable you to configure general settings for the application.
Output type
Specifies the type of application to build. The values are different depending on the project type. For example, for a Console App project, you can specify Windows Application, Console Application, or Class Library as the output type.
For more information about the Output type property, see /target (C# Compiler Options).
For information about how to access this property programmatically, see OutputType.
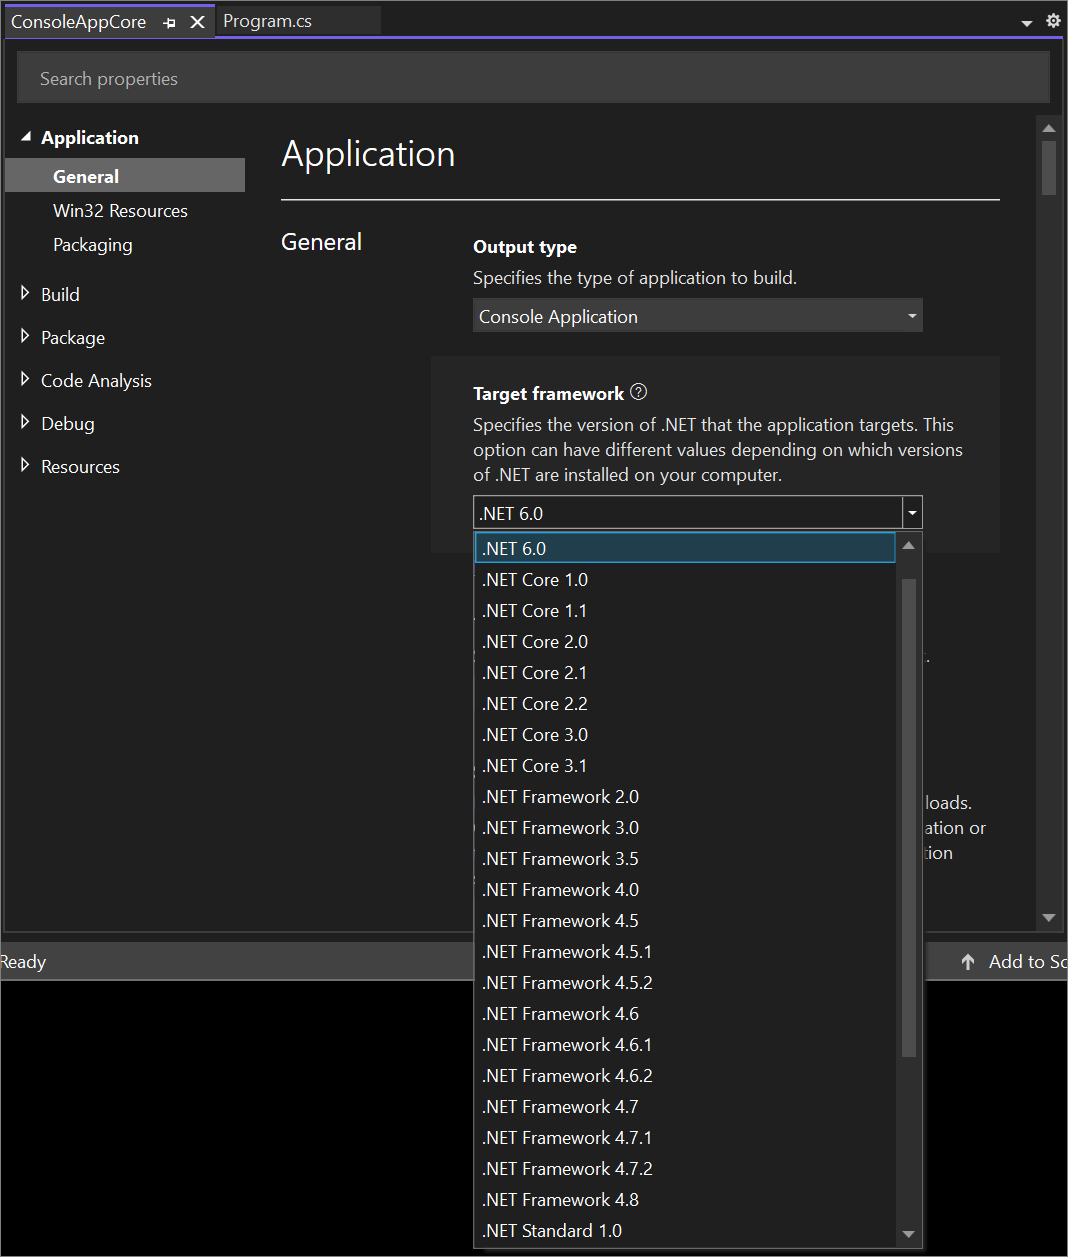
Target Framework
Specifies the version of .NET that the application targets. This option can have different values depending on which versions of .NET are installed on your computer.
For a project that targets .NET Core or .NET 5+, the available versions might appear as follows:
Note
For ClickOnce applications, the prerequisite packages listed in the Prerequisites Dialog Box are set automatically the first time that you open the dialog box. If you subsequently change the project's target framework, you must select the prerequisites manually to match the new target framework.
For more information, see Framework targeting overview.
Target OS
Specifies the operating system that the project will target. Combined with the target framework, this generates a .NET 5+ OS-specific TF.
Startup object
Defines the entry point to be called when the application loads. Generally this is set either to the main form in your application or to the Main procedure that should run when the application starts. Because class libraries do not have an entry point, their only option for this property is (Not set).
By default, in a WPF app project, this option is set to (Not set). The other option is [projectname].App. In a WPF project, you must set the startup URI to load a UI resource when the application starts. To do this, open the Application.xaml file in your project and set the StartupUri property to a .xaml file in your project, such as Window1.xaml. For a list of acceptable root elements, see StartupUri. You must also define a public static void Main() method in a class in the project. This class will appear in the Startup object list as ProjectName.ClassName. You can then select the class as the startup object.
See /main (C# Compiler Options) for more information. To access this property programmatically, see StartupObject.
Assembly name
Specifies the name of the output file that will hold the assembly manifest. Changing this property also changes the Output Name property.
You can also make this change from the command line by using /out (C# Compiler Options).
To access this property programmatically, see AssemblyName.
Default namespace
Specifies the base namespace for files added to the project.
See namespace for more information about creating namespaces in your code.
To access this property programmatically, see RootNamespace.
Application, Win32 Resources settings
Icon
Sets the .ico file that you want to use as your program icon. Click Browse to browse for an existing graphic, or type the name of the file that you want. See /win32icon (C# Compiler Options) for more information.
To access this property programmatically, see ApplicationIcon.
For information about creating an icon, see Image editor for icons.
Resources
The Resources option helps you configure resource settings for your app. By default, the Icon and Manifest options are enabled. This enables you to select your own icon or to select different manifest generation options. Leave this radio button selected unless you're providing a resource file for the project.
If you select Resource file, then configure a resource file for the project. Enter a path name or use the Browse button to add a Win32 resource file to the project. For more information, see Create resource files for .NET apps.
Manifest
Selects a manifest generation option when the application runs on Windows under User Account Control (UAC). This option can have the following values:
Embed manifest with default settings. Supports the typical manner in which Visual Studio operates on Windows, which is to embed security information in the application's executable file, specifying that
requestedExecutionLevelbeAsInvoker. This is the default option.Create application without a manifest. This method is known as virtualization. Use this option for compatibility with earlier applications.
Use a custom manifest. Allows you to enter a path or browse to a custom manifest for the project.
Global Usings settings
Implicit global usings
Enables or disables global usings, which allow you to use types defined in a namespace without specifying the fully qualified namespace.
Manage Implicit Global Usings
Manually add and delete global usings for use in your projects.
Build, General settings
Conditional compilation symbols
Specifies symbols on which to perform conditional compilation. Separate symbols with a semi-colon (";"). For more information, see /define (C# Compiler Options).
Debug Custom Symbols
Specifies symbols for conditional compilation for Debug builds. The default debug symbols are displayed in a string, separated by semi-colons.
Release Custom Symbols
Specifies symbols for conditional compilation for Release builds. The default release symbols are displayed in a string, separated by semi-colons.
Platform Target
Specifies the processor to be targeted by the output file. Choose x86 for any 32-bit Intel-compatible processor, choose x64 for any 64-bit Intel-compatible processor, choose ARM for ARM processors, or choose Any CPU to specify that any processor is acceptable. Any CPU is the default value for projects, because it allows the application to run on the broadest range of hardware.
For more information, see /platform (C# Compiler Options).
Nullable
Specifies the project-wide C# nullable context. This UI option was introduced in Visual Studio 16.5, and is only enabled for projects that use C# 8.0 or later.
For more information, see Nullable Contexts.
Generate assembly info
Specifies whether package-related project properties are transformed into assembly attributes. For more information, see the GenerateAssemblyInfo property.
Unsafe code
Allows code that uses the unsafe keyword to compile. For more information, see /unsafe (C# Compiler Options).
Optimize code
Enable or disable optimizations performed by the compiler to make your output file smaller, faster, and more efficient. For more information, see /optimize (C# Compiler Options).
Debug symbols
Specifies the type of debugging information generated by the compiler. For information on how to configure the debug performance of an application, see DebugType compiler option. This setting has the following options:
none
Specifies that no debugging information will be generated.
full
Enables attaching a debugger to the running program.
pdbonly
Allows source code debugging when the program is started in the debugger but will only display assembler when the running program is attached to the debugger.
portable
Produces a .PDB file, a non-platform-specific, portable symbol file that provides other tools, especially debuggers, information about what is in the main executable file and how it was produced. See Portable PDB for more information.
embedded
Embeds portable symbol information into the assembly. No external .PDB file is produced.
For more information, see /debug (C# Compiler Options).
Build, Errors and warnings settings
The following settings are used to configure the error and warning options for the build process.
Warning level
Specifies the level to display for compiler warnings. For more information, see /warn (C# Compiler Options).
Suppress specific warnings
Blocks the compiler's ability to generate one or more specific warnings. Separate multiple warning numbers with a comma or semicolon. For more information, see /nowarn (C# Compiler Options).
Treat warnings as errors
Select whether warnings are treated as errors during the build process. For more information, see /warnaserror (C# Compiler Options).
Treat specific warnings as errors
Specify which warnings are treated as errors. Separate multiple warning numbers with a comma or semicolon.
Tip
If you don't want code analysis warnings to be treated as errors, see Code analysis FAQ.
Build, Output settings
The following settings are used to configure the output options for the build process.
Base output path
Specifies the location of the output files for this project's configuration. Enter the path of the build output in this box, or choose the Browse button to specify a path. The path is relative; if you enter an absolute path, it will be saved as relative. The default path is bin\Debug or bin\Release\.
With simplified build configurations, the project system determines whether to build a debug or release version. The Build command from the Debug menu (F5) will put the build in the debug location regardless of the Output path you specify. However, the Build command from the Build menu puts it in the location you specify. For more information, see Understanding Build Configurations.
Reference assembly
Specifies whether to generate a reference assembly containing the public API of the project.
Documentation file
Specifies the name of a file into which documentation comments will be processed. For more information, see /doc (C# Compiler Options).
Build, Events settings
For information on the build event settings, see Specify build events (C#).
Build, Publish settings
Publishing
Allows the MSBuild publish target to run. For more information, see the MSBuild IsPublishable property.
Publish trimmed
Specifies whether trimming is enabled during the publish process. For more information, see Trim-related properties.
Publish native AOT
Specifies whether to produce an app that's self-contained and that has been ahead-of-time (AOT) compiled to native code. For more information, see Native AOT deployment.
Build, Strong naming settings
Sign the assembly
Select this check box to sign the assembly and create a strongly named key file. For more information about signing the assembly by using the Project Designer, see How to: Sign an Assembly (Visual Studio). For more information, see Strong-named assemblies.
This option uses the Al.exe tool provided by the Windows Software Development Kit (SDK) to sign the assembly. For more information about Al.exe, see How to: Sign an Assembly with a Strong Name.
Strong name key file list
Enables you to specify a new or existing strongly named key file that is used to sign the assembly. Select <Browse...> to select an existing key file.
Delay sign only
Select this check box to enable delay signing. For more information, see Delay-sign an assembly.
Note that a delay signed project will not run and cannot be debugged. You can, however, use the Sn.exe (Strong Name Tool) with the -Vr option to skip verification during development.
Note
When you sign an assembly, you might not always have access to a private key. For example, an organization might have a closely guarded key pair that developers don't have access to on a daily basis. The public key might be available, but access to the private key is restricted to a few individuals. In such a case, you can use delayed or partial signing to provide the public key, deferring the addition of the private key until the assembly is handed off.
Build, Advanced settings
The following options enable you to set advanced build settings.
Language version
Links to /langversion (C# compiler options), which provides information about how a default language version is chosen based on a project's target framework.
Check for arithmetic overflow
Specifies whether an integer arithmetic statement that is not in the scope of the checked or unchecked keywords and that results in a value outside the range of the data type will cause a run-time exception. For more information, see /checked (C# Compiler Options).
Deterministic
Specifies whether to produce byte-for-byte equivalent output from the same input source. For more information, see C# Compiler Options that control code generation.
Internal compiler error reporting
Specifies whether to report compiler errors to Microsoft. If set to prompt (the default), you will receive a prompt if an internal compiler error occurs, giving you the option of sending an error report electronically to Microsoft. If set to send, an error report will be sent automatically. If set to queue, error reports will be queued. If set to none, the error will be reported only in the compiler's text output. For more information, see /errorreport (C# Compiler Options).
File Alignment
Specifies the size of sections in the output file. Valid values are 512, 1024, 2048, 4096, and 8192. These values are measured in bytes. Each section will be aligned on a boundary that is a multiple of this value, affecting the size of the output file. For more information, see /filealign (C# Compiler Options).
Package, General settings
The properties in this section are used to configure packages, generally corresponding to properties in a NuGet .nuspec file. For more information, see .nuspec file.
Package, License settings
Package License
Specifies whether to include a license expression or license file in your package. For more information, see the license element.
Package, Symbol settings
Produce a symbol package
Specifies whether to create a symbol package for debugging. For more information, see Creating symbol packages (.snupkg).
Code Analysis, All analyzer settings
Run on build
Specifies whether to run source code analysis when you build the project. For more information, see Disable source code analysis for .NET.
Run on live analysis
Specifies whether to run live source code analysis when you build the project. For more information, see Disable source code analysis for .NET.
Code Analysis, .NET analyzer settings
Enforce code style on build
Specifies whether .NET code style violations are reported when building the project. For more information, see Enforce code styles on build.
Enable .NET analyzers
Enables or disables the .NET compiler platform (Roslyn) analyzers. For more information, see Enable or install first-party .NET analyzers.
Analysis level
Specifies the set of analyzers to run in the project. For more information, see Latest updates section in the code analysis overview article.
Debug, General settings
Select the link to open the debug launch profiles UI. This UI allows you to add and configure different profiles to use when debugging. Each profile name appears as a start option in the Start Debugging list.
For ASP.NET Core projects, the settings in the launch profiles UI correspond to settings in the project's launchSettings.json file. For detailed information on how this file is used in ASP.NET development, see Development and launchSettings.json.
Resources, General settings
Select the link to open the RESX assembly resources file. For more information, see Settings page, Project Designer.
See also
Visszajelzés
Hamarosan elérhető: 2024-ben fokozatosan kivezetjük a GitHub-problémákat a tartalom visszajelzési mechanizmusaként, és lecseréljük egy új visszajelzési rendszerre. További információ: https://aka.ms/ContentUserFeedback.
Visszajelzés küldése és megtekintése a következőhöz: