Catatan
Akses ke halaman ini memerlukan otorisasi. Anda dapat mencoba masuk atau mengubah direktori.
Akses ke halaman ini memerlukan otorisasi. Anda dapat mencoba mengubah direktori.
Gunakan artikel ini untuk menemukan instruksi langkah demi langkah dan sampel kode untuk menggunakan alat berbasis OpenAPI.
Buka portal Azure AI Foundry. di layar Agen atau Taman bermain Agen, pilih agen Anda.
Gulir ke bawah panel Penyetelan ke tindakan. Kemudian pilih Tambahkan.

Pilih alat yang ditentukan OpenAPI 3.0.
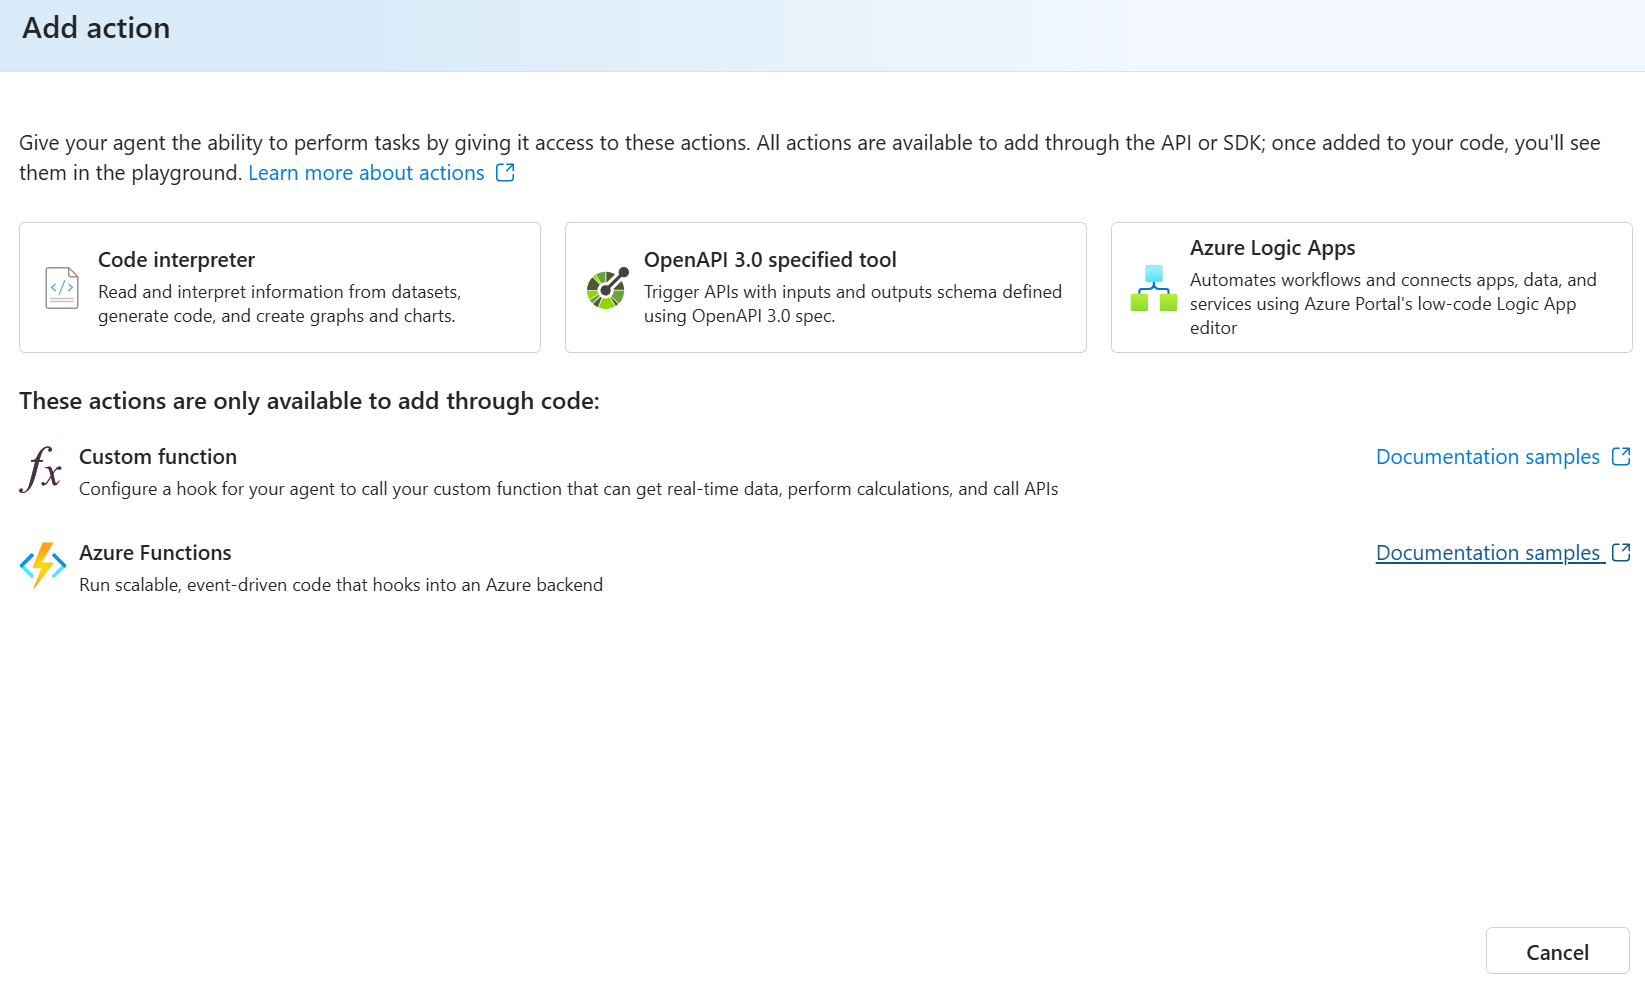
Beri nama alat Anda (wajib) dan deskripsi (opsional). Deskripsi akan digunakan oleh model untuk memutuskan kapan dan bagaimana menggunakan alat.

Pilih Berikutnya dan pilih metode autentikasi Anda.
- Jika Anda memilih
connection, Anda perlu memilih koneksi kustom dengan kunci API. - Jika Anda memilih
managed identity, Anda perlu memasukkan audiens untuk mendapatkan token Anda yang merupakan cakupan autentikasi. Pastikan Anda telah menyiapkan autentikasi dan penetapan peran seperti yang dijelaskan dalam gambaran umum alat OpenAPI. Contoh audiens dapat berupahttps://cognitiveservices.azure.com/untuk menyambungkan ke Azure AI Services, setelah penyiapan yang tepat dilakukan.
- Jika Anda memilih
Salin dan tempel spesifikasi OpenAPI Anda di kotak teks.
Tinjau dan tambahkan alat ke agen Anda.


Inisialisasi
Kode dimulai dengan menyiapkan impor yang diperlukan dan menginisialisasi klien Proyek AI:
# Import necessary libraries
import os
import jsonref
from azure.ai.projects import AIProjectClient
from azure.identity import DefaultAzureCredential
# import the folloing
from azure.ai.agents.models import OpenApiTool, OpenApiAnonymousAuthDetails
# use the following for connection auth
# from azure.ai.agents.models import OpenApiTool, OpenApiConnectionAuthDetails, OpenApiConnectionSecurityScheme
# use the following for managed identity auth
# from azure.ai.agents.models import OpenApiTool, OpenApiManagedAuthDetails, OpenApiManagedSecurityScheme

endpoint = os.environ["PROJECT_ENDPOINT"]
model_deployment_name = os.environ["MODEL_DEPLOYMENT_NAME"]
# Initialize the project client using the endpoint and default credentials
with AIProjectClient(
    endpoint=endpoint,
    credential=DefaultAzureCredential(exclude_interactive_browser_credential=False),
) as project_client:
Penyiapan alat
Demikian pula, spesifikasi OpenAPI dimuat dari weather.json. Objek autentikasi anonim (OpenApiAnonymousAuthDetails) dibuat, karena API khusus ini tidak memerlukan autentikasi dalam contoh ini. Anda dapat menemukan contoh spesifikasi OpenAPI di GitHub.
    # Load the OpenAPI specification for the weather service from a local JSON file
    with open(os.path.join(os.path.dirname(__file__), "weather.json"), "r") as f:
         openapi_weather = jsonref.loads(f.read())

    # Create Auth object for the OpenApiTool (note: using anonymous auth here; connection or managed identity requires additional setup)
    auth = OpenApiAnonymousAuthDetails()
    # for connection setup
    # auth = OpenApiConnectionAuthDetails(security_scheme=OpenApiConnectionSecurityScheme(connection_id=os.environ["CONNECTION_ID"]))
    # for managed identity set up
    # auth = OpenApiManagedAuthDetails(security_scheme=OpenApiManagedSecurityScheme(audience="https://your_identity_scope.com"))

    # Initialize the main OpenAPI tool definition for weather
    openapi_tool = OpenApiTool(
        name="get_weather", spec=openapi_weather, description="Retrieve weather information for a location", auth=auth
    )
Pembuatan Agen
Agen dibuat menggunakan metode project_client.agents.create_agent.
    # Create an agent configured with the combined OpenAPI tool definitions
    agent = project_client.agents.create_agent(
        model=os.environ["MODEL_DEPLOYMENT_NAME"],
        name="my-agent",
        instructions="You are a helpful agent",
        tools=openapi_tool.definitions,
    )
    print(f"Created agent, ID: {agent.id}")
Manajemen Utas
Buat utas baru dan tambahkan pesan awal dari pengguna.
    # Create a new conversation thread for the interaction
    thread = project_client.agents.threads.create()
    print(f"Created thread, ID: {thread.id}")

    # Create the initial user message in the thread
    message = project_client.agents.messages.create(
        thread_id=thread.id,
        role="user",
        content="What's the weather in Seattle?",
    )
    print(f"Created message, ID: {message.id}")
Membuat eksekusi dan memeriksa output
Buat eksekusi, periksa output, dan periksa alat apa yang dipanggil selama eksekusi.
    # Create and automatically process the run, handling tool calls internally
    run = project_client.agents.runs.create_and_process(thread_id=thread.id, agent_id=agent.id)
    print(f"Run finished with status: {run.status}")

    if run.status == "failed":
        print(f"Run failed: {run.last_error}")

    # Retrieve the steps taken during the run for analysis
    run_steps = project_client.agents.run_steps.list(thread_id=thread.id, run_id=run.id)

    # Loop through each step to display information
    for step in run_steps:
        print(f"Step {step['id']} status: {step['status']}")

        tool_calls = step.get("step_details", {}).get("tool_calls", [])
        for call in tool_calls:
            print(f"  Tool Call ID: {call.get('id')}")
            print(f"  Type: {call.get('type')}")
            function_details = call.get("function", {})
            if function_details:
                print(f"  Function name: {function_details.get('name')}")
                print(f" function output: {function_details.get('output')}")

        print()
Pembersihan
Setelah interaksi selesai, skrip melakukan pembersihan dengan menghapus sumber daya agen yang dibuat menggunakan agents_client.delete_agent() untuk menghindari meninggalkan sumber daya yang tidak digunakan. Ini juga mengambil dan mencetak seluruh riwayat pesan dari utas menggunakan agents_client.list_messages() untuk peninjauan atau pengelogan.
        # Delete the agent resource to clean up
        project_client.agents.delete_agent(agent.id)
        print("Deleted agent")

        # Fetch and log all messages exchanged during the conversation thread
        messages = project_client.agents.messages.list(thread_id=thread.id)
        for msg in messages:
            print(f"Message ID: {msg.id}, Role: {msg.role}, Content: {msg.content}")
Membuat klien proyek
Buat objek klien yang berisi titik akhir untuk menyambungkan ke proyek AI Anda dan sumber daya lainnya.
const { AgentsClient, isOutputOfType, ToolUtility } = require("@azure/ai-agents");
const { delay } = require("@azure/core-util");
const { DefaultAzureCredential } = require("@azure/identity");
const fs = require("fs");
require("dotenv/config");

const projectEndpoint = process.env["PROJECT_ENDPOINT"];

// Create an Azure AI Client
const client = new AgentsClient(projectEndpoint, new DefaultAzureCredential());
Baca dalam spesifikasi OpenAPI
Anda dapat menemukan contoh spesifikasi OpenAPI di GitHub.
// Read in OpenApi spec
const filePath = "./data/weatherOpenApi.json";
const openApiSpec = JSON.parse(fs.readFileSync(filePath, "utf-8"));

// Define OpenApi function
const openApiFunction = {
name: "getWeather",
spec: openApiSpec,
description: "Retrieve weather information for a location",
auth: {
    type: "anonymous",
},
default_params: ["format"], // optional
};
Membuat agen dan mengaktifkan alat OpenAPI
// Create OpenApi tool
const openApiTool = ToolUtility.createOpenApiTool(openApiFunction);

// Create agent with OpenApi tool
const agent = await client.createAgent(modelDeploymentName, {
name: "myAgent",
instructions: "You are a helpful agent",
tools: [openApiTool.definition],
});
console.log(`Created agent, agent ID: ${agent.id}`);
Buat utas
// Create a thread
const thread = await client.threads.create();
console.log(`Created thread, thread ID: ${thread.id}`);

// Create a message
const message = await client.messages.create(thread.id, "user", "What's the weather in Seattle?");
console.log(`Created message, message ID: ${message.id}`);
Membuat eksekusi dan memeriksa output
// Create and execute a run
let run = await client.runs.create(thread.id, agent.id);
while (run.status === "queued" || run.status === "in_progress") {
await delay(1000);
run = await client.runs.get(thread.id, run.id);
}
if (run.status === "failed") {
// Check if you got "Rate limit is exceeded.", then you want to get more quota
console.log(`Run failed: ${run.lastError}`);
}
console.log(`Run finished with status: ${run.status}`);

// Get most recent message from the assistant
const messagesIterator = client.messages.list(thread.id);
const messages = [];
for await (const m of messagesIterator) {
messages.push(m);
}
const assistantMessage = messages.find((msg) => msg.role === "assistant");
if (assistantMessage) {
const textContent = assistantMessage.content.find((content) => isOutputOfType(content, "text"));
if (textContent) {
    console.log(`Last message: ${textContent.text.value}`);
}
}
// Delete the agent once done
await client.deleteAgent(agent.id);
console.log(`Deleted agent, agent ID: ${agent.id}`);
Mengonfigurasi klien dan alat OpenAPI
Pertama, ambil detail konfigurasi dan buat PersistentAgentsClient, lalu tentukan OpenApiToolDefinition menggunakan spesifikasi OpenAPI. Anda dapat menemukan contoh spesifikasi OpenAPI di GitHub.
using Azure;
using Azure.AI.Agents.Persistent;
using Azure.Identity;
using Microsoft.Extensions.Configuration;

IConfigurationRoot configuration = new ConfigurationBuilder()
    .SetBasePath(AppContext.BaseDirectory)
    .AddJsonFile("appsettings.json", optional: false, reloadOnChange: true)
    .Build();

var projectEndpoint = configuration["ProjectEndpoint"];
var modelDeploymentName = configuration["ModelDeploymentName"];
var openApiSpec = configuration["OpenApiSpec"];
PersistentAgentsClient client = new(projectEndpoint, new DefaultAzureCredential());

BinaryData spec = BinaryData.FromBytes(File.ReadAllBytes(openApiSpec));

// Using anonymous auth for this example
OpenApiAnonymousAuthDetails openApiAnonAuth = new();

// Define the OpenAPI tool
OpenApiToolDefinition openApiToolDef = new(
    name: "get_weather",
    description: "Retrieve weather information for a location",
    spec: spec,
    openApiAuthentication: openApiAnonAuth,
    defaultParams: ["format"]
);
Membuat agen
Selanjutnya, buat PersistentAgent dengan deploy model yang diperlukan, nama, instruksi, dan alat OpenAPI yang ditentukan sebelumnya.
PersistentAgent agent = client.Administration.CreateAgent(
    model: modelDeploymentName,
    name: "Open API Tool Calling Agent",
    instructions: "You are a helpful agent.",
    tools: [openApiToolDef]
);
Buat utas, pesan, dan jalankan
PersistentAgentThread Buat untuk percakapan, tambahkan pesan pengguna ke dalamnya, lalu buat ThreadRun untuk memproses pesan, menunggu penyelesaiannya.
PersistentAgentThread thread = client.Threads.CreateThread();

client.Messages.CreateMessage(
    thread.Id,
    MessageRole.User,
    "What's the weather in Seattle?");

ThreadRun run = client.Runs.CreateRun(
    thread.Id,
    agent.Id);

// Poll for the run's completion status
do
{
    Thread.Sleep(TimeSpan.FromMilliseconds(500));
    run = client.Runs.GetRun(thread.Id, run.Id);
}
while (run.Status == RunStatus.Queued
    || run.Status == RunStatus.InProgress
    || run.Status == RunStatus.RequiresAction);
Menampilkan pesan percakapan
Ambil dan cetak semua pesan dari utas ke konsol dalam urutan kronologis untuk menampilkan alur percakapan.
Pageable<PersistentThreadMessage> messages = client.Messages.GetMessages(
    threadId: thread.Id,
    order: ListSortOrder.Ascending);

foreach (PersistentThreadMessage threadMessage in messages)
{
    foreach (MessageContent content in threadMessage.ContentItems)
    {
        switch (content)
        {
            case MessageTextContent textItem:
                Console.WriteLine($"[{threadMessage.Role}]: {textItem.Text}");
                break;
        }
    }
Membersihkan sumber daya
Terakhir, hapus sumber daya yang dibuat PersistentAgentThread dan PersistentAgent untuk membersihkan sumber daya yang digunakan dalam contoh ini.
client.Threads.DeleteThread(thread.Id);
client.Administration.DeleteAgent(agent.Id);
Ikuti Mulai Cepat REST API untuk mengatur nilai yang tepat untuk AGENT_TOKEN variabel lingkungan, AZURE_AI_FOUNDRY_PROJECT_ENDPOINT, dan API_VERSION.
Membuat definisi alat, agen, dan utas Spesifikasi OpenAPI
Anda mungkin ingin menyimpan spesifikasi OpenAPI di file lain dan mengimpor konten untuk menginisialisasi alat. Contoh ini menggunakan anonymous sebagai jenis autentikasi. Anda dapat menemukan contoh spesifikasi OpenAPI di GitHub.
curl --request POST \
  --url $AZURE_AI_FOUNDRY_PROJECT_ENDPOINT/assistants?api-version=$API_VERSION \
  -H "Authorization: Bearer $AGENT_TOKEN" \
  -H "Content-Type: application/json" \
  -d '{
    "instructions": "You are a weather bot. Use the provided functions to answer questions about the weather.",
    "model": "gpt-4o",
    "tools": [{
        "type": "openapi",
        "openapi": {
          "name": "weatherapp",
          "description": "Tool to get weather data",
          "auth": {
            "type": "anonymous"
          },
          "spec": {
            "openapi": "3.1.0",
            "info": {
                "title": "get weather data",
                "description": "Retrieves current weather data for a location.",
                "version": "v1.0.0"
            },
            "servers": [{
                "url": "https://wttr.in"
            }],
            "auth": [],
            "paths": {
                "/{location}": {
                    "get": {
                        "description": "Get weather information for a specific location",
                        "operationId": "GetCurrentWeather",
                        "parameters": [
                        {
                            "name": "location",
                            "in": "path",
                            "description": "City or location to retrieve the weather for",
                            "required": true,
                            "schema": {
                            "type": "string"
                            }
                        },
                        {
                            "name": "format",
                            "in": "query",
                            "description": "Format in which to return data. Always use 3.",
                            "required": true,
                            "schema": {
                            "type": "integer",
                            "default": 3
                            }
                        }
                        ],
                        "responses": {
                        "200": {
                            "description": "Successful response",
                            "content": {
                            "text/plain": {
                                "schema": {
                                "type": "string"
                                }
                            }
                            }
                        },
                        "404": {
                            "description": "Location not found"
                        }
                        },
                        "deprecated": false
                    }
                }
            },
            "components": {
                "schemes": { }
            }
            }
        }
    }]
    }'
Membuat eksekusi dan memeriksa output
Buat eksekusi dan amati bahwa model menggunakan alat Spesifikasi OpenAPI untuk memberikan respons terhadap pertanyaan pengguna.
Buat utas
curl --request POST \
  --url $AZURE_AI_FOUNDRY_PROJECT_ENDPOINT/threads?api-version=$API_VERSION \
  -H "Authorization: Bearer $AGENT_TOKEN" \
  -H "Content-Type: application/json" \
  -d ''
Tambahkan pertanyaan pengguna ke topik
curl curl --request POST \
  --url $AZURE_AI_FOUNDRY_PROJECT_ENDPOINT/threads/thread_abc123/messages?api-version=$API_VERSION \
  -H "Authorization: Bearer $AGENT_TOKEN" \
  -H "Content-Type: application/json" \
  -d '{
      "role": "user",
      "content": "What is the weather in Seattle?"
    }'
Jalankan thread
curl --request POST \
  --url $AZURE_AI_FOUNDRY_PROJECT_ENDPOINT/threads/thread_abc123/runs?api-version=$API_VERSION \
  -H "Authorization: Bearer $AGENT_TOKEN" \
  -H "Content-Type: application/json" \
  -d '{
    "assistant_id": "asst_abc123",
  }'
Mengambil status proses
curl --request GET \
  --url $AZURE_AI_FOUNDRY_PROJECT_ENDPOINT/threads/thread_abc123/runs/run_abc123?api-version=$API_VERSION \
  -H "Authorization: Bearer $AGENT_TOKEN"
Dapatkan respons agen
curl --request GET \
  --url $AZURE_AI_FOUNDRY_PROJECT_ENDPOINT/threads/thread_abc123/messages?api-version=$API_VERSION \
  -H "Authorization: Bearer $AGENT_TOKEN"