Dalam tutorial ini, Anda mempelajari cara mendeteksi liveness atau tanda kehidupan di wajah, menggunakan kombinasi kode sisi server dan aplikasi seluler klien.
Petunjuk / Saran
Untuk informasi umum tentang deteksi keaslian wajah, lihat panduan konseptual.
Tutorial ini menunjukkan cara mengoperasikan aplikasi frontend dan server aplikasi untuk melakukan deteksi liveness, termasuk langkah opsional verifikasi wajah, di berbagai platform dan bahasa.
Penting
SDK klien untuk Face dalam liveness adalah fitur yang memerlukan akses khusus. Anda harus meminta akses ke fitur keaktifan dengan mengisi formulir intake Pengenalan Wajah. Saat langganan Azure Anda diberikan akses, Anda dapat mengunduh Face liveness SDK.
Petunjuk / Saran
Setelah menyelesaikan prasyarat, Anda dapat mencoba pengalaman liveness iOS dari TestFlight dan pengalaman web-liveness dari Vision Studio. Selain itu, Anda juga dapat membuat dan menjalankan sampel frontend lengkap (baik di iOS, Android, atau Web) dari bagian Sampel .
Prasyarat
- Langganan Azure - Buat langganan secara gratis
- Akun Azure Anda harus memiliki peran Kontributor Cognitive Services yang ditetapkan supaya Anda dapat menyetujui persyaratan AI yang bertanggung jawab dan membuat sumber daya. Agar peran ini ditetapkan ke akun Anda, ikuti langkah-langkah dalam dokumentasi Menetapkan peran, atau hubungi administrator Anda.
- Setelah Anda memiliki langganan Azure, buat sumber daya Face di portal Azure untuk mendapatkan kunci dan titik akhir. Setelah penerapan selesai, pilih Buka sumber daya.
- Anda memerlukan kunci dan titik akhir dari sumber daya yang Anda buat untuk menghubungkan aplikasi Anda ke layanan Face.
- Anda dapat menggunakan tingkat harga gratis (
F0) untuk percobaan, lalu meningkatkannya ke tingkat berbayar untuk produksi.
- Akses ke Azure AI Vision Face Client SDK untuk Ponsel (IOS dan Android) dan Web. Untuk memulai, Anda perlu mengajukan permohonan fitur Face Recognition Limited Access untuk mendapatkan akses ke SDK. Untuk informasi selengkapnya, lihat halaman Face Limited Access.
- Memahami fitur deteksi keaslian wajah. Lihat panduan konseptual.
Menyiapkan SDK
Kami menyediakan SDK dalam bahasa yang berbeda untuk menyederhanakan pengembangan pada aplikasi frontend dan server aplikasi:
Unduh SDK untuk aplikasi frontend
Ikuti instruksi di repositori GitHub azure-ai-vision-sdk untuk mengintegrasikan UI dan kode ke dalam aplikasi seluler asli Anda. SDK liveness mendukung Java/Kotlin untuk aplikasi seluler Android, Swift untuk aplikasi seluler iOS dan JavaScript untuk aplikasi web:
Setelah Anda menambahkan kode ke dalam aplikasi, SDK menangani menghidupkan kamera, memandu pengguna akhir dalam menyesuaikan posisi mereka, menyusun data keaktifan, dan melakukan pemanggilan ke layanan cloud Azure AI Face untuk memproses data keaktifan.
Anda dapat memantau bagian Rilis dari repositori SDK untuk pembaruan versi SDK baru.
Mengunduh pustaka klien Azure AI Face untuk server aplikasi
Server/orkestrator aplikasi bertanggung jawab untuk mengontrol siklus hidup sesi liveness. Server aplikasi harus membuat sesi sebelum melakukan deteksi keaktifan, dan kemudian dapat memeriksa hasilnya dan menghapus sesi ketika pemeriksaan keaktifan selesai. Kami menawarkan pustaka dalam berbagai bahasa untuk mengimplementasikan server aplikasi Anda dengan mudah. Ikuti langkah-langkah berikut untuk menginstal paket yang Anda inginkan:
Penting
Untuk membuat variabel lingkungan untuk kunci dan titik akhir layanan Azure Face Anda, lihat panduan memulai
Langkah-langkah tingkat tinggi yang terlibat dalam orkestrasi keaktivaan diilustrasikan di bawah ini:
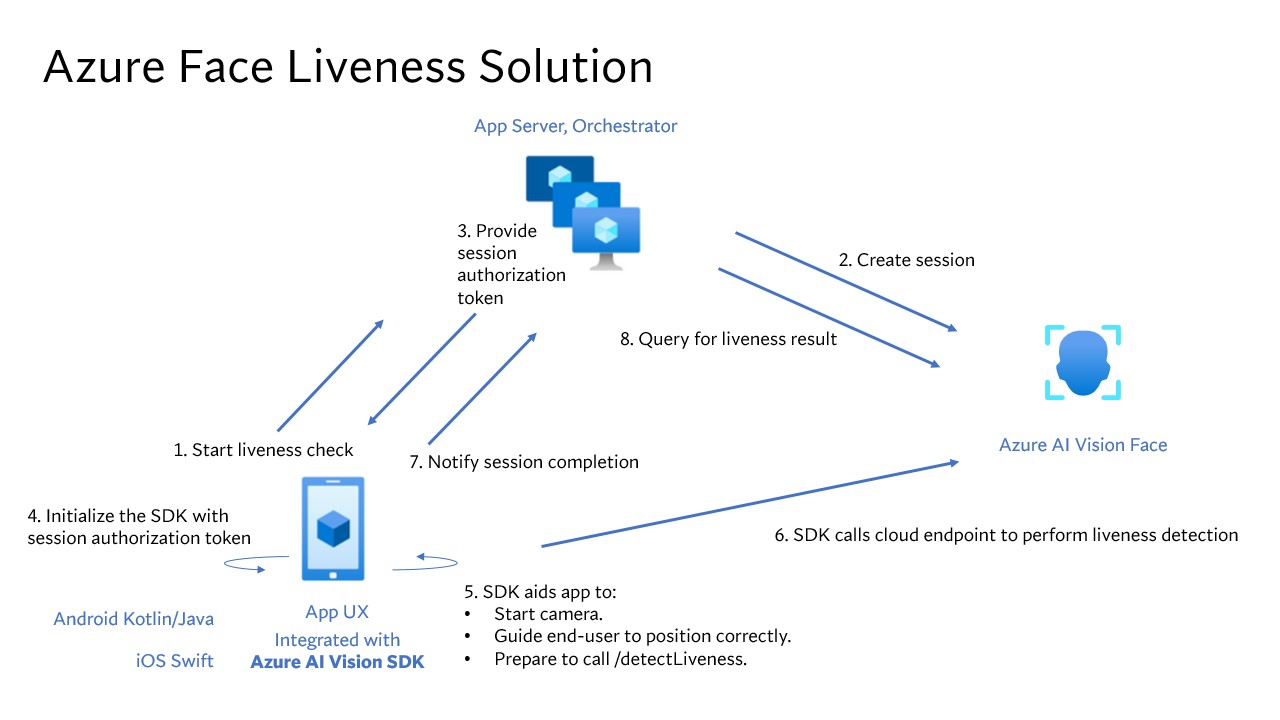
Aplikasi frontend memulai pemeriksaan keaktifan dan memberi tahu server aplikasi.
Server aplikasi membuat sesi keaktifan baru dengan Azure AI Face Service. Layanan ini membuat sesi keaktifan dan merespons kembali dengan token otorisasi sesi. Informasi lebih lanjut mengenai setiap parameter permintaan yang terlibat dalam membuat sesi liveness dirujuk dalam Liveness Create Session Operation.
var endpoint = new Uri(System.Environment.GetEnvironmentVariable("FACE_ENDPOINT"));
var credential = new AzureKeyCredential(System.Environment.GetEnvironmentVariable("FACE_APIKEY"));

var sessionClient = new FaceSessionClient(endpoint, credential);

var createContent = new CreateLivenessSessionContent(LivenessOperationMode.Passive)
{
    DeviceCorrelationId = "723d6d03-ef33-40a8-9682-23a1feb7bccd",
    EnableSessionImage = true,
};

var createResponse = await sessionClient.CreateLivenessSessionAsync(createContent);
var sessionId = createResponse.Value.SessionId;
Console.WriteLine($"Session created.");
Console.WriteLine($"Session id: {sessionId}");
Console.WriteLine($"Auth token: {createResponse.Value.AuthToken}");
String endpoint = System.getenv("FACE_ENDPOINT");
String accountKey = System.getenv("FACE_APIKEY");

FaceSessionClient sessionClient = new FaceSessionClientBuilder()
    .endpoint(endpoint)
    .credential(new AzureKeyCredential(accountKey))
    .buildClient();

CreateLivenessSessionContent parameters = new CreateLivenessSessionContent(LivenessOperationMode.PASSIVE)
    .setDeviceCorrelationId("723d6d03-ef33-40a8-9682-23a1feb7bccd")
    .setEnableSessionImage(true);

CreateLivenessSessionResult creationResult = sessionClient.createLivenessSession(parameters);
System.out.println("Session created.");
System.out.println("Session id: " + creationResult.getSessionId());
System.out.println("Auth token: " + creationResult.getAuthToken());
endpoint = os.environ["FACE_ENDPOINT"]
key = os.environ["FACE_APIKEY"]

face_session_client = FaceSessionClient(endpoint=endpoint, credential=AzureKeyCredential(key))

created_session = await face_session_client.create_liveness_session(
    CreateLivenessSessionContent(
        liveness_operation_mode=LivenessOperationMode.PASSIVE,
        device_correlation_id="723d6d03-ef33-40a8-9682-23a1feb7bccd",
        enable_session_image=True,
    )
)
print("Session created.")
print(f"Session id: {created_session.session_id}")
print(f"Auth token: {created_session.auth_token}")
const endpoint = process.env['FACE_ENDPOINT'];
const apikey = process.env['FACE_APIKEY'];

const credential = new AzureKeyCredential(apikey);
const client = createFaceClient(endpoint, credential);

const createLivenessSessionResponse = await client.path('/detectLiveness-sessions').post({
    body: {
        livenessOperationMode: 'Passive',
        deviceCorrelationId: '723d6d03-ef33-40a8-9682-23a1feb7bccd',
        enableSessionImage: true,
    },
});

if (isUnexpected(createLivenessSessionResponse)) {
    throw new Error(createLivenessSessionResponse.body.error.message);
}

console.log('Session created.');
console.log(`Session ID: ${createLivenessSessionResponse.body.sessionId}`);
console.log(`Auth token: ${createLivenessSessionResponse.body.authToken}`);
curl --request POST --location "%FACE_ENDPOINT%/face/v1.2/detectLiveness-sessions" ^
--header "Ocp-Apim-Subscription-Key: %FACE_APIKEY%" ^
--header "Content-Type: application/json" ^
--data ^
"{ ^
    ""livenessOperationMode"": ""passive"", ^
    ""deviceCorrelationId"": ""723d6d03-ef33-40a8-9682-23a1feb7bccd"", ^
    ""enableSessionImage"": ""true"" ^
}"
curl --request POST --location "${FACE_ENDPOINT}/face/v1.2/detectLivenesswithVerify-sessions" \
--header "Ocp-Apim-Subscription-Key: ${FACE_APIKEY}" \
--header "Content-Type: application/json" \
--data \
'{
    "livenessOperationMode": "passive",
    "deviceCorrelationId": "723d6d03-ef33-40a8-9682-23a1feb7bccd",
    "enableSessionImage": "true"
}'
Contoh isi respons:
{
    "sessionId": "a6e7193e-b638-42e9-903f-eaf60d2b40a5",
    "authToken": "<session-authorization-token>",
    "status": "NotStarted",
    "modelVersion": "2024-11-15",
    "results": {
        "attempts": []
    }
}
Server aplikasi menyediakan token otorisasi sesi kembali ke aplikasi frontend.
Aplikasi frontend menggunakan session-authorization-token untuk memulai face-liveness-detector yang akan memulai aliran liveness.
    FaceLivenessDetector(
        sessionAuthorizationToken = FaceSessionToken.sessionToken,
        verifyImageFileContent = FaceSessionToken.sessionSetInClientVerifyImage,
        deviceCorrelationId = "null",
        onSuccess = viewModel::onSuccess,
        onError = viewModel::onError
    )
struct HostView: View {
   @State var livenessDetectionResult: LivenessDetectionResult? = nil
   var token: String
   var body: some View {
       if livenessDetectionResult == nil {
           FaceLivenessDetectorView(result: $livenessDetectionResult,
                                    sessionAuthorizationToken: token)
       } else if let result = livenessDetectionResult {
           VStack {
               switch result {
                   case .success(let success):
                   /// <#show success#>
                   case .failure(let error):
                   /// <#show failure#>
               }
           }
       }
   }
}
faceLivenessDetector = document.createElement("azure-ai-vision-face-ui");
document.getElementById("container").appendChild(faceLivenessDetector);
faceLivenessDetector.start(session.authToken)
SDK kemudian memulai kamera, memandu pengguna untuk memposisikan dengan benar, lalu menyiapkan payload untuk memanggil titik akhir layanan deteksi keaktifan.
SDK memanggil layanan Azure AI Vision Face untuk melakukan deteksi keberadaan hidup. Setelah layanan merespons, SDK memberi tahu aplikasi frontend bahwa pemeriksaan keaktivaan telah selesai.
Aplikasi frontend menyampaikan penyelesaian pemeriksaan keaktivitas ke server aplikasi.
Server aplikasi sekarang dapat mengkueri hasil deteksi keaktifan dari layanan Azure AI Vision Face.
var getResultResponse = await sessionClient.GetLivenessSessionResultAsync(sessionId);

var sessionResult = getResultResponse.Value;
Console.WriteLine($"Session id: {sessionResult.Id}");
Console.WriteLine($"Session status: {sessionResult.Status}");
Console.WriteLine($"Liveness detection decision: {sessionResult.Result?.Response.Body.LivenessDecision}");
LivenessSession sessionResult = sessionClient.getLivenessSessionResult(creationResult.getSessionId());
System.out.println("Session id: " + sessionResult.getId());
System.out.println("Session status: " + sessionResult.getStatus());
System.out.println("Liveness detection decision: " + sessionResult.getResult().getResponse().getBody().getLivenessDecision());
liveness_result = await face_session_client.get_liveness_session_result(
    created_session.session_id
)
print(f"Session id: {liveness_result.id}")
print(f"Session status: {liveness_result.status}")
print(f"Liveness detection decision: {liveness_result.result.response.body.liveness_decision}")
const getLivenessSessionResultResponse = await client.path('/detectLiveness/singleModal/sessions/{sessionId}', createLivenessSessionResponse.body.sessionId).get();

if (isUnexpected(getLivenessSessionResultResponse)) {
    throw new Error(getLivenessSessionResultResponse.body.error.message);
}

console.log(`Session id: ${getLivenessSessionResultResponse.body.id}`);
console.log(`Session status: ${getLivenessSessionResultResponse.body.status}`);
console.log(`Liveness detection request id: ${getLivenessSessionResultResponse.body.result?.requestId}`);
console.log(`Liveness detection received datetime: ${getLivenessSessionResultResponse.body.result?.receivedDateTime}`);
console.log(`Liveness detection decision: ${getLivenessSessionResultResponse.body.result?.response.body.livenessDecision}`);
console.log(`Session created datetime: ${getLivenessSessionResultResponse.body.createdDateTime}`);
console.log(`Auth token TTL (seconds): ${getLivenessSessionResultResponse.body.authTokenTimeToLiveInSeconds}`);
console.log(`Session expired: ${getLivenessSessionResultResponse.body.sessionExpired}`);
console.log(`Device correlation id: ${getLivenessSessionResultResponse.body.deviceCorrelationId}`);
curl --request GET --location "%FACE_ENDPOINT%/face/v1.2/detectLiveness-sessions/<session-id>" ^
--header "Ocp-Apim-Subscription-Key: %FACE_APIKEY%"
curl --request GET --location "${FACE_ENDPOINT}/face/v1.2/detectLiveness-sessions/<session-id>" \
--header "Ocp-Apim-Subscription-Key: ${FACE_APIKEY}"
Contoh isi respons:
{
    "sessionId": "0acf6dbf-ce43-42a7-937e-705938881d62",
    "authToken": "",
    "status": "Succeeded",
    "modelVersion": "2024-11-15",
    "results": {
        "attempts": [
        {
            "attemptId": 1,
            "attemptStatus": "Succeeded",
            "result": {
            "livenessDecision": "realface",
            "targets": {
                "color": {
                "faceRectangle": {
                    "top": 763,
                    "left": 320,
                    "width": 739,
                    "height": 938
                }
                }
            },
            "digest": "517A0E700859E42107FA47E957DD12F54211C1A021A969CD391AC38BB88295A2",
            "sessionImageId": "Ab9tzwpDzqdCk35wWTiIHWJzzPr9fBCNSqBcXnJmDjbI"
            }
        }
        ]
    }
}
Server aplikasi dapat menghapus sesi setelah semua hasil sesi dikueri.
await sessionClient.DeleteLivenessSessionAsync(sessionId);
Console.WriteLine($"The session {sessionId} is deleted.");
sessionClient.deleteLivenessSession(creationResult.getSessionId());
System.out.println("The session " + creationResult.getSessionId() + " is deleted.");
await face_session_client.delete_liveness_session(
    created_session.session_id
)
print(f"The session {created_session.session_id} is deleted.")
await face_session_client.close()
const deleteLivenessSessionResponse = await client.path('/detectLiveness/singleModal/sessions/{sessionId}', createLivenessSessionResponse.body.sessionId).delete();
if (isUnexpected(deleteLivenessSessionResponse)) {
    throw new Error(deleteLivenessSessionResponse.body.error.message);
}
console.log(`The session ${createLivenessSessionResponse.body.sessionId} is deleted.`);
curl --request DELETE --location "%FACE_ENDPOINT%/face/v1.2/detectLiveness-sessions/<session-id>" ^
--header "Ocp-Apim-Subscription-Key: %FACE_APIKEY%"
curl --request DELETE --location "${FACE_ENDPOINT}/face/v1.2/detectLiveness-sessions/<session-id>" \
--header "Ocp-Apim-Subscription-Key: ${FACE_APIKEY}"
Menggabungkan verifikasi wajah dengan deteksi keaktifan memungkinkan verifikasi biometrik orang tertentu yang tertarik dengan jaminan tambahan bahwa orang tersebut secara fisik ada dalam sistem.
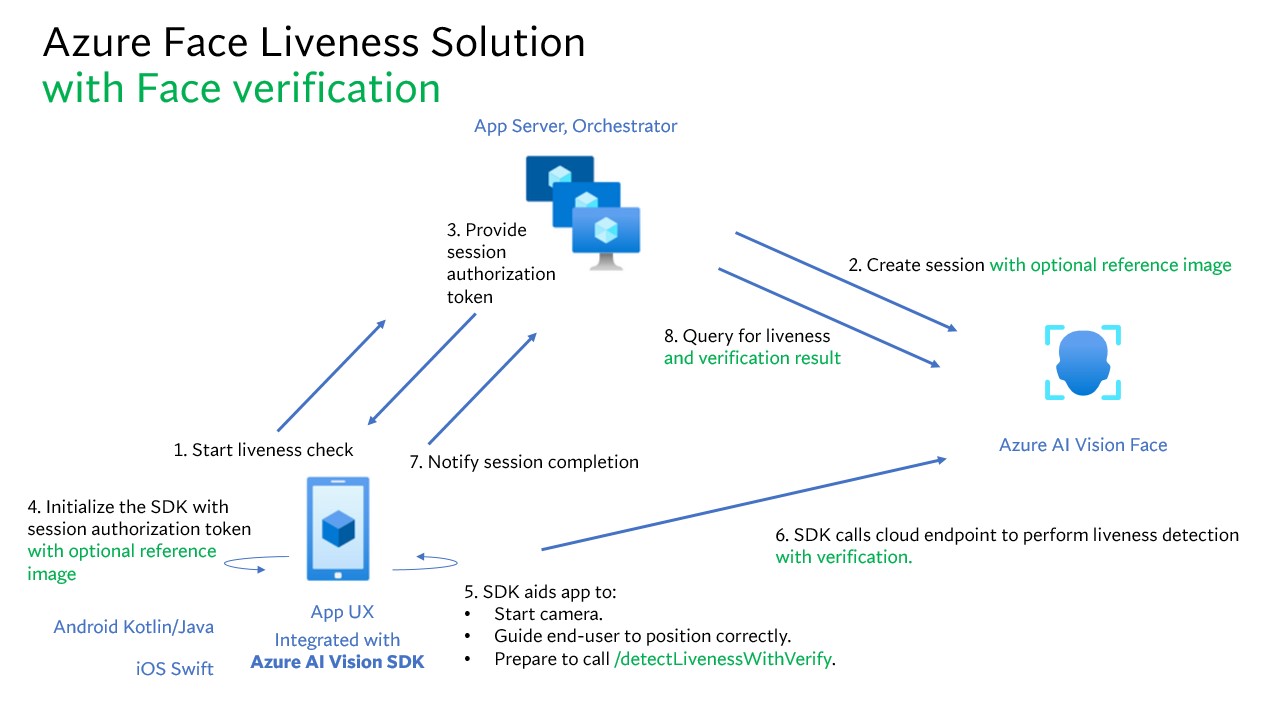
Ada dua bagian untuk mengintegrasikan liveness dengan verifikasi:
Langkah 1 - Pilih gambar referensi
Ikuti tips yang tercantum dalam persyaratan komposisi untuk skenario verifikasi ID untuk memastikan bahwa gambar input Anda memberikan hasil pengenalan yang paling akurat.
Langkah 2 - Siapkan orkestrasi liveness dengan verifikasi.
Langkah-langkah tingkat tinggi yang terlibat dalam keakuratan dengan orkestrasi verifikasi diilustrasikan di bawah ini:
Menyediakan gambar referensi verifikasi dengan salah satu dari dua metode berikut:
Server aplikasi menyediakan gambar referensi saat membuat sesi liveness. Informasi lebih lanjut mengenai setiap parameter permintaan yang terlibat dalam membuat sesi liveness dengan verifikasi dirujuk dalam Liveness With Verify Create Session Operation.
var endpoint = new Uri(System.Environment.GetEnvironmentVariable("FACE_ENDPOINT"));
var credential = new AzureKeyCredential(System.Environment.GetEnvironmentVariable("FACE_APIKEY"));

var sessionClient = new FaceSessionClient(endpoint, credential);

var createContent = new CreateLivenessWithVerifySessionContent(LivenessOperationMode.Passive)
{
    DeviceCorrelationId = "723d6d03-ef33-40a8-9682-23a1feb7bccd",
    EnableSessionImage = true,
};
using var fileStream = new FileStream("test.png", FileMode.Open, FileAccess.Read);

var createResponse = await sessionClient.CreateLivenessWithVerifySessionAsync(createContent, fileStream);

var sessionId = createResponse.Value.SessionId;
Console.WriteLine("Session created.");
Console.WriteLine($"Session id: {sessionId}");
Console.WriteLine($"Auth token: {createResponse.Value.AuthToken}");
Console.WriteLine("The reference image:");
Console.WriteLine($"  Face rectangle: {createResponse.Value.VerifyImage.FaceRectangle.Top}, {createResponse.Value.VerifyImage.FaceRectangle.Left}, {createResponse.Value.VerifyImage.FaceRectangle.Width}, {createResponse.Value.VerifyImage.FaceRectangle.Height}");
Console.WriteLine($"  The quality for recognition: {createResponse.Value.VerifyImage.QualityForRecognition}");
String endpoint = System.getenv("FACE_ENDPOINT");
String accountKey = System.getenv("FACE_APIKEY");

FaceSessionClient sessionClient = new FaceSessionClientBuilder()
    .endpoint(endpoint)
    .credential(new AzureKeyCredential(accountKey))
    .buildClient();

CreateLivenessWithVerifySessionContent parameters = new CreateLivenessWithVerifySessionContent(LivenessOperationMode.PASSIVE)
    .setDeviceCorrelationId("723d6d03-ef33-40a8-9682-23a1feb7bccd")
    .setEnableSessionImage(true);

Path path = Paths.get("test.png");
BinaryData data = BinaryData.fromFile(path);
CreateLivenessWithVerifySessionResult creationResult = sessionClient.createLivenessWithVerifySession(parameters, data);

System.out.println("Session created.");
System.out.println("Session id: " + creationResult.getSessionId());
System.out.println("Auth token: " + creationResult.getAuthToken());
System.out.println("The reference image:");
System.out.println("  Face rectangle: " + creationResult.getVerifyImage().getFaceRectangle().getTop() + " " + creationResult.getVerifyImage().getFaceRectangle().getLeft() + " " + creationResult.getVerifyImage().getFaceRectangle().getWidth() + " " + creationResult.getVerifyImage().getFaceRectangle().getHeight());
System.out.println("  The quality for recognition: " + creationResult.getVerifyImage().getQualityForRecognition());
endpoint = os.environ["FACE_ENDPOINT"]
key = os.environ["FACE_APIKEY"]

face_session_client = FaceSessionClient(endpoint=endpoint, credential=AzureKeyCredential(key))

reference_image_path = "test.png"
with open(reference_image_path, "rb") as fd:
    reference_image_content = fd.read()

created_session = await face_session_client.create_liveness_with_verify_session(
    CreateLivenessWithVerifySessionContent(
        liveness_operation_mode=LivenessOperationMode.PASSIVE,
        device_correlation_id="723d6d03-ef33-40a8-9682-23a1feb7bccd",
        enable_session_image=True,
    ),
    verify_image=reference_image_content,
)
print("Session created.")
print(f"Session id: {created_session.session_id}")
print(f"Auth token: {created_session.auth_token}")
print("The reference image:")
print(f"  Face rectangle: {created_session.verify_image.face_rectangle}")
print(f"  The quality for recognition: {created_session.verify_image.quality_for_recognition}")
const endpoint = process.env['FACE_ENDPOINT'];
const apikey = process.env['FACE_APIKEY'];

const credential = new AzureKeyCredential(apikey);
const client = createFaceClient(endpoint, credential);

const createLivenessSessionResponse = await client.path('/detectLivenesswithVerify-sessions').post({
    contentType: 'multipart/form-data',
    body: [
        {
            name: 'VerifyImage',
            // Note that this utilizes Node.js API.
            // In browser environment, please use file input or drag and drop to read files.
            body: readFileSync('test.png'),
        },
        {
            name: 'Parameters',
            body: {
                livenessOperationMode: 'Passive',
                deviceCorrelationId: '723d6d03-ef33-40a8-9682-23a1feb7bccd',
                enableSessionImage: true,
            },
        },
    ],
});

if (isUnexpected(createLivenessSessionResponse)) {
    throw new Error(createLivenessSessionResponse.body.error.message);
}

console.log('Session created:');
console.log(`Session ID: ${createLivenessSessionResponse.body.sessionId}`);
console.log(`Auth token: ${createLivenessSessionResponse.body.authToken}`);
console.log('The reference image:');
console.log(`  Face rectangle: ${createLivenessSessionResponse.body.verifyImage.faceRectangle}`);
console.log(`  The quality for recognition: ${createLivenessSessionResponse.body.verifyImage.qualityForRecognition}`)
curl --request POST --location "%FACE_ENDPOINT%/face/v1.2/detectLivenesswithVerify-sessions" ^
--header "Ocp-Apim-Subscription-Key: %FACE_APIKEY%" ^
--form "Parameters=""{\\\""livenessOperationMode\\\"": \\\""passive\\\"", \\\""deviceCorrelationId\\\"": \\\""723d6d03-ef33-40a8-9682-23a1feb7bccd\\\"", ""enableSessionImage"": ""true""}""" ^
--form "VerifyImage=@""test.png"""
curl --request POST --location "${FACE_ENDPOINT}/face/v1.2/detectLivenesswithVerify-sessions" \
--header "Ocp-Apim-Subscription-Key: ${FACE_APIKEY}" \
--form 'Parameters="{
    \"livenessOperationMode\": \"passive\",
    \"deviceCorrelationId\": \"723d6d03-ef33-40a8-9682-23a1feb7bccd\"
}"' \
--form 'VerifyImage=@"test.png"'
Contoh isi respons:
{
    "sessionId": "3847ffd3-4657-4e6c-870c-8e20de52f567",
    "authToken": "<session-authorization-token>",
    "status": "NotStarted",
    "modelVersion": "2024-11-15",
    "results": {
        "attempts": [],
        "verifyReferences": [
        {
            "referenceType": "image",
            "faceRectangle": {
            "top": 98,
            "left": 131,
            "width": 233,
            "height": 300
            },
            "qualityForRecognition": "high"
        }
        ]
    }
}
Aplikasi frontend menyediakan gambar referensi saat menginisialisasi SDK. Skenario ini tidak didukung dalam solusi web.
    FaceLivenessDetector(
        sessionAuthorizationToken = FaceSessionToken.sessionToken,
        verifyImageFileContent = FaceSessionToken.sessionSetInClientVerifyImage,
        deviceCorrelationId = "null",
        onSuccess = viewModel::onSuccess,
        onError = viewModel::onError
    )
struct HostView: View {
    @State var livenessDetectionResult: LivenessDetectionResult? = nil
    var token: String
    var body: some View {
        if livenessDetectionResult == nil {
            FaceLivenessDetectorView(result: $livenessDetectionResult,
                                        sessionAuthorizationToken: token)
        } else if let result = livenessDetectionResult {
            VStack {
                switch result {
                    case .success(let success):
                    /// <#show success#>
                    case .failure(let error):
                    /// <#show failure#>
                }
            }
        }
    }
}
Server aplikasi sekarang dapat mengkueri hasil verifikasi selain hasil keaktivaan.
var getResultResponse = await sessionClient.GetLivenessWithVerifySessionResultAsync(sessionId);
var sessionResult = getResultResponse.Value;
Console.WriteLine($"Session id: {sessionResult.Id}");
Console.WriteLine($"Session status: {sessionResult.Status}");
Console.WriteLine($"Liveness detection decision: {sessionResult.Result?.Response.Body.LivenessDecision}");
Console.WriteLine($"Verification result: {sessionResult.Result?.Response.Body.VerifyResult.IsIdentical}");
Console.WriteLine($"Verification confidence: {sessionResult.Result?.Response.Body.VerifyResult.MatchConfidence}");
LivenessWithVerifySession sessionResult = sessionClient.getLivenessWithVerifySessionResult(creationResult.getSessionId());
System.out.println("Session id: " + sessionResult.getId());
System.out.println("Session status: " + sessionResult.getStatus());
System.out.println("Liveness detection decision: " + sessionResult.getResult().getResponse().getBody().getLivenessDecision());
System.out.println("Verification result: " + sessionResult.getResult().getResponse().getBody().getVerifyResult().isIdentical());
System.out.println("Verification confidence: " + sessionResult.getResult().getResponse().getBody().getVerifyResult().getMatchConfidence());
liveness_result = await face_session_client.get_liveness_with_verify_session_result(
    created_session.session_id
)
print(f"Session id: {liveness_result.id}")
print(f"Session status: {liveness_result.status}")
print(f"Liveness detection decision: {liveness_result.result.response.body.liveness_decision}")
print(f"Verification result: {liveness_result.result.response.body.verify_result.is_identical}")
print(f"Verification confidence: {liveness_result.result.response.body.verify_result.match_confidence}")
const getLivenessSessionResultResponse = await client.path('/detectLivenesswithVerify/singleModal/sessions/{sessionId}', createLivenessSessionResponse.body.sessionId).get();
if (isUnexpected(getLivenessSessionResultResponse)) {
    throw new Error(getLivenessSessionResultResponse.body.error.message);
}

console.log(`Session id: ${getLivenessSessionResultResponse.body.id}`);
console.log(`Session status: ${getLivenessSessionResultResponse.body.status}`);
console.log(`Liveness detection request id: ${getLivenessSessionResultResponse.body.result?.requestId}`);
console.log(`Verification result: ${getLivenessSessionResultResponse.body.result?.response.body.verifyResult.isIdentical}`);
console.log(`Verification confidence: ${getLivenessSessionResultResponse.body.result?.response.body.verifyResult.matchConfidence}`);
curl --request GET --location "%FACE_ENDPOINT%/face/v1.2/detectLivenesswithVerify-sessions/<session-id>" ^
--header "Ocp-Apim-Subscription-Key: %FACE_APIKEY%"
curl --request GET --location "${FACE_ENDPOINT}/face/v1.2/detectLivenesswithVerify-sessions/<session-id>" \
--header "Ocp-Apim-Subscription-Key: ${FACE_APIKEY}"
Contoh isi respons:
{
    "sessionId": "93fd6f13-4161-41df-8a22-80a38ef53836",
    "authToken": "",
    "status": "Succeeded",
    "modelVersion": "2024-11-15",
    "results": {
        "attempts": [
            {
                "attemptId": 1,
                "attemptStatus": "Succeeded",
                "result": {
                "livenessDecision": "realface",
                "targets": {
                    "color": {
                        "faceRectangle": {
                            "top": 669,
                            "left": 203,
                            "width": 646,
                            "height": 724
                        }
                    }
                },
                "digest": "EE664438FDF0535C6344A468181E4DDD4A34AC89582D4FD6E9E8954B843C7AA7",
                "verifyResult": {
                        "matchConfidence": 0.08172279,
                        "isIdentical": false
                    }
                }
            }
        ],
        "verifyReferences": [
        {
            "faceRectangle": {
                "top": 98,
                "left": 131,
                "width": 233,
                "height": 300
                },
            "qualityForRecognition": "high"
        }
        ]
    }
}
Server aplikasi dapat menghapus sesi jika Anda tidak mengkueri hasilnya lagi.
await sessionClient.DeleteLivenessWithVerifySessionAsync(sessionId);
Console.WriteLine($"The session {sessionId} is deleted.");
sessionClient.deleteLivenessWithVerifySession(creationResult.getSessionId());
System.out.println("The session " + creationResult.getSessionId() + " is deleted.");
await face_session_client.delete_liveness_with_verify_session(
    created_session.session_id
)
print(f"The session {created_session.session_id} is deleted.")
await face_session_client.close()
const deleteLivenessSessionResponse = await client.path('/detectLivenesswithVerify/singleModal/sessions/{sessionId}', createLivenessSessionResponse.body.sessionId).delete();
if (isUnexpected(deleteLivenessSessionResponse)) {
    throw new Error(deleteLivenessSessionResponse.body.error.message);
}
console.log(`The session ${createLivenessSessionResponse.body.sessionId} is deleted.`);
curl --request DELETE --location "%FACE_ENDPOINT%/face/v1.2/detectLivenesswithVerify-sessions/<session-id>" ^
--header "Ocp-Apim-Subscription-Key: %FACE_APIKEY%"
curl --request DELETE --location "${FACE_ENDPOINT}/face/v1.2/detectLivenesswithVerify-sessions/<session-id>" \
--header "Ocp-Apim-Subscription-Key: ${FACE_APIKEY}"
Secara opsional, Anda dapat melakukan operasi wajah lebih lanjut setelah pemeriksaan keaktifan, seperti analisis fitur wajah (untuk mendapatkan atribut wajah, misalnya) atau operasi identitas wajah.
- Untuk mengaktifkan ini, Anda harus mengatur parameter "enableSessionImage" ke "true" selama langkahSession-Creation.
- Setelah sesi selesai, Anda dapat mengekstrak "sessionImageId" dari langkah Sesi-Get-Result.
- Anda sekarang dapat mengunduh gambar sesi (direferensikan dalam Liveness Get Session Image Operation API), atau menyediakan "sessionImageId" dalam operasi Detect from Session Image ID API untuk terus melakukan analisis wajah atau operasi identitas wajah lainnya.
Untuk informasi selengkapnya tentang operasi ini, lihat Konsep deteksi wajah dan konsep Pengenalan Wajah.
Opsi dukungan
Selain menggunakan opsi dukungan layanan Azure AI utama, Anda juga dapat memposting pertanyaan Anda di bagian masalah repositori SDK.
Konten terkait
Untuk mempelajari cara mengintegrasikan solusi deteksi keaktifan ke dalam aplikasi Anda yang ada, lihat panduan referensi Azure AI Vision SDK.
Untuk mempelajari selengkapnya tentang fitur yang tersedia untuk mengatur solusi keaktivaan, lihat referensi REST API Sesi.

