Cara mengenali niat dengan pencocokan pola entitas kustom
Layanan Azure AI Speech SDK memiliki fitur bawaan untuk memberikan pengenalan niat dengan pencocokan pola bahasa sederhana. Niat adalah sesuatu yang ingin dilakukan pengguna: menutup jendela, menandai kotak centang, menyisipkan beberapa teks, dll.
Dalam panduan ini, Anda menggunakan Speech SDK untuk mengembangkan aplikasi konsol yang memperoleh niat dari ucapan yang diucapkan melalui mikrofon perangkat Anda. Anda akan mempelajari cara untuk:
- Membuat proyek Visual Studio yang mengacu pada paket Speech SDK NuGet
- Membuat konfigurasi ucapan dan mendapatkan pengenal niat
- Menambahkan niat dan pola melalui API Speech SDK
- Menambahkan entitas kustom melalui Speech SDK API
- Gunakan pengenalan berkelanjutan yang digerakkan oleh peristiwa dan asinkron
Kapan menggunakan pencocokan pola
Gunakan pencocokan pola jika:
- Anda hanya tertarik untuk mencocokkan dengan ketat apa yang dikatakan pengguna. Pola-pola ini cocok lebih agresif daripada pemahaman bahasa percakapan (CLU).
- Anda tidak memiliki akses ke model CLU, tetapi masih menginginkan niat.
Untuk informasi selengkapnya, lihat ringkasan pencocokan pola.
Prasyarat
Pastikan Anda memiliki item berikut sebelum memulai panduan ini:
- Sumber daya layanan Azure AI atau sumber daya Ucapan Terpadu
- Visual Studio 2019 (semua edisi).
Membuat proyek
Buatlah proyek aplikasi konsol C# yang baru di Visual Studio 2019 dan instal SDK Speech.
Memulai dengan beberapa kode boilerplate
Mari buka Program.cs dan tambahkan beberapa kode yang berfungsi sebagai kerangka untuk proyek kita.
using System;
using System.Threading.Tasks;
using Microsoft.CognitiveServices.Speech;
using Microsoft.CognitiveServices.Speech.Intent;

namespace helloworld
{
    class Program
    {
        static void Main(string[] args)
        {
            IntentPatternMatchingWithMicrophoneAsync().Wait();
        }

        private static async Task IntentPatternMatchingWithMicrophoneAsync()
        {
            var config = SpeechConfig.FromSubscription("YOUR_SUBSCRIPTION_KEY", "YOUR_SUBSCRIPTION_REGION");
        }
    }
}
Membuat konfigurasi Ucapan
Sebelum dapat menginisialisasi IntentRecognizer objek, Anda perlu membuat konfigurasi yang menggunakan kunci dan wilayah Azure untuk sumber daya prediksi layanan Azure AI Anda.
- Ganti
"YOUR_SUBSCRIPTION_KEY"dengan kunci prediksi layanan Azure AI Anda. - Ganti
"YOUR_SUBSCRIPTION_REGION"dengan wilayah sumber daya layanan Azure AI Anda.
Sampel ini menggunakan metode FromSubscription() untuk membuat SpeechConfig. Untuk daftar lengkap metode yang tersedia, lihat Kelas SpeechConfig.
Menginisialisasi IntentRecognizer
Sekarang buat IntentRecognizer. Masukkan kode ini tepat di bawah konfigurasi Ucapan Anda.
using (var recognizer = new IntentRecognizer(config))
{

}
Menambahkan beberapa niat
Anda perlu mengaitkan beberapa pola dengan PatternMatchingModel dan menerapkannya ke IntentRecognizer.
Kita akan mulai dengan membuat PatternMatchingModel dan menambahkan beberapa niat ke dalamnya.
Catatan
Kita dapat menambahkan beberapa pola ke PatternMatchingIntent.
Sisipkan kode ini di dalam blok using:
// Creates a Pattern Matching model and adds specific intents from your model. The
// Id is used to identify this model from others in the collection.
var model = new PatternMatchingModel("YourPatternMatchingModelId");

// Creates a pattern that uses groups of optional words. "[Go | Take me]" will match either "Go", "Take me", or "".
var patternWithOptionalWords = "[Go | Take me] to [floor|level] {floorName}";

// Creates a pattern that uses an optional entity and group that could be used to tie commands together.
var patternWithOptionalEntity = "Go to parking [{parkingLevel}]";

// You can also have multiple entities of the same name in a single pattern by adding appending a unique identifier
// to distinguish between the instances. For example:
var patternWithTwoOfTheSameEntity = "Go to floor {floorName:1} [and then go to floor {floorName:2}]";
// NOTE: Both floorName:1 and floorName:2 are tied to the same list of entries. The identifier can be a string
//       and is separated from the entity name by a ':'

// Creates the pattern matching intents and adds them to the model
model.Intents.Add(new PatternMatchingIntent("ChangeFloors", patternWithOptionalWords, patternWithOptionalEntity, patternWithTwoOfTheSameEntity));
model.Intents.Add(new PatternMatchingIntent("DoorControl", "{action} the doors", "{action} doors", "{action} the door", "{action} door"));
Menambahkan beberapa entitas kustom
Untuk sepenuhnya memanfaatkan pencocokan pola, Anda dapat menyesuaikan entitas Anda. Kita akan membuat "floorName" dari daftar lantai yang tersedia. Kita juga akan menjadikan "parkingLevel" sebagai entitas bilangan bulat.
Masukkan kode ini di bawah niat Anda:
// Creates the "floorName" entity and set it to type list.
// Adds acceptable values. NOTE the default entity type is Any and so we do not need
// to declare the "action" entity.
model.Entities.Add(PatternMatchingEntity.CreateListEntity("floorName", EntityMatchMode.Strict, "ground floor", "lobby", "1st", "first", "one", "1", "2nd", "second", "two", "2"));

// Creates the "parkingLevel" entity as a pre-built integer
model.Entities.Add(PatternMatchingEntity.CreateIntegerEntity("parkingLevel"));
Menerapkan model ke Recognizer
Sekarang saatnya menerapkan model ke IntentRecognizer. Anda dapat menggunakan beberapa model sekaligus sehingga API dapat mengambil koleksi model.
Sisipkan kode ini di bawah entitas Anda:
var modelCollection = new LanguageUnderstandingModelCollection();
modelCollection.Add(model);

recognizer.ApplyLanguageModels(modelCollection);
Mengenali niat
Dari objek IntentRecognizer, Anda akan memanggil metode RecognizeOnceAsync(). Metode ini meminta layanan Ucapan untuk mengenali ucapan dalam satu frase, dan berhenti mengenali ucapan setelah frase diidentifikasi.
Sisipkan kode ini setelah menerapkan model bahasa:
Console.WriteLine("Say something...");

var result = await recognizer.RecognizeOnceAsync();
Menampilkan hasil pengenalan (atau kesalahan)
Ketika hasil pengenalan dikembalikan oleh layanan Ucapan, kita akan mencetak hasilnya.
Masukkan kode ini di bawah var result = await recognizer.RecognizeOnceAsync();:
if (result.Reason == ResultReason.RecognizedIntent)
{
    Console.WriteLine($"RECOGNIZED: Text={result.Text}");
    Console.WriteLine($"       Intent Id={result.IntentId}.");

    var entities = result.Entities;
    switch (result.IntentId)
    {
        case "ChangeFloors":
            if (entities.TryGetValue("floorName", out string floorName))
            {
                Console.WriteLine($"       FloorName={floorName}");
            }

            if (entities.TryGetValue("floorName:1", out floorName))
            {
                Console.WriteLine($"     FloorName:1={floorName}");
            }

            if (entities.TryGetValue("floorName:2", out floorName))
            {
                Console.WriteLine($"     FloorName:2={floorName}");
            }

            if (entities.TryGetValue("parkingLevel", out string parkingLevel))
            {
                Console.WriteLine($"    ParkingLevel={parkingLevel}");
            }

            break;

        case "DoorControl":
            if (entities.TryGetValue("action", out string action))
            {
                Console.WriteLine($"          Action={action}");
            }
            break;
    }
}
else if (result.Reason == ResultReason.RecognizedSpeech)
{
    Console.WriteLine($"RECOGNIZED: Text={result.Text}");
    Console.WriteLine($"    Intent not recognized.");
}
else if (result.Reason == ResultReason.NoMatch)
{
    Console.WriteLine($"NOMATCH: Speech could not be recognized.");
}
else if (result.Reason == ResultReason.Canceled)
{
    var cancellation = CancellationDetails.FromResult(result);
    Console.WriteLine($"CANCELED: Reason={cancellation.Reason}");

    if (cancellation.Reason == CancellationReason.Error)
    {
        Console.WriteLine($"CANCELED: ErrorCode={cancellation.ErrorCode}");
        Console.WriteLine($"CANCELED: ErrorDetails={cancellation.ErrorDetails}");
        Console.WriteLine($"CANCELED: Did you set the speech resource key and region values?");
    }
}
Memeriksa kode Anda
Pada titik ini, kode Anda akan terlihat seperti ini:
using System;
using System.Threading.Tasks;
using Microsoft.CognitiveServices.Speech;
using Microsoft.CognitiveServices.Speech.Intent;

namespace helloworld
{
    class Program
    {
        static void Main(string[] args)
        {
            IntentPatternMatchingWithMicrophoneAsync().Wait();
        }

        private static async Task IntentPatternMatchingWithMicrophoneAsync()
        {
            var config = SpeechConfig.FromSubscription("YOUR_SUBSCRIPTION_KEY", "YOUR_SUBSCRIPTION_REGION");

            using (var recognizer = new IntentRecognizer(config))
            {
                // Creates a Pattern Matching model and adds specific intents from your model. The
                // Id is used to identify this model from others in the collection.
                var model = new PatternMatchingModel("YourPatternMatchingModelId");

                // Creates a pattern that uses groups of optional words. "[Go | Take me]" will match either "Go", "Take me", or "".
                var patternWithOptionalWords = "[Go | Take me] to [floor|level] {floorName}";

                // Creates a pattern that uses an optional entity and group that could be used to tie commands together.
                var patternWithOptionalEntity = "Go to parking [{parkingLevel}]";

                // You can also have multiple entities of the same name in a single pattern by adding appending a unique identifier
                // to distinguish between the instances. For example:
                var patternWithTwoOfTheSameEntity = "Go to floor {floorName:1} [and then go to floor {floorName:2}]";
                // NOTE: Both floorName:1 and floorName:2 are tied to the same list of entries. The identifier can be a string
                //       and is separated from the entity name by a ':'

                // Adds some intents to look for specific patterns.
                model.Intents.Add(new PatternMatchingIntent("ChangeFloors", patternWithOptionalWords, patternWithOptionalEntity, patternWithTwoOfTheSameEntity));
                model.Intents.Add(new PatternMatchingIntent("DoorControl", "{action} the doors", "{action} doors", "{action} the door", "{action} door"));

                // Creates the "floorName" entity and set it to type list.
                // Adds acceptable values. NOTE the default entity type is Any and so we do not need
                // to declare the "action" entity.
                model.Entities.Add(PatternMatchingEntity.CreateListEntity("floorName", EntityMatchMode.Strict, "ground floor", "lobby", "1st", "first", "one", "1", "2nd", "second", "two", "2"));

                // Creates the "parkingLevel" entity as a pre-built integer
                model.Entities.Add(PatternMatchingEntity.CreateIntegerEntity("parkingLevel"));

                var modelCollection = new LanguageUnderstandingModelCollection();
                modelCollection.Add(model);

                recognizer.ApplyLanguageModels(modelCollection);

                Console.WriteLine("Say something...");

                var result = await recognizer.RecognizeOnceAsync();

                if (result.Reason == ResultReason.RecognizedIntent)
                {
                    Console.WriteLine($"RECOGNIZED: Text={result.Text}");
                    Console.WriteLine($"       Intent Id={result.IntentId}.");

                    var entities = result.Entities;
                    switch (result.IntentId)
                    {
                        case "ChangeFloors":
                            if (entities.TryGetValue("floorName", out string floorName))
                            {
                                Console.WriteLine($"       FloorName={floorName}");
                            }

                            if (entities.TryGetValue("floorName:1", out floorName))
                            {
                                Console.WriteLine($"     FloorName:1={floorName}");
                            }

                            if (entities.TryGetValue("floorName:2", out floorName))
                            {
                                Console.WriteLine($"     FloorName:2={floorName}");
                            }

                            if (entities.TryGetValue("parkingLevel", out string parkingLevel))
                            {
                                Console.WriteLine($"    ParkingLevel={parkingLevel}");
                            }

                            break;

                        case "DoorControl":
                            if (entities.TryGetValue("action", out string action))
                            {
                                Console.WriteLine($"          Action={action}");
                            }
                            break;
                    }
                }
                else if (result.Reason == ResultReason.RecognizedSpeech)
                {
                    Console.WriteLine($"RECOGNIZED: Text={result.Text}");
                    Console.WriteLine($"    Intent not recognized.");
                }
                else if (result.Reason == ResultReason.NoMatch)
                {
                    Console.WriteLine($"NOMATCH: Speech could not be recognized.");
                }
                else if (result.Reason == ResultReason.Canceled)
                {
                    var cancellation = CancellationDetails.FromResult(result);
                    Console.WriteLine($"CANCELED: Reason={cancellation.Reason}");

                    if (cancellation.Reason == CancellationReason.Error)
                    {
                        Console.WriteLine($"CANCELED: ErrorCode={cancellation.ErrorCode}");
                        Console.WriteLine($"CANCELED: ErrorDetails={cancellation.ErrorDetails}");
                        Console.WriteLine($"CANCELED: Did you set the speech resource key and region values?");
                    }
                }
            }
        }
    }
}
Membuat dan menjalankan aplikasi Anda
Sekarang, Anda siap untuk membuat aplikasi Anda dan menguji pengenalan ucapan kami menggunakan layanan Ucapan.
- Mengompilasi kode - Dari bilah menu Visual Studio, pilih Buat>Buat Solusi.
- Memulai aplikasi Anda - Dari bilah menu, pilih Debug>Mulai Menelusuri Kesalahan atau tekan F5.
- Mulai pengenalan - Hal ini akan meminta Anda untuk mengatakan sesuatu. Bahasa defaultnya adalah bahasa Inggris. Ucapan Anda dikirim ke layanan Ucapan, ditranskripsikan sebagai teks, dan dirender di konsol.
Misalnya jika Anda mengatakan "Bawa saya ke lantai 2", output-nya akan menjadi seperti ini:
Say something...
RECOGNIZED: Text=Take me to floor 2.
       Intent Id=ChangeFloors.
       FloorName=2
Contoh lainnya, jika Anda mengatakan "Bawa saya ke lantai 7", output-nya akan menjadi seperti ini:
Say something...
RECOGNIZED: Text=Take me to floor 7.
    Intent not recognized.
Tidak ada niat yang dikenali karena 7 tidak ada dalam daftar nilai valid untuk floorName.
Membuat proyek
Buatlah proyek aplikasi konsol C++ yang baru di Visual Studio 2019 dan instal SDK Speech.
Memulai dengan beberapa kode boilerplate
Mari buka helloworld.cpp dan tambahkan beberapa kode yang berfungsi sebagai kerangka untuk proyek kita.
#include <iostream>
#include <speechapi_cxx.h>

using namespace Microsoft::CognitiveServices::Speech;
using namespace Microsoft::CognitiveServices::Speech::Intent;

int main()
{
    std::cout << "Hello World!\n";

    auto config = SpeechConfig::FromSubscription("YOUR_SUBSCRIPTION_KEY", "YOUR_SUBSCRIPTION_REGION");
}
Membuat konfigurasi Ucapan
Sebelum dapat menginisialisasi IntentRecognizer objek, Anda perlu membuat konfigurasi yang menggunakan kunci dan wilayah Azure untuk sumber daya prediksi layanan Azure AI Anda.
- Ganti
"YOUR_SUBSCRIPTION_KEY"dengan kunci prediksi layanan Azure AI Anda. - Ganti
"YOUR_SUBSCRIPTION_REGION"dengan wilayah sumber daya layanan Azure AI Anda.
Sampel ini menggunakan metode FromSubscription() untuk membuat SpeechConfig. Untuk daftar lengkap metode yang tersedia, lihat Kelas SpeechConfig.
Menginisialisasi IntentRecognizer
Sekarang buat IntentRecognizer. Masukkan kode ini tepat di bawah konfigurasi Ucapan Anda.
auto intentRecognizer = IntentRecognizer::FromConfig(config);
Menambahkan beberapa niat
Anda perlu mengaitkan beberapa pola dengan PatternMatchingModel dan menerapkannya ke IntentRecognizer.
Kita akan mulai dengan membuat PatternMatchingModel dan menambahkan beberapa niat ke dalamnya. PatternMatchingIntent adalah struct, jadi kita hanya akan menggunakan sintaks in-line.
Catatan
Kita dapat menambahkan beberapa pola ke PatternMatchingIntent.
auto model = PatternMatchingModel::FromId("myNewModel");

model->Intents.push_back({"Take me to floor {floorName}.", "Go to floor {floorName}."} , "ChangeFloors");
model->Intents.push_back({"{action} the door."}, "OpenCloseDoor");
Menambahkan beberapa entitas kustom
Untuk sepenuhnya memanfaatkan pencocokan pola, Anda dapat menyesuaikan entitas Anda. Kita akan membuat "floorName" dari daftar lantai yang tersedia.
model->Entities.push_back({ "floorName" , Intent::EntityType::List, Intent::EntityMatchMode::Strict, {"one", "1", "two", "2", "lobby", "ground floor"} });
Menerapkan model ke Recognizer
Sekarang saatnya menerapkan model ke IntentRecognizer. Anda dapat menggunakan beberapa model sekaligus sehingga API dapat mengambil koleksi model.
std::vector<std::shared_ptr<LanguageUnderstandingModel>> collection;

collection.push_back(model);
intentRecognizer->ApplyLanguageModels(collection);
Mengenali niat
Dari objek IntentRecognizer, Anda akan memanggil metode RecognizeOnceAsync(). Metode ini meminta layanan Ucapan untuk mengenali ucapan dalam satu frase, dan berhenti mengenali ucapan setelah frase diidentifikasi. Untuk mempermudah, mari menunggu ke depannya kembali selesai.
Masukkan kode ini di bawah niat Anda:
std::cout << "Say something ..." << std::endl;
auto result = intentRecognizer->RecognizeOnceAsync().get();
Menampilkan hasil pengenalan (atau kesalahan)
Ketika hasil pengenalan dikembalikan oleh layanan Ucapan, kita akan mencetak hasilnya.
Masukkan kode ini di bawah auto result = intentRecognizer->RecognizeOnceAsync().get();:
switch (result->Reason)
{
case ResultReason::RecognizedSpeech:
        std::cout << "RECOGNIZED: Text = " << result->Text.c_str() << std::endl;
        std::cout << "NO INTENT RECOGNIZED!" << std::endl;
        break;
case ResultReason::RecognizedIntent:
    std::cout << "RECOGNIZED: Text = " << result->Text.c_str() << std::endl;
    std::cout << "  Intent Id = " << result->IntentId.c_str() << std::endl;
    auto entities = result->GetEntities();
    if (entities.find("floorName") != entities.end())
    {
        std::cout << "  Floor name: = " << entities["floorName"].c_str() << std::endl;
    }

    if (entities.find("action") != entities.end())
    {
        std::cout << "  Action: = " << entities["action"].c_str() << std::endl;
    }

    break;
case ResultReason::NoMatch:
{
    auto noMatch = NoMatchDetails::FromResult(result);
    switch (noMatch->Reason)
    {
    case NoMatchReason::NotRecognized:
        std::cout << "NOMATCH: Speech was detected, but not recognized." << std::endl;
        break;
    case NoMatchReason::InitialSilenceTimeout:
        std::cout << "NOMATCH: The start of the audio stream contains only silence, and the service timed out waiting for speech." << std::endl;
        break;
    case NoMatchReason::InitialBabbleTimeout:
        std::cout << "NOMATCH: The start of the audio stream contains only noise, and the service timed out waiting for speech." << std::endl;
        break;
    case NoMatchReason::KeywordNotRecognized:
        std::cout << "NOMATCH: Keyword not recognized" << std::endl;
        break;
    }
    break;
}
case ResultReason::Canceled:
{
    auto cancellation = CancellationDetails::FromResult(result);

    if (!cancellation->ErrorDetails.empty())
    {
        std::cout << "CANCELED: ErrorDetails=" << cancellation->ErrorDetails.c_str() << std::endl;
        std::cout << "CANCELED: Did you set the speech resource key and region values?" << std::endl;
    }
}
default:
    break;
}
Memeriksa kode Anda
Pada titik ini, kode Anda akan terlihat seperti ini:
#include <iostream>
#include <speechapi_cxx.h>

using namespace Microsoft::CognitiveServices::Speech;
using namespace Microsoft::CognitiveServices::Speech::Intent;

int main()
{
    auto config = SpeechConfig::FromSubscription("YOUR_SUBSCRIPTION_KEY", "YOUR_SUBSCRIPTION_REGION");
    auto intentRecognizer = IntentRecognizer::FromConfig(config);

    auto model = PatternMatchingModel::FromId("myNewModel");

    model->Intents.push_back({"Take me to floor {floorName}.", "Go to floor {floorName}."} , "ChangeFloors");
    model->Intents.push_back({"{action} the door."}, "OpenCloseDoor");

    model->Entities.push_back({ "floorName" , Intent::EntityType::List, Intent::EntityMatchMode::Strict, {"one", "1", "two", "2", "lobby", "ground floor"} });

    std::vector<std::shared_ptr<LanguageUnderstandingModel>> collection;

    collection.push_back(model);
    intentRecognizer->ApplyLanguageModels(collection);

    std::cout << "Say something ..." << std::endl;

    auto result = intentRecognizer->RecognizeOnceAsync().get();

    switch (result->Reason)
    {
    case ResultReason::RecognizedSpeech:
        std::cout << "RECOGNIZED: Text = " << result->Text.c_str() << std::endl;
        std::cout << "NO INTENT RECOGNIZED!" << std::endl;
        break;
    case ResultReason::RecognizedIntent:
        std::cout << "RECOGNIZED: Text = " << result->Text.c_str() << std::endl;
        std::cout << "  Intent Id = " << result->IntentId.c_str() << std::endl;
        auto entities = result->GetEntities();
        if (entities.find("floorName") != entities.end())
        {
            std::cout << "  Floor name: = " << entities["floorName"].c_str() << std::endl;
        }

        if (entities.find("action") != entities.end())
        {
            std::cout << "  Action: = " << entities["action"].c_str() << std::endl;
        }

        break;
    case ResultReason::NoMatch:
    {
        auto noMatch = NoMatchDetails::FromResult(result);
        switch (noMatch->Reason)
        {
        case NoMatchReason::NotRecognized:
            std::cout << "NOMATCH: Speech was detected, but not recognized." << std::endl;
            break;
        case NoMatchReason::InitialSilenceTimeout:
            std::cout << "NOMATCH: The start of the audio stream contains only silence, and the service timed out waiting for speech." << std::endl;
            break;
        case NoMatchReason::InitialBabbleTimeout:
            std::cout << "NOMATCH: The start of the audio stream contains only noise, and the service timed out waiting for speech." << std::endl;
            break;
        case NoMatchReason::KeywordNotRecognized:
            std::cout << "NOMATCH: Keyword not recognized." << std::endl;
            break;
        }
        break;
    }
    case ResultReason::Canceled:
    {
        auto cancellation = CancellationDetails::FromResult(result);

        if (!cancellation->ErrorDetails.empty())
        {
            std::cout << "CANCELED: ErrorDetails=" << cancellation->ErrorDetails.c_str() << std::endl;
            std::cout << "CANCELED: Did you set the speech resource key and region values?" << std::endl;
        }
    }
    default:
        break;
    }
}
Membuat dan menjalankan aplikasi Anda
Sekarang, Anda siap untuk membuat aplikasi Anda dan menguji pengenalan ucapan kami menggunakan layanan Ucapan.
- Mengompilasi kode - Dari bilah menu Visual Studio, pilih Buat>Buat Solusi.
- Memulai aplikasi Anda - Dari bilah menu, pilih Debug>Mulai Menelusuri Kesalahan atau tekan F5.
- Mulai pengenalan - Hal ini akan meminta Anda untuk mengatakan sesuatu. Bahasa defaultnya adalah bahasa Inggris. Ucapan Anda dikirim ke layanan Ucapan, ditranskripsikan sebagai teks, dan dirender di konsol.
Misalnya jika Anda mengatakan "Bawa saya ke lantai 2", output-nya akan menjadi seperti ini:
Say something ...
RECOGNIZED: Text = Take me to floor 2.
  Intent Id = ChangeFloors
  Floor name: = 2
Misalnya, jika Anda mengatakan "Bawa saya ke lantai 7", output-nya akan menjadi seperti ini:
Say something ...
RECOGNIZED: Text = Take me to floor 7.
NO INTENT RECOGNIZED!
ID Niat bernilai kosong karena 7 tidak ada dalam daftar.
Dokumentasi referensi | Sampel Tambahan pada GitHub
Dalam mulai cepat ini, Anda menginstal Speech SDK untuk Java.
Persyaratan platform
Pilih lingkungan target Anda:
Speech SDK untuk Java kompatibel dengan Windows, Linux, dan macOS.
Di Windows, Anda harus menggunakan arsitektur target 64-bit. Windows 10 atau yang lebih baru diperlukan.
Instal Microsoft Visual C++ Redistributable untuk Visual Studio 2015, 2017, 2019, dan 2022 untuk platform Anda. Memasang paket ini untuk pertama kalinya mungkin memerlukan menghidupkan ulang.
Speech SDK untuk Java tidak mendukung Windows di ARM64.
Pasang Java Development Kit seperti Azul Zulu OpenJDK. Microsoft Build of OpenJDK atau JDK pilihan Anda juga harus berfungsi.
Menginstal Speech SDK untuk Java
Beberapa instruksi menggunakan versi SDK tertentu seperti 1.24.2. Untuk memeriksa versi terbaru, cari repositori GitHub kami.
Pilih lingkungan target Anda:
Panduan ini menunjukkan cara menginstal Speech SDK untuk Java pada Java Runtime.
Sistem operasi yang didukung
Paket Java Speech SDK tersedia untuk sistem operasi berikut:
- Windows: Hanya 64-bit.
- Mac: macOS X versi 10.14 atau yang lebih baru.
- Linux: Lihat distribusi Linux dan arsitektur target yang didukung.
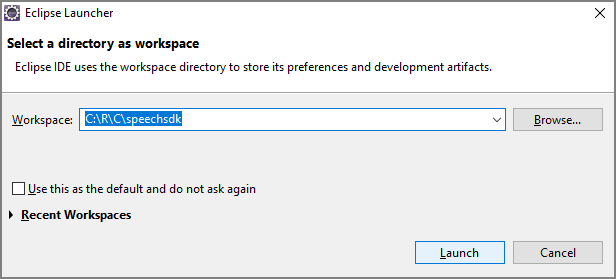
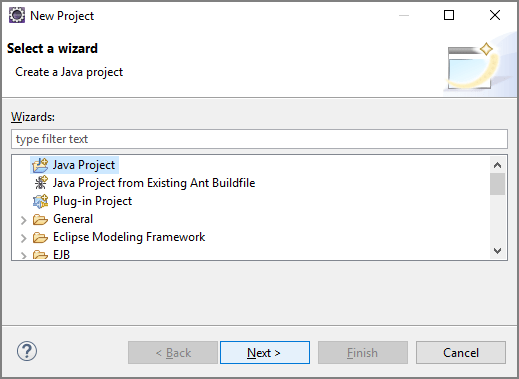
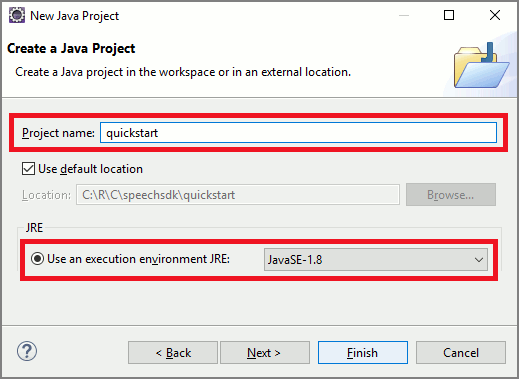
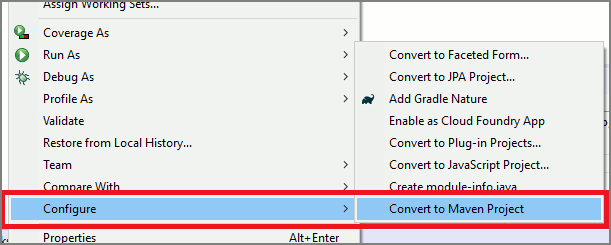
Ikuti langkah-langkah berikut untuk menginstal Speech SDK untuk Java menggunakan Apache Maven:
Menginstal Apache Maven.
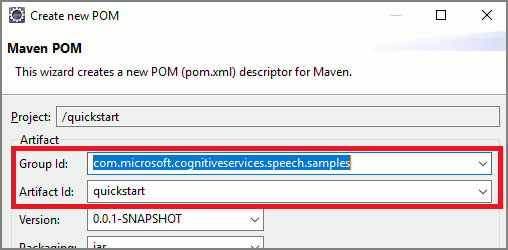
Buka prompt perintah tempat Anda menginginkan proyek baru, dan buat file pom.xml baru.
Salin konten XML berikut ke dalam pom.xml:
<project xmlns="http://maven.apache.org/POM/4.0.0" xmlns:xsi="http://www.w3.org/2001/XMLSchema-instance" xsi:schemaLocation="http://maven.apache.org/POM/4.0.0 http://maven.apache.org/xsd/maven-4.0.0.xsd">
    <modelVersion>4.0.0</modelVersion>
    <groupId>com.microsoft.cognitiveservices.speech.samples</groupId>
    <artifactId>quickstart-eclipse</artifactId>
    <version>1.0.0-SNAPSHOT</version>
    <build>
        <sourceDirectory>src</sourceDirectory>
        <plugins>
        <plugin>
            <artifactId>maven-compiler-plugin</artifactId>
            <version>3.7.0</version>
            <configuration>
            <source>1.8</source>
            <target>1.8</target>
            </configuration>
        </plugin>
        </plugins>
    </build>
    <dependencies>
        <dependency>
        <groupId>com.microsoft.cognitiveservices.speech</groupId>
        <artifactId>client-sdk</artifactId>
        <version>1.37.0</version>
        </dependency>
    </dependencies>
</project>
Jalankan perintah Maven berikut untuk menginstal SDK Azure Cognitive Service untuk Ucapan dan dependensi.
mvn clean dependency:copy-dependencies

Memulai dengan beberapa kode boilerplate
Buka
Main.javadari src dir.Mengganti isi file dengan yang berikut:
import java.util.ArrayList;
import java.util.Dictionary;
import java.util.concurrent.ExecutionException;


import com.microsoft.cognitiveservices.speech.*;
import com.microsoft.cognitiveservices.speech.intent.*;

public class Main {
    public static void main(String[] args) throws InterruptedException, ExecutionException {
        IntentPatternMatchingWithMicrophone();
    }

    public static void IntentPatternMatchingWithMicrophone() throws InterruptedException, ExecutionException {
        SpeechConfig config = SpeechConfig.fromSubscription("YOUR_SUBSCRIPTION_KEY", "YOUR_SUBSCRIPTION_REGION");
    }
}
Membuat konfigurasi Ucapan
Sebelum dapat menginisialisasi IntentRecognizer objek, Anda perlu membuat konfigurasi yang menggunakan kunci dan wilayah Azure untuk sumber daya prediksi layanan Azure AI Anda.
- Ganti
"YOUR_SUBSCRIPTION_KEY"dengan kunci prediksi layanan Azure AI Anda. - Ganti
"YOUR_SUBSCRIPTION_REGION"dengan wilayah sumber daya layanan Azure AI Anda.
Sampel ini menggunakan metode fromSubscription() untuk membuat SpeechConfig. Untuk daftar lengkap metode yang tersedia, lihat Kelas SpeechConfig.
Menginisialisasi IntentRecognizer
Sekarang buat IntentRecognizer. Masukkan kode ini tepat di bawah konfigurasi Ucapan Anda. Kami melakukan ini dalam percobaan sehingga kami memanfaatkan antarmuka yang dapat ditutup secara otomatis.
try (IntentRecognizer recognizer = new IntentRecognizer(config)) {

}
Menambahkan beberapa niat
Anda perlu mengaitkan beberapa pola dengan PatternMatchingModel dan menerapkannya ke IntentRecognizer.
Kita akan mulai dengan membuat PatternMatchingModel dan menambahkan beberapa niat ke dalamnya.
Catatan
Kita dapat menambahkan beberapa pola ke PatternMatchingIntent.
Sisipkan kode ini di dalam blok try:
// Creates a Pattern Matching model and adds specific intents from your model. The
// Id is used to identify this model from others in the collection.
PatternMatchingModel model = new PatternMatchingModel("YourPatternMatchingModelId");

// Creates a pattern that uses groups of optional words. "[Go | Take me]" will match either "Go", "Take me", or "".
String patternWithOptionalWords = "[Go | Take me] to [floor|level] {floorName}";

// Creates a pattern that uses an optional entity and group that could be used to tie commands together.
String patternWithOptionalEntity = "Go to parking [{parkingLevel}]";

// You can also have multiple entities of the same name in a single pattern by adding appending a unique identifier
// to distinguish between the instances. For example:
String patternWithTwoOfTheSameEntity = "Go to floor {floorName:1} [and then go to floor {floorName:2}]";
// NOTE: Both floorName:1 and floorName:2 are tied to the same list of entries. The identifier can be a string
//       and is separated from the entity name by a ':'

// Creates the pattern matching intents and adds them to the model
model.getIntents().put(new PatternMatchingIntent("ChangeFloors", patternWithOptionalWords, patternWithOptionalEntity, patternWithTwoOfTheSameEntity));
model.getIntents().put(new PatternMatchingIntent("DoorControl", "{action} the doors", "{action} doors", "{action} the door", "{action} door"));
Menambahkan beberapa entitas kustom
Untuk sepenuhnya memanfaatkan pencocokan pola, Anda dapat menyesuaikan entitas Anda. Kita akan membuat "floorName" dari daftar lantai yang tersedia. Kita juga akan menjadikan "parkingLevel" sebagai entitas bilangan bulat.
Masukkan kode ini di bawah niat Anda:
// Creates the "floorName" entity and set it to type list.
// Adds acceptable values. NOTE the default entity type is Any and so we do not need
// to declare the "action" entity.
model.getEntities().put(PatternMatchingEntity.CreateListEntity("floorName", PatternMatchingEntity.EntityMatchMode.Strict, "ground floor", "lobby", "1st", "first", "one", "1", "2nd", "second", "two", "2"));

// Creates the "parkingLevel" entity as a pre-built integer
model.getEntities().put(PatternMatchingEntity.CreateIntegerEntity("parkingLevel"));
Menerapkan model ke Recognizer
Sekarang saatnya menerapkan model ke IntentRecognizer. Anda dapat menggunakan beberapa model sekaligus sehingga API dapat mengambil koleksi model.
Sisipkan kode ini di bawah entitas Anda:
ArrayList<LanguageUnderstandingModel> modelCollection = new ArrayList<LanguageUnderstandingModel>();
modelCollection.add(model);

recognizer.applyLanguageModels(modelCollection);
Mengenali niat
Dari objek IntentRecognizer, Anda akan memanggil metode RecognizeOnceAsync(). Metode ini meminta layanan Ucapan untuk mengenali ucapan dalam satu frase, dan berhenti mengenali ucapan setelah frase diidentifikasi.
Sisipkan kode ini setelah menerapkan model bahasa:
System.out.println("Say something...");

IntentRecognitionResult result = recognizer.recognizeOnceAsync().get();
Menampilkan hasil pengenalan (atau kesalahan)
Ketika hasil pengenalan dikembalikan oleh layanan Ucapan, kita akan mencetak hasilnya.
Masukkan kode ini di bawah IntentRecognitionResult result = recognizer.recognizeOnceAsync.get();:
if (result.getReason() == ResultReason.RecognizedSpeech) {
    System.out.println("RECOGNIZED: Text= " + result.getText());
    System.out.println(String.format("%17s", "Intent not recognized."));
}
else if (result.getReason() == ResultReason.RecognizedIntent)
{
    System.out.println("RECOGNIZED: Text= " + result.getText());
    System.out.println(String.format("%17s %s", "Intent Id=", result.getIntentId() + "."));
    Dictionary<String, String> entities = result.getEntities();

    switch (result.getIntentId())
    {
        case "ChangeFloors":
            if (entities.get("floorName") != null) {
                System.out.println(String.format("%17s %s", "FloorName=", entities.get("floorName")));
            }
            if (entities.get("floorName:1") != null) {
                System.out.println(String.format("%17s %s", "FloorName:1=", entities.get("floorName:1")));
            }
            if (entities.get("floorName:2") != null) {
                System.out.println(String.format("%17s %s", "FloorName:2=", entities.get("floorName:2")));
            }
            if (entities.get("parkingLevel") != null) {
                System.out.println(String.format("%17s %s", "ParkingLevel=", entities.get("parkingLevel")));
            }
            break;
        case "DoorControl":
            if (entities.get("action") != null) {
                System.out.println(String.format("%17s %s", "Action=", entities.get("action")));
            }
            break;
    }
}
else if (result.getReason() == ResultReason.NoMatch) {
    System.out.println("NOMATCH: Speech could not be recognized.");
}
else if (result.getReason() == ResultReason.Canceled) {
    CancellationDetails cancellation = CancellationDetails.fromResult(result);
    System.out.println("CANCELED: Reason=" + cancellation.getReason());

    if (cancellation.getReason() == CancellationReason.Error)
    {
        System.out.println("CANCELED: ErrorCode=" + cancellation.getErrorCode());
        System.out.println("CANCELED: ErrorDetails=" + cancellation.getErrorDetails());
        System.out.println("CANCELED: Did you update the subscription info?");
    }
}
Memeriksa kode Anda
Pada titik ini, kode Anda akan terlihat seperti ini:
package quickstart;
import java.util.ArrayList;
import java.util.concurrent.ExecutionException;
import java.util.Dictionary;

import com.microsoft.cognitiveservices.speech.*;
import com.microsoft.cognitiveservices.speech.intent.*;

public class Main {
    public static void main(String[] args) throws InterruptedException, ExecutionException {
        IntentPatternMatchingWithMicrophone();
    }

    public static void IntentPatternMatchingWithMicrophone() throws InterruptedException, ExecutionException {
        SpeechConfig config = SpeechConfig.fromSubscription("YOUR_SUBSCRIPTION_KEY", "YOUR_SUBSCRIPTION_REGION");
        try (IntentRecognizer recognizer = new IntentRecognizer(config)) {
            // Creates a Pattern Matching model and adds specific intents from your model. The
            // Id is used to identify this model from others in the collection.
            PatternMatchingModel model = new PatternMatchingModel("YourPatternMatchingModelId");

            // Creates a pattern that uses groups of optional words. "[Go | Take me]" will match either "Go", "Take me", or "".
            String patternWithOptionalWords = "[Go | Take me] to [floor|level] {floorName}";

            // Creates a pattern that uses an optional entity and group that could be used to tie commands together.
            String patternWithOptionalEntity = "Go to parking [{parkingLevel}]";

            // You can also have multiple entities of the same name in a single pattern by adding appending a unique identifier
            // to distinguish between the instances. For example:
            String patternWithTwoOfTheSameEntity = "Go to floor {floorName:1} [and then go to floor {floorName:2}]";
            // NOTE: Both floorName:1 and floorName:2 are tied to the same list of entries. The identifier can be a string
            // and is separated from the entity name by a ':'

            // Creates the pattern matching intents and adds them to the model
            model.getIntents().put(new PatternMatchingIntent("ChangeFloors", patternWithOptionalWords, patternWithOptionalEntity, patternWithTwoOfTheSameEntity));
            model.getIntents().put(new PatternMatchingIntent("DoorControl", "{action} the doors", "{action} doors", "{action} the door", "{action} door"));

            // Creates the "floorName" entity and set it to type list.
            // Adds acceptable values. NOTE the default entity type is Any and so we do not need
            // to declare the "action" entity.
            model.getEntities().put(PatternMatchingEntity.CreateListEntity("floorName", PatternMatchingEntity.EntityMatchMode.Strict, "ground floor", "lobby", "1st", "first", "one", "1", "2nd", "second", "two", "2"));

            // Creates the "parkingLevel" entity as a pre-built integer
            model.getEntities().put(PatternMatchingEntity.CreateIntegerEntity("parkingLevel"));

            ArrayList<LanguageUnderstandingModel> modelCollection = new ArrayList<LanguageUnderstandingModel>();
            modelCollection.add(model);

            recognizer.applyLanguageModels(modelCollection);

            System.out.println("Say something...");

            IntentRecognitionResult result = recognizer.recognizeOnceAsync().get();

            if (result.getReason() == ResultReason.RecognizedSpeech) {
                System.out.println("RECOGNIZED: Text= " + result.getText());
                System.out.println(String.format("%17s", "Intent not recognized."));
            }
            else if (result.getReason() == ResultReason.RecognizedIntent)
            {
                System.out.println("RECOGNIZED: Text= " + result.getText());
                System.out.println(String.format("%17s %s", "Intent Id=", result.getIntentId() + "."));
                Dictionary<String, String> entities = result.getEntities();

                switch (result.getIntentId())
                {
                    case "ChangeFloors":
                        if (entities.get("floorName") != null) {
                            System.out.println(String.format("%17s %s", "FloorName=", entities.get("floorName")));
                        }
                        if (entities.get("floorName:1") != null) {
                            System.out.println(String.format("%17s %s", "FloorName:1=", entities.get("floorName:1")));
                        }
                        if (entities.get("floorName:2") != null) {
                            System.out.println(String.format("%17s %s", "FloorName:2=", entities.get("floorName:2")));
                        }
                        if (entities.get("parkingLevel") != null) {
                            System.out.println(String.format("%17s %s", "ParkingLevel=", entities.get("parkingLevel")));
                        }
                        break;

                    case "DoorControl":
                        if (entities.get("action") != null) {
                            System.out.println(String.format("%17s %s", "Action=", entities.get("action")));
                        }
                        break;
                }
            }
            else if (result.getReason() == ResultReason.NoMatch) {
                System.out.println("NOMATCH: Speech could not be recognized.");
            }
            else if (result.getReason() == ResultReason.Canceled) {
                CancellationDetails cancellation = CancellationDetails.fromResult(result);
                System.out.println("CANCELED: Reason=" + cancellation.getReason());

                if (cancellation.getReason() == CancellationReason.Error)
                {
                    System.out.println("CANCELED: ErrorCode=" + cancellation.getErrorCode());
                    System.out.println("CANCELED: ErrorDetails=" + cancellation.getErrorDetails());
                    System.out.println("CANCELED: Did you update the subscription info?");
                }
            }
        }
    }
}
Membuat dan menjalankan aplikasi Anda
Sekarang Anda siap membangun aplikasi dan menguji pengenalan niat menggunakan layanan ucapan dan pencocokan pola yang disematkan.
Pilih tombol jalankan di Eclipse atau tekan ctrl+F11, lalu tonton output untuk "Ucapkan sesuatu..." Prompt. Setelah muncul, ucapkan sesuatu dan perhatikan outputnya.
Misalnya jika Anda mengatakan "Bawa saya ke lantai 2", output-nya akan menjadi seperti ini:
Say something...
RECOGNIZED: Text=Take me to floor 2.
       Intent Id=ChangeFloors.
       FloorName=2
Contoh lainnya, jika Anda mengatakan "Bawa saya ke lantai 7", output-nya akan menjadi seperti ini:
Say something...
RECOGNIZED: Text=Take me to floor 7.
    Intent not recognized.
Tidak ada niat yang dikenali karena 7 tidak ada dalam daftar nilai valid untuk floorName.