Menyebarkan beban kerja IoT Edge menggunakan berbagi GPU di Azure Stack Edge Pro Anda
Artikel ini menjelaskan bagaimana beban kerja terkontainer dapat berbagi GPU di perangkat GPU Azure Stack Edge Pro Anda. Pendekatan ini melibatkan pengaktifan Layanan Multi-Proses (MPS) dan kemudian menentukan beban kerja GPU melalui penyebaran IoT Edge.
Prasyarat
Sebelum Anda mulai, pastikan bahwa:
Anda memiliki akses ke perangkat GPU Azure Stack Edge Pro yang diaktifkan dan memiliki komputasi yang dikonfigurasi. Anda memiliki titik akhir API Kubernetes dan Anda telah menambahkan titik akhir ini ke file
hostspada klien yang akan mengakses perangkat.Anda memiliki akses ke sistem klien dengan Sistem operasi yang didukung. Jika menggunakan klien Windows, sistem harus menjalankan PowerShell 5.0 atau yang lebih baru untuk mengakses perangkat.
Simpan penyebaran berikut
jsonpada sistem lokal Anda. Anda akan menggunakan informasi dari file ini untuk menjalankan penyebaran IoT Edge. Penyebaran ini didasarkan pada kontainer Simple CUDA yang tersedia untuk umum dari Nvidia.{ "modulesContent": { "$edgeAgent": { "properties.desired": { "modules": { "cuda-sample1": { "settings": { "image": "nvidia/samples:nbody", "createOptions": "{\"Entrypoint\":[\"/bin/sh\"],\"Cmd\":[\"-c\",\"/tmp/nbody -benchmark -i=1000; while true; do echo no-op; sleep 10000;done\"],\"HostConfig\":{\"IpcMode\":\"host\",\"PidMode\":\"host\"}}" }, "type": "docker", "version": "1.0", "env": { "NVIDIA_VISIBLE_DEVICES": { "value": "0" } }, "status": "running", "restartPolicy": "never" }, "cuda-sample2": { "settings": { "image": "nvidia/samples:nbody", "createOptions": "{\"Entrypoint\":[\"/bin/sh\"],\"Cmd\":[\"-c\",\"/tmp/nbody -benchmark -i=1000; while true; do echo no-op; sleep 10000;done\"],\"HostConfig\":{\"IpcMode\":\"host\",\"PidMode\":\"host\"}}" }, "type": "docker", "version": "1.0", "env": { "NVIDIA_VISIBLE_DEVICES": { "value": "0" } }, "status": "running", "restartPolicy": "never" } }, "runtime": { "settings": { "minDockerVersion": "v1.25" }, "type": "docker" }, "schemaVersion": "1.1", "systemModules": { "edgeAgent": { "settings": { "image": "mcr.microsoft.com/azureiotedge-agent:1.0", "createOptions": "" }, "type": "docker" }, "edgeHub": { "settings": { "image": "mcr.microsoft.com/azureiotedge-hub:1.0", "createOptions": "{\"HostConfig\":{\"PortBindings\":{\"443/tcp\":[{\"HostPort\":\"443\"}],\"5671/tcp\":[{\"HostPort\":\"5671\"}],\"8883/tcp\":[{\"HostPort\":\"8883\"}]}}}" }, "type": "docker", "status": "running", "restartPolicy": "always" } } } }, "$edgeHub": { "properties.desired": { "routes": { "route": "FROM /messages/* INTO $upstream" }, "schemaVersion": "1.1", "storeAndForwardConfiguration": { "timeToLiveSecs": 7200 } } }, "cuda-sample1": { "properties.desired": {} }, "cuda-sample2": { "properties.desired": {} } } }
Verifikasi driver GPU, versi CUDA
Langkah pertama adalah memverifikasi bahwa perangkat Anda menjalankan driver GPU dan versi CUDA yang diperlukan.
Sambungkan ke antarmuka PowerShell perangkat Anda.
Jalankan perintah berikut:
Get-HcsGpuNvidiaSmiDalam output smi Nvidia, buat catatan versi GPU dan versi CUDA di perangkat Anda. Jika Anda menjalankan perangkat lunak Azure Stack Edge 2102, versi ini akan sesuai dengan versi driver berikut:
- Versi driver GPU: 460.32.03
- Versi CUDA: 11.2
Berikut adalah contoh output:
[10.100.10.10]: PS>Get-HcsGpuNvidiaSmi
K8S-1HXQG13CL-1HXQG13:

Tue Feb 23 10:34:01 2021
+-----------------------------------------------------------------------------+
| NVIDIA-SMI 460.32.03    Driver Version: 460.32.03    CUDA Version: 11.2     |
|-------------------------------+----------------------+----------------------+
| GPU  Name        Persistence-M| Bus-Id        Disp.A | Volatile Uncorr. ECC |
| Fan  Temp  Perf  Pwr:Usage/Cap|         Memory-Usage | GPU-Util  Compute M. |
|                               |                      |               MIG M. |
|===============================+======================+======================|
|   0  Tesla T4            On   | 0000041F:00:00.0 Off |                    0 |
| N/A   40C    P8    15W /  70W |      0MiB / 15109MiB |      0%      Default |
|                               |                      |                  N/A |
+-------------------------------+----------------------+----------------------+

+-----------------------------------------------------------------------------+
| Processes:                                                                  |
|  GPU   GI   CI        PID   Type   Process name                  GPU Memory |
|        ID   ID                                                   Usage      |
|=============================================================================|
|  No running processes found                                                 |
+-----------------------------------------------------------------------------+
[10.100.10.10]: PS>
Tetap buka sesi ini karena Anda akan menggunakannya untuk melihat output smi Nvidia di artikel.
Menyebarkan tanpa berbagi konteks
Anda sekarang dapat menyebarkan aplikasi di perangkat Anda ketika Layanan Multi-Proses tidak berjalan dan tidak ada berbagi konteks. Penyebarannya melalui portal Microsoft Azure di namespace iotedge yang ada di perangkat Anda.
Membuat pengguna di namespace IoT Edge
Pertama, Anda akan membuat pengguna yang akan tersambung ke namespace iotedge. Modul IoT Edge disebarkan di namespace iotedge. Untuk informasi lebih lanjut, lihat Namespace Kubernetes di perangkat Anda.
Ikuti langkah-langkah ini untuk membuat pengguna dan memberi pengguna akses ke namespace iotedge.
Sambungkan ke antarmuka PowerShell perangkat Anda.
Membuat pengguna baru di namespace
iotedge. Jalankan perintah berikut:New-HcsKubernetesUser -UserName <user name>Berikut adalah contoh output:
[10.100.10.10]: PS>New-HcsKubernetesUser -UserName iotedgeuser
apiVersion: v1
clusters:
- cluster:
    certificate-authority-data:
===========================//snipped //======================// snipped //=============================
    server: https://compute.myasegpudev.wdshcsso.com:6443
  name: kubernetes
contexts:
- context:
    cluster: kubernetes
    user: iotedgeuser
  name: iotedgeuser@kubernetes
current-context: iotedgeuser@kubernetes
kind: Config
preferences: {}
users:
- name: iotedgeuser
  user:
    client-certificate-data:
===========================//snipped //======================// snipped //=============================
    client-key-data:
===========================//snipped //======================// snipped ============================
PQotLS0tLUVORCBSU0EgUFJJVkFURSBLRVktLS0tLQo=
Salin output yang ditampilkan dalam teks biasa. Simpan output sebagai file config (tanpa ekstensi) di folder
.kubeprofil pengguna Anda di komputer lokal Anda, misalnya,C:\Users\<username>\.kube.Berikan akses ke namespace
iotedgepada pengguna yang Anda buat. Jalankan perintah berikut:Grant-HcsKubernetesNamespaceAccess -Namespace iotedge -UserName <user name>Berikut adalah contoh output:
[10.100.10.10]: PS>Grant-HcsKubernetesNamespaceAccess -Namespace iotedge -UserName iotedgeuser
[10.100.10.10]: PS>
Untuk instruksi terperinci, lihat Menyambungkan dan mengelola kluster Kubernetes melalui kubectl pada perangkat Azure Stack Edge Pro GPU Anda.
Menyebarkan modul melalui portal
Sebarkan modul IoT Edge melalui portal Microsoft Azure. Anda akan menyebarkan modul sampel Nvidia CUDA yang tersedia untuk umum yang menjalankan simulasi n-body.
Pastikan bahwa layanan IoT Edge berjalan di perangkat Anda.
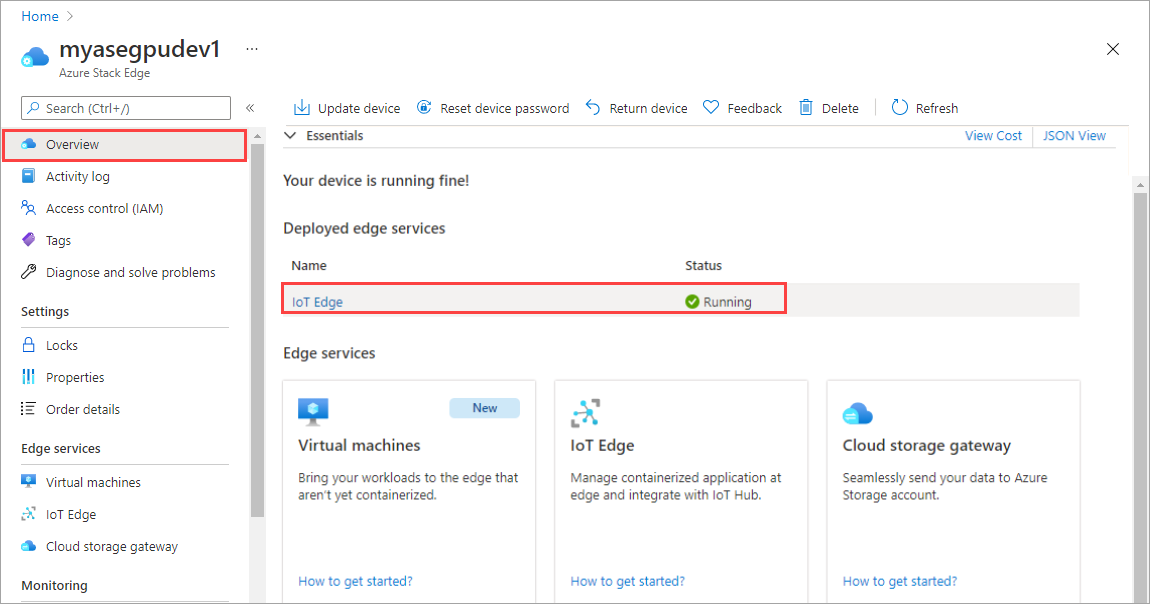
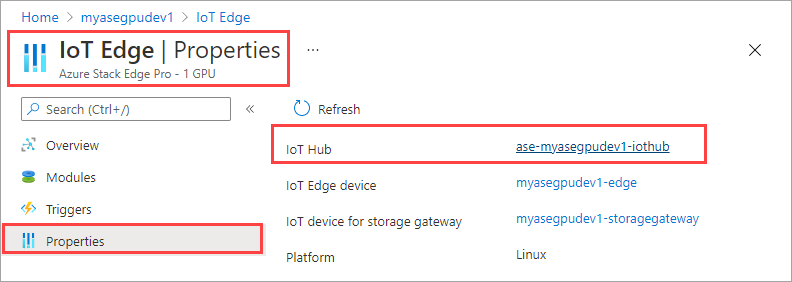
Pilih petak IoT Edge di panel kanan. Buka Properti IoT Edge>. Di panel kanan, pilih sumber daya IoT Hub yang terkait dengan perangkat Anda.
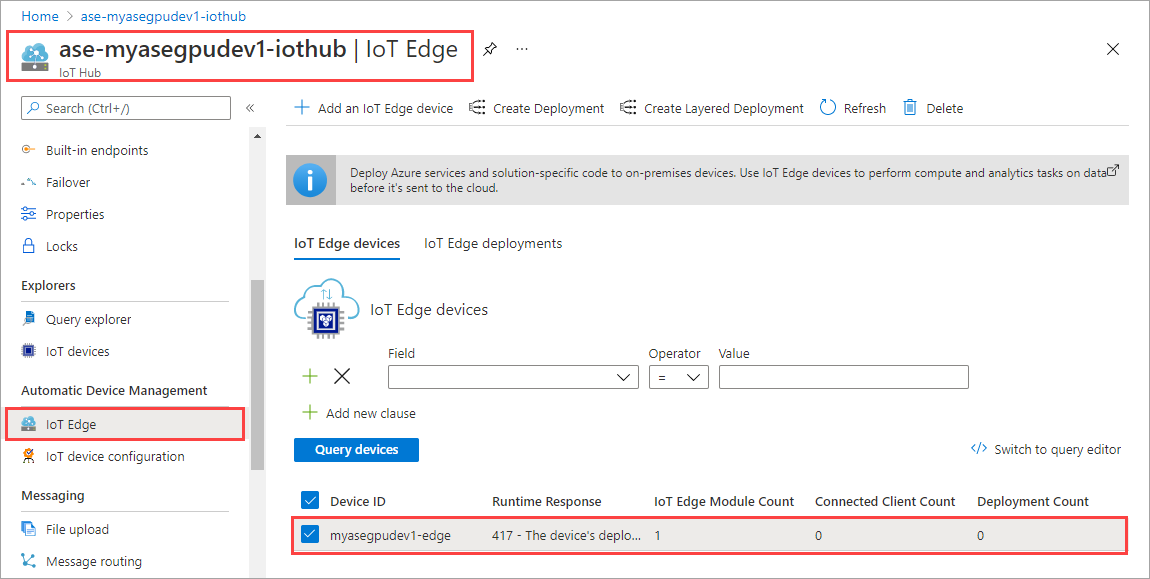
Di sumber daya IoT Hub, buka Otomatis Manajemen Perangkat > IoT Edge. Di panel kanan, pilih perangkat IoT Edge yang terkait dengan perangkat Anda.
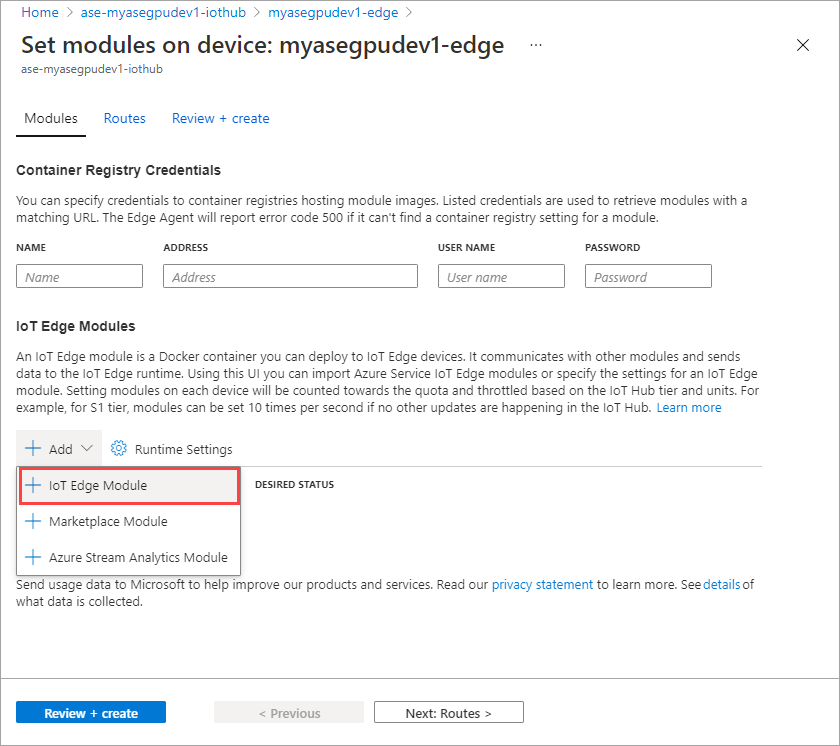
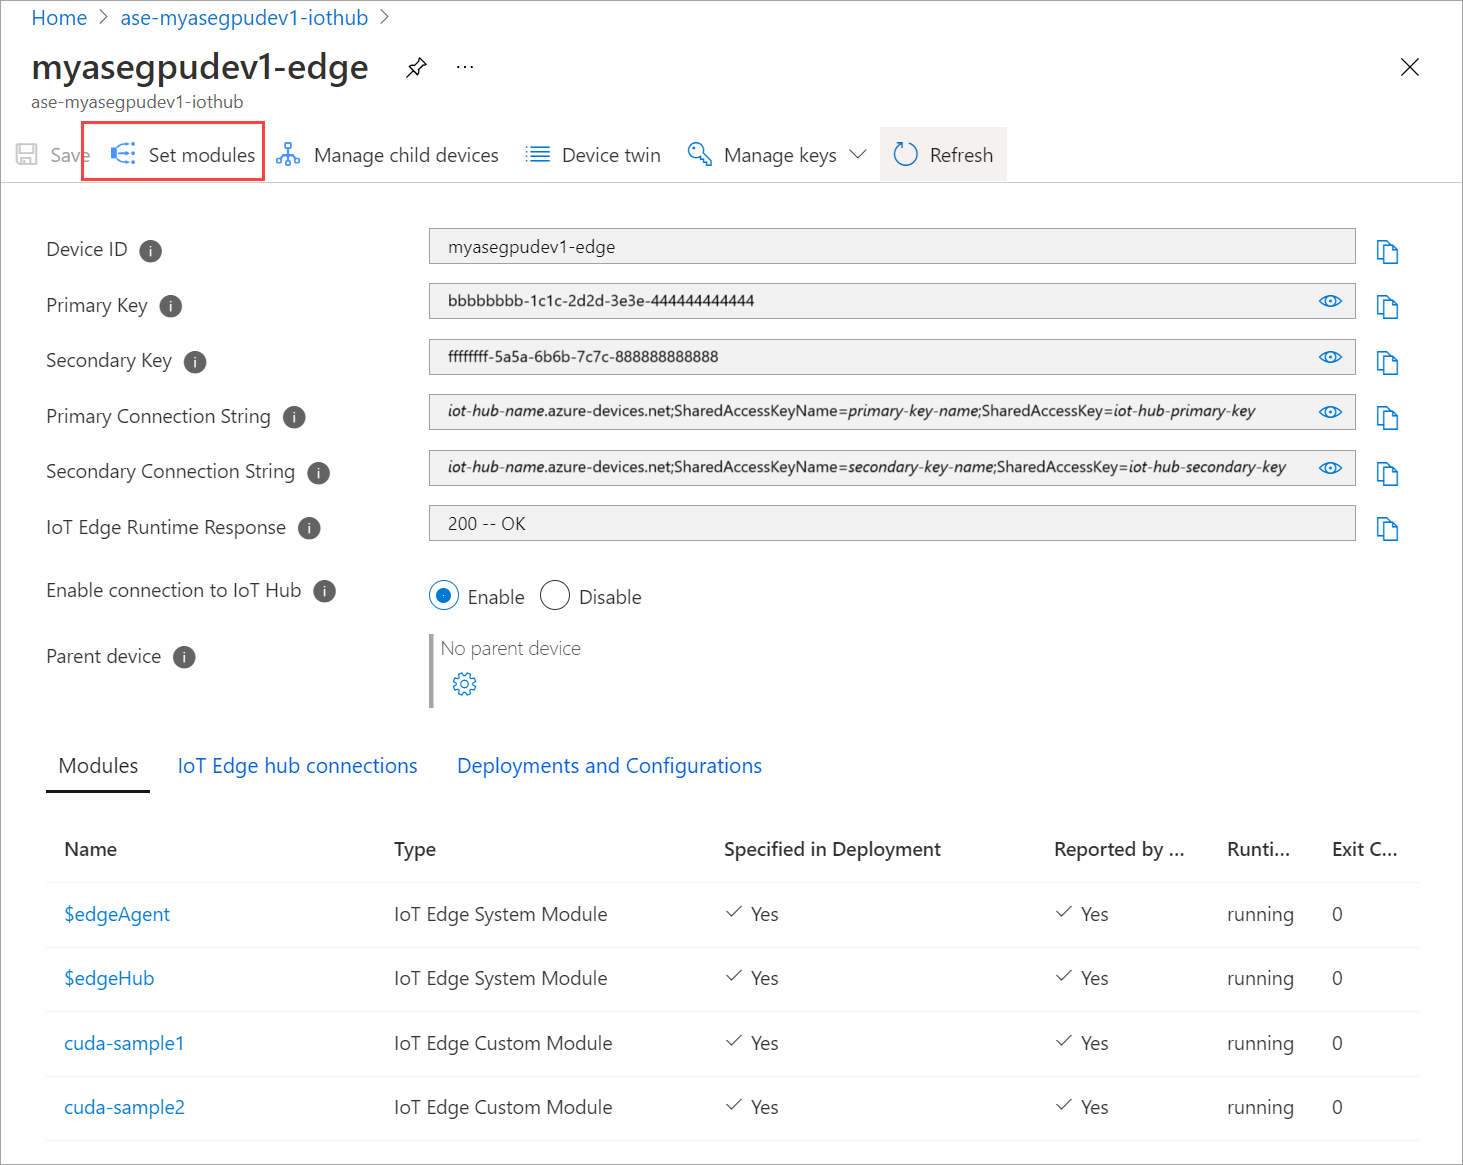
Pilih Set modul.

Pilih + Tambahkan > + modul IoT Edge.
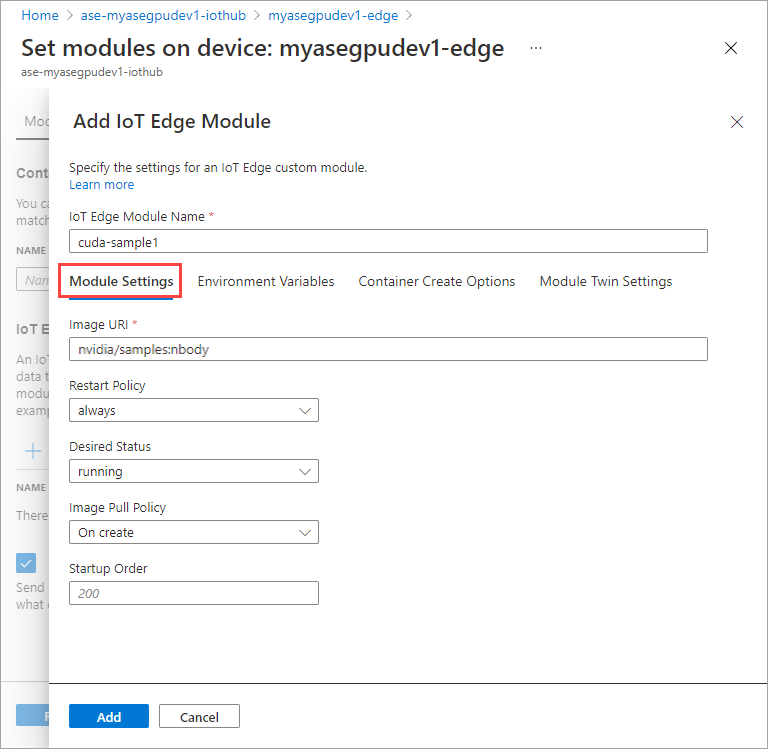
Pada tab Pengaturan Modul, berikan nama modul IoT Edge dan URI Gambar. Atur Kebijakan penarikan gambar ke Saat dibuat.
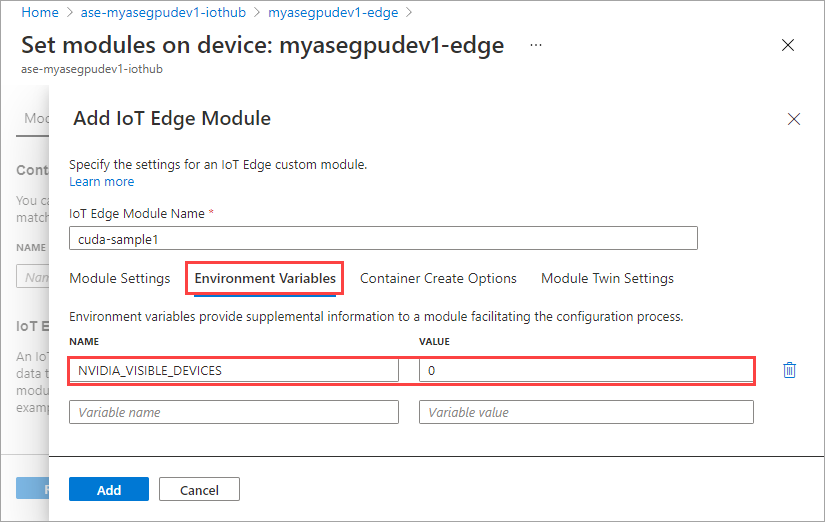
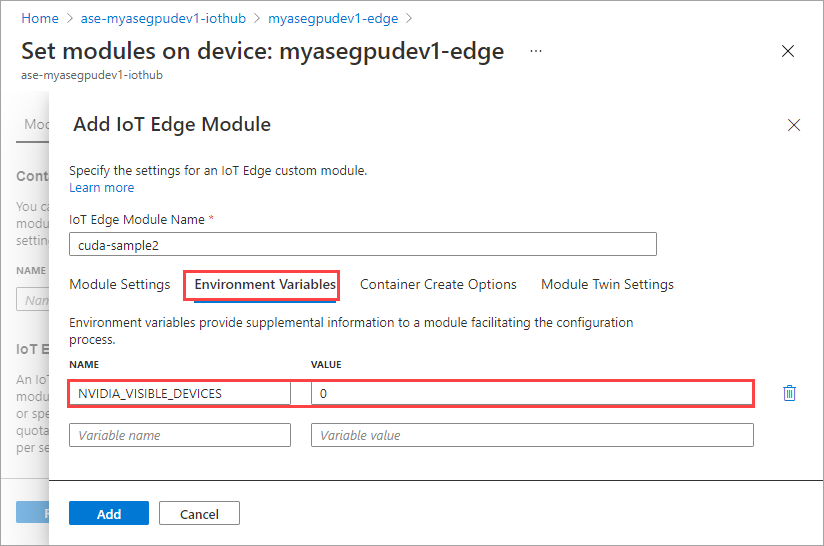
Pada tab Variabel Lingkungan, tentukan NVIDIA_VISIBLE_DEVICES sebagai 0.
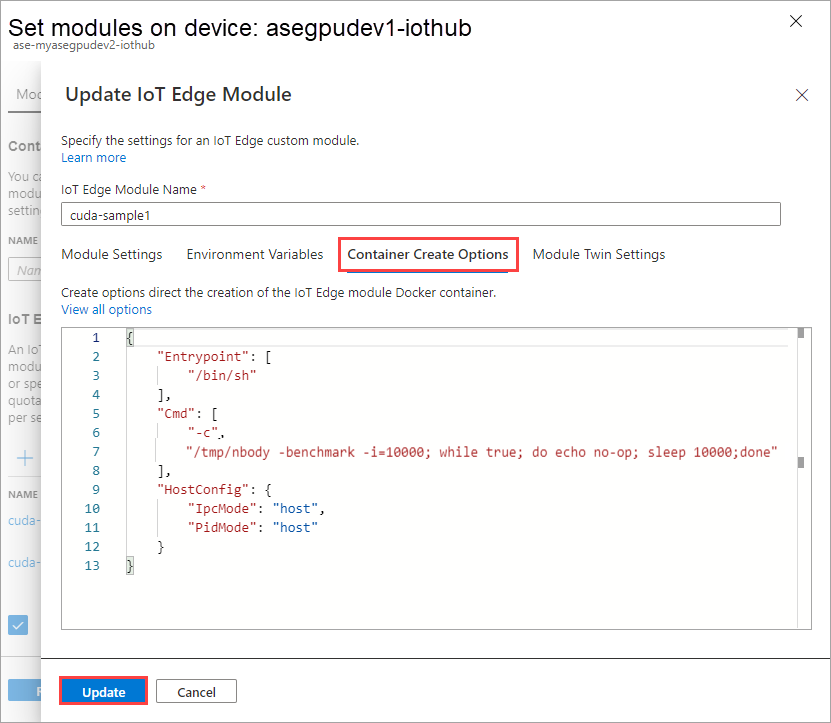
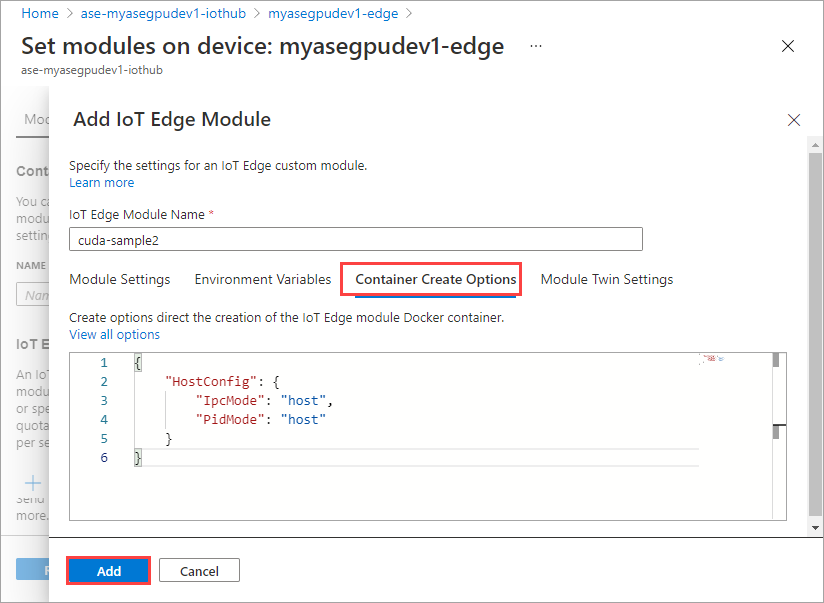
Pada tab Opsi Buat Kontainer, berikan opsi berikut ini:
{
    "Entrypoint": [
        "/bin/sh"
    ],
    "Cmd": [
        "-c",
        "/tmp/nbody -benchmark -i=1000; while true; do echo no-op; sleep 10000;done"
    ],
    "HostConfig": {
        "IpcMode": "host",
        "PidMode": "host"
    }
}
Opsi ditampilkan sebagai berikut:
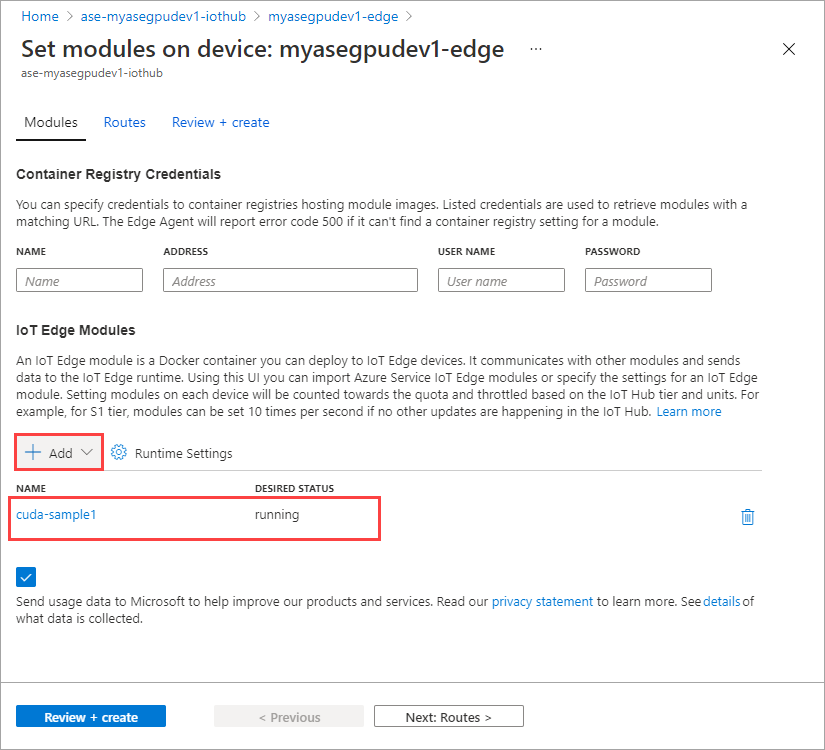
Pilih Tambahkan.
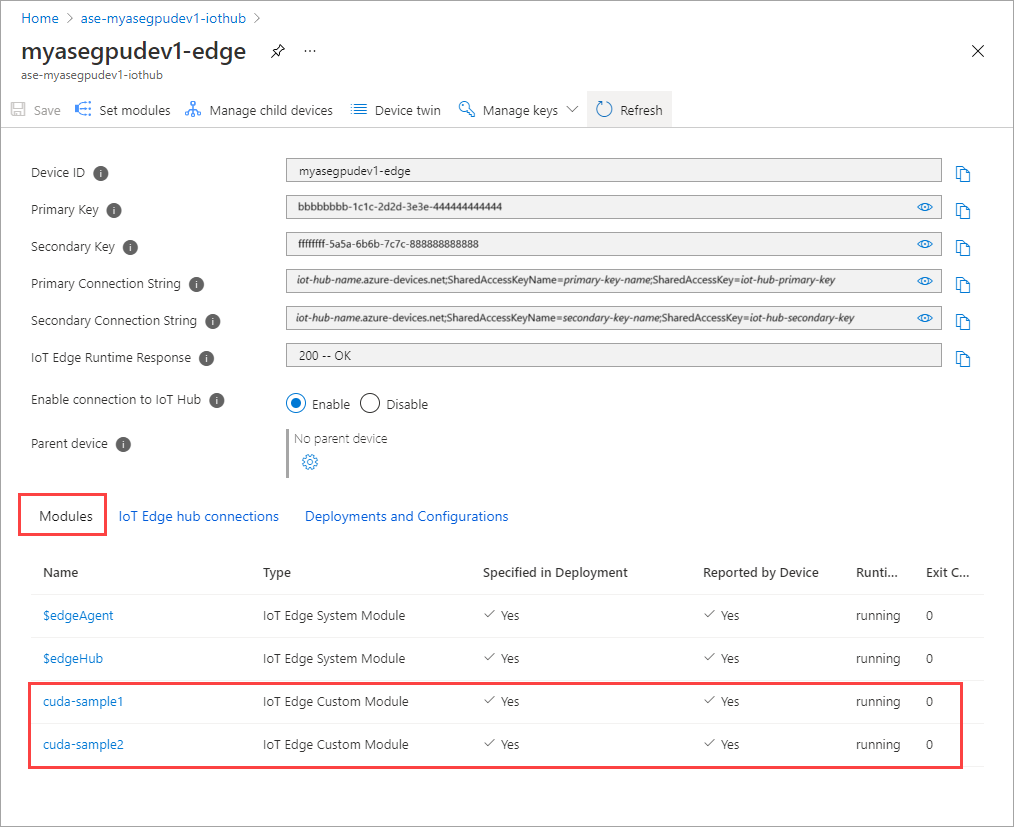
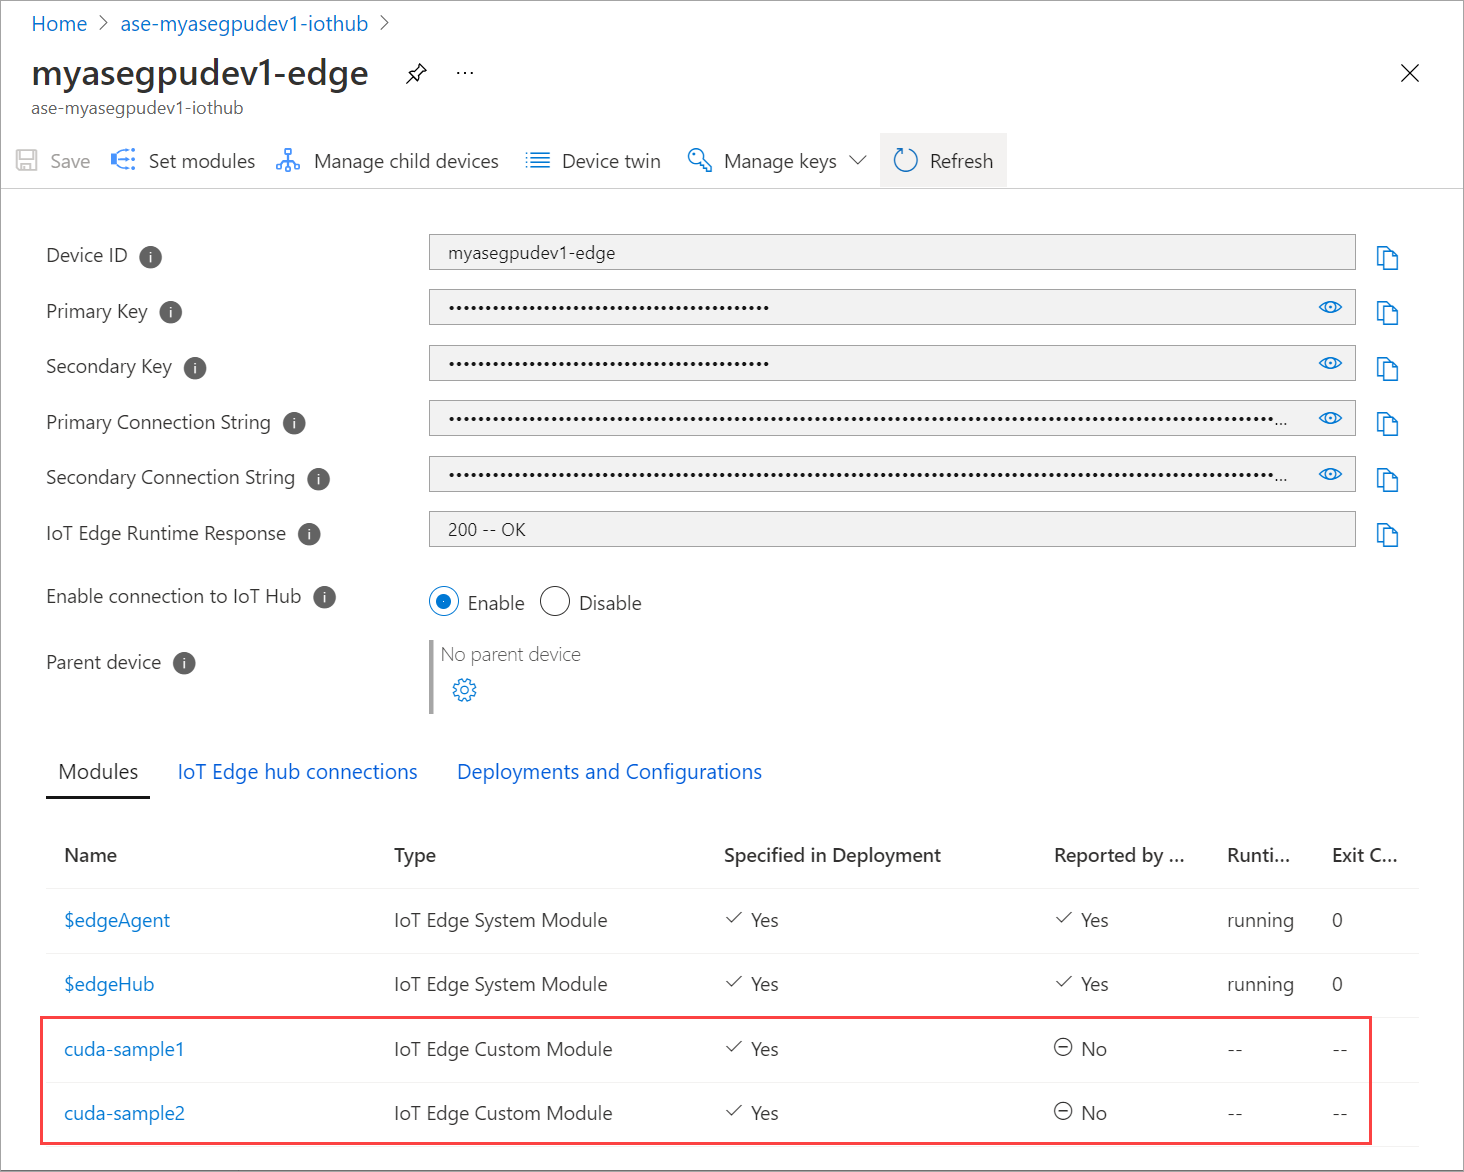
Modul yang Anda tambahkan harus ditampilkan sebagai Menjalankan.
Ulangi semua langkah untuk menambahkan modul yang Anda ikuti saat menambahkan modul pertama. Dalam contoh ini, berikan nama modul sebagai
cuda-sample2.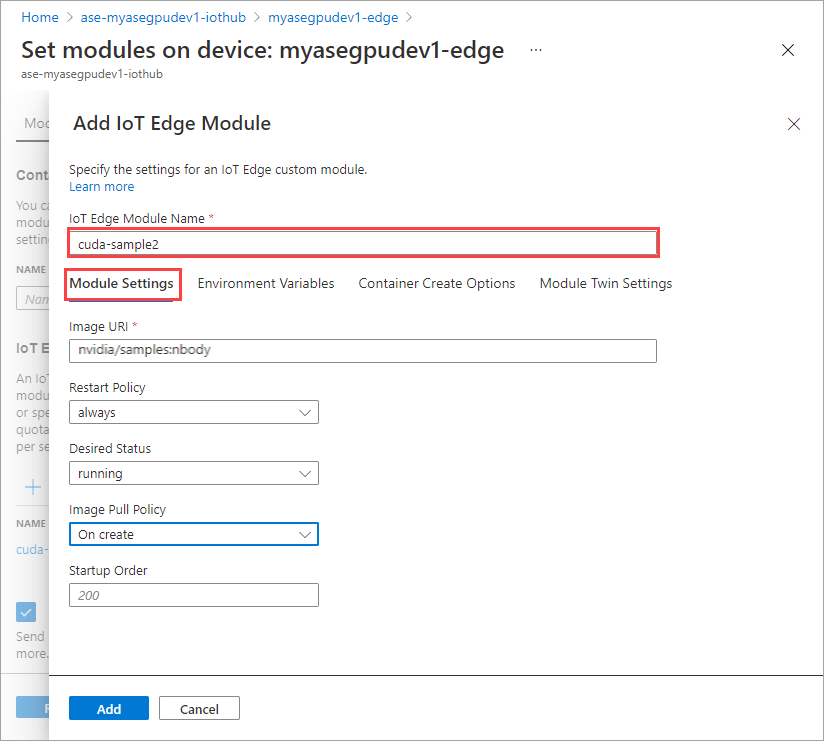
Gunakan variabel lingkungan yang sama karena kedua modul akan berbagi GPU yang sama.
Gunakan opsi buat kontainer yang sama dengan yang Anda sediakan untuk modul pertama dan pilih Tambahkan.
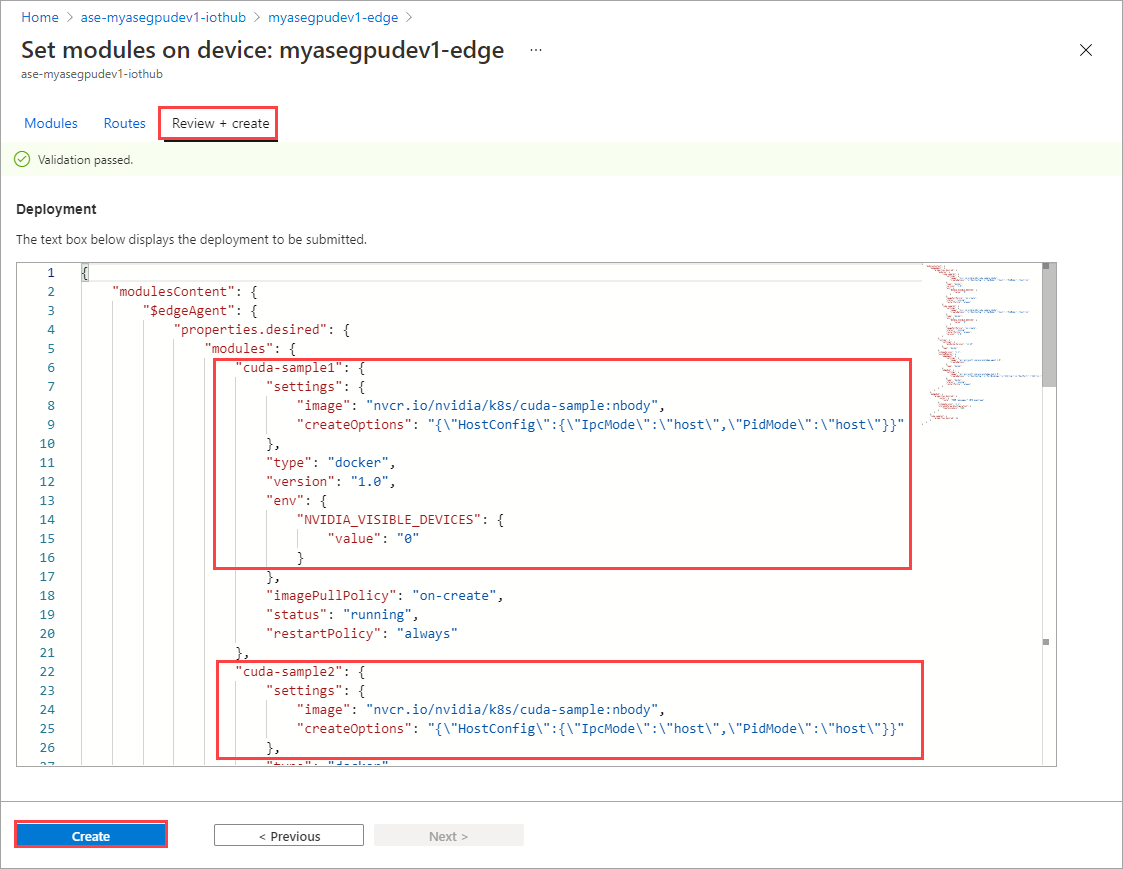
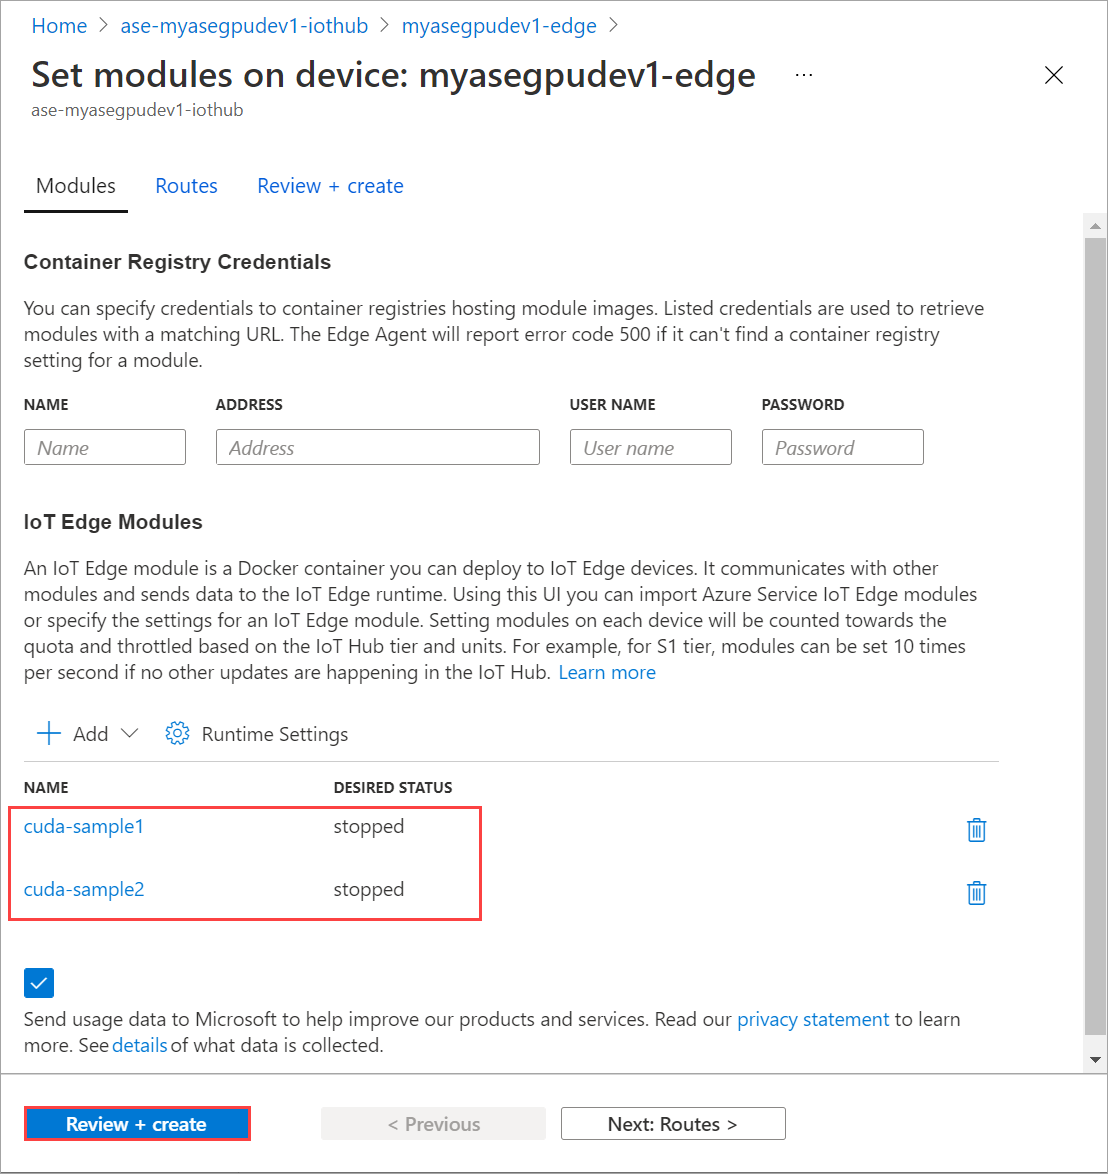
Pada halaman Atur modul, pilih Tinjau + Buat lalu pilih Buat.
Status Runtime dari kedua modul sekarang ditampilkan sebagai Menjalankan.
Memantau penyebaran beban kerja
Buka sesi PowerShell baru.
Cantumkan semua pod yang berjalan di namespace
iotedge. Jalankan perintah berikut:kubectl get pods -n iotedgeBerikut adalah contoh output:
PS C:\WINDOWS\system32> kubectl get pods -n iotedge --kubeconfig C:\GPU-sharing\kubeconfigs\configiotuser1
NAME                            READY   STATUS    RESTARTS   AGE
cuda-sample1-869989578c-ssng8   2/2     Running   0          5s
cuda-sample2-6db6d98689-d74kb   2/2     Running   0          4s
edgeagent-79f988968b-7p2tv      2/2     Running   0          6d21h
edgehub-d6c764847-l8v4m         2/2     Running   0          24h
iotedged-55fdb7b5c6-l9zn8       1/1     Running   1          6d21h
PS C:\WINDOWS\system32>
Ada dua Pod,
cuda-sample1-97c494d7f-lnmnsdancuda-sample2-d9f6c4688-2rld9yang berjalan di perangkat Anda.Sementara kedua kontainer menjalankan simulasi n-body, lihat pemanfaatan GPU dari output smi Nvidia. Masuk ke antarmuka PowerShell perangkat dan jalankan
Get-HcsGpuNvidiaSmi.Berikut adalah contoh output ketika kedua kontainer menjalankan simulasi n-body:
[10.100.10.10]: PS>Get-HcsGpuNvidiaSmi
K8S-1HXQG13CL-1HXQG13:

Fri Mar  5 13:31:16 2021
+-----------------------------------------------------------------------------+
| NVIDIA-SMI 460.32.03    Driver Version: 460.32.03    CUDA Version: 11.2     |
|-------------------------------+----------------------+----------------------+
| GPU  Name        Persistence-M| Bus-Id        Disp.A | Volatile Uncorr. ECC |
| Fan  Temp  Perf  Pwr:Usage/Cap|         Memory-Usage | GPU-Util  Compute M. |
|                               |                      |               MIG M. |
|===============================+======================+======================|
|   0  Tesla T4            On   | 00002C74:00:00.0 Off |                    0 |
| N/A   52C    P0    69W /  70W |    221MiB / 15109MiB |    100%      Default |
|                               |                      |                  N/A |
+-------------------------------+----------------------+----------------------+

+-----------------------------------------------------------------------------+
| Processes:                                                                  |
|  GPU   GI   CI        PID   Type   Process name                  GPU Memory |
|        ID   ID                                                   Usage      |
|=============================================================================|
|    0   N/A  N/A    188342      C   /tmp/nbody                        109MiB |
|    0   N/A  N/A    188413      C   /tmp/nbody                        109MiB |
+-----------------------------------------------------------------------------+
[10.100.10.10]: PS>
Seperti yang Anda lihat, ada dua kontainer yang berjalan dengan simulasi n-body pada GPU 0. Anda juga dapat melihat penggunaan memori yang sesuai.
Setelah simulasi selesai, output SMI Nvidia akan menunjukkan bahwa tidak ada proses yang berjalan pada perangkat.
[10.100.10.10]: PS>Get-HcsGpuNvidiaSmi
K8S-1HXQG13CL-1HXQG13:

Fri Mar  5 13:54:48 2021
+-----------------------------------------------------------------------------+
| NVIDIA-SMI 460.32.03    Driver Version: 460.32.03    CUDA Version: 11.2     |
|-------------------------------+----------------------+----------------------+
| GPU  Name        Persistence-M| Bus-Id        Disp.A | Volatile Uncorr. ECC |
| Fan  Temp  Perf  Pwr:Usage/Cap|         Memory-Usage | GPU-Util  Compute M. |
|                               |                      |               MIG M. |
|===============================+======================+======================|
|   0  Tesla T4            On   | 00002C74:00:00.0 Off |                    0 |
| N/A   34C    P8     9W /  70W |      0MiB / 15109MiB |      0%      Default |
|                               |                      |                  N/A |
+-------------------------------+----------------------+----------------------+

+-----------------------------------------------------------------------------+
| Processes:                                                                  |
|  GPU   GI   CI        PID   Type   Process name                  GPU Memory |
|        ID   ID                                                   Usage      |
|=============================================================================|
|  No running processes found                                                 |
+-----------------------------------------------------------------------------+
[10.100.10.10]: PS>
Setelah simulasi n-body selesai, lihat log untuk memahami detail penyebaran dan waktu yang diperlukan agar simulasi selesai.
Berikut adalah contoh output dari kontainer pertama:
PS C:\WINDOWS\system32> kubectl -n iotedge  --kubeconfig C:\GPU-sharing\kubeconfigs\configiotuser1 logs cuda-sample1-869989578c-ssng8 cuda-sample1
Run "nbody -benchmark [-numbodies=<numBodies>]" to measure performance.
==============// snipped //===================//  snipped  //=============
> Windowed mode
> Simulation data stored in video memory
> Single precision floating point simulation
> 1 Devices used for simulation
GPU Device 0: "Turing" with compute capability 7.5

> Compute 7.5 CUDA device: [Tesla T4]
40960 bodies, total time for 10000 iterations: 170171.531 ms
= 98.590 billion interactions per second
= 1971.801 single-precision GFLOP/s at 20 flops per interaction
no-op
PS C:\WINDOWS\system32>
Berikut adalah contoh output dari kontainer kedua:
PS C:\WINDOWS\system32> kubectl -n iotedge  --kubeconfig C:\GPU-sharing\kubeconfigs\configiotuser1 logs cuda-sample2-6db6d98689-d74kb cuda-sample2
Run "nbody -benchmark [-numbodies=<numBodies>]" to measure performance.
==============// snipped //===================//  snipped  //=============
> Windowed mode
> Simulation data stored in video memory
> Single precision floating point simulation
> 1 Devices used for simulation
GPU Device 0: "Turing" with compute capability 7.5

> Compute 7.5 CUDA device: [Tesla T4]
40960 bodies, total time for 10000 iterations: 170054.969 ms
= 98.658 billion interactions per second
= 1973.152 single-precision GFLOP/s at 20 flops per interaction
no-op
PS C:\WINDOWS\system32>
Hentikan penyebaran modul. Di sumber daya IoT Hub untuk perangkat Anda:
Buka IoT Edge Penyebaran > Perangkat Otomatis. Pilih perangkat IoT Edge yang sesuai dengan perangkat Anda.
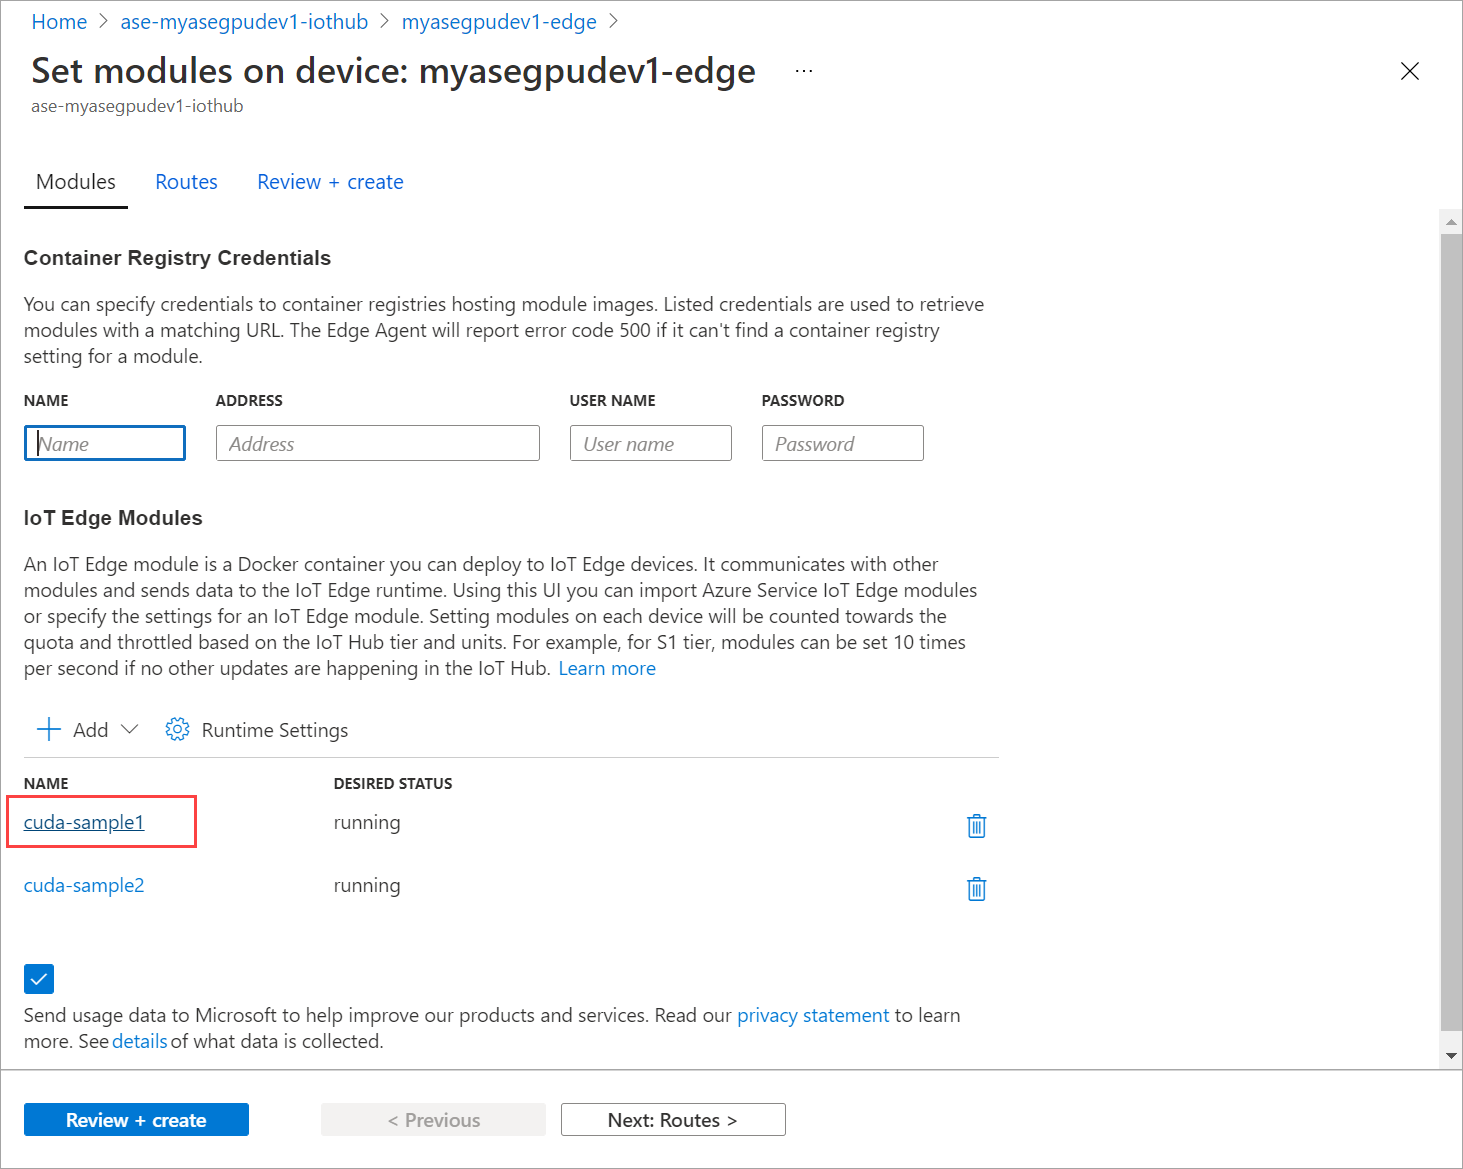
Buka Atur modul dan pilih modul.
Pada tab Modul, pilih modul.
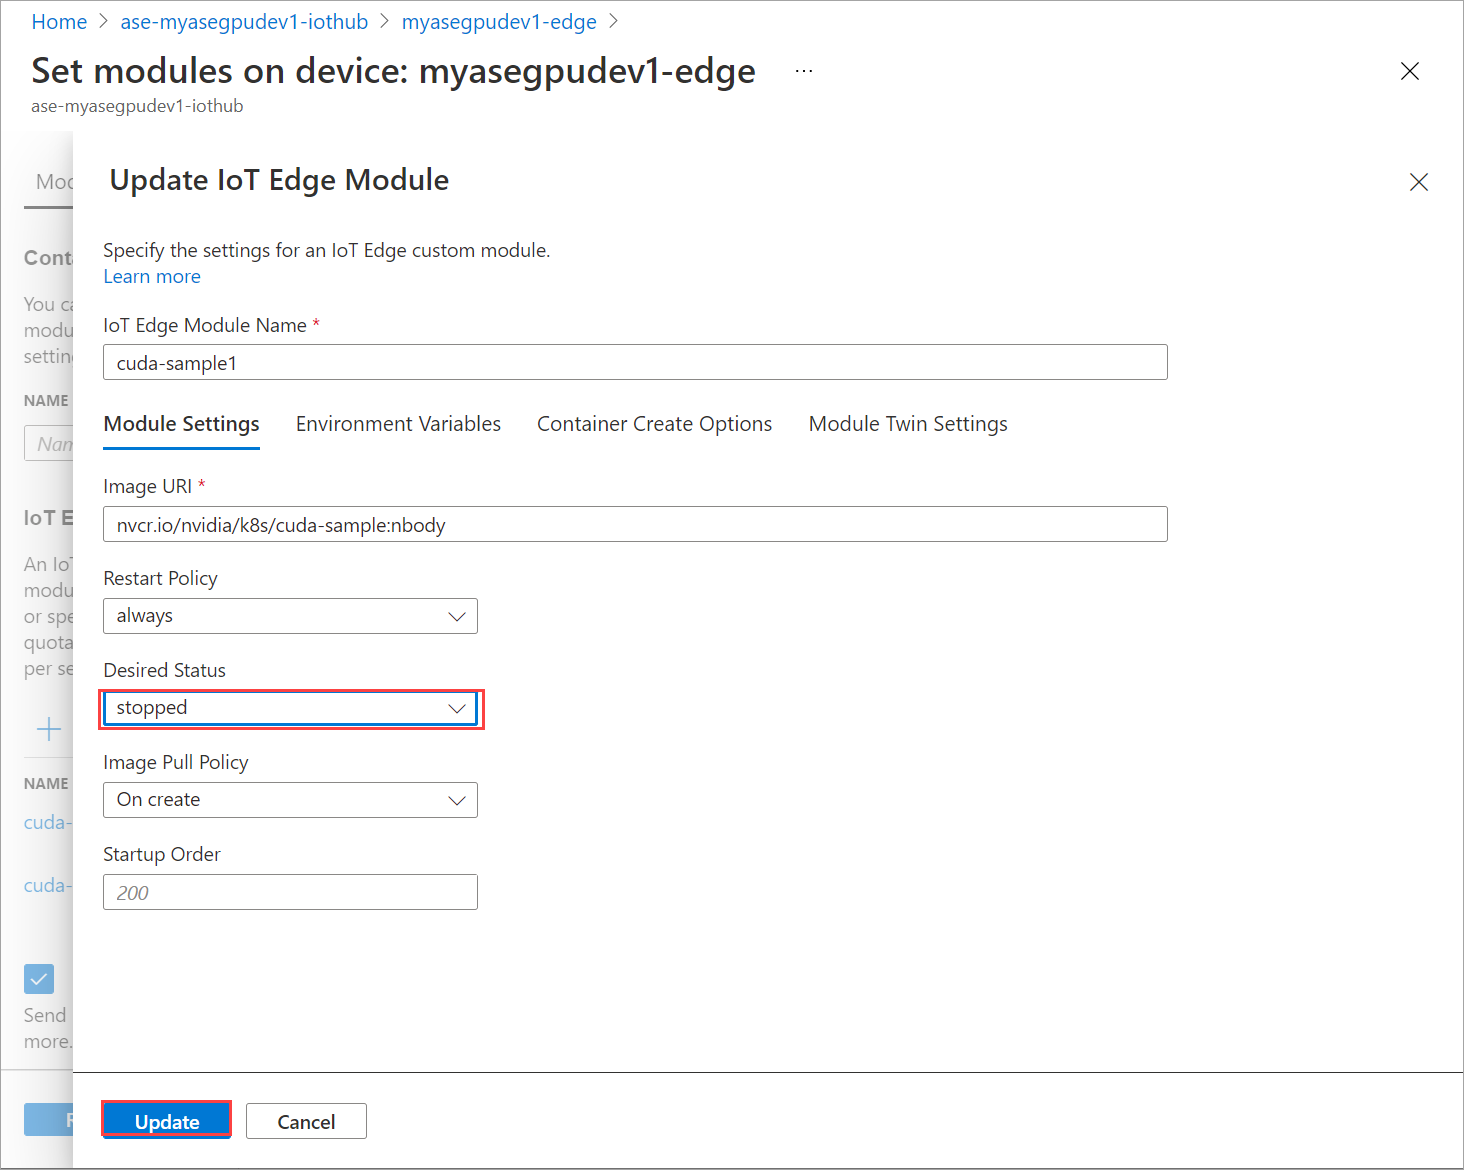
Pada tab Pengaturan modul, atur Status yang diinginkan untuk dihentikan. Pilih Perbarui.
Ulangi langkah-langkah untuk menghentikan modul kedua yang disebarkan pada perangkat. Pilih Tinjauan + buat kemudian pilih Buat. Ini harus memperbarui penyebaran.
Refresh halaman Atur modul beberapa kali. hingga status Runtime modul menampilkan sebagai Dihentikan.
Menyebarkan dengan berbagi konteks
Anda sekarang dapat menyebarkan simulasi n-body pada dua kontainer CUDA ketika MPS berjalan di perangkat Anda. Pertama, Anda akan mengaktifkan MPS pada perangkat.
Sambungkan ke antarmuka PowerShell perangkat Anda.
Untuk mengaktifkan MPS di perangkat Anda, jalankan perintah
Start-HcsGpuMPS.[10.100.10.10]: PS>Start-HcsGpuMPS K8S-1HXQG13CL-1HXQG13: Set compute mode to EXCLUSIVE_PROCESS for GPU 0000191E:00:00.0. All done. Created nvidia-mps.service [10.100.10.10]: PS>Dapatkan output smi Nvidia dari antarmuka PowerShell perangkat. Anda dapat melihat proses
nvidia-cuda-mps-serveratau layanan MPS berjalan pada perangkat.Berikut adalah contoh output:
[10.100.10.10]: PS>Get-HcsGpuNvidiaSmi
K8S-1HXQG13CL-1HXQG13:

Thu Mar  4 12:37:39 2021
+-----------------------------------------------------------------------------+
| NVIDIA-SMI 460.32.03    Driver Version: 460.32.03    CUDA Version: 11.2     |
|-------------------------------+----------------------+----------------------+
| GPU  Name        Persistence-M| Bus-Id        Disp.A | Volatile Uncorr. ECC |
| Fan  Temp  Perf  Pwr:Usage/Cap|         Memory-Usage | GPU-Util  Compute M. |
|                               |                      |               MIG M. |
|===============================+======================+======================|
|   0  Tesla T4            On   | 00002C74:00:00.0 Off |                    0 |
| N/A   36C    P8     9W /  70W |     28MiB / 15109MiB |      0%   E. Process |
|                               |                      |                  N/A |
+-------------------------------+----------------------+----------------------+

+-----------------------------------------------------------------------------+
| Processes:                                                                  |
|  GPU   GI   CI        PID   Type   Process name                  GPU Memory |
|        ID   ID                                                   Usage      |
|=============================================================================|
|    0   N/A  N/A    122792      C   nvidia-cuda-mps-server             25MiB |
+-----------------------------------------------------------------------------+
[10.100.10.10]: PS>Get-HcsGpuNvidiaSmi
Sebarkan modul yang Anda hentikan sebelumnya. Atur Status yang diinginkan untuk berjalan melalui Atur modul.
Berikut adalah contoh output:
PS C:\WINDOWS\system32> kubectl get pods -n iotedge --kubeconfig C:\GPU-sharing\kubeconfigs\configiotuser1
NAME                            READY   STATUS    RESTARTS   AGE
cuda-sample1-869989578c-2zxh6   2/2     Running   0          44s
cuda-sample2-6db6d98689-fn7mx   2/2     Running   0          44s
edgeagent-79f988968b-7p2tv      2/2     Running   0          5d20h
edgehub-d6c764847-l8v4m         2/2     Running   0          27m
iotedged-55fdb7b5c6-l9zn8       1/1     Running   1          5d20h
PS C:\WINDOWS\system32>
Anda dapat melihat bahwa modul disebarkan dan berjalan di perangkat Anda.
Ketika modul disebarkan, simulasi n-body juga mulai berjalan pada kedua kontainer. Berikut adalah contoh output ketika simulasi telah selesai pada kontainer pertama:
PS C:\WINDOWS\system32> kubectl -n iotedge logs cuda-sample1-869989578c-2zxh6 cuda-sample1
Run "nbody -benchmark [-numbodies=<numBodies>]" to measure performance.
==============// snipped //===================//  snipped  //=============

> Windowed mode
> Simulation data stored in video memory
> Single precision floating point simulation
> 1 Devices used for simulation
GPU Device 0: "Turing" with compute capability 7.5

> Compute 7.5 CUDA device: [Tesla T4]
40960 bodies, total time for 10000 iterations: 155256.062 ms
= 108.062 billion interactions per second
= 2161.232 single-precision GFLOP/s at 20 flops per interaction
no-op
PS C:\WINDOWS\system32>
Berikut adalah contoh output ketika simulasi telah selesai pada kontainer kedua:
PS C:\WINDOWS\system32> kubectl -n iotedge  --kubeconfig C:\GPU-sharing\kubeconfigs\configiotuser1 logs cuda-sample2-6db6d98689-fn7mx cuda-sample2
Run "nbody -benchmark [-numbodies=<numBodies>]" to measure performance.
==============// snipped //===================//  snipped  //=============

> Windowed mode
> Simulation data stored in video memory
> Single precision floating point simulation
> 1 Devices used for simulation
GPU Device 0: "Turing" with compute capability 7.5

> Compute 7.5 CUDA device: [Tesla T4]
40960 bodies, total time for 10000 iterations: 155366.359 ms
= 107.985 billion interactions per second
= 2159.697 single-precision GFLOP/s at 20 flops per interaction
no-op
PS C:\WINDOWS\system32>
Dapatkan output smi Nvidia dari antarmuka PowerShell perangkat ketika kedua kontainer menjalankan simulasi n-body. Berikut adalah contoh {i>output
/tmp/nbody(jenis M + C) yang sesuai dengan beban kerja n-body yang disebarkan oleh modul.[10.100.10.10]: PS>Get-HcsGpuNvidiaSmi K8S-1HXQG13CL-1HXQG13: Thu Mar 4 12:59:44 2021 +-----------------------------------------------------------------------------+ | NVIDIA-SMI 460.32.03 Driver Version: 460.32.03 CUDA Version: 11.2 | |-------------------------------+----------------------+----------------------+ | GPU Name Persistence-M| Bus-Id Disp.A | Volatile Uncorr. ECC | | Fan Temp Perf Pwr:Usage/Cap| Memory-Usage | GPU-Util Compute M. | | | | MIG M. | |===============================+======================+======================| | 0 Tesla T4 On | 00002C74:00:00.0 Off | 0 | | N/A 54C P0 69W / 70W | 242MiB / 15109MiB | 100% E. Process | | | | N/A | +-------------------------------+----------------------+----------------------+ +-----------------------------------------------------------------------------+ | Processes: | | GPU GI CI PID Type Process name GPU Memory | | ID ID Usage | |=============================================================================| | 0 N/A N/A 56832 M+C /tmp/nbody 107MiB | | 0 N/A N/A 56900 M+C /tmp/nbody 107MiB | | 0 N/A N/A 122792 C nvidia-cuda-mps-server 25MiB | +-----------------------------------------------------------------------------+ [10.100.10.10]: PS>Get-HcsGpuNvidiaSmi