Ekstensi komputer virtual Network Watcher Agent adalah persyaratan untuk beberapa fitur Azure Network Watcher yang menangkap lalu lintas jaringan untuk mendiagnosis dan memantau komputer virtual (VM) Azure. Untuk informasi selengkapnya, lihat Apa itu Azure Network Watcher?
Dalam artikel ini, Anda mempelajari cara menginstal, memperbarui, dan menghapus Network Watcher Agent untuk Windows dan Linux. Penginstalan agen tidak mengganggu, atau memerlukan boot ulang komputer virtual. Jika mesin virtual diterapkan oleh layanan Azure, periksa dokumentasi layanan untuk menentukan apakah layanan tersebut mengizinkan instalasi ekstensi di mesin virtual.
Note
Ekstensi Network Watcher Agent tidak didukung pada klaster AKS.
Prasyarat
Mesin virtual Azure (VM) yang menjalankan sistem operasi yang didukung. Untuk informasi lebih lanjut, lihat Sistem operasi yang didukung.
Konektivitas TCP keluar ke 169.254.169.254 ke atas port 80 dan 168.63.129.16 ke atas port 8037. Agen menggunakan alamat IP ini untuk berkomunikasi dengan platform Azure.
Konektivitas internet: Network Watcher Agent memerlukan konektivitas internet agar beberapa fitur dapat berfungsi dengan baik. Misalnya, memerlukan konektivitas ke akun penyimpanan Anda untuk mengunggah tangkapan paket.
Mesin virtual Azure (VM) yang menjalankan sistem operasi yang didukung. Untuk informasi lebih lanjut, lihat Sistem operasi yang didukung.
Konektivitas TCP keluar ke 169.254.169.254 ke atas port 80 dan 168.63.129.16 ke atas port 8037. Agen menggunakan alamat IP ini untuk berkomunikasi dengan platform Azure.
Konektivitas internet: Network Watcher Agent memerlukan konektivitas internet agar beberapa fitur dapat berfungsi dengan baik. Misalnya, memerlukan konektivitas ke akun penyimpanan Anda untuk mengunggah tangkapan paket.
Azure Cloud Shell atau Azure PowerShell.
Langkah-langkah dalam artikel ini menjalankan cmdlet Azure PowerShell secara interaktif di Azure Cloud Shell. Untuk menjalankan perintah di Cloud Shell, pilih Buka Cloud Shell di sudut kanan atas blok kode. Pilih Copy untuk menyalin kode lalu tempelkan ke Cloud Shell untuk menjalankannya. Anda juga dapat menjalankan Cloud Shell dari dalam portal Azure.
Anda juga dapat menginstal Azure PowerShell secara lokal untuk menjalankan cmdlet. Jika Anda menjalankan PowerShell secara lokal, masuk ke Azure menggunakan cmdlet Connect-AzAccount.
Mesin virtual Azure (VM) yang menjalankan sistem operasi yang didukung. Untuk informasi lebih lanjut, lihat Sistem operasi yang didukung.
Konektivitas TCP keluar ke 169.254.169.254 ke atas port 80 dan 168.63.129.16 ke atas port 8037. Agen menggunakan alamat IP ini untuk berkomunikasi dengan platform Azure.
Konektivitas internet: Network Watcher Agent memerlukan konektivitas internet agar beberapa fitur dapat berfungsi dengan baik. Misalnya, memerlukan konektivitas ke akun penyimpanan Anda untuk mengunggah tangkapan paket.
Azure Cloud Shell atau Azure CLI.
Langkah-langkah dalam artikel ini menjalankan perintah Azure CLI secara interaktif di Azure Cloud Shell. Untuk menjalankan perintah di Cloud Shell, pilih Buka Cloud Shell di sudut kanan atas blok kode. Pilih Salin untuk menyalin kode, dan tempelkan ke Cloud Shell untuk menjalankannya. Anda juga dapat menjalankan Cloud Shell dari dalam portal Azure.
Anda juga dapat menginstal Azure CLI secara lokal untuk menjalankan perintah. Jika Anda menjalankan Azure CLI secara lokal, masuk ke Azure menggunakan perintah az login .
Mesin virtual Azure (VM) yang menjalankan sistem operasi yang didukung. Untuk informasi lebih lanjut, lihat Sistem operasi yang didukung.
Konektivitas TCP keluar ke 169.254.169.254 ke atas port 80 dan 168.63.129.16 ke atas port 8037. Agen menggunakan alamat IP ini untuk berkomunikasi dengan platform Azure.
Konektivitas internet: Network Watcher Agent memerlukan konektivitas internet agar beberapa fitur dapat berfungsi dengan baik. Misalnya, memerlukan konektivitas ke akun penyimpanan Anda untuk mengunggah tangkapan paket.
Azure PowerShell atau Azure CLI diinstal secara lokal untuk menyebarkan templat.
Sistem operasi yang didukung
Anda dapat menginstal ekstensi Network Watcher Agent untuk Windows pada sistem operasi berikut:
- Rilis Windows Server 2012, 2012 R2, 2016, 2019, 2022, dan 2025.
- Rilis Windows 10 dan 11.
Note
Saat ini, Nano Server tidak didukung.
Anda dapat menginstal ekstensi Network Watcher Agent untuk Linux pada distribusi Linux berikut:
| Distribution |
Versi |
| AlmaLinux |
9.2 |
| Azure Linux |
2.0 |
| CentOS 1 |
6.10 dan 7 |
| Debian |
7 dan 8 |
| openSUSE Leap (sistem operasi berbasis Linux) |
42.3+ |
| Oracle Linux |
6.10 2, 7, 8, dan 9+ |
| Red Hat Enterprise Linux (RHEL) |
6.10 3, 7, 8, dan 9.2 |
| Rocky Linux |
9.1 |
| SUSE Linux Enterprise Server (SLES) |
12 dan 15 (SP2, SP3, dan SP4) |
| Ubuntu |
16+ |
1 CentOS Linux mencapai akhir masa pakainya (EOL) pada 30 Juni 2024. Untuk informasi lebih lanjut, lihat panduan CentOS End Of Life.
2 Dukungan Extended life cycle (ELS) untuk Oracle Linux versi 6.X berakhir pada 1 Juli 2024.
3Dukungan Extended life cycle (ELS) untuk Red Hat Enterprise Linux 6.X berakhir pada 30 Juni 2024.
Note
Pemantauan Internet Control Message Protocol (ICMP) saat ini belum didukung di Network Watcher Agent di Oracle Linux karena keterbatasan tingkat kernel yang diketahui khusus untuk distro tersebut.
Skema ekstensi
JSON berikut menunjukkan skema untuk ekstensi Network Watcher Agent. Ekstensi ini tidak memerlukan atau mendukung pengaturan yang disediakan pengguna, dan bergantung pada konfigurasi defaultnya.
{
    "name": "[concat(parameters('vmName'), '/AzureNetworkWatcherExtension')]",
    "type": "Microsoft.Compute/virtualMachines/extensions",
    "apiVersion": "2023-03-01",
    "location": "[resourceGroup().location]",
    "dependsOn": [
        "[concat('Microsoft.Compute/virtualMachines/', parameters('vmName'))]"
    ],
    "properties": {
        "autoUpgradeMinorVersion": true,
        "publisher": "Microsoft.Azure.NetworkWatcher",
        "type": "NetworkWatcherAgentWindows",
        "typeHandlerVersion": "1.4"
    }
}
{
    "name": "[concat(parameters('vmName'), '/AzureNetworkWatcherExtension')]",
    "type": "Microsoft.Compute/virtualMachines/extensions",
    "apiVersion": "2023-03-01",
    "location": "[resourceGroup().location]",
    "dependsOn": [
        "[concat('Microsoft.Compute/virtualMachines/', parameters('vmName'))]"
    ],
    "properties": {
        "autoUpgradeMinorVersion": true,
        "publisher": "Microsoft.Azure.NetworkWatcher",
        "type": "NetworkWatcherAgentLinux",
        "typeHandlerVersion": "1.4"
    }
}
Mencantumkan ekstensi yang terinstal
Dari halaman mesin virtual di portal Azure, Anda dapat melihat ekstensi yang terpasang dengan mengikuti langkah-langkah berikut:
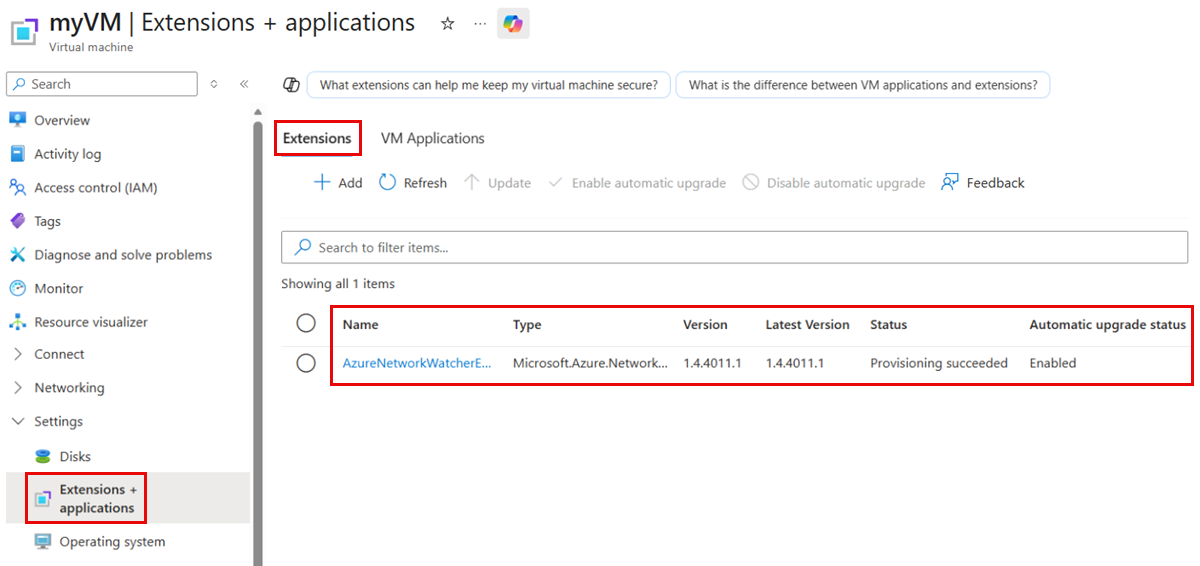
Di bawah Pengaturan, pilih Ekstensi + aplikasi.
Di tab Ekstensi , Anda dapat melihat semua ekstensi yang diinstal pada komputer virtual. Jika daftarnya panjang, gunakan kotak pencarian untuk memfilter daftar.
Gunakan cmdlet Get-AzVMExtension untuk mencantumkan semua ekstensi yang terpasang di mesin virtual.
# List the installed extensions on the virtual machine.
Get-AzVMExtension -ResourceGroupName 'myResourceGroup' -VMName 'myVM' | format-table Name, Publisher, ExtensionType, AutoUpgradeMinorVersion, EnableAutomaticUpgrade
Output dari cmdlet tersebut mencantumkan ekstensi yang diinstal:
Name                         Publisher                      ExtensionType              AutoUpgradeMinorVersion EnableAutomaticUpgrade
----                         ---------                      -------------              ----------------------- ----------------------
AzureNetworkWatcherExtension Microsoft.Azure.NetworkWatcher NetworkWatcherAgentWindows                    True                   True
Name                         Publisher                      ExtensionType            AutoUpgradeMinorVersion EnableAutomaticUpgrade
----                         ---------                      -------------            ----------------------- ----------------------
AzureNetworkWatcherExtension Microsoft.Azure.NetworkWatcher NetworkWatcherAgentLinux                    True                   True
Gunakan perintah daftar ekstensi az vm untuk mencantumkan semua ekstensi yang terpasang di mesin virtual.
# List the installed extensions on the virtual machine.
az vm extension list --resource-group 'myResourceGroup' --vm-name 'myVM' --out table
Perintah menghasilkan daftar ekstensi yang terpasang.
Name                          ProvisioningState    Publisher                       Version    AutoUpgradeMinorVersion
----------------------------  -------------------  ------------------------------  ---------  -------------------------
AzureNetworkWatcherExtension  Succeeded            Microsoft.Azure.NetworkWatcher  1.4        True
Menginstal Network Watcher Agent VM Extension
Dari halaman komputer virtual di portal Azure, Anda dapat menginstal ekstensi VM Agen Network Watcher dengan mengikuti langkah-langkah berikut:
Di bawah Pengaturan, pilih Ekstensi + aplikasi.
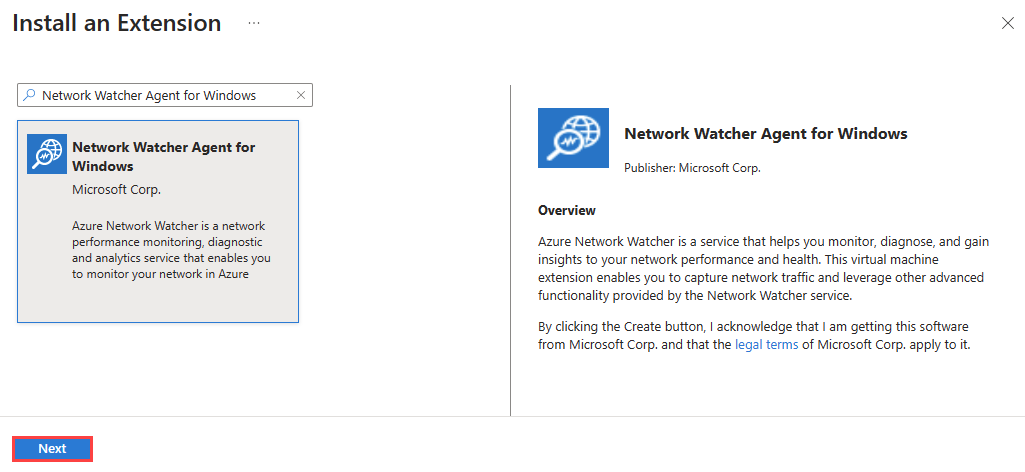
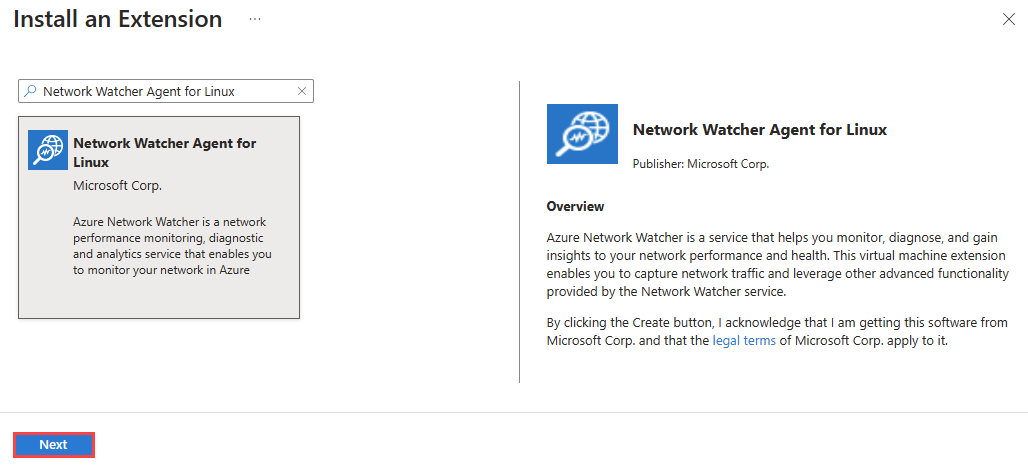
Pilih + Tambah, cari Network Watcher Agent, lalu instal aplikasi tersebut. Jika ekstensi sudah diinstal, Anda dapat melihatnya dalam daftar ekstensi.
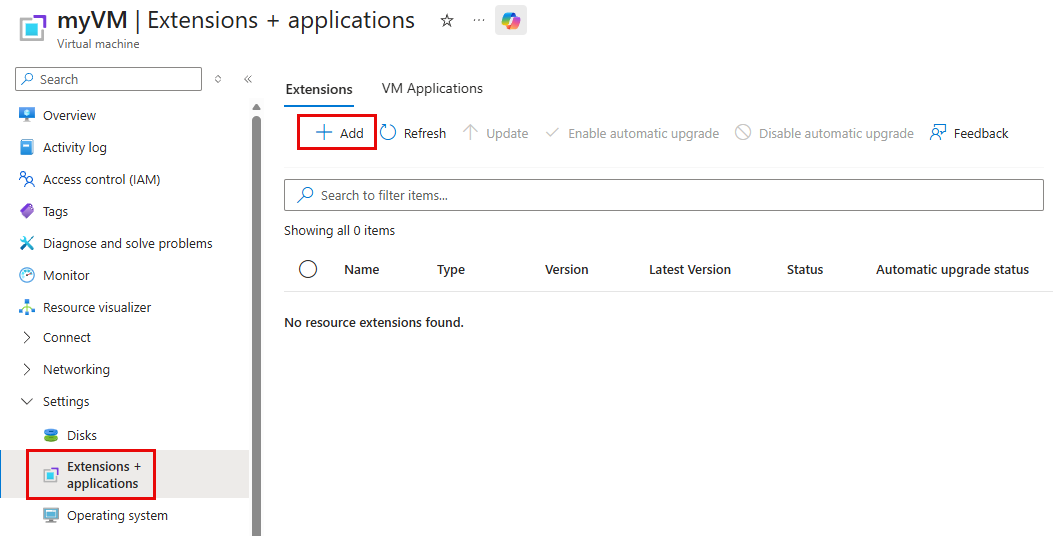
Di kotak pencarian Instal Ekstensi, masukkan Network Watcher Agent, pilih ekstensi yang sesuai untuk sistem operasi Anda dari daftar, lalu pilih Berikutnya.
Pilih Tinjau + Buat kemudian pilih Buat.
Gunakan cmdlet Set-AzVMExtension untuk menginstal ekstensi VM Network Watcher Agent pada mesin virtual:
# Install Network Watcher Agent for Windows on the virtual machine.
Set-AzVMExtension -Name 'AzureNetworkWatcherExtension' -Publisher 'Microsoft.Azure.NetworkWatcher' -ExtensionType 'NetworkWatcherAgentWindows' -EnableAutomaticUpgrade 1 -TypeHandlerVersion '1.4' -ResourceGroupName 'myResourceGroup' -VMName 'myVM'
# Install Network Watcher Agent for Linux on the virtual machine.
Set-AzVMExtension -Name 'AzureNetworkWatcherExtension' -Publisher 'Microsoft.Azure.NetworkWatcher' -ExtensionType 'NetworkWatcherAgentLinux' -EnableAutomaticUpgrade 1 -TypeHandlerVersion '1.4' -ResourceGroupName 'myResourceGroup' -VMName 'myVM'
Ketika instalasi selesai, Anda akan melihat output berikut:
RequestId IsSuccessStatusCode StatusCode ReasonPhrase
--------- ------------------- ---------- ------------
                         True         OK
Gunakan perintah az vm extension set untuk menginstal ekstensi VM Network Watcher Agent pada mesin virtual:
# Install Network Watcher Agent for Windows on the virtual machine.
az vm extension set --name 'NetworkWatcherAgentWindows' --extension-instance-name 'AzureNetworkWatcherExtension' --publisher 'Microsoft.Azure.NetworkWatcher' --enable-auto-upgrade 'true' --version '1.4' --resource-group 'myResourceGroup' --vm-name 'myVM'
# Install Network Watcher Agent for Linux on the virtual machine.
az vm extension set --name 'NetworkWatcherAgentLinux' --extension-instance-name 'AzureNetworkWatcherExtension' --publisher 'Microsoft.Azure.NetworkWatcher' --enable-auto-upgrade 'true' --version '1.4' --resource-group 'myResourceGroup' --vm-name 'myVM'
Gunakan template Azure Resource Manager (template ARM) berikut untuk menginstal ekstensi VM Network Watcher Agent pada mesin virtual:
{
    "$schema": "https://schema.management.azure.com/schemas/2019-04-01/deploymentTemplate.json#",
    "contentVersion": "1.0.0.0",
    "parameters": {
        "vmName": {
            "type": "string"
        }
    },
    "resources": [
        {
            "name": "[concat(parameters('vmName'), '/AzureNetworkWatcherExtension')]",
            "type": "Microsoft.Compute/virtualMachines/extensions",
            "apiVersion": "2024-07-01",
            "location": "[resourceGroup().location]",
            "properties": {
                "autoUpgradeMinorVersion": true,
                "publisher": "Microsoft.Azure.NetworkWatcher",
                "type": "NetworkWatcherAgentWindows",
                "typeHandlerVersion": "1.4"
            }
        }
    ]
}
{
    "$schema": "https://schema.management.azure.com/schemas/2019-04-01/deploymentTemplate.json#",
    "contentVersion": "1.0.0.0",
    "parameters": {
        "vmName": {
            "type": "string"
        }
    },
    "resources": [
        {
            "name": "[concat(parameters('vmName'), '/AzureNetworkWatcherExtension')]",
            "type": "Microsoft.Compute/virtualMachines/extensions",
            "apiVersion": "2024-07-01",
            "location": "[resourceGroup().location]",
            "properties": {
                "autoUpgradeMinorVersion": true,
                "publisher": "Microsoft.Azure.NetworkWatcher",
                "type": "NetworkWatcherAgentLinux",
                "typeHandlerVersion": "1.4"
            }
        }
    ]
}
Anda dapat menggunakan Azure PowerShell atau Azure CLI untuk menyebarkan templat Resource Manager:
# Deploy the JSON template file using Azure PowerShell.
New-AzResourceGroupDeployment -ResourceGroupName 'myResourceGroup' -TemplateFile 'agent.json'
# Deploy the JSON template file using the Azure CLI.
az deployment group create --resource-group 'myResourceGroup' --template-file 'agent.json'
Perbarui ekstensi VM Network Watcher Agent
Memeriksa versi ekstensi Anda
Anda dapat memeriksa versi ekstensi Anda dengan menggunakan portal Microsoft Azure, Azure CLI, atau PowerShell.
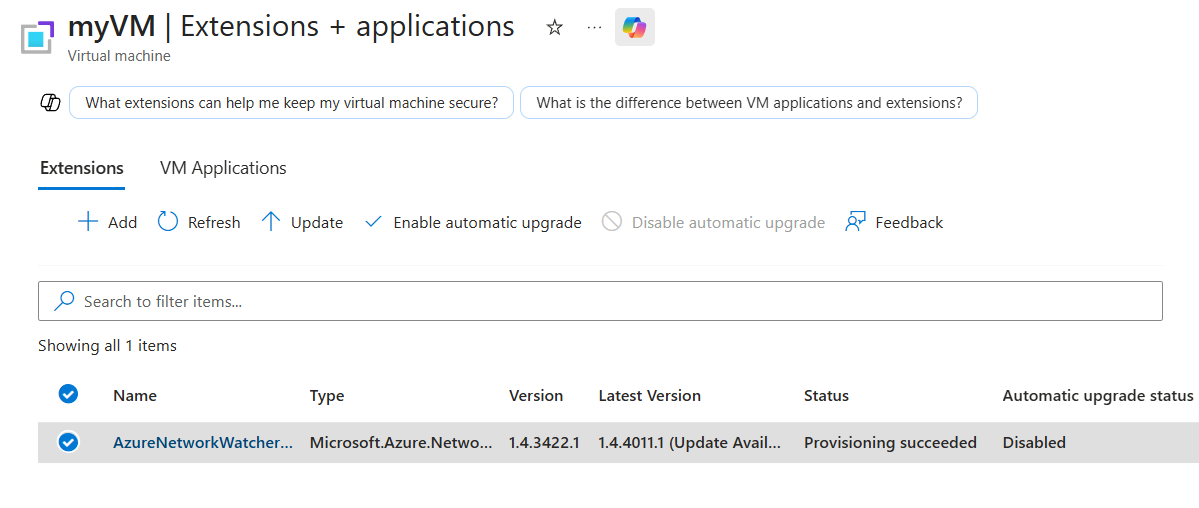
Buka Ekstensi + aplikasi VM Anda di portal Azure.
Di daftar ekstensi, centang kolom Versi untuk AzureNetworkWatcherExtension. Jika versi yang lebih baru tersedia, kolom Versi Terbaru akan menampilkan (Update Available).
Gunakan cmdlet Get-AzVM untuk memeriksa versi yang terpasang dari ekstensi:
(Get-AzVM -ResourceGroupName 'myResourceGroup' -Name 'myVM' -Status).Extensions | Where-Object { $_.Name -eq 'AzureNetworkWatcherExtension' } | Select-Object Name, TypeHandlerVersion
Gunakan cmdlet Get-AzVMExtensionImage untuk menemukan versi ekstensi terbaru yang tersedia untuk sistem operasi dan wilayah VM Anda:
Get-AzVMExtensionImage -Location '<region>' -PublisherName 'Microsoft.Azure.NetworkWatcher' -Type 'NetworkWatcherAgentWindows' | Sort-Object -Property { [Version]$_.Version } -Descending | Select-Object -First 1
Get-AzVMExtensionImage -Location '<region>' -PublisherName 'Microsoft.Azure.NetworkWatcher' -Type 'NetworkWatcherAgentLinux' | Sort-Object -Property { [Version]$_.Version } -Descending | Select-Object -First 1
Gunakan perintah az vm get-instance-view untuk memeriksa versi ekstensi yang terpasang:
az vm get-instance-view --resource-group 'myResourceGroup' --name 'myVM' --query "extensions[?name=='AzureNetworkWatcherExtension'].typeHandlerVersion" --output tsv
Gunakan perintah daftar gambar ekstensi az vm untuk menemukan versi ekstensi terbaru yang tersedia untuk sistem operasi VM Anda:
az vm extension image list --name 'NetworkWatcherAgentWindows' --publisher 'Microsoft.Azure.NetworkWatcher' --latest
az vm extension image list --name 'NetworkWatcherAgentLinux' --publisher 'Microsoft.Azure.NetworkWatcher' --latest
Note
Versi terbaru ekstensi Network Watcher adalah 1.4.4011.1.
Aktifkan upgrade otomatis
Upgrade otomatis memungkinkan platform Azure memperbarui ekstensi ke versi terbaru tanpa intervensi manual. Gunakan langkah-langkah berikut untuk memeriksa apakah upgrade otomatis diaktifkan, dan untuk mengaktifkannya jika belum.
Di bawah Pengaturan VM Anda di portal Azure, pilih Ekstensi + aplikasi.
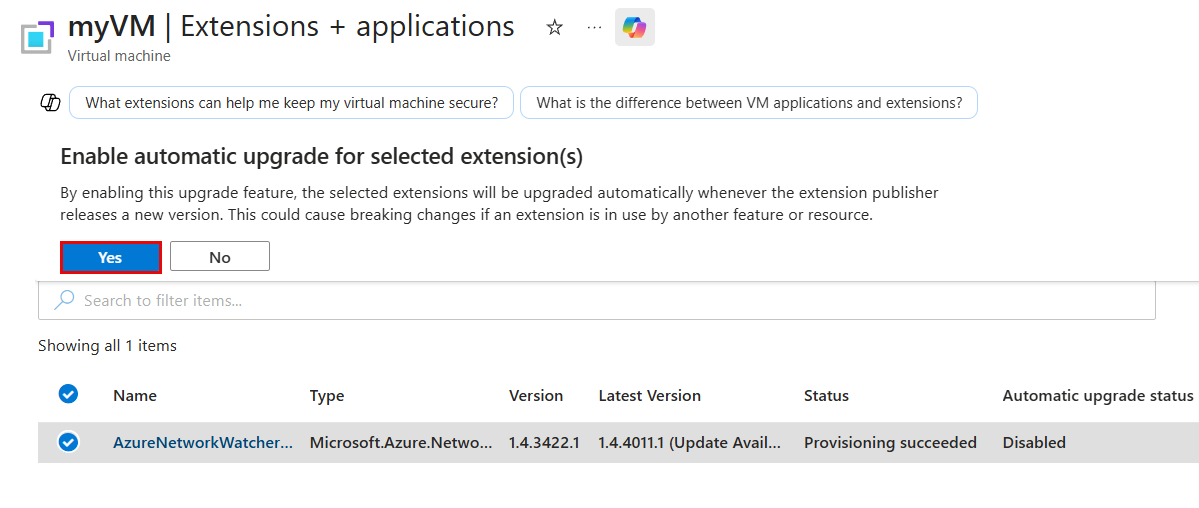
Pilih AzureNetworkWatcherExtension dari daftar ekstensi, dan centang kolom Status upgrade otomatis .
Jika muncul Dinonaktifkan, pilih Aktifkan upgrade otomatis dari toolbar.
Pilih Ya untuk mengonfirmasi.
Gunakan cmdlet Get-AzVMExtension untuk memeriksa apakah peningkatan otomatis diaktifkan:
Get-AzVMExtension -ResourceGroupName 'myResourceGroup' -VMName 'myVM' -Name 'AzureNetworkWatcherExtension' | Select-Object Name, EnableAutomaticUpgrade
Jika EnableAutomaticUpgrade adalah False, gunakan cmdlet Set-AzVMExtension untuk mengaktifkannya:
Set-AzVMExtension -ResourceGroupName 'myResourceGroup' -VMName 'myVM' -Name 'AzureNetworkWatcherExtension' -Publisher 'Microsoft.Azure.NetworkWatcher' -ExtensionType 'NetworkWatcherAgentWindows' -EnableAutomaticUpgrade $true
Set-AzVMExtension -ResourceGroupName 'myResourceGroup' -VMName 'myVM' -Name 'AzureNetworkWatcherExtension' -Publisher 'Microsoft.Azure.NetworkWatcher' -ExtensionType 'NetworkWatcherAgentLinux' -EnableAutomaticUpgrade $true
Gunakan perintah az vm extension show untuk memeriksa apakah upgrade otomatis diaktifkan:
az vm extension show --resource-group 'myResourceGroup' --vm-name 'myVM' --name 'AzureNetworkWatcherExtension' --query 'enableAutomaticUpgrade'
Jika perintah mengembalikan false, gunakan perintah set ekstensi az vm untuk mengaktifkannya:
az vm extension set --resource-group 'myResourceGroup' --vm-name 'myVM' --name 'NetworkWatcherAgentWindows' --publisher 'Microsoft.Azure.NetworkWatcher' --enable-auto-upgrade 'true'
az vm extension set --resource-group 'myResourceGroup' --vm-name 'myVM' --name 'NetworkWatcherAgentLinux' --publisher 'Microsoft.Azure.NetworkWatcher' --enable-auto-upgrade 'true'
Gunakan template Azure Resource Manager (template ARM) berikut untuk mengaktifkan peningkatan otomatis pada ekstensi VM Network Watcher Agent:
{
    "$schema": "https://schema.management.azure.com/schemas/2019-04-01/deploymentTemplate.json#",
    "contentVersion": "1.0.0.0",
    "parameters": {
        "vmName": {
            "type": "string"
        }
    },
    "resources": [
        {
            "name": "[concat(parameters('vmName'), '/AzureNetworkWatcherExtension')]",
            "type": "Microsoft.Compute/virtualMachines/extensions",
            "apiVersion": "2024-07-01",
            "location": "[resourceGroup().location]",
            "properties": {
                "autoUpgradeMinorVersion": true,
                "enableAutomaticUpgrade": true,
                "publisher": "Microsoft.Azure.NetworkWatcher",
                "type": "NetworkWatcherAgentWindows",
                "typeHandlerVersion": "1.4"
            }
        }
    ]
}
{
    "$schema": "https://schema.management.azure.com/schemas/2019-04-01/deploymentTemplate.json#",
    "contentVersion": "1.0.0.0",
    "parameters": {
        "vmName": {
            "type": "string"
        }
    },
    "resources": [
        {
            "name": "[concat(parameters('vmName'), '/AzureNetworkWatcherExtension')]",
            "type": "Microsoft.Compute/virtualMachines/extensions",
            "apiVersion": "2024-07-01",
            "location": "[resourceGroup().location]",
            "properties": {
                "autoUpgradeMinorVersion": true,
                "enableAutomaticUpgrade": true,
                "publisher": "Microsoft.Azure.NetworkWatcher",
                "type": "NetworkWatcherAgentLinux",
                "typeHandlerVersion": "1.4"
            }
        }
    ]
}
Anda dapat menggunakan Azure PowerShell atau Azure CLI untuk menyebarkan templat Resource Manager:
# Deploy the JSON template file using Azure PowerShell.
New-AzResourceGroupDeployment -ResourceGroupName 'myResourceGroup' -TemplateFile 'agent.json'
# Deploy the JSON template file using the Azure CLI.
az deployment group create --resource-group 'myResourceGroup' --template-file 'agent.json'
Note
Setelah Anda mengaktifkan upgrade otomatis, Azure memperbarui ekstensi secara otomatis tanpa memerlukan restart mesin virtual. Proses ini dapat memakan waktu hingga 30 hari setelah versi baru dirilis.
Perbarui secara manual
Di bawah Pengaturan VM Anda di portal Azure, pilih Ekstensi + aplikasi.
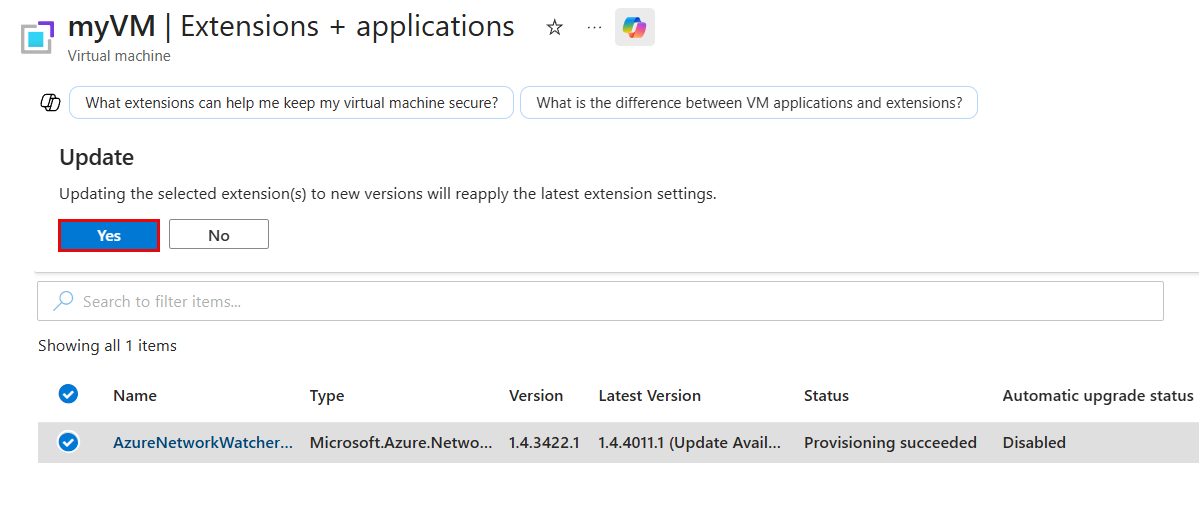
Pilih AzureNetworkWatcherExtension dari daftar ekstensi, lalu pilih Update dari toolbar.
Pilih Ya untuk mengonfirmasi.
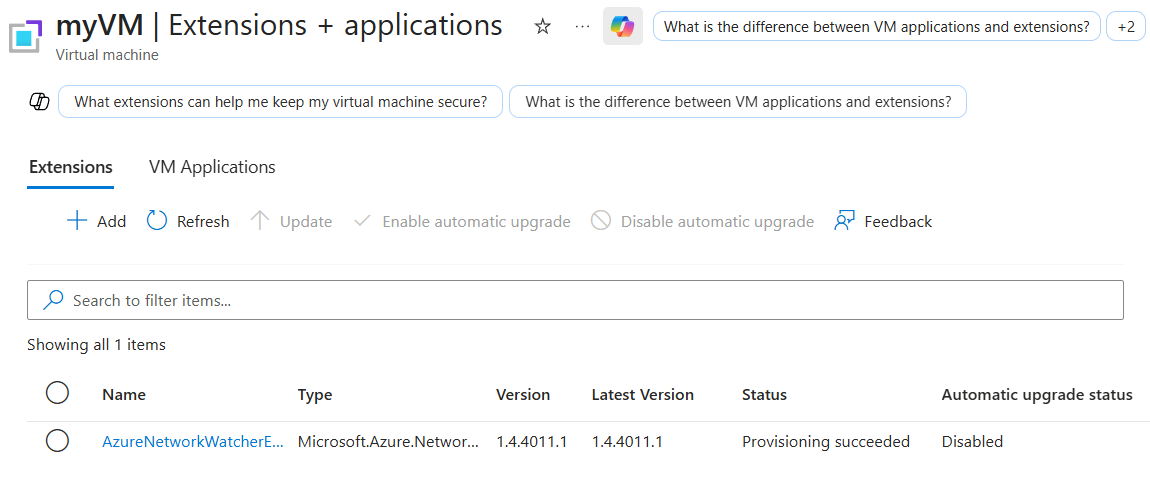
Ketika pembaruan selesai, kolom Versi danVersi Terbaru menampilkan nomor versi yang sama.
Jika pembaruan tidak menerapkan versi terbaru, hapus ekstensi dan instal kembali:
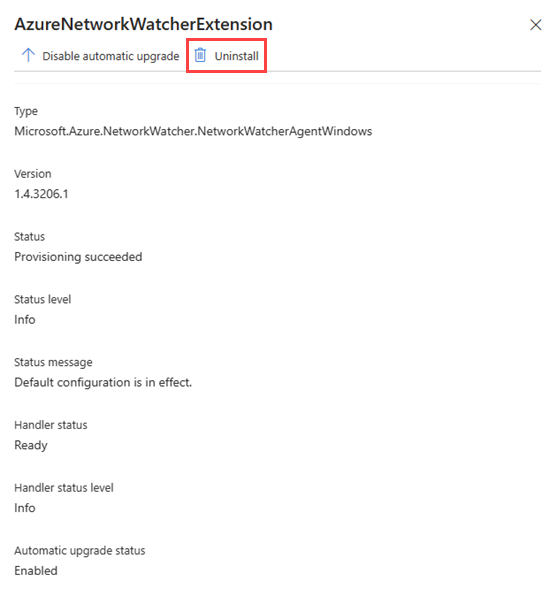
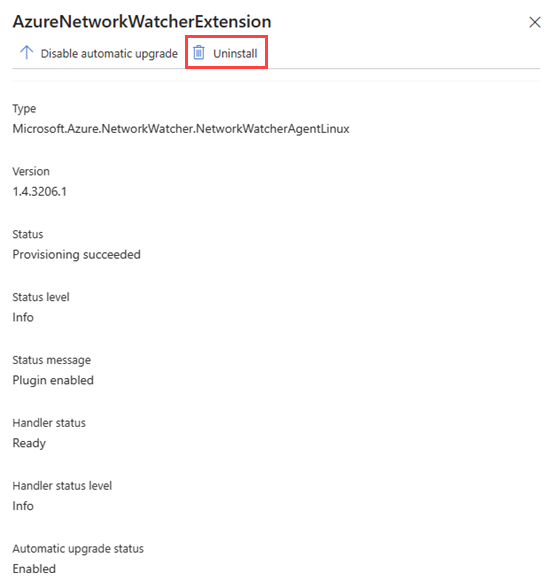
- Pilih AzureNetworkWatcherExtension dari daftar ekstensi, lalu pilih Hapus instalan.
- Pilih + Tambah, cari Network Watcher Agent, lalu instal lagi. Platform secara otomatis menginstal versi terbaru yang tersedia. Untuk informasi lebih lanjut, lihat Instal ekstensi VM Network Watcher Agent.
Gunakan cmdlet Set-AzVMExtension dengan parameter untuk -ForceRerun menerapkan ulang ekstensi tanpa menghapusnya. Nilai -ForceRerun harus berbeda dari nilai saat ini setiap kali Anda menjalankan perintah, jadi gunakan nilai yang berubah, seperti tanggal dan waktu saat ini:
Set-AzVMExtension -ResourceGroupName 'myResourceGroup' -VMName 'myVM' -Name 'AzureNetworkWatcherExtension' -Publisher 'Microsoft.Azure.NetworkWatcher' -Type 'NetworkWatcherAgentWindows' -ForceRerun (Get-Date -Format o)
Set-AzVMExtension -ResourceGroupName 'myResourceGroup' -VMName 'myVM' -Name 'AzureNetworkWatcherExtension' -Publisher 'Microsoft.Azure.NetworkWatcher' -Type 'NetworkWatcherAgentLinux' -ForceRerun (Get-Date -Format o)
Jika kondisi tersebut tidak memperbarui ekstensi, hapus dan instal lagi untuk mendapatkan versi terbaru:
Remove-AzVMExtension -ResourceGroupName 'myResourceGroup' -VMName 'myVM' -Name 'AzureNetworkWatcherExtension'
Set-AzVMExtension -ResourceGroupName 'myResourceGroup' -VMName 'myVM' -Name 'AzureNetworkWatcherExtension' -Publisher 'Microsoft.Azure.NetworkWatcher' -Type 'NetworkWatcherAgentWindows'
Set-AzVMExtension -ResourceGroupName 'myResourceGroup' -VMName 'myVM' -Name 'AzureNetworkWatcherExtension' -Publisher 'Microsoft.Azure.NetworkWatcher' -Type 'NetworkWatcherAgentLinux'
Gunakan perintah az vm extension set dengan parameter untuk --force-update menerapkan ulang ekstensi tanpa menghapusnya:
az vm extension set --resource-group 'myResourceGroup' --vm-name 'myVM' --name 'NetworkWatcherAgentWindows' --publisher 'Microsoft.Azure.NetworkWatcher' --force-update
az vm extension set --resource-group 'myResourceGroup' --vm-name 'myVM' --name 'NetworkWatcherAgentLinux' --publisher 'Microsoft.Azure.NetworkWatcher' --force-update
Jika kondisi tersebut tidak memperbarui ekstensi, hapus dan instal lagi untuk mendapatkan versi terbaru:
az vm extension delete --resource-group 'myResourceGroup' --vm-name 'myVM' --name 'AzureNetworkWatcherExtension'
az vm extension set --resource-group 'myResourceGroup' --vm-name 'myVM' --name 'NetworkWatcherAgentWindows' --publisher 'Microsoft.Azure.NetworkWatcher'
az vm extension set --resource-group 'myResourceGroup' --vm-name 'myVM' --name 'NetworkWatcherAgentLinux' --publisher 'Microsoft.Azure.NetworkWatcher'
Gunakan template Azure Resource Manager berikut (template ARM) untuk menerapkan ulang ekstensi. Perbarui typeHandlerVersion parameter ke versi terbaru yang Anda identifikasi di Periksa versi ekstensi Anda, dan deploy ulang template:
{
    "$schema": "https://schema.management.azure.com/schemas/2019-04-01/deploymentTemplate.json#",
    "contentVersion": "1.0.0.0",
    "parameters": {
        "vmName": {
            "type": "string"
        },
        "typeHandlerVersion": {
            "type": "string"
        }
    },
    "resources": [
        {
            "name": "[concat(parameters('vmName'), '/AzureNetworkWatcherExtension')]",
            "type": "Microsoft.Compute/virtualMachines/extensions",
            "apiVersion": "2024-07-01",
            "location": "[resourceGroup().location]",
            "properties": {
                "autoUpgradeMinorVersion": true,
                "publisher": "Microsoft.Azure.NetworkWatcher",
                "type": "NetworkWatcherAgentWindows",
                "typeHandlerVersion": "[parameters('typeHandlerVersion')]"
            }
        }
    ]
}
{
    "$schema": "https://schema.management.azure.com/schemas/2019-04-01/deploymentTemplate.json#",
    "contentVersion": "1.0.0.0",
    "parameters": {
        "vmName": {
            "type": "string"
        },
        "typeHandlerVersion": {
            "type": "string"
        }
    },
    "resources": [
        {
            "name": "[concat(parameters('vmName'), '/AzureNetworkWatcherExtension')]",
            "type": "Microsoft.Compute/virtualMachines/extensions",
            "apiVersion": "2024-07-01",
            "location": "[resourceGroup().location]",
            "properties": {
                "autoUpgradeMinorVersion": true,
                "publisher": "Microsoft.Azure.NetworkWatcher",
                "type": "NetworkWatcherAgentLinux",
                "typeHandlerVersion": "[parameters('typeHandlerVersion')]"
            }
        }
    ]
}
Anda dapat menggunakan Azure PowerShell atau Azure CLI untuk menyebarkan templat Resource Manager:
# Deploy the JSON template file using Azure PowerShell.
New-AzResourceGroupDeployment -ResourceGroupName 'myResourceGroup' -TemplateFile 'agent.json' -typeHandlerVersion '<version>'
# Deploy the JSON template file using the Azure CLI.
az deployment group create --resource-group 'myResourceGroup' --template-file 'agent.json' --parameters typeHandlerVersion='<version>'
Perbarui dalam skala besar dengan skrip PowerShell
Jika Anda memiliki deployment besar, gunakan skrip PowerShell untuk memperbarui beberapa VM dalam satu langganan sekaligus. Skrip berikut memperbarui ekstensi Network Watcher pada semua VM yang sudah usang dalam langganan:
<#
    .SYNOPSIS
    This script scans all VMs in the provided subscription and upgrades any out-of-date AzureNetworkWatcherExtensions to the latest available version.
    .DESCRIPTION
    This script is a no-op if AzureNetworkWatcherExtensions are already up to date.
    Requires Azure PowerShell 4.2 or higher to be installed.
    .EXAMPLE
    .\UpdateVMAgentsInSub.ps1 -SubID aaaa0a0a-bb1b-cc2c-dd3d-eeeeee4e4e4e -NoUpdate
#>

[CmdletBinding()]
param(
    [Parameter(Mandatory=$true)]
    [string] $SubID,
    [Parameter(Mandatory=$false)]
    [Switch] $NoUpdate = $false
)
function Get-LatestExtensionVersion($location, $extensionType)
{
    $latestImage = Get-AzVMExtensionImage -Location $location -PublisherName "Microsoft.Azure.NetworkWatcher" -Type $extensionType |
        Sort-Object -Property { [Version]$_.Version } -Descending |
        Select-Object -First 1
    return $latestImage.Version
}
Write-Host "Scanning all VMs in the subscription: $($SubID)"
Set-AzContext -SubscriptionId $SubID
$vms = Get-AzVM
$foundVMs = $false
Write-Host "Starting VM search, this may take a while"
foreach ($vmName in $vms)
{
    # Get Detailed VM info
    $vm = Get-AzVM -ResourceGroupName $vmName.ResourceGroupName -Name $vmName.name -Status
    $isitWindows = $vm.OsName -like "*Windows*"
    $type = if ($isitWindows) { "NetworkWatcherAgentWindows" } else { "NetworkWatcherAgentLinux" }
    $latestVersion = Get-LatestExtensionVersion -location $vmName.Location -extensionType $type

    foreach ($extension in $vm.Extensions)
    {
        if ($extension.Name -eq "AzureNetworkWatcherExtension")
        {
            if ([Version]$extension.TypeHandlerVersion -lt [Version]$latestVersion)
            {
                $foundVMs = $true
                if (-not ($NoUpdate))
                {
                    Write-Host "Found VM that needs to be updated: subscriptions/$($SubID)/resourceGroups/$($vm.ResourceGroupName)/providers/Microsoft.Compute/virtualMachines/$($vm.Name) -> Updating to $latestVersion " -NoNewline
                    Remove-AzVMExtension -ResourceGroupName $vm.ResourceGroupName -VMName $vm.Name -Name "AzureNetworkWatcherExtension" -Force
                    Write-Host "... " -NoNewline
                    Set-AzVMExtension -ResourceGroupName $vm.ResourceGroupName -Location $vmName.Location -VMName $vm.Name -Name "AzureNetworkWatcherExtension" -Publisher "Microsoft.Azure.NetworkWatcher" -Type $type -TypeHandlerVersion $latestVersion
                    Write-Host "Done"
                }
                else
                {
                    Write-Host "Found $(if ($isitWindows) {"Windows"} else {"Linux"}) VM that needs to be updated to $($latestVersion): subscriptions/$($SubID)/resourceGroups/$($vm.ResourceGroupName)/providers/Microsoft.Compute/virtualMachines/$($vm.Name)"
                }
            }
        }
    }
}

if ($foundVMs)
{
    Write-Host "Finished $(if ($NoUpdate) {"searching"} else {"updating"}) out of date AzureNetworkWatcherExtension on VMs"
}
else
{
    Write-Host "All AzureNetworkWatcherExtensions up to date"
}
Copot pemasangan ekstensi Agen Network Watcher untuk VM
Dari halaman komputer virtual di portal Azure, Anda dapat menghapus instalan ekstensi VM Agen Network Watcher dengan mengikuti langkah-langkah berikut:
Di bawah Pengaturan, pilih Ekstensi + aplikasi.
Pilih AzureNetworkWatcherExtension dari daftar ekstensi, lalu pilih Hapus instalan.
Note
Anda mungkin melihat ekstensi VM Agen Network Watcher memiliki nama berbeda dengan AzureNetworkWatcherExtension.
Gunakan cmdlet Remove-AzVMExtension untuk menghapus ekstensi VM Network Watcher Agent dari mesin virtual:
# Uninstall Network Watcher Agent VM extension.
Remove-AzVMExtension -Name 'AzureNetworkWatcherExtension' -ResourceGroupName 'myResourceGroup' -VMName 'myVM'
Gunakan perintah hapus ekstensi az vm untuk menghapus ekstensi VM Network Watcher Agent dari mesin virtual:
# Uninstall Network Watcher Agent VM extension.
az vm extension delete --name 'AzureNetworkWatcherExtension' --resource-group 'myResourceGroup' --vm-name 'myVM'
Tanya jawab umum (FAQ)
Untuk mendapatkan jawaban atas pertanyaan yang paling sering diajukan tentang Network Watcher Agent, lihat FAQ Network Watcher Agent.
Konten terkait