Memulai Azure Blob Storage dan JavaScript
Artikel ini menunjukkan cara menghubungkan ke Azure Blob Storage menggunakan pustaka klien Azure Blob Storage v12 untuk JavaScript. Setelah terhubung, kode Anda dapat beroperasi pada kontainer, blob, dan fitur layanan Blob Storage.
Cuplikan kode sampel tersedia di GitHub sebagai file Node.js yang dapat dijalankan.
Paket referensi | API (npm) | Sampel | kode | sumber pustaka Berikan umpan balik
Prasyarat
- Langganan Azure - buat akun secara gratis
- Akun penyimpanan Azure - buat akun penyimpanan
- Node.js LTS
- Untuk aplikasi klien (browser), Anda memerlukan alat bundling.
Menyiapkan proyek Anda
Buka perintah dan ubah ke folder proyek Anda. Ubah
YOUR-DIRECTORYke nama folder Anda:cd YOUR-DIRECTORYJika Anda belum memiliki file
package.jsondi direktori Anda, inisialisasi proyek untuk membuat file:npm init -yInstal pustaka klien Azure Blob Storage untuk JavaScript:
npm install @azure/storage-blobJika Anda ingin menggunakan koneksi tanpa kata sandi menggunakan ID Microsoft Entra, instal pustaka klien Azure Identity untuk JavaScript:
npm install @azure/identity
Mengotorisasi akses dan menyambungkan ke Blob Storage
MICROSOFT Entra ID menyediakan koneksi yang paling aman dengan mengelola identitas koneksi (identitas terkelola). Fungsionalitas tanpa kata sandi ini memungkinkan Anda mengembangkan aplikasi yang tidak memerlukan rahasia apa pun (kunci atau string koneksi) yang disimpan dalam kode.
Menyiapkan akses identitas ke cloud Azure
Untuk menyambungkan ke Azure tanpa kata sandi, Anda perlu menyiapkan identitas Azure atau menggunakan identitas yang sudah ada. Setelah identitas disiapkan, pastikan untuk menetapkan peran yang sesuai ke identitas.
Untuk mengotorisasi akses tanpa kata sandi dengan ID Microsoft Entra, Anda harus menggunakan kredensial Azure. Jenis info masuk yang Anda butuhkan bergantung pada tempat aplikasi Anda berjalan. Gunakan tabel ini sebagai panduan.
| Lingkungan | Metode |
|---|---|
| Lingkungan pengembang | Visual Studio Code |
| Lingkungan pengembang | Prinsipal layanan |
| Aplikasi yang dihosting Azure | Penyiapan aplikasi yang dihosting Azure |
| Lokal | Penyiapan aplikasi lokal |
Menyiapkan peran akun penyimpanan
Sumber daya penyimpanan Anda harus memiliki satu atau beberapa peran Azure RBAC berikut yang ditetapkan ke sumber daya identitas yang anda rencanakan untuk disambungkan. Siapkan peran Azure Storage untuk setiap identitas yang Anda buat di langkah sebelumnya: Cloud Azure, pengembangan lokal, lokal.
Setelah Anda menyelesaikan penyiapan, setiap identitas memerlukan setidaknya salah satu peran yang sesuai:
Peran akses data - seperti:
- Pembaca Data Blob Penyimpanan.
- Data blob penyimpanan kontributor
Peran sumber daya - seperti:
- Pembaca
- Kontributor
Bangun aplikasi Anda
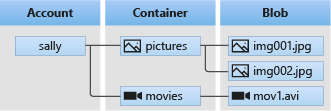
Saat Anda membangun aplikasi, kode Anda terutama akan berinteraksi dengan tiga jenis sumber daya:
- Akun penyimpanan, yang merupakan namespace tingkat atas yang unik untuk data Azure Storage Anda.
- Kontainer, yang mengatur data blob di akun penyimpanan Anda.
- Blob, yang menyimpan data tidak terstruktur seperti teks dan data biner.
Diagram berikut menunjukkan hubungan antara ketiga sumber daya ini.
Setiap jenis sumber daya diwakili oleh satu atau beberapa klien JavaScript terkait:
| Kelas | Deskripsi |
|---|---|
| KlienLayananBlob | Mewakili titik akhir Blob Storage untuk akun penyimpanan Anda. |
| ContainerClient | Memungkinkan Anda untuk memanipulasi kontainer Azure Storage dan blob kontainer. |
| BlobClient | Memungkinkan Anda untuk memanipulasi blob Azure Storage. |
Membuat objek BlobServiceClient
Objek BlobServiceClient adalah objek teratas di SDK. Klien ini memungkinkan Anda memanipulasi layanan, kontainer, dan blob.
Setelah peran identitas akun penyimpanan Azure dan lingkungan lokal Anda disiapkan, buat file JavaScript yang menyertakan @azure/identity paket. Buat kredensial, seperti DefaultAzureCredential, untuk menerapkan koneksi tanpa kata sandi ke Blob Storage. Gunakan kredensial tersebut untuk mengautentikasi dengan objek BlobServiceClient .
// connect-with-default-azure-credential.js
const { BlobServiceClient } = require('@azure/storage-blob');
const { DefaultAzureCredential } = require('@azure/identity');
require('dotenv').config()

const accountName = process.env.AZURE_STORAGE_ACCOUNT_NAME;
if (!accountName) throw Error('Azure Storage accountName not found');

const blobServiceClient = new BlobServiceClient(
  `https://${accountName}.blob.core.windows.net`,
  new DefaultAzureCredential()
);

async function main(){

  const containerName = 'REPLACE-WITH-EXISTING-CONTAINER-NAME';
  const blobName = 'REPLACE-WITH-EXISTING-BLOB-NAME';

  const timestamp = Date.now();
  const fileName = `my-new-file-${timestamp}.txt`;

  // create container client
  const containerClient = await blobServiceClient.getContainerClient(containerName);

  // create blob client
  const blobClient = await containerClient.getBlockBlobClient(blobName);

  // download file
  await blobClient.downloadToFile(fileName);

  console.log(`${fileName} downloaded`);

}

main()
  .then(() => console.log(`done`))
  .catch((ex) => console.log(`error: ${ex.message}`));
Paket dotenv digunakan untuk membaca nama akun penyimpanan Anda dari .env file. File ini tidak boleh diperiksa ke kontrol sumber. Jika Anda menggunakan perwakilan layanan lokal sebagai bagian dari penyiapan DefaultAzureCredential Anda, informasi keamanan apa pun untuk kredensial tersebut .env juga akan masuk ke file.
Jika Anda berencana untuk menyebarkan aplikasi ke server dan klien yang berjalan di luar Azure, buat salah satu kredensial yang memenuhi kebutuhan Anda.
Membuat objek ContainerClient
Anda dapat membuat objek ContainerClient baik dari BlobServiceClient, atau secara langsung.
Membuat objek ContainerClient dari BlobServiceClient
Buat objek ContainerClient dari BlobServiceClient.
// Azure Storage dependency
const {
  StorageSharedKeyCredential,
  BlobServiceClient,
} = require("@azure/storage-blob");

// For development environment - include environment variables from .env
require("dotenv").config();

// Azure Storage resource name
const accountName = process.env.AZURE_STORAGE_ACCOUNT_NAME;
if (!accountName) throw Error("Azure Storage accountName not found");

// Azure Storage resource key
const accountKey = process.env.AZURE_STORAGE_ACCOUNT_KEY;
if (!accountKey) throw Error("Azure Storage accountKey not found");

// Create credential
const sharedKeyCredential = new StorageSharedKeyCredential(
  accountName,
  accountKey
);

const baseUrl = `https://${accountName}.blob.core.windows.net`;
const containerName = `my-container`;

// Create BlobServiceClient
const blobServiceClient = new BlobServiceClient(
  `${baseUrl}`,
  sharedKeyCredential
);

async function main() {
  try {
    // Create container client
    const containerClient = await blobServiceClient.getContainerClient(
      containerName
    );

    // do something with containerClient...
    let i = 1;

    // List blobs in container
    for await (const blob of containerClient.listBlobsFlat()) {
      console.log(`Blob ${i++}: ${blob.name}`);
    }
  } catch (err) {
    console.log(err);
    throw err;
  }
}

main()
  .then(() => console.log(`done`))
  .catch((ex) => console.log(ex.message));
Membuat ContainerClient secara langsung
// Azure Storage dependency
const {
  ContainerClient
} = require("@azure/storage-blob");

// Azure authentication for credential dependency
const { DefaultAzureCredential } = require('@azure/identity');

// For development environment - include environment variables from .env
require("dotenv").config();

// Azure Storage resource name
const accountName = process.env.AZURE_STORAGE_ACCOUNT_NAME;
if (!accountName) throw Error("Azure Storage accountName not found");

// Azure SDK needs base URL
const baseUrl = `https://${accountName}.blob.core.windows.net`;

// Unique container name
const timeStamp = Date.now();
const containerName = `test`;

async function main() {
  try {

    // create container client from DefaultAzureCredential
    const containerClient = new ContainerClient(
      `${baseUrl}/${containerName}`,
      new DefaultAzureCredential()
    );

    // do something with containerClient...
    let i = 1;

    // List blobs in container
    for await (const blob of containerClient.listBlobsFlat()) {
        console.log(`Blob ${i++}: ${blob.name}`);
    }


  } catch (err) {
    console.log(err);
    throw err;
  }
}

main()
  .then(() => console.log(`done`))
  .catch((ex) => console.log(ex.message));
Paket dotenv digunakan untuk membaca nama akun penyimpanan Anda dari .env file. File ini tidak boleh diperiksa ke kontrol sumber.
Membuat objek BlobClient
Anda dapat membuat salah satu objek BlobClient, yang tercantum di bawah ini, baik dari ContainerClient, atau secara langsung.
Daftar klien Blob:
Membuat objek BlobClient dari ContainerClient
// Azure Storage dependency
const {
  StorageSharedKeyCredential,
  ContainerClient
} = require("@azure/storage-blob");

// For development environment - include environment variables from .env
require("dotenv").config();

// Azure Storage resource name
const accountName = process.env.AZURE_STORAGE_ACCOUNT_NAME;
if (!accountName) throw Error("Azure Storage accountName not found");

// Azure Storage resource key
const accountKey = process.env.AZURE_STORAGE_ACCOUNT_KEY;
if (!accountKey) throw Error("Azure Storage accountKey not found");

// Create credential
const sharedKeyCredential = new StorageSharedKeyCredential(
  accountName,
  accountKey
);

const baseUrl = `https://${accountName}.blob.core.windows.net`;
const containerName = `my-container`;
const blobName = `my-blob`;

// Create ContainerClient
const containerClient = new ContainerClient(
  `${baseUrl}/${containerName}`,
  sharedKeyCredential
);

async function main() {
  try {

    // Create BlobClient object
    const blobClient = containerClient.getBlobClient(blobName);

    // do something with blobClient...
    const properties = await blobClient.getProperties();
    console.log(`Blob ${blobName} properties:`);

    // get BlockBlobClient from blobClient
    const blockBlobClient = blobClient.getBlockBlobClient();

    // do something with blockBlobClient...
    const downloadResponse = await blockBlobClient.download(0);

  } catch (err) {
    console.log(err);
    throw err;
  }
}

main()
  .then(() => console.log(`done`))
  .catch((ex) => console.log(ex.message));
Membuat BlobClient secara langsung
// Azure Storage dependency
const { BlockBlobClient } = require("@azure/storage-blob");

// Azure authentication for credential dependency
const { DefaultAzureCredential } = require('@azure/identity');

// For development environment - include environment variables from .env
require("dotenv").config();

// Azure Storage resource name
const accountName = process.env.AZURE_STORAGE_ACCOUNT_NAME;
if (!accountName) throw Error("Azure Storage accountName not found");

// Azure SDK needs base URL
const baseUrl = `https://${accountName}.blob.core.windows.net`;

// Container must exist prior to running this script
const containerName = `test`;

// Random blob name and contents
const timeStamp = Date.now();
const blobName = `${timeStamp}-my-blob.txt`;
const fileContentsAsString = "Hello there.";

async function main(){

  // Create a client that can authenticate with Azure Active Directory
  const client = new BlockBlobClient(
    `${baseUrl}/${containerName}/${blobName}`,
    new DefaultAzureCredential()
  );

  // Get file url - available before contents are uploaded
  console.log(`blob.url: ${client.url}`);

  // Upload file contents
  const result = await client.upload(fileContentsAsString, fileContentsAsString.length);

  // Get results
  return result;
}

main().then((result) => console.log(result)).catch((ex) => console.log(ex.message));

/*

Response looks like this:

{
  etag: '"0x8DAD247F1F4896E"',
  lastModified: 2022-11-29T20:26:07.000Z,
  contentMD5: <Buffer 9d 6a 29 63 87 20 77 db 67 4a 27 a3 9c 49 2e 61>,
  clientRequestId: 'a07fdd1f-5937-44c7-984f-0699a48a05c0',
  requestId: '3580e726-201e-0045-1a30-0474f6000000',
  version: '2021-04-10',
  date: 2022-11-29T20:26:06.000Z,
  isServerEncrypted: true,
  'content-length': '0',
  server: 'Windows-Azure-Blob/1.0 Microsoft-HTTPAPI/2.0',
  'x-ms-content-crc64': 'BLv7vb1ONT8=',
  body: undefined
}
*/
Paket dotenv digunakan untuk membaca nama akun penyimpanan Anda dari .env file. File ini tidak boleh diperiksa ke kontrol sumber.