Cara: Mengatur Perataan Horizontal dan Vertikal Petak PetaBrush
Contoh ini memperlihatkan cara mengontrol perataan konten horizontal dan vertikal dalam petak peta. Untuk mengontrol perataan horizontal dan vertikal dari , TileBrushgunakan properti dan AlignmentY .AlignmentX
Properti AlignmentX dan AlignmentY digunakan TileBrush ketika salah satu kondisi berikut ini benar:
Properti Stretch adalah Uniform atau UniformToFill dan Viewbox dan Viewport memiliki rasio aspek yang berbeda.
Properti Stretch adalah None dan Viewbox dan Viewport berukuran berbeda.
Ratakan Petak PetaBrush ke sudut kiri atas
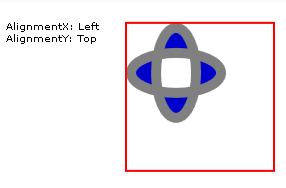
Contoh berikut menyelaraskan konten DrawingBrush, yang merupakan jenis TileBrush, ke sudut kiri atas petak petanya. Untuk meratakan konten, contoh mengatur AlignmentX properti ke DrawingBrushLeft dan AlignmentY properti ke Top. Contoh ini menghasilkan output berikut.

Petak PetaBrush dengan konten diratakan ke sudut kiri atas
//
// Create a TileBrush and align its
// content to the top-left of its tile.
//
DrawingBrush topLeftAlignedTileBrush = new DrawingBrush();
topLeftAlignedTileBrush.AlignmentX = AlignmentX.Left;
topLeftAlignedTileBrush.AlignmentY = AlignmentY.Top;

// Set Stretch to None so that the brush's
// content doesn't automatically expand to
// fill the entire tile.
topLeftAlignedTileBrush.Stretch = Stretch.None;

// Define the brush's content.
GeometryGroup ellipses = new GeometryGroup();
ellipses.Children.Add(new EllipseGeometry(new Point(50, 50), 20, 45));
ellipses.Children.Add(new EllipseGeometry(new Point(50, 50), 45, 20));
Pen drawingPen = new Pen(Brushes.Gray, 10);
GeometryDrawing ellipseDrawing = new GeometryDrawing(Brushes.Blue, drawingPen, ellipses);
topLeftAlignedTileBrush.Drawing = ellipseDrawing;

// Use the brush to paint a rectangle.
Rectangle rectangle1 = new Rectangle();
rectangle1.Width = 150;
rectangle1.Height = 150;
rectangle1.Stroke = Brushes.Red;
rectangle1.StrokeThickness = 2;
rectangle1.Margin = new Thickness(20);
rectangle1.Fill = topLeftAlignedTileBrush;
'
' Create a TileBrush and align its
' content to the top-left of its tile.
'
Dim topLeftAlignedTileBrush As New DrawingBrush()
topLeftAlignedTileBrush.AlignmentX = AlignmentX.Left
topLeftAlignedTileBrush.AlignmentY = AlignmentY.Top

' Set Stretch to None so that the brush's
' content doesn't automatically expand to
' fill the entire tile.
topLeftAlignedTileBrush.Stretch = Stretch.None

' Define the brush's content.
Dim ellipses As New GeometryGroup()
ellipses.Children.Add(New EllipseGeometry(New Point(50, 50), 20, 45))
ellipses.Children.Add(New EllipseGeometry(New Point(50, 50), 45, 20))
Dim drawingPen As New Pen(Brushes.Gray, 10)
Dim ellipseDrawing As New GeometryDrawing(Brushes.Blue, drawingPen, ellipses)
topLeftAlignedTileBrush.Drawing = ellipseDrawing

' Use the brush to paint a rectangle.
Dim rectangle1 As New Rectangle()
With rectangle1
    .Width = 150
    .Height = 150
    .Stroke = Brushes.Red
    .StrokeThickness = 2
    .Margin = New Thickness(20)
    .Fill = topLeftAlignedTileBrush
End With
<Rectangle
  Width="150" Height="150"
  Stroke="Red" StrokeThickness="2"
  Margin="20">
  <Rectangle.Fill>

    <!-- This brush's content is aligned to the top-left
         of its tile. -->
    <DrawingBrush
      Stretch="None"
      AlignmentX="Left"
      AlignmentY="Top">
      <DrawingBrush.Drawing>
        <GeometryDrawing Brush="MediumBlue">
          <GeometryDrawing.Geometry>
            <GeometryGroup>
              <EllipseGeometry RadiusX="20" RadiusY="45" Center="50,50" />
              <EllipseGeometry RadiusX="45" RadiusY="20" Center="50,50" />
            </GeometryGroup>
          </GeometryDrawing.Geometry>
          <GeometryDrawing.Pen>
            <Pen Brush="Gray" Thickness="10" />
          </GeometryDrawing.Pen>
        </GeometryDrawing>
      </DrawingBrush.Drawing>
    </DrawingBrush>
  </Rectangle.Fill>
</Rectangle>
Ratakan GambarBrush ke sudut kanan bawah
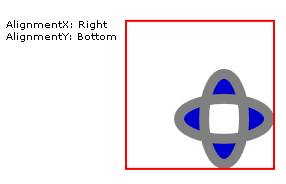
Contoh berikutnya menyelaraskan konten ke DrawingBrush sudut kanan bawah petak petanya dengan mengatur AlignmentX properti ke Right dan AlignmentY properti ke Bottom. Contohnya menghasilkan output berikut.

Petak PetaBrush dengan konten diratakan ke sudut kanan bawah
//
// Create a TileBrush and align its
// content to the bottom-right of its tile.
//
DrawingBrush bottomRightAlignedTileBrush = new DrawingBrush();
bottomRightAlignedTileBrush.AlignmentX = AlignmentX.Right;
bottomRightAlignedTileBrush.AlignmentY = AlignmentY.Bottom;
bottomRightAlignedTileBrush.Stretch = Stretch.None;

// Define the brush's content.
bottomRightAlignedTileBrush.Drawing = ellipseDrawing;

// Use the brush to paint a rectangle.
Rectangle rectangle2 = new Rectangle();
rectangle2.Width = 150;
rectangle2.Height = 150;
rectangle2.Stroke = Brushes.Red;
rectangle2.StrokeThickness = 2;
rectangle2.Margin = new Thickness(20);
rectangle2.Fill = bottomRightAlignedTileBrush;
'
' Create a TileBrush and align its
' content to the bottom-right of its tile.
'
Dim bottomRightAlignedTileBrush As New DrawingBrush()
With bottomRightAlignedTileBrush
    .AlignmentX = AlignmentX.Right
    .AlignmentY = AlignmentY.Bottom
    .Stretch = Stretch.None

    ' Define the brush's content.
    .Drawing = ellipseDrawing
End With

' Use the brush to paint a rectangle.
Dim rectangle2 As New Rectangle()
With rectangle2
    .Width = 150
    .Height = 150
    .Stroke = Brushes.Red
    .StrokeThickness = 2
    .Margin = New Thickness(20)
    .Fill = bottomRightAlignedTileBrush
End With
<Rectangle
  Width="150" Height="150"
  Stroke="Red" StrokeThickness="2"
  Margin="20">
  <Rectangle.Fill>

    <!-- This brush's content is aligned to the bottom right
         of its tile. -->
    <DrawingBrush
      Stretch="None"
      AlignmentX="Right"
      AlignmentY="Bottom">
      <DrawingBrush.Drawing>
        <GeometryDrawing Brush="MediumBlue">
          <GeometryDrawing.Geometry>
            <GeometryGroup>
              <EllipseGeometry RadiusX="20" RadiusY="45" Center="50,50" />
              <EllipseGeometry RadiusX="45" RadiusY="20" Center="50,50" />
            </GeometryGroup>
          </GeometryDrawing.Geometry>
          <GeometryDrawing.Pen>
            <Pen Brush="Gray" Thickness="10" />
          </GeometryDrawing.Pen>
        </GeometryDrawing>
      </DrawingBrush.Drawing>
    </DrawingBrush>
  </Rectangle.Fill>
</Rectangle>
Ratakan GambarBrush ke sudut kiri atas
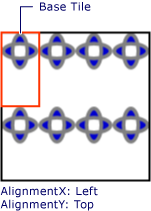
Contoh berikutnya menyelaraskan konten ke DrawingBrush sudut kiri atas petak petanya dengan mengatur AlignmentX properti ke Left dan AlignmentY properti ke Top. Ini juga mengatur Viewport dan TileMode dari DrawingBrush untuk menghasilkan pola petak peta. Contohnya menghasilkan output berikut.

Pola petak peta dengan konten diratakan ke kiri atas dalam petak peta dasar
Ilustrasi menyoroti petak peta abase sehingga Anda dapat melihat bagaimana kontennya diratakan. Perhatikan bahwa AlignmentX pengaturan tidak berpengaruh karena konten DrawingBrush sepenuhnya mengisi ubin dasar secara horizontal.
//
// Create a TileBrush that generates a
// tiled pattern and align its
// content to the top-left of its tile.
//
DrawingBrush tiledTopLeftAlignedTileBrush = new DrawingBrush();
tiledTopLeftAlignedTileBrush.AlignmentX = AlignmentX.Left;
tiledTopLeftAlignedTileBrush.AlignmentY = AlignmentY.Top;
tiledTopLeftAlignedTileBrush.Stretch = Stretch.Uniform;

// Set the brush's Viewport and TileMode to produce a
// tiled pattern.
tiledTopLeftAlignedTileBrush.Viewport = new Rect(0, 0, 0.25, 0.5);
tiledTopLeftAlignedTileBrush.TileMode = TileMode.Tile;

// Define the brush's content.
tiledTopLeftAlignedTileBrush.Drawing = ellipseDrawing;

// Use the brush to paint a rectangle.
Rectangle rectangle3 = new Rectangle();
rectangle3.Width = 150;
rectangle3.Height = 150;
rectangle3.Stroke = Brushes.Black;
rectangle3.StrokeThickness = 2;
rectangle3.Margin = new Thickness(20);
rectangle3.Fill = tiledTopLeftAlignedTileBrush;
'
' Create a TileBrush that generates a
' tiled pattern and align its
' content to the top-left of its tile.
'
Dim tiledTopLeftAlignedTileBrush As New DrawingBrush()
With tiledTopLeftAlignedTileBrush
    .AlignmentX = AlignmentX.Left
    .AlignmentY = AlignmentY.Top
    .Stretch = Stretch.Uniform

    ' Set the brush's Viewport and TileMode to produce a
    ' tiled pattern.
    .Viewport = New Rect(0, 0, 0.25, 0.5)
    .TileMode = TileMode.Tile

    ' Define the brush's content.
    .Drawing = ellipseDrawing
End With

' Use the brush to paint a rectangle.
Dim rectangle3 As New Rectangle()
With rectangle3
    .Width = 150
    .Height = 150
    .Stroke = Brushes.Black
    .StrokeThickness = 2
    .Margin = New Thickness(20)
    .Fill = tiledTopLeftAlignedTileBrush
End With
<Rectangle
 Width="150" Height="150"
 Stroke="Black" StrokeThickness="2"
 Margin="20">
  <Rectangle.Fill>

    <!-- This brush's content is aligned to the top left
         of its tile.  -->
    <DrawingBrush
      Stretch="Uniform"
      Viewport="0,0,0.25,0.5"
      TileMode="Tile"
      AlignmentX="Left"
      AlignmentY="Top">
      <DrawingBrush.Drawing>
        <GeometryDrawing Brush="MediumBlue">
          <GeometryDrawing.Geometry>
            <GeometryGroup>
              <EllipseGeometry RadiusX="20" RadiusY="45" Center="50,50" />
              <EllipseGeometry RadiusX="45" RadiusY="20" Center="50,50" />
            </GeometryGroup>
          </GeometryDrawing.Geometry>
          <GeometryDrawing.Pen>
            <Pen Brush="Gray" Thickness="10" />
          </GeometryDrawing.Pen>
        </GeometryDrawing>
      </DrawingBrush.Drawing>
    </DrawingBrush>
  </Rectangle.Fill>
</Rectangle>
Ratakan DrawingBrush ke sudut kanan bawah
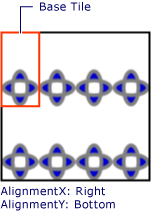
Contoh akhir menyelaraskan konten petak DrawingBrush peta ke kanan bawah petak peta dasarnya dengan mengatur AlignmentX properti ke Right dan AlignmentY properti ke Bottom. Contohnya menghasilkan output berikut.

Pola petak peta dengan konten diratakan ke kanan bawah dalam petak peta dasar
Sekali lagi, AlignmentX pengaturan tidak berpengaruh karena konten DrawingBrush sepenuhnya mengisi petak dasar secara horizontal.
//
// Create a TileBrush and align its
// content to the bottom-right of its tile.
//
DrawingBrush bottomRightAlignedTileBrush = new DrawingBrush();
bottomRightAlignedTileBrush.AlignmentX = AlignmentX.Right;
bottomRightAlignedTileBrush.AlignmentY = AlignmentY.Bottom;
bottomRightAlignedTileBrush.Stretch = Stretch.None;

// Define the brush's content.
bottomRightAlignedTileBrush.Drawing = ellipseDrawing;

// Use the brush to paint a rectangle.
Rectangle rectangle2 = new Rectangle();
rectangle2.Width = 150;
rectangle2.Height = 150;
rectangle2.Stroke = Brushes.Red;
rectangle2.StrokeThickness = 2;
rectangle2.Margin = new Thickness(20);
rectangle2.Fill = bottomRightAlignedTileBrush;
'
' Create a TileBrush and align its
' content to the bottom-right of its tile.
'
Dim bottomRightAlignedTileBrush As New DrawingBrush()
With bottomRightAlignedTileBrush
    .AlignmentX = AlignmentX.Right
    .AlignmentY = AlignmentY.Bottom
    .Stretch = Stretch.None

    ' Define the brush's content.
    .Drawing = ellipseDrawing
End With

' Use the brush to paint a rectangle.
Dim rectangle2 As New Rectangle()
With rectangle2
    .Width = 150
    .Height = 150
    .Stroke = Brushes.Red
    .StrokeThickness = 2
    .Margin = New Thickness(20)
    .Fill = bottomRightAlignedTileBrush
End With
<Rectangle
  Width="150" Height="150"
  Stroke="Red" StrokeThickness="2"
  Margin="20">
  <Rectangle.Fill>

    <!-- This brush's content is aligned to the bottom right
         of its tile. -->
    <DrawingBrush
      Stretch="None"
      AlignmentX="Right"
      AlignmentY="Bottom">
      <DrawingBrush.Drawing>
        <GeometryDrawing Brush="MediumBlue">
          <GeometryDrawing.Geometry>
            <GeometryGroup>
              <EllipseGeometry RadiusX="20" RadiusY="45" Center="50,50" />
              <EllipseGeometry RadiusX="45" RadiusY="20" Center="50,50" />
            </GeometryGroup>
          </GeometryDrawing.Geometry>
          <GeometryDrawing.Pen>
            <Pen Brush="Gray" Thickness="10" />
          </GeometryDrawing.Pen>
        </GeometryDrawing>
      </DrawingBrush.Drawing>
    </DrawingBrush>
  </Rectangle.Fill>
</Rectangle>
Contoh menggunakan DrawingBrush objek untuk menunjukkan bagaimana AlignmentX properti dan AlignmentY digunakan. Properti ini berulah identik untuk semua sikat petak: DrawingBrush, , ImageBrushdan VisualBrush. Untuk informasi selengkapnya tentang sikat petak peta, lihat Melukis dengan Gambar, Gambar, dan Visual.
Baca juga
.NET Desktop feedback
Saran dan Komentar
Segera hadir: Sepanjang tahun 2024 kami akan menghentikan penggunaan GitHub Issues sebagai mekanisme umpan balik untuk konten dan menggantinya dengan sistem umpan balik baru. Untuk mengetahui informasi selengkapnya, lihat: https://aka.ms/ContentUserFeedback.
Kirim dan lihat umpan balik untuk
