StackLayout
 Telusuri sampel
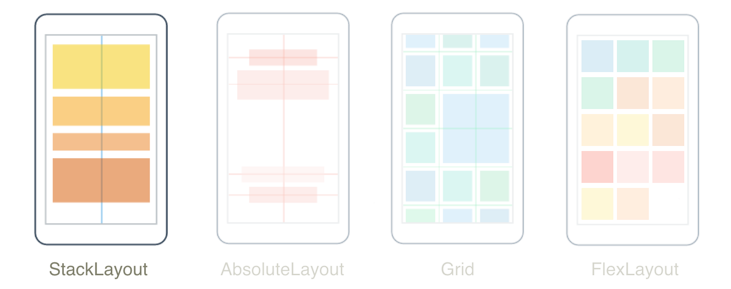
.NET Multi-platform App UI (.NET MAUI) StackLayout mengatur tampilan anak dalam tumpukan satu dimensi, baik secara horizontal maupun vertikal. Secara default, berorientasi StackLayout vertikal. Selain itu, StackLayout dapat digunakan sebagai tata letak induk yang berisi tata letak anak lainnya.
Kelas StackLayout menentukan properti berikut:
Orientation, dari jenisStackOrientation, mewakili arah di mana tampilan anak diposisikan. Nilai default properti ini adalahVertical.Spacing, dari jenisdouble, menunjukkan jumlah ruang antara setiap tampilan anak. Nilai default properti ini adalah 0.
Properti ini didukung oleh BindableProperty objek, yang berarti bahwa properti dapat menjadi target pengikatan data dan ditata.
Orientasi vertikal
XAML berikut menunjukkan cara membuat berorientasi StackLayout vertikal yang berisi tampilan turunan yang berbeda:
<ContentPage xmlns="http://schemas.microsoft.com/dotnet/2021/maui"
             xmlns:x="http://schemas.microsoft.com/winfx/2009/xaml"
             x:Class="StackLayoutDemos.Views.XAML.VerticalStackLayoutPage"
             Title="Vertical StackLayout demo">
    <StackLayout Margin="20">
        <Label Text="Primary colors" />
        <BoxView Color="Red"
                 HeightRequest="40" />
        <BoxView Color="Yellow"
                 HeightRequest="40" />
        <BoxView Color="Blue"
                 HeightRequest="40" />
        <Label Text="Secondary colors" />
        <BoxView Color="Green"
                 HeightRequest="40" />
        <BoxView Color="Orange"
                 HeightRequest="40" />
        <BoxView Color="Purple"
                 HeightRequest="40" />
    </StackLayout>
</ContentPage>
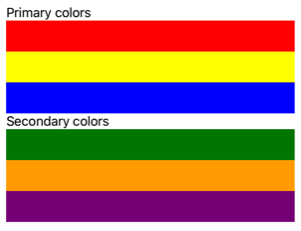
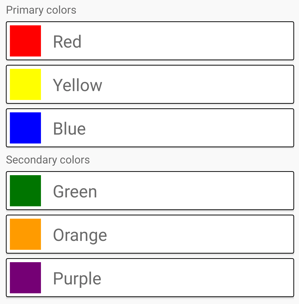
Contoh ini membuat vertikal StackLayout yang berisi Label objek dan BoxView . Secara default, tidak ada spasi di antara tampilan anak:
Kode C# yang setara adalah:
public class VerticalStackLayoutPage : ContentPage
{
    public VerticalStackLayoutPage()
    {
        Title = "Vertical StackLayout demo";

        StackLayout stackLayout = new StackLayout { Margin = new Thickness(20) };

        stackLayout.Add(new Label { Text = "Primary colors" });
        stackLayout.Add(new BoxView { Color = Colors.Red, HeightRequest = 40 });
        stackLayout.Add(new BoxView { Color = Colors.Yellow, HeightRequest = 40 });
        stackLayout.Add(new BoxView { Color = Colors.Blue, HeightRequest = 40 });
        stackLayout.Add(new Label { Text = "Secondary colors" });
        stackLayout.Add(new BoxView { Color = Colors.Green, HeightRequest = 40 });
        stackLayout.Add(new BoxView { Color = Colors.Orange, HeightRequest = 40 });
        stackLayout.Add(new BoxView { Color = Colors.Purple, HeightRequest = 40 });

        Content = stackLayout;
    }
}
Catatan
Nilai Margin properti mewakili jarak antara elemen dan elemen yang berdekatan. Untuk informasi selengkapnya, lihat Kontrol posisi.
Orientasi horizontal
XAML berikut menunjukkan cara membuat yang berorientasi StackLayout horizontal dengan mengatur propertinya Orientation ke Horizontal:
<ContentPage xmlns="http://schemas.microsoft.com/dotnet/2021/maui"
             xmlns:x="http://schemas.microsoft.com/winfx/2009/xaml"
             x:Class="StackLayoutDemos.Views.XAML.HorizontalStackLayoutPage"
             Title="Horizontal StackLayout demo">
    <StackLayout Margin="20"
                 Orientation="Horizontal"
                 HorizontalOptions="Center">
        <BoxView Color="Red"
                 WidthRequest="40" />
        <BoxView Color="Yellow"
                 WidthRequest="40" />
        <BoxView Color="Blue"
                 WidthRequest="40" />
        <BoxView Color="Green"
                 WidthRequest="40" />
        <BoxView Color="Orange"
                 WidthRequest="40" />
        <BoxView Color="Purple"
                 WidthRequest="40" />
    </StackLayout>
</ContentPage>
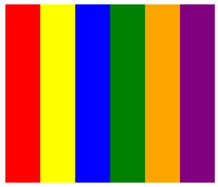
Contoh ini membuat objek yang berisi BoxView horizontalStackLayout, tanpa spasi di antara tampilan anak:
Kode C# yang setara adalah:
public class HorizontalStackLayoutPage : ContentPage
{
    public HorizontalStackLayoutPage()
    {
        Title = "Horizontal StackLayout demo";

        StackLayout stackLayout = new StackLayout
        {
            Margin = new Thickness(20),
            Orientation = StackOrientation.Horizontal,
            HorizontalOptions = LayoutOptions.Center
        };

        stackLayout.Add(new BoxView { Color = Colors.Red, WidthRequest = 40 });
        stackLayout.Add(new BoxView { Color = Colors.Yellow, WidthRequest = 40 });
        stackLayout.Add(new BoxView { Color = Colors.Blue, WidthRequest = 40 });
        stackLayout.Add(new BoxView { Color = Colors.Green, WidthRequest = 40 });
        stackLayout.Add(new BoxView { Color = Colors.Orange, WidthRequest = 40 });
        stackLayout.Add(new BoxView { Color = Colors.Purple, WidthRequest = 40 });

        Content = stackLayout;
    }
}
Spasi antar tampilan anak
Penspasian antara tampilan anak dalam StackLayout dapat diubah dengan mengatur Spacing properti ke double nilai:
<ContentPage xmlns="http://schemas.microsoft.com/dotnet/2021/maui"
             xmlns:x="http://schemas.microsoft.com/winfx/2009/xaml"
             x:Class="StackLayoutDemos.Views.XAML.StackLayoutSpacingPage"
             Title="StackLayout Spacing demo">
    <StackLayout Margin="20"
                 Spacing="6">
        <Label Text="Primary colors" />
        <BoxView Color="Red"
                 HeightRequest="40" />
        <BoxView Color="Yellow"
                 HeightRequest="40" />
        <BoxView Color="Blue"
                 HeightRequest="40" />
        <Label Text="Secondary colors" />
        <BoxView Color="Green"
                 HeightRequest="40" />
        <BoxView Color="Orange"
                 HeightRequest="40" />
        <BoxView Color="Purple"
                 HeightRequest="40" />
    </StackLayout>
</ContentPage>
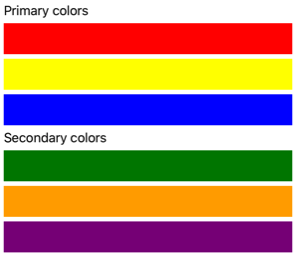
Contoh ini membuat vertikal StackLayout yang berisi Label dan BoxView objek yang memiliki enam unit ruang vertikal independen perangkat di antaranya:
Tip
Properti Spacing dapat diatur ke nilai negatif untuk membuat tampilan anak tumpang tindih.
Kode C# yang setara adalah:
public class StackLayoutSpacingPage : ContentPage
{
    public StackLayoutSpacingPage()
    {
        Title = "StackLayout Spacing demo";

        StackLayout stackLayout = new StackLayout
        {
            Margin = new Thickness(20),
            Spacing = 6
        };

        stackLayout.Add(new Label { Text = "Primary colors" });
        stackLayout.Add(new BoxView { Color = Colors.Red, HeightRequest = 40 });
        stackLayout.Add(new BoxView { Color = Colors.Yellow, HeightRequest = 40 });
        stackLayout.Add(new BoxView { Color = Colors.Blue, HeightRequest = 40 });
        stackLayout.Add(new Label { Text = "Secondary colors" });
        stackLayout.Add(new BoxView { Color = Colors.Green, HeightRequest = 40 });
        stackLayout.Add(new BoxView { Color = Colors.Orange, HeightRequest = 40 });
        stackLayout.Add(new BoxView { Color = Colors.Purple, HeightRequest = 40 });

        Content = stackLayout;
    }
}
Posisi dan ukuran tampilan anak
Ukuran dan posisi tampilan anak dalam tergantung StackLayout pada nilai tampilan HeightRequest dan WidthRequest properti anak, dan nilai properti dannya HorizontalOptionsVerticalOptions . Dalam tampilan vertikal StackLayout, anak diperluas untuk mengisi lebar yang tersedia saat ukurannya tidak diatur secara eksplisit. Demikian pula, dalam tampilan horizontal StackLayout, anak diperluas untuk mengisi tinggi yang tersedia saat ukurannya tidak diatur secara eksplisit.
Properti HorizontalOptions dan VerticalOptions tampilan StackLayout, dan anaknya, dapat diatur ke bidang dari LayoutOptions struktur, yang merangkum preferensi tata letak perataan. Preferensi tata letak ini menentukan posisi dan ukuran tampilan anak dalam tata letak induknya.
Contoh XAML berikut menetapkan preferensi perataan pada setiap tampilan anak di StackLayout:
<ContentPage xmlns="http://schemas.microsoft.com/dotnet/2021/maui"
             xmlns:x="http://schemas.microsoft.com/winfx/2009/xaml"
             x:Class="StackLayoutDemos.Views.XAML.AlignmentPage"
             Title="Alignment demo">
    <StackLayout Margin="20"
                 Spacing="6">
        <Label Text="Start"
               BackgroundColor="Gray"
               HorizontalOptions="Start" />
        <Label Text="Center"
               BackgroundColor="Gray"
               HorizontalOptions="Center" />
        <Label Text="End"
               BackgroundColor="Gray"
               HorizontalOptions="End" />
        <Label Text="Fill"
               BackgroundColor="Gray"
               HorizontalOptions="Fill" />
    </StackLayout>
</ContentPage>
Dalam contoh ini, preferensi perataan diatur pada Label objek untuk mengontrol posisinya dalam StackLayout. Bidang Start, Center, End, dan Fill digunakan untuk menentukan perataan Label objek dalam induk StackLayout:
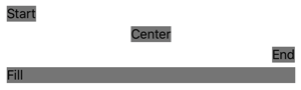
Hanya StackLayout menghormati preferensi perataan pada tampilan anak yang berada di arah yang berlawanan dengan StackLayout orientasi. Oleh karena itu, Label tampilan anak dalam properti yang HorizontalOptions berorientasi StackLayout vertikal diatur ke salah satu bidang perataan:
Start, yang memposisikan Label di sisi StackLayoutkiri .Center, yang berpusat LabelStackLayoutdi .End, yang memposisikan Label di sisi StackLayoutkanan .Fill, yang memastikan bahwa Label mengisi lebar StackLayout.
Kode C# yang setara adalah:
public class AlignmentPage : ContentPage
{
    public AlignmentPage()
    {
        Title = "Alignment demo";

        StackLayout stackLayout = new StackLayout
        {
            Margin = new Thickness(20),
            Spacing = 6
        };

        stackLayout.Add(new Label { Text = "Start", BackgroundColor = Colors.Gray, HorizontalOptions = LayoutOptions.Start });
        stackLayout.Add(new Label { Text = "Center", BackgroundColor = Colors.Gray, HorizontalOptions = LayoutOptions.Center });
        stackLayout.Add(new Label { Text = "End", BackgroundColor = Colors.Gray, HorizontalOptions = LayoutOptions.End });
        stackLayout.Add(new Label { Text = "Fill", BackgroundColor = Colors.Gray, HorizontalOptions = LayoutOptions.Fill });

        Content = stackLayout;
    }
}
Untuk informasi selengkapnya tentang perataan, lihat Meratakan tampilan dalam tata letak.
Objek StackLayout Berlapis
StackLayout Dapat digunakan sebagai tata letak induk yang berisi objek turunan StackLayout berlapis, atau tata letak anak lainnya.
XAML berikut menunjukkan contoh objek berlapis StackLayout :
<ContentPage xmlns="http://schemas.microsoft.com/dotnet/2021/maui"
             xmlns:x="http://schemas.microsoft.com/winfx/2009/xaml"
             x:Class="StackLayoutDemos.Views.XAML.CombinedStackLayoutPage"
             Title="Combined StackLayouts demo">
    <StackLayout Margin="20">
        ...
        <Frame BorderColor="Black"
               Padding="5">
            <StackLayout Orientation="Horizontal"
                         Spacing="15">
                <BoxView Color="Red"
                         WidthRequest="40" />
                <Label Text="Red"
                       FontSize="18"
                       VerticalOptions="Center" />
            </StackLayout>
        </Frame>
        <Frame BorderColor="Black"
               Padding="5">
            <StackLayout Orientation="Horizontal"
                         Spacing="15">
                <BoxView Color="Yellow"
                         WidthRequest="40" />
                <Label Text="Yellow"
                       FontSize="18"
                       VerticalOptions="Center" />
            </StackLayout>
        </Frame>
        <Frame BorderColor="Black"
               Padding="5">
            <StackLayout Orientation="Horizontal"
                         Spacing="15">
                <BoxView Color="Blue"
                         WidthRequest="40" />
                <Label Text="Blue"
                       FontSize="18"
                       VerticalOptions="Center" />
            </StackLayout>
        </Frame>
        ...
    </StackLayout>
</ContentPage>
Dalam contoh ini, induk StackLayout berisi objek berlapis StackLayout di dalam Frame objek. Induk StackLayout berorientasi vertikal, sementara objek anak StackLayout berorientasi horizontal:
Penting
Semakin dalam Anda menumpuk StackLayout objek dan tata letak lainnya, semakin banyak perhitungan tata letak yang akan dilakukan yang dapat memengaruhi performa. Untuk informasi selengkapnya, lihat Memilih tata letak yang benar.
Kode C# yang setara adalah:
public class CombinedStackLayoutPage : ContentPage
{
    public CombinedStackLayoutPage()
    {
        Title = "Combined StackLayouts demo";

        Frame frame1 = new Frame
        {
            BorderColor = Colors.Black,
            Padding = new Thickness(5)
        };
        StackLayout frame1StackLayout = new StackLayout
        {
            Orientation = StackOrientation.Horizontal,
            Spacing = 15
        };
        frame1StackLayout.Add(new BoxView { Color = Colors.Red, WidthRequest = 40 });
        frame1StackLayout.Add(new Label { Text = "Red", FontSize = 22, VerticalOptions = LayoutOptions.Center });
        frame1.Content = frame1StackLayout;

        Frame frame2 = new Frame
        {
            BorderColor = Colors.Black,
            Padding = new Thickness(5)
        };
        StackLayout frame2StackLayout = new StackLayout
        {
            Orientation = StackOrientation.Horizontal,
            Spacing = 15
        };
        frame2StackLayout.Add(new BoxView { Color = Colors.Yellow, WidthRequest = 40 });
        frame2StackLayout.Add(new Label { Text = "Yellow", FontSize = 22, VerticalOptions = LayoutOptions.Center });
        frame2.Content = frame2StackLayout;

        Frame frame3 = new Frame
        {
            BorderColor = Colors.Black,
            Padding = new Thickness(5)
        };
        StackLayout frame3StackLayout = new StackLayout
        {
            Orientation = StackOrientation.Horizontal,
            Spacing = 15
        };
        frame3StackLayout.Add(new BoxView { Color = Colors.Blue, WidthRequest = 40 });
        frame3StackLayout.Add(new Label { Text = "Blue", FontSize = 22, VerticalOptions = LayoutOptions.Center });
        frame3.Content = frame3StackLayout;

        ...

        StackLayout stackLayout = new StackLayout { Margin = new Thickness(20) };
        stackLayout.Add(new Label { Text = "Primary colors" });
        stackLayout.Add(frame1);
        stackLayout.Add(frame2);
        stackLayout.Add(frame3);
        stackLayout.Add(new Label { Text = "Secondary colors" });
        stackLayout.Add(frame4);
        stackLayout.Add(frame5);
        stackLayout.Add(frame6);

        Content = stackLayout;
    }
}